SEARCH FINESCALE.COM

Enter keywords or a search phrase below:

Fw 190 Butcher Bird 2013 (extended to June 2014) Group Build

564751 views
5865 replies
1 rating 2 rating 3 rating 4 rating 5 rating
  • Member since
    April 2005
Posted by Thunderbolt379 on Saturday, June 28, 2014 4:05 AM

Progress today -- I got the new cylinder on so have full AB capability again, and my first job was t mask the 23 on the 152, then I reprimed around the DOR bands with flat white, masked the rudder of the lil 109, then blew the undersides of both into 76 (two mixings). I must say, the Acryl paint goes on as a near flawless low gloss, I could decal or accent the panel lines directly onto this finish. I'm thinking I'll use Microscale Flat as the final finish, which is actually a satin, just less bright that their regular satin.

Target for tomorrow: cut the card soft-masks for the topside camo of the 152 and, just maybe, get the mixed 81 on. I'm not sure what to do about the wavy softedge leading edge demarcation... Freehand? All being well, the mixed 82 should go on the following day, then I'm into clearcoats, decals and finishing effects.

I'm also working on the final round of sanding on the engine facia of the A-8, and masking the wheel wells will be coming up soon, so I can prime and get that 04 under the engine.

Obviously these planes are not going to be done by the stroke of midyear, though the 152 will be close.

Cheers, M/TB379

http://worldinminiature.blogspot.com/

  • Member since
    April 2005
Posted by Thunderbolt379 on Saturday, June 28, 2014 10:00 PM

Hi guys, today I'm cutting soft masks for the camo. The 152 scheme I'm going with is Green 1, which appears to have been the mount of the commander of JG 301.  I have ben looking at the schemes and there seems to be two -- Italeri offered Green 1 and Yellow 1 on their sheet, with the same scheme for each, which is, strangely, considering the date, a straight-edge, hard mask style, ala the early war years. There were hard edge schemes on some Me 262s, I believe, so that's not out of the question. However, the most common scheme seems to be a soft edge freehand design of a different pattern, and most of the JG 301 birds I've seen built have been in this one. It makes sense that all the planes delivered to Rechlin/Alteno would have been finished in the same general scheme, with individual variation due to being freehand painted. the colours I'm going with are 81/82, both mixed in Tamiya acrylics, and variation seen in models will be due to the difficulty in establishing shades overall.

Still looking at stuff, not cutting yet, though I touched up the 76 earlier.

M/TB379

http://worldinminiature.blogspot.com/

  • Member since
    April 2005
Posted by Thunderbolt379 on Saturday, June 28, 2014 10:10 PM

Okay, now I've spotted Green 1 in 82/83, and it looks good...! Freehand pattern...

http://worldinminiature.blogspot.com/

  • Member since
    April 2005
Posted by Thunderbolt379 on Saturday, June 28, 2014 10:20 PM

Now I've found Yellow 1 in the splinter scheme, in 82/83!

http://worldinminiature.blogspot.com/

  • Member since
    March 2012
  • From: Corpus Christi, Tx
Posted by mustang1989 on Sunday, June 29, 2014 3:53 AM

Whichever scheme youre gonna go with I'm really looking forward to seeing you execute Thunder.


 Forum | Modelers Social Club Forum (proboards.com) 

  • Member since
    April 2005
Posted by Thunderbolt379 on Sunday, June 29, 2014 4:42 AM

Thanks, Mustang! Well, I've spent most of today looking at what information is available and pondering what finish I'll use, while masking accordingly. In the end I chose not to cut softmasks, and have used tape to hardmask the wingroots and tail, and the wavy leading edge. My planned approach is to use the factory freehand scheme in 82/83, and to try to do it unmasked. The horizontal surfaces and the top of the fuselage I'll tackle as separate rounds of work, to simplify masking -- possibly using softmasks for the longitudinal demarcation, though I could also hardmask and use the AB to fluff the edges as part of the mottle process.

Here's the current state of masking:

The AB is really spotting these days -- it does for a while, then stops. I sanded away some overspray on the tails. The good news is the solid paint coats look fine.

Fingers crossed, tomorrow I'll get the greens done, certainly on wings and tail, and see if I need to softmask for definition or if I can carry it as-is.

Cheers, Mike/TB379

http://worldinminiature.blogspot.com/

  • Member since
    March 2012
  • From: Corpus Christi, Tx
Posted by mustang1989 on Sunday, June 29, 2014 6:02 AM

I wonder what could be causing the AB to be finicky that way. There's  a thread on here somewhere about an AB splattering.  So far I've had good luck with the two that I'm using. Good progress so far.buddy.


 Forum | Modelers Social Club Forum (proboards.com) 

  • Member since
    December 2002
  • From: Bury St Edmunds, Suffolk, England
Posted by Bish on Sunday, June 29, 2014 6:38 AM

Mike, sweet work on the build.

When my airbrush has done that, its usually when it hasn't been cleaned properly, but I would be you have thought of that. have you checked the needle.

I am a Norfolk man and i glory in being so


On the bench: Airfix 1/72nd Harrier GR.3/Fujimi 1/72nd Ju 87D-3

  • Member since
    October 2008
  • From: Georgia
Posted by Rigidrider on Sunday, June 29, 2014 6:51 AM

TB... NOTHING, is worse then doing a beautiful job on o build then having the AB Ef up when applying the finish! Several things will cause a splattering issue. Keeping in mind I dont know what your using and assuming nothing about skill.... Just stating points... First and most common, is paint thinned properly, is the thinner compatible with paint, is pressure at proper level for paint being sprayed.

Less common but still needs mention, is the needle bent, is the needle seat or air horn (nozzle) damaged or worn, is the mixing chamber clean,(the area in the tip of the gun where the paint and air come together).Another thing thats needs to be checked, is the needle seal worn or damaged. Not knowing what type of gun you use, is the needle REAL easy to move when you loosen collet and pull on it, The seal could be loose or worn. If you remove needle and collet w/guide. (the piece that adjusts the trigger spring tension) take trigger out, look down barrel , you should see a piece that looks like a carborator jet. The seal is under this part, and is normally made of viton or a similar nylon type material. If not badly worn, get a small screwdriver and tighten a bit then reinsert needle until you feel a slight drag on the needle. then reassy and try out. This mainly applys to suction and Gravity fed DA guns. With a SA suction gune (like a Paasche "H" gun) splatter is almost always a proper thinning or pressure (or both) problem. And remember , nomatter what you use, Cleanliness is next to... well... you know the rest. Hope this might help and Good Luck!

Doug

When Life Hands You A Bucket Of Lemons...

Make Lemonade!

Then Sell It Back At $2 Bucks A Glass...

  • Member since
    April 2005
Posted by Thunderbolt379 on Sunday, June 29, 2014 7:49 AM

Hi Mustang, Bish and Doug -- it's a syphon feed Paasche VL, and I've had this problem in one form or another for years, it comes and goes, sometimes better, sometimes worse, but typically not visible on the finished model. The paint/thinner mix in general seems to work very nicely, but sometimes the blobs appear. The needle is seated quite tightly/snugly and is always carefully removed/installed. The tip may be slightly bent, if so the bend is too subtle for me to pick up with the old fashioned finger test, but under magnification there could be some deviation. A new needle is an easy check for this problem. The VL has a mid-point seal but it's a major hassle to get to, so much that the technician I use is not game to tackle it if he can help it. The trigger on this model is held in place by the needle passing through it, and reinstalling a removed trigger is a job for a specialist, it was certainly not something I could do one time it fell out... It's a durable model, I've been using this AB coming up on 25 years, and it's mostly still original.

It's always tough adjusting the thinning ratio with temp/humidity in mind, it's mid-winter here and temp in the workshop depends on whether the reverse cycle AC is running or not, so it can be unpredictable. I'm using Tamiya and Acryl paints, the former thins at 50%, the latter at 25% -- I get the problem with both.

Ultimately so long as I have a decent coat of paint on the surface it absorbs the problem, but it makes it less certain doing finer effects. The mottle will be interesting -- I'll use the fine tip and needle and work at high pressure for that phase, and it'll be interesting to see if the problem persists through the reconfiguration.

Onto green tomorrow!

Cheers, Mike/TB379

http://worldinminiature.blogspot.com/

  • Member since
    October 2008
  • From: Georgia
Posted by Rigidrider on Sunday, June 29, 2014 9:59 AM

TB... Yup, The VL is a nice gun, and by all means it is a pain in the rump to keep "in tune" . the trick to installing the trigger is to stand it in its nose angling slightly away from you and insert the trigger, then the rocker and insert needle after your sure the openings are in line and clear. Tweezers help when inserting rocker. After 25 years, I';d guess that the seal needs to be replaced. Sometimes, if you use a color cup, you might see little bubbles (like foam) in the cup during use. Sure sign that the air is not being contained in the mixing chamber by the seal. I had a VL for many years and still have a V but since the creation of the Gravity guns, I use it only rarely. Hope it smooths out for you, Great work on your 190s , Take care...

Doug

When Life Hands You A Bucket Of Lemons...

Make Lemonade!

Then Sell It Back At $2 Bucks A Glass...

  • Member since
    October 2006
  • From: Tucson, AZ
Posted by Archangel Shooter on Sunday, June 29, 2014 10:15 PM

Having faced one problem after another with this ill fitting Airfix kit, I am finally done with it. I will need to finish it off as a maintenance hanger dio, something I don't have time to complete here.

Having gone from this....

To this...


Main reason for making it a maintenace dio with the fwd cowling ring off.

If I were to attemp to correct this defect the stress will cause the bottom engine fuselage halves to split open. Bang Head  Bang Head

And now I'm having issues with both my computers so I'm going to post this now before I lose this for a third time and follow up with afew more pics shortly.

Scott


 Your image is loading...

 On the bench: So many hanger queens.


  • Member since
    March 2012
  • From: Corpus Christi, Tx
Posted by mustang1989 on Monday, June 30, 2014 4:16 AM

YES!!!!!!!!!!!! I have been thinking about this build here and there and was wondering about it. Man Scott you've really come a long way with this bird. You've got yourself a build to definitely say that you've won the battle with and I'm glad to see you sticking this one out to finish it. Post a pic that you would like in the Completed Builds and I'll get her up there for you there Scott!


 Forum | Modelers Social Club Forum (proboards.com) 

  • Member since
    April 2013
Posted by SchattenSpartan on Monday, June 30, 2014 4:39 AM

Truly amazing work on a very difficult kit! I'm glad you decided to finish her!

  • Member since
    October 2008
  • From: Georgia
Posted by Rigidrider on Monday, June 30, 2014 4:43 AM

Scott... In the immortal words of Chief Lone Witiie (The Outlaw Josey Wales)... We must endevor to Perservere... Nice work my friend!

Doug

When Life Hands You A Bucket Of Lemons...

Make Lemonade!

Then Sell It Back At $2 Bucks A Glass...

  • Member since
    December 2002
  • From: Bury St Edmunds, Suffolk, England
Posted by Bish on Monday, June 30, 2014 4:52 AM

Amazing looking build there, a big well done for having the guts to take it out of the bin and give it another go.

Are any of these Airfix 24th kits any good, I take it they are all old kits.

I am a Norfolk man and i glory in being so


On the bench: Airfix 1/72nd Harrier GR.3/Fujimi 1/72nd Ju 87D-3

  • Member since
    April 2005
Posted by Thunderbolt379 on Monday, June 30, 2014 7:16 AM

Scott -- that's the Airfix 1:24? Brave to take it on! I remember reading many years ago that it had problems but I remember only something about a proportional problem, the length of the nose or whatever. You've made a difficult beast look pretty darn good, and the engine is worth showing off -- usually the engine vanishes in a closed up kit, the fan removes even the final hint of engine.

Well done with an obstinate kit!

M/TB379

http://worldinminiature.blogspot.com/

  • Member since
    July 2011
  • From: minnesota
Posted by handiabled on Monday, June 30, 2014 7:29 AM

Bravo Sir!   Outstanding!!

  • Member since
    April 2005
Posted by Thunderbolt379 on Monday, June 30, 2014 7:56 AM

Update on today's activity -- I got the first green onto the 152. I was all set to mix the 82 when I realised MM had the 82/83 codes backward on their Acryls as well as enamels. So, 82 straight out of the bottle and 83 is not in the range yet. Most references I've found online cite Tamiya XF-61 as a fairly close match, or you can mix it with others, depending on your optical taste. I should have had some but I can't find it, so I'll pick up some tomorrow. Here's three or four coats of Acryl 82:

Hopefully I'll be able to freehand the demarcation, but if it's not looking right then I'll move to the soft masks.

On the A-8 front, today I masked the DOR band, first outlining with strips:

Then I filled in with more strip:

Other work today included finishing the rub-down of the engine joints -- it's as good as it's going to get now -- and masking the upper inner faces of the split flaps. I have a while before I hit the sack, I might start masking the gear bays. The 04 patch under the engine does not appear in Hasegawa's instructions, but it is on the box art and side panel build-up. This is Hans Dortenmann's plane, and most references I've seen show the yellow panel -- but not all. I find myself wondering if it's either a research confusion or if there was a period when this plane did not carry that patch.

Target for tomorrow -- get the A-8 as ready for main paint as possible, perhaps reprime around the DOR band with grey or white, maybe preshade, and pick up an acceptable 83 for the 152. I need thinner as well...

M/TB379

http://worldinminiature.blogspot.com/

  • Member since
    October 2006
  • From: Tucson, AZ
Posted by Archangel Shooter on Monday, June 30, 2014 8:24 AM

Thanks for the comments gents she's certainly no contest entry but step a couple feet away she does look good though there's been more than one time that I wanted to toss this one away.

It started out well and having read of the problem with the engine fan assembly extending some 5mm beyond the engine cowling ring I was prepared for that issue and took care of it by sanding down the front and backs of each cylinder assemblies as I was building up the engine and it worked.

The troubles really began first with the cockpit instrument panels with the upper panel nearly covering all the bottom panel from view which was a real shame it looked so good.

The gaps at the wing to fuselage were huge but that was overcome, having believed that was the worst of it I found that the warpage of the fwd fuselage was preventing the cowling ring to fit correctly hence the need to finalize the model in a engine maintenance setting. That shouldn't take too long to do but am out of time for the build here. I tried using the Scale Aircraft Conversion landing gear set but like it said on the package it's meant for the Trumpeter kit, and the kit MLG seems weak so I'm worried that it would snap. One other thing I want to do is to add some more wiring to the engine-gun bay areas.

Now having bought the kit in Riyadh back in 94' and moving around a number of times may well have accounted for the kit warpage but having built a couple of other 24th kits by Airfix, I have encounter similar issues but not this bad.

The paints used were Model Master enamels RLM 74, 75 and 76. Decals by Eagle Strike productions No# 24001 and they laid down with no issues. The seat belts I got from Ultracast and a shout out to the folks there, the product and their customer service were great.

Will try to post the final pic of the bird later this evening after work. Got two computers, the new one won't let me copy pics onto this page and the old one hangs up just as I am nearly done submitting my work. It's always something isn't it? More later.....

Scott

 Your image is loading...

 On the bench: So many hanger queens.


  • Member since
    October 2006
  • From: Tucson, AZ
Posted by Archangel Shooter on Tuesday, July 1, 2014 1:00 AM

Hi Mustang! I believe I will use this pic to add to the fine list of better finished 190's. Everyone of them is a real beauty too, I have seen some mighty fine workmanship by all here and some great tips too. Hats off to all of you.


I will post a few more pics after this post.

Scott


 Your image is loading...

 On the bench: So many hanger queens.


  • Member since
    October 2006
  • From: Tucson, AZ
Posted by Archangel Shooter on Tuesday, July 1, 2014 2:49 AM

Luckly I came across a review telling how the eng fans would extend beyond the cowling some 5mm. The reviewer built a new eng mount bracket while I went with sanding the cylinder assy halves which came out fine.


I really like the Ultracast seatbelts and in this scale they were easy to work with and I would recommend them. The antenna wire was one length of fishing line threaded through a drilled hole from the aft canopy wall working it's way out of the canopy and to the tail mast. It was actually rather easy and one of the few things that went right with this kit.


The wing mounted guns were plastic tubing and a brass set in the eng gun bay.


Okay...here's something I have not touched since I was maybe 6 yrs old when JC was a L/Cpl and that is building a model car. This is the Italerii 1/24th Mercedes Benz 540K and will be in the dio. Just started on this recently and so far it's going together well. Figures in this scale is sadly lacking, seen a race car pit crew that might work with some modifications.


And something from the stash box that looks a little like the group badge. Hmmm guess I need to complete this kit too


I'm admiring the model (the FW that is) now that it, with the exception of maybe adding more wiring to it, is done but boy she was a bear to work with. Were it not for other commitments I have had I would like to have done more but then there were times of utter frustrations in the build that I had to walk away from the kit for awhile but I hung in there and walk back to it.

Happy Modeling to all

Scott


 Your image is loading...

 On the bench: So many hanger queens.


  • Member since
    March 2012
  • From: Corpus Christi, Tx
Posted by mustang1989 on Tuesday, July 1, 2014 5:18 AM

Scott: Dude you've done a magnificant recovery on this thing. I had been thinking about this bird throughout the build and had wondered if it had made its way back to the trash can or stayed on the bench. Looks like it was the latter. Sometimes it just takes that "This things gonna get built no matter what" mindset to pull through. I'll be happy to post this among the fine builds that are up there in the Completed Builds section and would like to thank you for being part of this GB Scott.

Thunder:  Looking good so far. I've had hang ups with references before as many have had. Sometimes its just up to the best interpretation you can come up with. I'm building Polz's Stuka in the Stuka GB and I've already found SEVERAL color interpretations/ references for this thing. One says its a red spotted snake, another says its a tan snake, camo patterns are different from reference to reference, yada yada yada.  I just went with the red snake because it has a more sinister look to it and went with a pattern that looked good to me. Sometimes that's just how it is. Coming along nicely and am looking forward to the paint on these builds.


 Forum | Modelers Social Club Forum (proboards.com) 

  • Member since
    March 2010
  • From: MN
Posted by Nathan T on Tuesday, July 1, 2014 7:29 AM

Wonderful looking model Archangel. Great cammo and decal work. The open panels and cowling latches really set it off. Thanks for finishing it.


  • Member since
    October 2006
  • From: Tucson, AZ
Posted by Archangel Shooter on Tuesday, July 1, 2014 9:16 AM

Mustang...Stuka huh? Do you know where I can get my hands on a set of 1/48th decals for the old Monogram 1/48 Ju=87DD? I check everywhere with no luck so far, only set I came up is for a Hungarian bird.

Scott

 Your image is loading...

 On the bench: So many hanger queens.


  • Member since
    April 2005
Posted by Thunderbolt379 on Tuesday, July 1, 2014 9:24 AM

Thanks, Mustang -- it's a case of making a call and hopefully the finished model will look the part (which I'm pretty sure it will...) I didn't get to the LHS today for paint and thinner, so I'll make a special trip tomorrow. What I did get done today was to mask the gear bays of the A-8, prime the under-cowl area with white, and reprime the overspray areas of the DOR band outside the masking, then preshade in black overall. I was out this evening, thus didn't get a chance to apply the 04 to the chin area, so I'll do that before going out tomorrow, and hopefully she'll be ready to mask when I get back -- in which case I'll get the 76 onto her.

Photos tomorrow...

M/TB379

http://worldinminiature.blogspot.com/

  • Member since
    October 2008
  • From: Georgia
Posted by Rigidrider on Tuesday, July 1, 2014 1:59 PM

Archangel... unless your dead set on the exact set that came with the kit, ebay has loads of aftermarket decals, if you are set on the original... let me check my stash, I know I have a set, and when I get a kit I remove the decals and try to preserve them in a stable temp and humidity location.

Doug

Ps... great job on your build, glad you finished it!

When Life Hands You A Bucket Of Lemons...

Make Lemonade!

Then Sell It Back At $2 Bucks A Glass...

  • Member since
    April 2005
Posted by Thunderbolt379 on Wednesday, July 2, 2014 3:42 AM

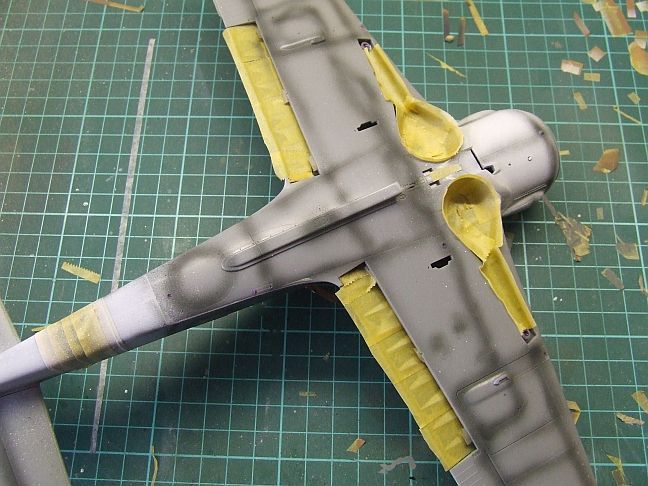
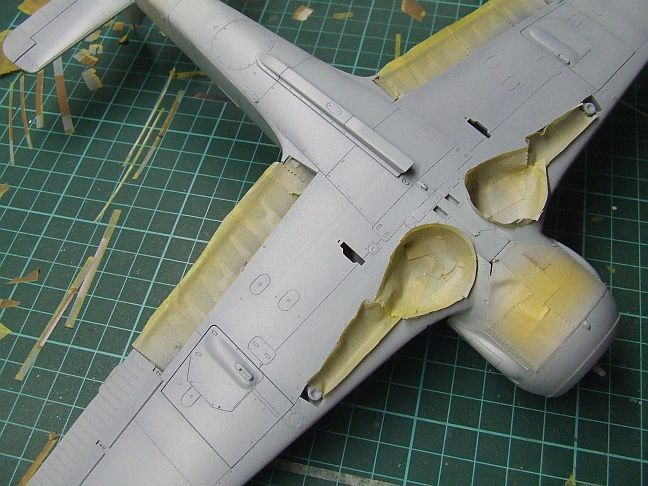
Hi guys -- progress over the last 48 hours. As mentioned, I masked the flaps and gear bays on the A-8, which was a less difficult task than I had expected (I'll brush paint the edges of the bays at the finish):

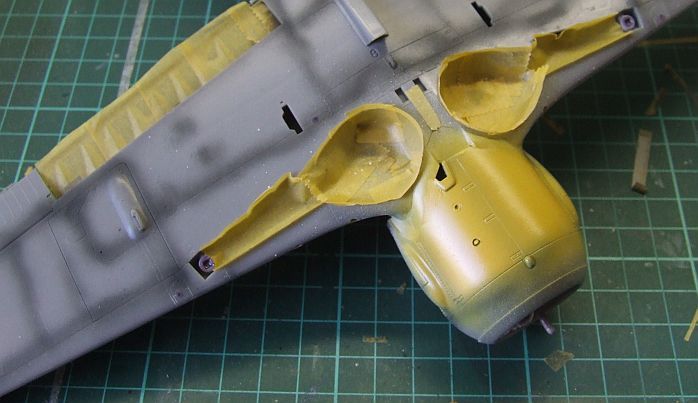
Then I primed in white where the yellow panel would be, and preshaded overall:

This morning I added the 04 -- the Acryl is so thin and transparent that the degree of strikethrough from the preshade you see here is coming through seven coats -- basically all the paint I made up I used on this area:

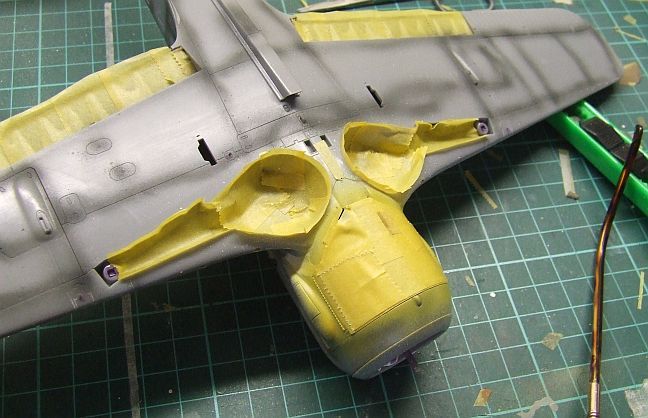
Then I headed out to the LHS while the paint hardened up, and masked it when I got back:

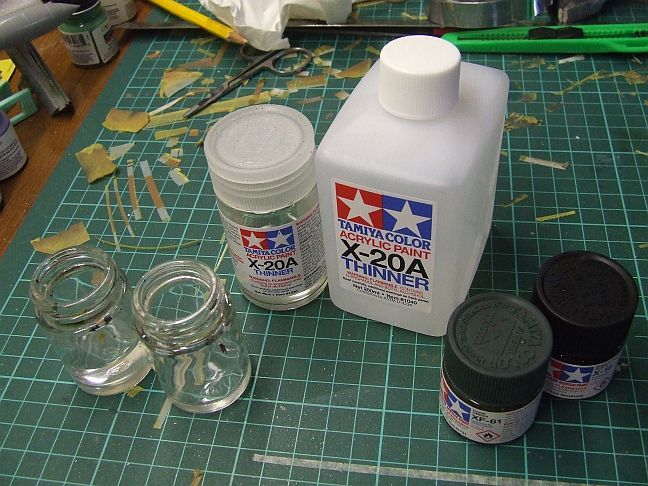
Speaking of the LHS, I decided it was time to graduate from 46mL bottles of thinner, this is the 250mL carton, for getting serious about modelling in bulk!

And finally, I did two mixings of 76 and laid them onto the underside and fuselage sides. I'll need to do another mixing for other parts, and possibly redress some joint work around the tail the paint has shown up as needy:

Target for tomorrow: get the darker green onto the Ta 152, whether with masks or freehand. The Bf 109 shares the same 74/75 scheme with the big bird here, so I should get some masking done on both to move toward getting the greys on.

I'm not sure when I'll have them done, but it can't be too far off, and of course the D-9 is waiting patiently for her turn in the paint bay as well.

Cheers, Mike

http://worldinminiature.blogspot.com/

  • Member since
    April 2013
Posted by SchattenSpartan on Wednesday, July 2, 2014 3:55 AM

Nice work, Mike!

  • Member since
    May 2013
  • From: Indiana, USA
Posted by Greg on Wednesday, July 2, 2014 3:57 PM

Mike, she's really coming along. Beautiful masking work, btw.

Scott, wow. I love your 190. I tip my hat to your perseverance, mate.

JOIN OUR COMMUNITY!

Our community is FREE to join. To participate you must either login or register for an account.

SEARCH FORUMS
FREE NEWSLETTER
By signing up you may also receive reader surveys and occasional special offers. We do not sell, rent or trade our email lists. View our Privacy Policy.