SEARCH FINESCALE.COM

Enter keywords or a search phrase below:

Fw 190 Butcher Bird 2013 (extended to June 2014) Group Build

564934 views
5865 replies
1 rating 2 rating 3 rating 4 rating 5 rating
  • Member since
    March 2012
  • From: Corpus Christi, Tx
Posted by mustang1989 on Sunday, February 9, 2014 8:51 PM

Joe I have to say that is one heckuva build there! A true 1/72nd scale masterpiece! The camo scheme is definitely a one of its kind here in the GB and you pulled it off well. I am really glad to have had you in this GB with us and look forward to more of your commentary and look forward to seeing you in the Stuka GB in April or so. I'll have the completed pic up on the "billboard" soon pal!


 Forum | Modelers Social Club Forum (proboards.com) 

  • Member since
    August 2009
  • From: MOAB, UTAH
Posted by JOE RIX on Sunday, February 9, 2014 7:19 PM

HALLELUJAH!!!!! I am finally done!! My Gawd, I thought I would never get this bugger completed. Especially when the whole paint debacle occurred. But, I am sure glad I stuck with it and saw her through. Not necessarily my best paint finish and some panel lines suffered from multiple coats of paint but otherwise I am pleased. So, some updates on the finishing touches. The SC 50 bombs were painted MM Schwarzgrau (German Gray) and the SC 250 painted Gunze Khaki Green. They were given an oil wash and then weathered with pastels and a silver pencil. The antenna is EZ Line. I must note here that this the first time I have used EZ Line and the stuff is the Bomb! Thanks Joe. It's hard to see in my sub standard pics but I applied some chipping along the upper wing roots with a silver pencil to simulate foot traffic wear. Overall, the 1/72 Hasegawa kit is a sweet build. My biggest complaint is mounting the gear doors. There is a single guide pin/hole on the lower end of the gear and door and the upper gear door is to wide to fit in the wheel well thus making the gear door too long. I had to cut a small bit off the top and glue the door right to the landing gear making lining things straight a bit challenging.

 I just want to extend my heart felt gratitude to you all for the great fun, learning and overall comaraderie I have experienced here. Thank You Joe for hosting what has to be considered one the epic GBs in FSM history. I will be hanging around to the finish. I am also sure that I will be to seein' you Mugs around on other GBs. For me, I will be moving on to my 1/72 Eduard F6F-3 Hellcat for the Pacific Carrier and 1944 GBs. So, without further adieu here is pics of the 30th completed Butcher Bird for this GB.

And here is prelim pic of the base I will finish up for my Lil' 190

In closing:

  "Remain strong and resolute in your faith of the styrene my Brothers. Yield not to the temptation of responsibility. For this is merely an evil ploy commonly employed by wives, family and employers. Wander not from the path destined upon you by the Group Build. For to do so is..Sacrilege!"

                                                                             The Reverend Joe

"Not only do I not know what's going on, I wouldn't know what to do about it if I did". George Carlin

  • Member since
    April 2013
Posted by SchattenSpartan on Sunday, February 9, 2014 8:07 AM

You guys are not alone. I am thinking the same right now. I have to apply the fuselage crosses on my P-47 right on top of the turbocharger air outlets on the tail. They are recessed quite a bit and the decals are extremely fragile, so I have to be very careful not to ruin them. After that I have to put even bigger ones (they are really huge) to the lower surfaces of the wings. They go right on top of several raised details and I have no clue on how I'm going to tackle that. I'll post a pic when I get to it and hope you guys can help me out...

  • Member since
    March 2012
  • From: Corpus Christi, Tx
Posted by mustang1989 on Sunday, February 9, 2014 7:58 AM

That was very well put Joe because I was wondering the same exact thing this morning while trying to line all of that stuff up and make it work in a 5 minute window!  lol


 Forum | Modelers Social Club Forum (proboards.com) 

  • Member since
    August 2009
  • From: MOAB, UTAH
Posted by JOE RIX on Sunday, February 9, 2014 7:46 AM

Very nicely executed Joe. I often wonder why exactly I love this hobby while trying to restore oxygen to my brain after having held my breath trying to align 4 different parts that requires 7 hands all the while timing the setting of the glue while attempting not to impair any damage to parts or paint.

"Not only do I not know what's going on, I wouldn't know what to do about it if I did". George Carlin

  • Member since
    March 2012
  • From: Corpus Christi, Tx
Posted by mustang1989 on Sunday, February 9, 2014 7:20 AM

Thanks Clemens! This is the whole nose section as of right now. I still have to apply a gloss coat to the side panels, give them a light wash and dull coat them. Will try to apply the gloss today hopefully!


 Forum | Modelers Social Club Forum (proboards.com) 

  • Member since
    April 2013
Posted by SchattenSpartan on Sunday, February 9, 2014 7:16 AM

That's great news, Joe! The nose section is looking truly awesome!

I'm still working on my P-47 (finishing the decalling right now), so I'll probably neede another week or so untill I can come back to my 190s...

  • Member since
    March 2012
  • From: Corpus Christi, Tx
Posted by mustang1989 on Sunday, February 9, 2014 7:07 AM

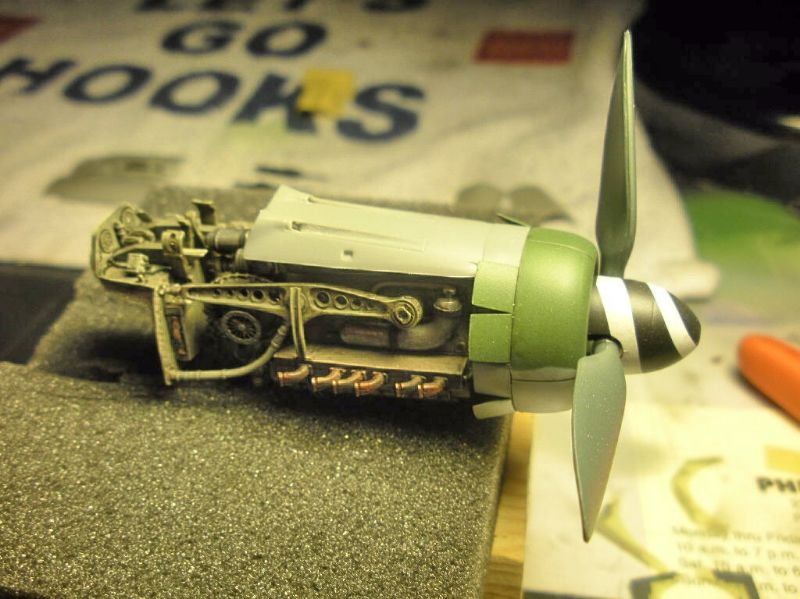
Ok guys. All modeling efforts this weekend have hinged on this panel in particular to include paint and fit. Getting it painted, glossed, washed and dull coated wasn't a problem at all. My apprehension was in the fit of the panel onto the engine while installing the guns at the same time and getting everything to lay properly in place.ALOT of time went in to modifiying the panel underneath to attain proper angle as well as a thinned ledge for the hinged panels to rest on for installation purposes.  Well needless to say as shown here, when it came time to install the gun trough panel,  the prop had to come back off. I just couldn't install the panel with that thing in the way so off it came. I used 5 minute epoxy on the guns to have enough time to play with the alignment and proper positioning of the panel and gel super glue on the panel to nose and engine. It worked! The guns protrude through the cowl in the proper place and the guns aren't at a weird angle. I've been working on the other panels too but this was my main focus this weekend. So far and can breathe a sigh of releif!


 Forum | Modelers Social Club Forum (proboards.com) 

  • Member since
    March 2012
  • From: Corpus Christi, Tx
Posted by mustang1989 on Friday, February 7, 2014 3:22 AM

Thanks for the vote of confidence on my Tamiya birdie guys. Its Friday and I'm winding up for another three day streak here to see if I can get this thing mostly finished this weekend. Build time has all but ceased throughout the week but I try to make up for lost time with the long weekends. With that........................it's benchtime!


 Forum | Modelers Social Club Forum (proboards.com) 

  • Member since
    March 2012
  • From: Corpus Christi, Tx
Posted by mustang1989 on Friday, February 7, 2014 3:19 AM

Hey JJ I've got your build posted on the front page here. Sorry it took a day or two longer than what I had expected. Thank you for being a valuable part of this GB as you have added to the many fine builds and good commentary and techniques that all of us here enjoy.


 Forum | Modelers Social Club Forum (proboards.com) 

  • Member since
    May 2013
  • From: Indiana, USA
Posted by Greg on Tuesday, February 4, 2014 10:48 AM

JJ, that's an excellent looking bird. Fantastic work! So glad you joined in the fun, you added a lot to this GB.

Joe, you'll get the top cover sorted out, she's looking marvelous as per your usual.

  • Member since
    December 2006
  • From: N. Georgia
Posted by Jester75 on Tuesday, February 4, 2014 7:39 AM

I have to echo Nathan on those late war greens, they looks scrumptious!! Excellent work all around jj!!

Eric


  • Member since
    October 2008
  • From: Georgia
Posted by Rigidrider on Tuesday, February 4, 2014 4:36 AM

LOLOL... You got it Joe!

When Life Hands You A Bucket Of Lemons...

Make Lemonade!

Then Sell It Back At $2 Bucks A Glass...

  • Member since
    August 2009
  • From: MOAB, UTAH
Posted by JOE RIX on Monday, February 3, 2014 10:37 PM

J.J.: That is one fantastic looking 190. You have done a solid job all the way around. Your paint skills are quite remarkable. It has been a real pleasure to participate in the GB with you. Sorry you will not be able to build another with us but, I understand the need to move on. Please Take Care and i hope to catch you in another GB.

Joe: Aaww, just a bump in the road for you. I know you'll get that gun cover fixed up toot sweet. Looking good.

Doug: Congrats to your Seahawks. See you for rematch next year.

"Not only do I not know what's going on, I wouldn't know what to do about it if I did". George Carlin

  • Member since
    April 2005
Posted by Thunderbolt379 on Monday, February 3, 2014 10:19 PM

Thanks, JJ -- I have a positive lust to add something like this to my cabinet!

M/TB379

http://worldinminiature.blogspot.com/

  • Member since
    March 2012
  • From: Corpus Christi, Tx
Posted by mustang1989 on Monday, February 3, 2014 8:08 PM

Thats VERY convincing paint that displays ultimate realism JJ!!   I'll put this beauty on the front page within the next day or so. I'd like to invite you to build another and hang out awhile longer. Again, top notch!


 Forum | Modelers Social Club Forum (proboards.com) 

  • Member since
    April 2013
Posted by SchattenSpartan on Monday, February 3, 2014 6:27 PM

She's looking fantastic, JJ! What flat coat did you use?

  • Member since
    April 2005
Posted by Thunderbolt379 on Monday, February 3, 2014 4:58 PM

JJ -- fabulous! I've yet to tackle a really good D-9, and you've done mouth-watering justice to this one. Is that scheme 70/83/76?

Cheers, Mike/TB379

http://worldinminiature.blogspot.com/

  • Member since
    March 2010
  • From: MN
Posted by Nathan T on Monday, February 3, 2014 4:01 PM

Thats amazing work JJ! I love the late war greens. Really nice antenna wire too. But doesn't the fuselage lead in wire attach further aft, on top of the fuselage extension piece? Great work still!


  • Member since
    October 2008
  • From: Georgia
Posted by Rigidrider on Monday, February 3, 2014 3:56 PM

Beautiful job brother... Just beautiful!

When Life Hands You A Bucket Of Lemons...

Make Lemonade!

Then Sell It Back At $2 Bucks A Glass...

  • Member since
    June 2008
Posted by jugjunkie on Monday, February 3, 2014 2:32 PM

Well that's it done and that makes two so far for 2014. I want to thank all you great dudes for a truly memorable Group Build and if it wasn't for my commitment to a whole bunch of others for this year, I would have tried to do a dozen more! Thanks again to a wonderful group of modelers!!

  • Member since
    October 2008
  • From: Georgia
Posted by Rigidrider on Monday, February 3, 2014 4:41 AM

Yeah, I'm a Seahawk fan from the very first game they ever played way back when. Through all the sucky years till now! Yup... It was one of the more enjoyable Super Bowls I've ever watched! Although I have admired and respected Paton and his amazing ability on field... I think he needs to do something else... like sell pizza or something... maybe...?(LOL)

Doug

When Life Hands You A Bucket Of Lemons...

Make Lemonade!

Then Sell It Back At $2 Bucks A Glass...

  • Member since
    March 2010
  • From: MN
Posted by Nathan T on Sunday, February 2, 2014 10:49 PM

mustang1989

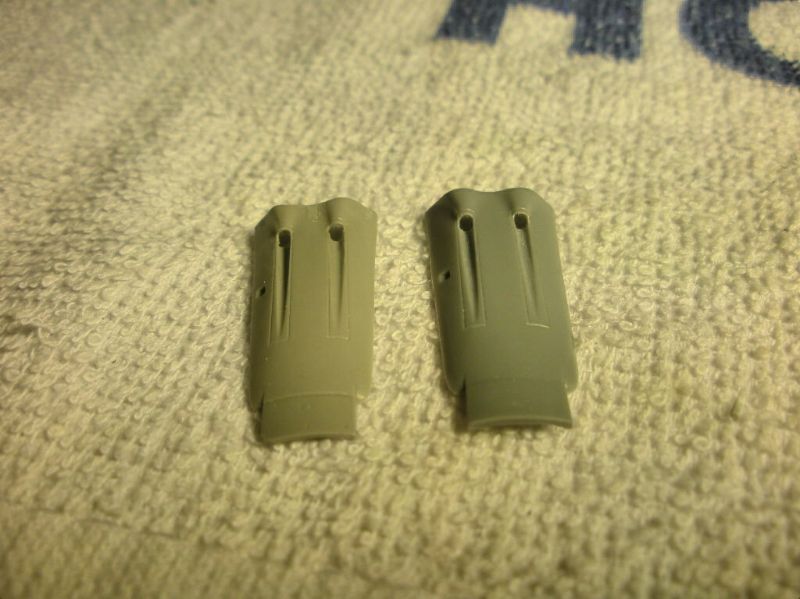
Ok....back to the build at hand. I had some trouble out of the Aires engine cowl panel. First off it was way too short in which I would have had to reposition the cowl machine guns further forward to have the barrels exit the gun trough openings in the proper place and the proportions of the Aires piece was off a smidgen here and there resulting in an odd appearance when installed on the nose assy.

  To sum this up I used the Tamiya cowl piece and cut the molded gun cover from it. I also drilled out the molded gun barrel ends and opened the gun trough holes up in the Tamiya panel like they were in the Aires piece. This is what it looks like now. The Aires part is on the left and the modified Tamiya part is on the right:
This is what it's looking like installed:
 The Aires gun cover looks like crap too so here's my question to you guys. Anybody got an Eduard cowl gun cover / access panel? This kit is about half Eduard parts now to counter the Tamiya flaws and now the Aires flaws. I'd appreciate it very much if anybody can help here.

I think I can help. I have a resin MDC cowl for the Tamiya kit. Only thing is you'd have to cut the gun cover away from the rest of the top cowl...again...like you just did to the tamiya kit. I'll PM you in the morning...Nice close up pic btw.

Doug! haha, The Broncos did have a tough night, and it started right from the first snap! That safety was a different way to start the game.


  • Member since
    August 2009
  • From: MOAB, UTAH
Posted by JOE RIX on Sunday, February 2, 2014 9:28 PM

Holy Cow! What in the heck was that! Somebody snuck a different team in there because that sure wasn't the same team I watched this season. Well. major kudos to the Seahawks. They played a whale of a game and certainly made my wife happy. And that is all good. So, now no more distractions on Sundays. Well, that is until NASCAR starts. Believe I will go and console myself with some bomb weathering. Nothing like bench time to chase the blues away. Nobody knows the trouble I've seen....

"Not only do I not know what's going on, I wouldn't know what to do about it if I did". George Carlin

  • Member since
    March 2012
  • From: Corpus Christi, Tx
Posted by mustang1989 on Sunday, February 2, 2014 9:28 PM

Ok....back to the build at hand. I had some trouble out of the Aires engine cowl panel. First off it was way too short in which I would have had to reposition the cowl machine guns further forward to have the barrels exit the gun trough openings in the proper place and the proportions of the Aires piece was off a smidgen here and there resulting in an odd appearance when installed on the nose assy.

  To sum this up I used the Tamiya cowl piece and cut the molded gun cover from it. I also drilled out the molded gun barrel ends and opened the gun trough holes up in the Tamiya panel like they were in the Aires piece. This is what it looks like now. The Aires part is on the left and the modified Tamiya part is on the right:

This is what it's looking like installed:

 The Aires gun cover looks like crap too so here's my question to you guys. Anybody got an Eduard cowl gun cover / access panel? This kit is about half Eduard parts now to counter the Tamiya flaws and now the Aires flaws. I'd appreciate it very much if anybody can help here.


 Forum | Modelers Social Club Forum (proboards.com) 

  • Member since
    March 2012
  • From: Corpus Christi, Tx
Posted by mustang1989 on Sunday, February 2, 2014 9:11 PM

You know when I wrote that last message the score was only twenty something to zero. Man I kind of feel a little bad for the ol' Broncs. Manning was just one of the guys I saw that looked downright disgusted.


 Forum | Modelers Social Club Forum (proboards.com) 

  • Member since
    October 2008
  • From: Georgia
Posted by Rigidrider on Sunday, February 2, 2014 8:27 PM

Hey... Didnt the Broncos have a big game today??? Seahawks showed up, ... When are the Broncos arriving??? Wink

When Life Hands You A Bucket Of Lemons...

Make Lemonade!

Then Sell It Back At $2 Bucks A Glass...

  • Member since
    March 2012
  • From: Corpus Christi, Tx
Posted by mustang1989 on Sunday, February 2, 2014 6:39 PM

Joe Rix:I now interrupt this GB for the following announcement:"How bout them Broncos!!"Hahahaha....woooo hoooo!!!!


 Forum | Modelers Social Club Forum (proboards.com) 

  • Member since
    April 2005
Posted by Thunderbolt379 on Sunday, February 2, 2014 4:40 PM

Thanks, SS! It's actually my first go... Here's the blog post I put up about it yesterday:

worldinminiature.blogspot.com.au

http://worldinminiature.blogspot.com/

JOIN OUR COMMUNITY!

Our community is FREE to join. To participate you must either login or register for an account.

SEARCH FORUMS
FREE NEWSLETTER
By signing up you may also receive reader surveys and occasional special offers. We do not sell, rent or trade our email lists. View our Privacy Policy.