SEARCH FINESCALE.COM

Enter keywords or a search phrase below:

Gift GB

73679 views
605 replies
1 rating 2 rating 3 rating 4 rating 5 rating
  • Member since
    September 2003
  • From: AandF in the Badger State
Posted by checkmateking02 on Wednesday, April 3, 2013 2:07 PM

Yup, the Stuka looks good all around, Bish.  I will have to give your method for lights a try, since plain paint looks kind of flat.

Z:  it's a great job on the NMF.  These are difficult to accomplish, I find.  I'm never sure how much variation is enough--or too much.  Three shades like you used might be something I'll try.  It sure looks good on your '29. 

Here's a photo of a B-17C/D I did years ago--Colin Kelly's plane from early in the Pacific war.  I used silver Floquil RR paint on it, although I don't remember specifically which one(s).  As you can see, I used only two tones of it, cuz I didn't want it to look like a patch work quilt. I think I might have added gun metal to the basic color, but somehow the two-tones aren't quite enough. 

You avoided the "quilt-look" on your B-29, though!   


  • Member since
    December 2002
  • From: Bury St Edmunds, Suffolk, England
Posted by Bish on Wednesday, April 3, 2013 12:55 PM

Well, i like it. Alclad does take some getting used to, i still haven't got the hang of it yet.

I am a Norfolk man and i glory in being so


On the bench: Airfix 1/72nd Harrier GR.3/Fujimi 1/72nd Ju 87D-3

  • Member since
    December 2012
Posted by Z Square 8 on Wednesday, April 3, 2013 12:35 PM

Bish

I am curious about the front section of the fuselage. It looks very different from the rest of the aircraft. I am guessing this matches the real thing, was there a reason it was like that.

The 29 was manufactured in different sections in various places in the US back then. It was very common to have panels and even entire sections show distinct variations in the aluminum sheet metal. With that said, I have to admit that my inexperience with Alclad and even an airbrush (first time for both), made it turn more dull than I wanted it. I considered doing another section dull like the nose (which has 2 variations of dull), further aft but decided against it. If I had to do over again, I would mix the Airframe and dull shades and come up with a less pronounced change...same with the wing panels.
Overall, she received 3 shades of Alclad and metal plate buffing metalizer on the cowlings.
There is a change in metal shade between the glass dome and the leading edge of the wings on
Z-8 in images I have...just not as much as I recreated! Wink ...probably not that much variation in wing panels either.
If you look at the first two images and notice the two different shades in that nose section, that is the shade transition I was going for initially right before the wings. That transition came out too harsh. I re-taped up further and the second attempt came out more subtle like I was shooting for.
I'll chalk it up to inexperience and creative latitude! LOL

--Rich

Site builder of CooksonTributeB29.com 


  • Member since
    December 2002
  • From: Bury St Edmunds, Suffolk, England
Posted by Bish on Wednesday, April 3, 2013 9:55 AM

Thanks Z, i must admit i am pretty chuffed with it. The Stuka is my favorite aircraft and i am glad i did this one some justice.

The 29 is looking stunning. I am curious about the front section of the fuselage. It looks very different from the rest of the aircraft. I am guessing this matches the real thing, was there a reason it was like that.

I am a Norfolk man and i glory in being so


On the bench: Airfix 1/72nd Harrier GR.3/Fujimi 1/72nd Ju 87D-3

  • Member since
    December 2012
Posted by Z Square 8 on Wednesday, April 3, 2013 8:55 AM

Bish- your Stuka in diaorama is excellent! Very nice work! I aspire to be as good as you and others here! Bow Down Toast

--Rich

Site builder of CooksonTributeB29.com 


  • Member since
    December 2012
Posted by Z Square 8 on Wednesday, April 3, 2013 8:53 AM

I started with completing the build last night > then moved to adding decals....

I have to wait a day or two for more printer ink to arrive before I can complete decal work... Tongue Tied Censored

Remaining "to do's":

1. clean glass

2. print and apply custom decals and underside decals

3. engine exhaust wash

4. touch up detail paint 

5. install two port side pitots-waiting until after the Mission to Albuquerque custom decal is applied so I don't have to fight around them to get it on.

I'll hold off on posting many shots until completed...but, for my own personal enjoyment of "antsy-ness",

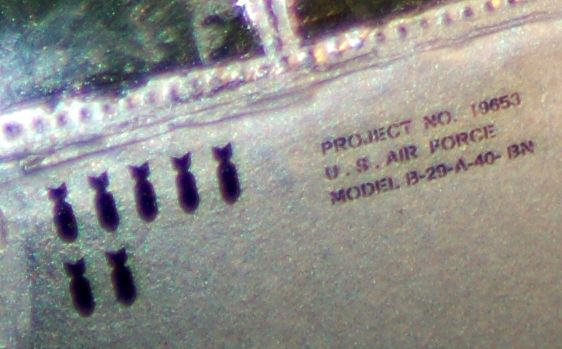
Here are a few shots of one of my "creative latitude" efforts in customization that I could not resist in getting a pic of: (The mission credits-bombs, do not appear in any image I have of Z-8, but in the true fashion of honoring her and her crew...I'm giving them to her). The third of four Z-8's in the pacific theater was credited with 7 missions and was lost on her eighth mission on 17 March 45 over Kobe. No credit was given for this last mission...

for the last image today...the writing next to the mission credits is barely visible under a 3x magnifying glass, but my camera picks it up well from 8' away! (it has a 250mm zoom lens on it).

I cut the rest of the text off because the next line was the serial number for one of the two kits you could build OOB and did not apply in this custom kit build.

Looking forward to completing her soon and thanks for looking!

--Rich

Site builder of CooksonTributeB29.com 


  • Member since
    December 2002
  • From: Bury St Edmunds, Suffolk, England
Posted by Bish on Monday, April 1, 2013 12:14 PM

Ye, and they work really well. This is the red side on my recent Stuka.

I am a Norfolk man and i glory in being so


On the bench: Airfix 1/72nd Harrier GR.3/Fujimi 1/72nd Ju 87D-3

  • Member since
    September 2003
  • From: AandF in the Badger State
Posted by checkmateking02 on Monday, April 1, 2013 12:12 PM

Wingtip lights were what I was thinking, Bish.  

Do you paint them silver, then apply the clear colo(u)r?


  • Member since
    December 2002
  • From: Bury St Edmunds, Suffolk, England
Posted by Bish on Monday, April 1, 2013 12:07 PM

Z, thats looking really nice.

I am a Norfolk man and i glory in being so


On the bench: Airfix 1/72nd Harrier GR.3/Fujimi 1/72nd Ju 87D-3

  • Member since
    December 2002
  • From: Bury St Edmunds, Suffolk, England
Posted by Bish on Monday, April 1, 2013 12:06 PM

checkmateking02

Nice-looking parts, BL.  Should build up fine!

Are these Tamiya clear colors acrylic or enamel/lacquer?  I haven't used them or even looked at them.  Maybe they'd be useful.

They are Acrylics. X-23=Blue. X-24=yellow. X-25=Green. X-26=Orange and X-27=Red. I don't think i have hardly used the blue yellow or orange. But the green and red come in very handy for wing tip lights.

I am a Norfolk man and i glory in being so


On the bench: Airfix 1/72nd Harrier GR.3/Fujimi 1/72nd Ju 87D-3

  • Member since
    December 2012
Posted by Z Square 8 on Monday, April 1, 2013 9:52 AM

BL- I have limited experience with both, but used both on the 29. Suface prep is the key to alcald!

the metalizer I really like because in an hour you can buff it to whatever degree of "shiney" you want. I used it on the cowlings. If you peruse back to those images you can see I went to a high shine on the front edge and left a section more dull and then went back to shiney.

--Rich

Site builder of CooksonTributeB29.com 


  • Member since
    April 2011
  • From: Silver Spring, MD
Posted by badlanguage on Monday, April 1, 2013 9:46 AM

checkmateking02

Nice-looking parts, BL.  Should build up fine!

Are these Tamiya clear colors acrylic or enamel/lacquer?  I haven't used them or even looked at them.  Maybe they'd be useful.

I believe the Tamiya clears are acrylic (the rest of their colors are). Z, nice looking 29! I really love the effect different metals have when applied that way!

Question for you (and anyone else who may know) - how do Alclad metals compare with Testors metalizer as far as how to use them and how they look? I have a project in mind that I'd like to use a NMF on and I could use the advice.

  • Member since
    September 2003
  • From: AandF in the Badger State
Posted by checkmateking02 on Monday, April 1, 2013 9:38 AM

Vast improvement.  Great recovery!


  • Member since
    December 2012
Posted by Z Square 8 on Monday, April 1, 2013 9:17 AM

Here we go...

Wing before:

Wing after:

Her cladding:


I think the first image of cladding (after the wing before and after shots), is the best of the cladding as it shows more of the true shading because of lighting adjustments.

I failed to get an underside shot, but it looks slightly better than these because of limited surface work I had to do on it. You'll get a chance to see that after the assemblies have been secured in place.

Thanks for looking.

--Rich

Site builder of CooksonTributeB29.com 


  • Member since
    December 2012
Posted by Z Square 8 on Sunday, March 31, 2013 6:46 PM

That mech is going to be "pretty trick"...anxious to see the continued progress!

Happy Easter to all...

29 build update...the cladding of the 29 is complete.  She received 3 shades of clad including: airframe aluminum, dull aluminum, magnesium and also took on some silver plate buffing metalizer, (which I really liked the control of even though it meant extra work!)

Wing tabacle abated...but I'll let you folks be the judge on that! LOL...the shortcomings of the overall result is in the base coat and sanding (surface prep before clad). I would definitely do some things different now, but feel I made a "fair" recovery. Intrigued to see??

...doing some touch ups this evening and should get images up by Tuesday/Wed.

--Rich

Site builder of CooksonTributeB29.com 


  • Member since
    September 2003
  • From: AandF in the Badger State
Posted by checkmateking02 on Sunday, March 31, 2013 6:38 PM

Nice-looking parts, BL.  Should build up fine!

Are these Tamiya clear colors acrylic or enamel/lacquer?  I haven't used them or even looked at them.  Maybe they'd be useful.


  • Member since
    April 2011
  • From: Silver Spring, MD
Posted by badlanguage on Sunday, March 31, 2013 1:40 PM

Yeah, I can think of a couple spots on this model alone where the effect I was looking for would probably have been achieved better by a silver/chrome base with a clear color on top. I definitely need to start working with them so I remember they're there!

  • Member since
    December 2002
  • From: Bury St Edmunds, Suffolk, England
Posted by Bish on Sunday, March 31, 2013 1:27 PM

Nice work there bad. Those tamiya clears do come in very handy. I have all the clear colours and often forget about them.

I am a Norfolk man and i glory in being so


On the bench: Airfix 1/72nd Harrier GR.3/Fujimi 1/72nd Ju 87D-3

  • Member since
    April 2011
  • From: Silver Spring, MD
Posted by badlanguage on Sunday, March 31, 2013 12:33 PM

Good tip about the Tamiya clears, for some reason I keep forgetting they exist! Maybe I'll pick up a bottle and experiment a bit...

  • Member since
    April 2011
  • From: Silver Spring, MD
Posted by badlanguage on Saturday, March 30, 2013 9:35 PM

I just realized I never posted a pic of the bits and pieces! Anyway, here it is.

  • Member since
    May 2005
Posted by pyrman64 on Saturday, March 30, 2013 5:59 PM

I've never said this to a guy before, but...nice GAMS!! Whistling

You might try using Future and Tamiya clear paints for the light saber thing.  Looks great.

Greg H

"There is many a boy here today who looks on war as all glory, but, boys, it is all hell." Gen. Wm T. Sherman (11 April 1880, Columbus, Ohio)

  • Member since
    April 2011
  • From: Silver Spring, MD
Posted by badlanguage on Saturday, March 30, 2013 5:16 PM

Making more progress on the Gundam. I thought I took more pics of my work in progress, especially some of the little pieces that I painted, but I'm putting up what I got.

Base coat of the beam saber. That's kind of like a lightsaber for giant robots.

Shiny brass band on the back of the legs. I saw it on another one and I liked the color contrast, so here it is.

Beam saber with some pink on it. I have no idea how to paint a piece of plastic to look like a lightsaber, so I'm winging it.

More beam saber.

Here are the bits and pieces ready for clear. With the exception of the hands and the rest of the weapons this is pretty much the whole thing. I'm going to clear and decal and then get to the weathering. Sometimes I put these models together before I weather and sometimes not. I think this time I'll weather before I put it together. Making decals now, I'll post pics when I get them done.

  • Member since
    September 2003
  • From: AandF in the Badger State
Posted by checkmateking02 on Monday, March 25, 2013 6:38 PM

Sorry to hear about the set-back, Z.  What did work for the NMF looks really good.

I haven't done a NMF in years, but when I did, I used Floquil RR paint.  They make about three different labels of silverish color--although my can't really see the difference.

I find NMF's to be. . . anxiety-provoking.


  • Member since
    December 2002
  • From: Bury St Edmunds, Suffolk, England
Posted by Bish on Sunday, March 24, 2013 5:52 PM

Interesting dcals bad, i still haven't come close to makeing my own, looking forward to seeing how this work out.

Z, glad to hear you have the problem sorted. I think i washed my NMF's with my usual pro modeller and then used Tamiya's weathering pastels, the gun metal, on it. But its been a while now and not entirely sure. The 29 is looking good.

I've made a start on my 0/400. Last week was a bit slow and still not got the inside done, even though tehres not much there. But should have some pics in a day or so and hopeing to pick up the pace this week.

I am a Norfolk man and i glory in being so


On the bench: Airfix 1/72nd Harrier GR.3/Fujimi 1/72nd Ju 87D-3

  • Member since
    December 2012
Posted by Z Square 8 on Sunday, March 24, 2013 4:14 PM

Just for fun...I tested the metal plate buffing over a spare part that had been painted and dipped in Future and was completely dry...when attempting to buff, it appears that the metal buffing spray ate through the future and softened the original paint. so when trying to buff to a polish shine, it removed all back to the bare plastic or grey primer. FYI...

--Rich

Site builder of CooksonTributeB29.com 


  • Member since
    December 2012
Posted by Z Square 8 on Sunday, March 24, 2013 4:08 PM

BL- will be interested to see the final decal work...you are making great progress.

eatthis- love the clad enthusiasm...great results! Yes

29 Build update: The repair of the right wing paint tabacle is complete. After sanding, I took a piece of landscape wiring and stripped it to reveal stranded wire. Then I took a single strand and pulled it through a small puddle of clear parts glue and touched each panel line and removed the wire. It left a small ridge of glue to simulate the raised panel line...not perfect, but may just be enough. I proceeded with a few touch ups to sanding and polishing...and then on to masking...she is ready for cladding. After that is done, I will revisit some additional panel work as necessary.

Some WIP below: (including engine/prop assemblies)

Masked bottom side-

The assemblies close to their homes...tempting huh?

Smelling the build assembly finish...undetermined yet on washes. Decaling and detail work pending.

--Rich

Site builder of CooksonTributeB29.com 


  • Member since
    April 2011
  • From: Silver Spring, MD
Posted by badlanguage on Friday, March 22, 2013 10:18 AM

Trying to make the decals I want for my Gundam. I found some 1/100 scale decals for the version I'm building, but I need them in 1/144 scale. I scanned in the decals, plucked out the ones I wanted, cleaned up the images and removed the background blue of the decal paper, and created images of them. Fortunately for me I only needed to get the bigger ones, since I have a very detailed decal sheet in 1/144 scale from another version of the Gundam (which I'll borrow heavily from). I have some resizing of the images to do - the big white image will probably be at most 1.25 inches wide. I put the images on a blue background so I could see the white ones, obviously that won't be there when I print on decal paper. Anyway, here they are.

  • Member since
    September 2003
  • From: AandF in the Badger State
Posted by checkmateking02 on Friday, March 22, 2013 9:42 AM

That looks slick, eatthis.  Really great looking NMF.  Good work!


  • Member since
    April 2011
  • From: Silver Spring, MD
Posted by badlanguage on Friday, March 22, 2013 8:14 AM

Eatthis, that chrome looks fantastic! Great build, thanks for sharing. And Z, can't wait to see how the wing turns out.

I've been looking for tips on how to paint metal finishes better, and so far I've learned a lot by tuning in here. Thanks to all!

  • Member since
    December 2002
  • From: Bury St Edmunds, Suffolk, England
Posted by Bish on Friday, March 22, 2013 3:28 AM

Nice, sounds like this thing packs a big punch. Thanks for bringing this to the GB.

I am a Norfolk man and i glory in being so


On the bench: Airfix 1/72nd Harrier GR.3/Fujimi 1/72nd Ju 87D-3

JOIN OUR COMMUNITY!

Our community is FREE to join. To participate you must either login or register for an account.

SEARCH FORUMS
FREE NEWSLETTER
By signing up you may also receive reader surveys and occasional special offers. We do not sell, rent or trade our email lists. View our Privacy Policy.