SEARCH FINESCALE.COM

Enter keywords or a search phrase below:

Twin Boom Group Build 2013

46236 views
314 replies
1 rating 2 rating 3 rating 4 rating 5 rating
  • Member since
    August 2009
  • From: Borlando Fla home of the rat
Posted by TREYZX10R on Sunday, January 20, 2013 7:29 PM

Hope you get feeling better soon ww2psyco!

The Canopy fit turned out decent enough after I sanded the edges to a bevel on the top join areas and took off some length on the sides and top parts,at least it was too long instead of being short. I also added the small intakes to the port sides of both engine nacelles.

I gave up trying to replicate the tiny vortex generator tabs on the controls and just concentrated on scratching the small actuators arms and control horns along with the mass balancers.

Next I scratched up the aerials

After a shot of some thinned down MM flat grey enamel I wet sanded everything with 1000grt knocking of some of the fiddly bits and having to reglue them in the process . Now its ready for the final coat of light USAF grey and some decals.

cheers Trey

  • Member since
    December 2002
  • From: Bury St Edmunds, Suffolk, England
Posted by Bish on Tuesday, January 22, 2013 11:30 AM

Thats looking sweet Trey, what colour scheme will this be in.

I am a Norfolk man and i glory in being so


On the bench: Airfix 1/72nd Harrier GR.3/Fujimi 1/72nd Ju 87D-3

  • Member since
    April 2003
Posted by shivinigh on Tuesday, January 22, 2013 2:19 PM

That horse is looking great Treyz.


  • Member since
    August 2009
  • From: Borlando Fla home of the rat
Posted by TREYZX10R on Tuesday, January 22, 2013 8:33 PM

Bish thanks ,went with an overall USAF grey

Shivinigh thank you!

Shot some color on after a presahde of very dark grey

Then some decals went down,a mix of the kit supplied ones and some spares I had

next I'll deal with the props and exhausts,cheers Trey

  • Member since
    January 2012
  • From: East Peoria, IL
Posted by stoutfella on Tuesday, January 22, 2013 8:57 PM

Trey: Looking really good. And thanks for the earlier rundown on your scribing tools. I'll try to remember that lacquer thinner trick.

Cheers,

Stoutfella

On the bench: 1/48 Tamiya Bristol Beaufighter

On deck: 1/48 Tamiya P51-B

  • Member since
    August 2009
  • From: Borlando Fla home of the rat
Posted by TREYZX10R on Wednesday, January 23, 2013 8:13 PM

Thanks Stoutfella!

  • Member since
    December 2009
Posted by ww2psycho on Wednesday, January 23, 2013 8:36 PM

Ok sickness is gone and i should have a nice full weekend to work on things. I starting gluing the other boom together tonight so hopefully the wings will get done this weekend.

  • Member since
    January 2012
  • From: East Peoria, IL
Posted by stoutfella on Thursday, January 24, 2013 11:31 AM

Greetings,

Moving along on the 38. After preshading, I sprayed the underside with Tamiya neutral gray, heavily thinned with 91% alcohol, then went back with a slightly lighter shade on the control surfaces and randomly elsewhere.. Overall, I'm fairly pleased with how it turned out. And I'm beginning to really like my new Iwata airbrush that Santa brought.
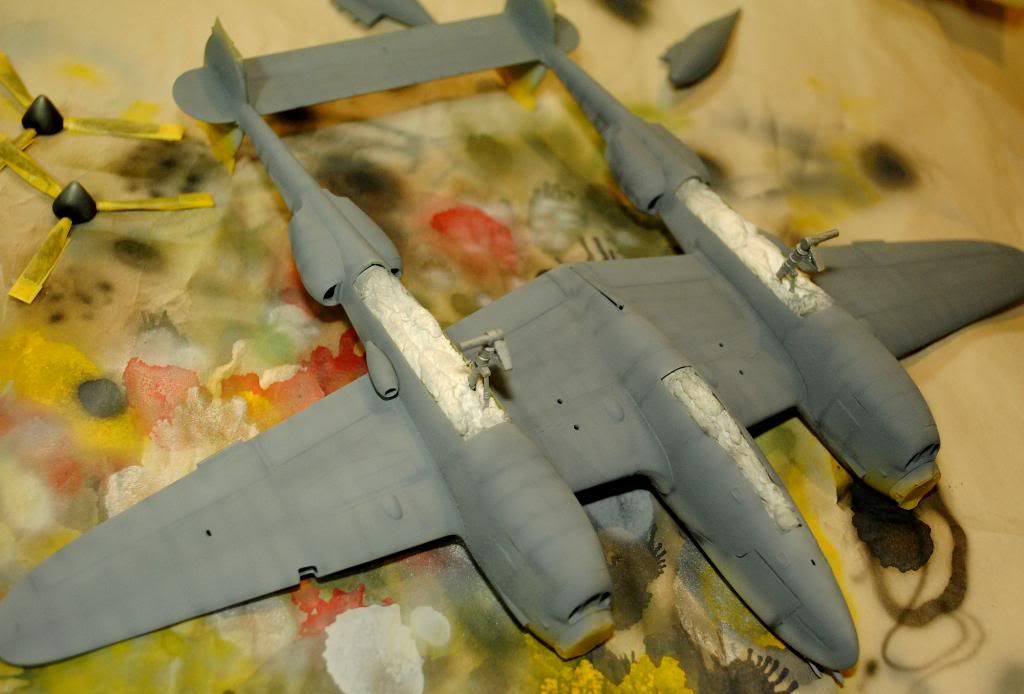
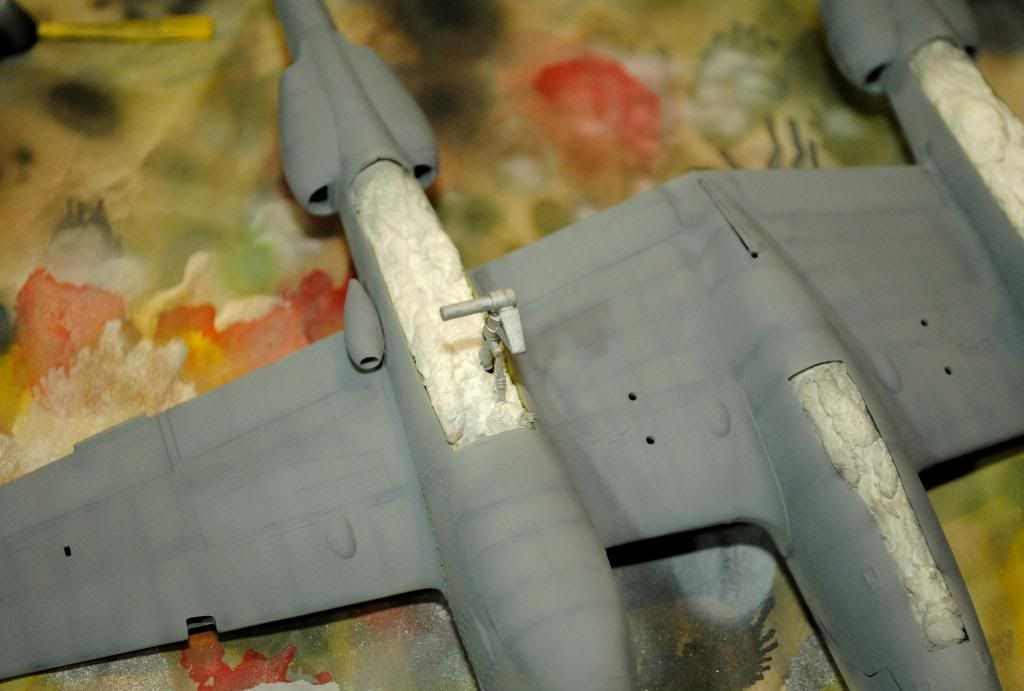
After the gray I did the topside with Tamiya olive drab, which seems really dark, darker than the pictures appear. I built it up very gradually with the paint again very thin, and then hit it with a lighter mix for variation. I spent an hour or so on this, as it's not the easiest bird to paint, with all the nooks and crannies created by the booms. But again, I'm fairly happy with the overall look.
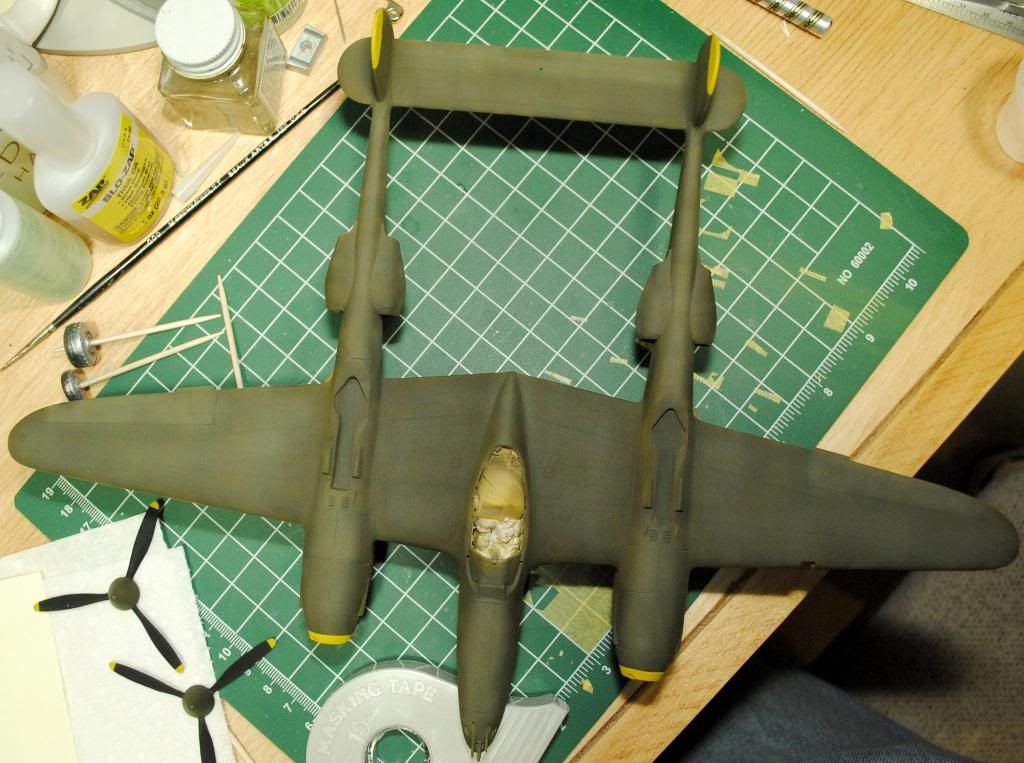
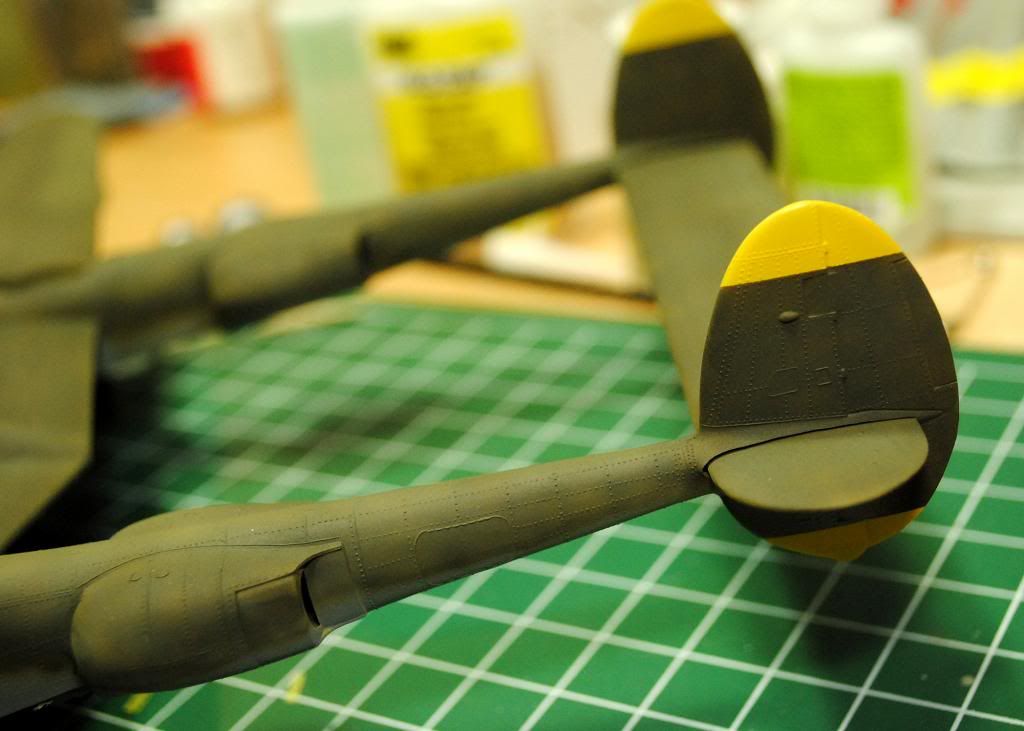
I've said it before and I'll say it again. Of all the things that have changed in this hobby since my early days in the 60s and 70s, Tamiya tape just might be the modeling equivalent of sliced bread. What great stuff! I remember trying to brush paint canopies and anti-glare panels with Scotch tape masks. The results were predictable and unsatisfying, even to my less-critical 12-year-old self back then.

Now that I've got the base colors down, I'll plan to hit it with a gloss coat later today. I was thinking of trying to use Future again (the first time I tried it didn't go well), but I just got a bottle of Micro Gloss from Microscale, so I may give that a shot. Gloss coats have been a weakness for me. I've been using MM acrylic gloss and can never get it as smooth and shiny as I'd like for decaling. But I'm actually starting with a pretty smooth finish here with the Tamiya colors, so I'm hoping for something good to happen.

Cheers,

Stoutfella

On the bench: 1/48 Tamiya Bristol Beaufighter

On deck: 1/48 Tamiya P51-B

  • Member since
    December 2002
  • From: Bury St Edmunds, Suffolk, England
Posted by Bish on Thursday, January 24, 2013 11:37 AM

Stoutfella, that is coming on really nicely. I use Microscale varnish all the time. I don't use the gloss much as i use gloss paints. I do like the Matt, though it can be a bit temperamental. My only advice is to make sure you thin it with decent water. It can glogg up the airbrush if not.

I am a Norfolk man and i glory in being so


On the bench: Airfix 1/72nd Harrier GR.3/Fujimi 1/72nd Ju 87D-3

  • Member since
    August 2009
  • From: Borlando Fla home of the rat
Posted by TREYZX10R on Thursday, January 24, 2013 8:22 PM

Stoutfella the preshading really has given depth to the finish,looking awesome! I'm not familiar with microscale ,geussing from Bish's suggestion to use water its acrylic?

Should be posting up some finished pics of the Bronco tomorrow!

  • Member since
    September 2003
  • From: Australia
Posted by Helo H-34 on Friday, January 25, 2013 4:17 AM

I think the pre-shadding on the P-38 is really quite good , awesome stuff stoutfella .

Trey , the Bronco is also looking great .

I'm hopping to get some more done on my HH-43 Huskie this weekend and post some more WIP pic's

John .

  • Member since
    December 2002
  • From: Bury St Edmunds, Suffolk, England
Posted by Bish on Friday, January 25, 2013 11:00 AM

Trey, not sure if its classed as Acrylic. It doesn't say that on the bottle, and it is very different from the Acrylic paints i have seen. But it is water based. Not many people seem to use it. Some people say the Matt comes out more of a satin, but i don't think so. I have also heard people say it yellows with age, but i have some very old kits sprayed with it and they are fine.

The Bronco is looking great, i like the sharks teeth.

I am a Norfolk man and i glory in being so


On the bench: Airfix 1/72nd Harrier GR.3/Fujimi 1/72nd Ju 87D-3

  • Member since
    January 2012
  • From: East Peoria, IL
Posted by stoutfella on Friday, January 25, 2013 12:12 PM

The bottle says to thin it with water or alcohol. I used alcohol and it went on pretty well. I'm decaling now and all seems OK. I only have it because I ordered decals from Microscale, had to add some items to reach their minimum order amount and thought I'd give it a try.

Cheers,

Stoutfella

On the bench: 1/48 Tamiya Bristol Beaufighter

On deck: 1/48 Tamiya P51-B

  • Member since
    December 2002
  • From: Bury St Edmunds, Suffolk, England
Posted by Bish on Friday, January 25, 2013 1:03 PM

Thats odd, mine only mention water. Maybe mine is labelebed for the UK marget and they know what us Brits are like with Alchol.

I am a Norfolk man and i glory in being so


On the bench: Airfix 1/72nd Harrier GR.3/Fujimi 1/72nd Ju 87D-3

  • Member since
    October 2009
  • From: Oil City, PA
Posted by greentracker98 on Saturday, January 26, 2013 6:20 AM

Hi, everyone, Put me down for a Monogram 1 48 scale P-38 as well. I just started it for "My First Time" GB. It's at about 30% built

Here is a mock up pic to see how it looks. The Cockpit/wings aren't glued together yet.

Stoutfella: What is in your P-38 Landing Gear Bays?

Thanks: Is there any limit on how many GBs you can join with one model? I am building this for "My First Time" GB, "Force of Nature" GB, and "1943" GB. Geeked

Thanks

Ken


A.K.A. Ken                Making Modeling Great Again

  • Member since
    April 2003
Posted by shivinigh on Sunday, January 27, 2013 4:43 AM

wow everyone's builds are looking incredible. I finished the base and figures for mine and wish to thank Bish for his input on doing my figures. Well here is the end result

unfortunately my skill in doing figures is really weak, but have lots of subjects to practice on.


  • Member since
    December 2002
  • From: Bury St Edmunds, Suffolk, England
Posted by Bish on Sunday, January 27, 2013 5:00 AM

I wouldn't apologise for those figures. I have been doing 72nd figures for years and i still struggle with them. Your uniforms look fine. My biggest struggle is the faces, especially the eye's, some of mine look really scary. Thats a really nice Dio.

I am a Norfolk man and i glory in being so


On the bench: Airfix 1/72nd Harrier GR.3/Fujimi 1/72nd Ju 87D-3

  • Member since
    September 2003
  • From: Australia
Posted by Helo H-34 on Sunday, January 27, 2013 5:58 AM

Awesome work on the Aircraft , vehicle and figures Shivinigh

Well done sir ...Toast

John .

  • Member since
    January 2012
  • From: East Peoria, IL
Posted by stoutfella on Sunday, January 27, 2013 8:02 AM

Ditto! Very nice. I did the Gabreski figure that came with my recent P-47 and I agree with Bish that the eyes are a huge challenge.

Your glider and dio look great. As I said in an earlier post, you've made me want to build a glider.

Cheers,

Stoutfella

On the bench: 1/48 Tamiya Bristol Beaufighter

On deck: 1/48 Tamiya P51-B

  • Member since
    August 2009
  • From: Borlando Fla home of the rat
Posted by TREYZX10R on Sunday, January 27, 2013 9:52 AM

shivinigh that came out great,really like the dio and the figures look fine ! I 've updated the finished page if you would rather have a different pic just let me know! Congrats on being the first to finish with a superb looking build !

Ken welcome aboard ,looking forward to seeing what you do with your 38!

  • Member since
    August 2009
  • From: Borlando Fla home of the rat
Posted by TREYZX10R on Sunday, January 27, 2013 10:01 AM

Finally broke this Bronco in!

cheers Trey

  • Member since
    December 2009
Posted by ww2psycho on Sunday, January 27, 2013 10:07 AM

Wow all very nice work!

I bought some plastic rod to remake the chair, still nothing from squadron. I have both booms glued together and one wing, I'll take pictures before attaching them. The fit between the booms and the wings is very good, a lot better than compared to an academy P-38. (Now if GWH or Tamiya would make a 38)

  • Member since
    December 2002
  • From: Bury St Edmunds, Suffolk, England
Posted by Bish on Sunday, January 27, 2013 10:31 AM

Trey, your usual standard as always. But please tell me you didn't have somone throw it to get that last pic. Or is that some wire is see looped round it.

I am a Norfolk man and i glory in being so


On the bench: Airfix 1/72nd Harrier GR.3/Fujimi 1/72nd Ju 87D-3

  • Member since
    August 2009
  • From: Borlando Fla home of the rat
Posted by TREYZX10R on Sunday, January 27, 2013 10:36 AM

ww2psycho thanks ,looking forward to seeing some pics !

Bish ,believe me I did want to throw this thing more than once ;)! Thanks for compliments!

  • Member since
    April 2003
Posted by shivinigh on Sunday, January 27, 2013 6:00 PM

Thank you everyone for the nice words. Treyz that Bronco looks really good. I love those action pics.


  • Member since
    December 2009
Posted by ww2psycho on Sunday, January 27, 2013 11:28 PM

Working on the seat right now, the rod I bought is a bit bigger than what I needed but I don't feel like buying more or sanding it down, since its a ceiling hanger it wont matter. I'm also considering not putting most of the decals in the cockpit. It wont be seen and It will speed things up. When I build one of these again (Yes I plan on getting another sometime) I will do a better job in the cockpit area.

This kit is pretty well detailed, only a few fit issues that will be hard to see once built. I think the biggest problem with breaking pieces is that they are small and brittle and they are attached by a bigger piece of plastic than needed.

  • Member since
    January 2012
  • From: East Peoria, IL
Posted by stoutfella on Tuesday, January 29, 2013 5:32 PM

Greetings,

I'll take some proper pictures in the lightbox later, but wanted to post a few just to prove I've persevered to completion on the P-38. Though I do reserve the option to replace the canopy with a vacuform part someday. Of all the lousy-fitting pieces in this kit, the clear parts rose to a new level of towering awfulness. Wow! If I'd done a bit more test fitting earlier in the process, I would have bitten that bullet and ordered a Squadron canopy. Anyway, here 'tis. As I've said, it'll look OK on the shelf just because the 38 is such an impressive aircraft, but don't look too close. This was meatball surgery on a mediocre kit cast from nearly 50-year-old molds. So I'm moving on to something from my Tamiya stash and not looking back, unless I decide to replace that canopy.

Cheers,

Stoutfella

On the bench: 1/48 Tamiya Bristol Beaufighter

On deck: 1/48 Tamiya P51-B

  • Member since
    August 2009
  • From: Borlando Fla home of the rat
Posted by TREYZX10R on Tuesday, January 29, 2013 7:35 PM

Stoutfella you sure did a great job with that old kit! The weathering is outstanding,really like what you did with the streaking and staining on the upper surfaces. The canopy does'nt look bad in the pics at all. I'll wait for the lightbox photos before I update the front page if you want?

  • Member since
    April 2003
Posted by shivinigh on Tuesday, January 29, 2013 8:30 PM

Stoutfella with all the problems you had with the fittings you Lightning turned out great. I have the Dragon kit and hope it turns out half as well as yours did. Good job.


  • Member since
    April 2005
  • From: Australia
Posted by taxtp on Tuesday, January 29, 2013 9:23 PM

Stoutfella - I've complimented you on the P-38 in another GB.

Trey - outstanding work on the Bronco, but somehow I knew it would be !

Reminds me the Sea Vixen is calling, although I nearly weakened and bought a Sea Venom too the other day.

Cheers

Tony

I'm just taking it one GB at a time.

JOIN OUR COMMUNITY!

Our community is FREE to join. To participate you must either login or register for an account.

SEARCH FORUMS
FREE NEWSLETTER
By signing up you may also receive reader surveys and occasional special offers. We do not sell, rent or trade our email lists. View our Privacy Policy.