SEARCH FINESCALE.COM

Enter keywords or a search phrase below:

Rommel vs Monty (North African GB 1941-43) Jan. 1 - Aug. 31 2014

137511 views
1455 replies
1 rating 2 rating 3 rating 4 rating 5 rating
  • Member since
    April 2006
  • From: ON, Canada
Posted by jgeratic on Thursday, February 6, 2014 5:19 PM

Mike, you got me there - I've no idea the size of the hinge I used, I just followed my trusty Mk.I eyeball.  My reasoning to include it is this, it's just as prominent, if not more so, than some of the surrounding panel lines.

If I had to make a guess, the stretched sprue would be no more 0.2mm wide -  so thin it pretty much matches the individual tick marks on the ruler.  If you do wish to try it, cut a longer length than required and tape in place.  Apply liquid cement and trim to proper length.  Once dry, you can serrate with sharp knife.

regards,

Jack

  • Member since
    April 2005
Posted by Thunderbolt379 on Thursday, February 6, 2014 4:36 PM

Gamera -- very true, I try not to agonise over cockpits too much as the amount I see the workmanship once she's closed up is approaching zero without good light and a magnifying glass!

Jibber and SS -- thanks!

Jgeratic -- good suggestion! I've studied other builds and it's not a detail which is often replicated, certainly not below 1:32. I'm considering laying a strip along the centreline as you say -- I don't stretch sprue, I never got the hang of it, so the question is, what thickness of rod, and what profile? The hinge line appears near-flush in some photos. Here's the famous Black 6 which I photographed in '06:

It's very fine, to be sure -- even .010" would create a raised line the equivalent of half an inch high, which seems too much. I might have some .005" though, which would be about right.

The plan for today is to get some masking in place, and add the missing stiffeners in the split flaps. It's already too hot at 9am to be worth thinking about painting. We have an airconditioner service call coming in a while, so we might get some of this heat under control soon!

Cheers, glad you like the progress, Mike/TB379

http://worldinminiature.blogspot.com/

  • Member since
    April 2013
Posted by SchattenSpartan on Thursday, February 6, 2014 2:43 PM

Mike: Great looking 109!

Jack: Thanks a bunch for that link!

Everyone: I just picked up the AM barrel at my LHS and I'll start working on my Tiger today. I'll post a few pics later tonight.

  • Member since
    April 2006
  • From: ON, Canada
Posted by jgeratic on Thursday, February 6, 2014 2:29 PM

Mike - great work on the 109F, and really nice job on that IP.  I may be jumping the gun here, but the engine cowl is hinged down the center.  This is easily replicated by attaching a thin stretched sprue, brush over some liquid cement, and then serrate it with your hobby knife to give that hinged look.

--------------------------------------

To the Tamiya Tiger builders, should check out this site if you want a more accurate model of a 501st vehicle:

http://tiger1.info/models/products/TAM35227

regards,

Jack

  • Member since
    January 2013
Posted by jibber on Thursday, February 6, 2014 2:19 PM

Thunder, nice work on the panel and cockpit. What tedious work its really coming together nicely.  

  • Member since
    November 2009
  • From: SW Virginia
Posted by Gamera on Thursday, February 6, 2014 9:45 AM

Don: Yeah, I've used aftermarket sets designed for a specific kit and fit seemed like it was designed for something entirely different before. These plus your modifications look perfect.

Wayne: Have you tried Super-Sculpty? Basically it's the same thing as clay but you bake it in the oven and it becomes rock hard. Not really as good as epoxy putty of course since you have to remove it from the model to bake instead of letting it cure in place. But it does the job if you can shape it, bake it, and then add it to the model.

Mike: Looks good! Bit of a shame that most of the cockpit work won't be seen though the tiny cockpit opening there though!

"I dream in fire but work in clay." -Arthur Machen


  • Member since
    April 2005
Posted by Thunderbolt379 on Thursday, February 6, 2014 7:08 AM

Hi guys, as promised here are WIP pics of the Bf 109.

First up, the Hasegawa kit has a few shortcomings, not many but a couple that need attention. The greatest drawback is the way the forward fuselage is engineered, it takes a lot of pushing and pulling, chocking, superglue and putty to get a near-decent profile around the engine, which is lamentable because from the firewall back the fit is remarkable. The cowl guns are a part that goes inside and the muzzles appear through apertures, but notoriously too far back so the shorter barrel is internal. Here's my solution -- lengthening the mounting stub:

Now both barrels emerge cleanly. Next, here's the instrument panel, airbrushed and drybrushed, and using Future for the glass:
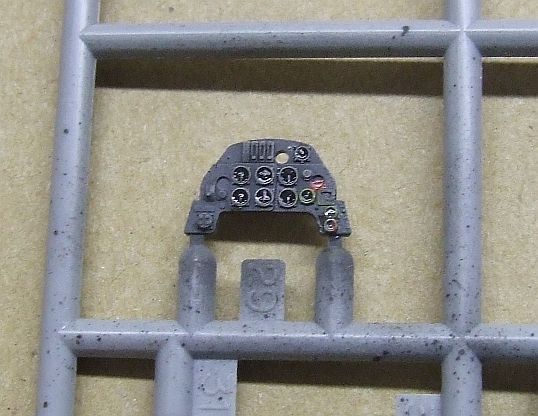
Here are the cockpit parts. The only detail I added in the cockpit was the yellow fuel line, made from .020" rod, bent to shape. The grey centre fitting on the pipe is not yet painted here:
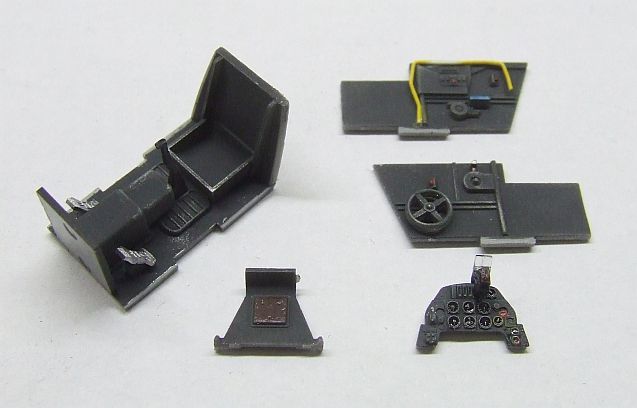
Next, cockpit assembly under way: 

Wing and fuselage subassemblies -- note the cockpit rear area smoothed and sprayed, as well as the copious filler on the cowling:
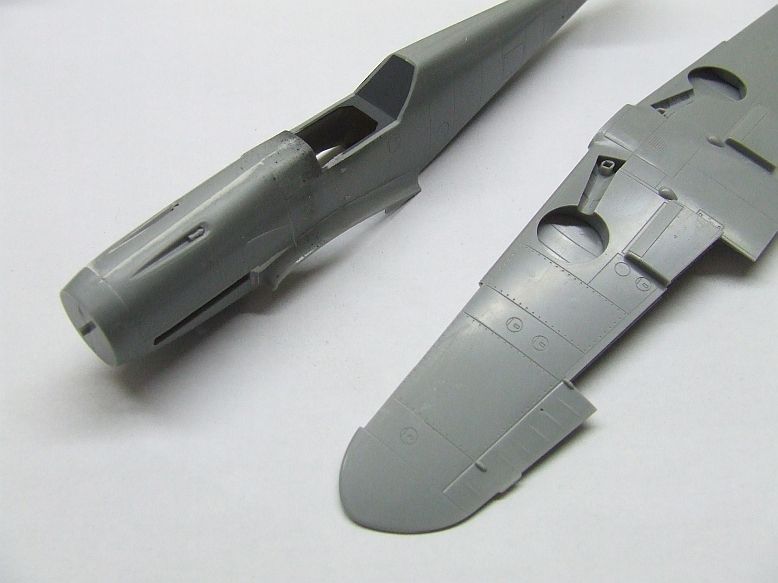
The cockpit goes in from the bottom, and when it's in the wing snaps in. Here I'm using tape to flex the wings into solid contact with the mounting areas:

And lastly, the canopy was attached using superglue in very small amounts:

The slats and outer flaps are on, the lower radiator scoop likewise. There are four tiny intakes around the cowl and some planes have them and some do not, even in what seems to be the same production batch of the same variant. Profile artwork of Shroer's plane shows them absent, reflected by the Aeromaster decal sheet artwork, so that's how I decided to do it.

One more superdetail I usually add is a couple of stiffening strips inside the split flaps, they're easy to add from plasticard. My plan for tomorrow is to get the canopy masks on, then step back and take stock of the project.

Today I also painted the jerry cans for the Pz. IV D, so that one is still in the works. The Plastruct hex rod can't be far away now, so I can get on with the superdetailing for that project soon.

 Cheers, Mike/TB379

http://worldinminiature.blogspot.com/

  • Member since
    October 2007
  • From: Louisville, KY
Posted by pordoi on Wednesday, February 5, 2014 7:23 PM

Gamera

Don: The Panzer III looks good, for pre-made sandbags they fit great!

Gamera:  the bags on the turret fit perfectly.  However, I had to cut off several sand bags from the resin part that fits on the main hull.  It was a bit tricky to fit this part over the lights and klaxen on the front fenders.  There was also a gap between the sand bags and the spaced armor plate.  Maybe it was my mistake, but it took some cutting, re-positioning and filling with epoxy putty to fit this part.  So it did take a little effort, but I think certainly worth the effort.  This part also had some spare track links included but they were tracks for earlier versions of the PzIII.  So I cut them out and will replace them with the appropriate tracks from either the kit indy links or from spare Friul links.

Wayne:  Give Milliput or Aves putty a try.  I think that you'll not use modeling clay again after that.

Don

  • Member since
    April 2006
  • From: Denver, Colorado
Posted by waynec on Wednesday, February 5, 2014 1:38 PM

pordoi

waynec

here are sand bags i made from modeling clay for my syrian T-62.

Nice.  How long does it take you to form one and set it to shape on the vehicle?  I ask because the epoxy putties like Aves gives you about 2 hours or more working time and in the end will harden rock hard, so no issue with dings, etc. later on.  Seems like you could make permanent bags by just changing the medium that you use.

I will have to sit down and try my hand at sculpting things like tarps, sand bags, etc.  Get a little practice.

Don

i use a cutting board so, once i figure out the size of the lump maybe a minute to shape them. maybe a bit longer with the sculptor syuff, will have to try it. i wonder if, after i shaped, fitted, removed and painted the modeling clay, a shot of dulcoat or futute would harden it up a bit?

Никто не Забыт    (No one is Forgotten)
Ничто не Забыто  (Nothing is Forgotten)


  • Member since
    November 2009
  • From: SW Virginia
Posted by Gamera on Wednesday, February 5, 2014 11:32 AM

Alan: The scout car looks great, love the chipping and scraped off paint. I've done windshields like that by figuring out where the blades would hit and then masking that off with tape, then spray the rest of the windshield and pull off the masks to show where the blades wiped all the gunk off.

Don: The Panzer III looks good, for pre-made sandbags they fit great!

Dan: That Tiger is going to look cool!

"I dream in fire but work in clay." -Arthur Machen


  • Member since
    December 2002
  • From: Bury St Edmunds, Suffolk, England
Posted by Bish on Wednesday, February 5, 2014 11:16 AM

SchattenSpartan


Bish: The AM barrel is already ordered at ma LHS and it should arrive tomorrow. As far a Tracks go, I'll just use that set of Friuls I have lying around here (I hope they are the right ones... ATL-25)

Ye, those are the Fruils I have for mine. Look forward to seeing what you do with it.

I am a Norfolk man and i glory in being so


On the bench: Airfix 1/72nd Harrier GR.3/Fujimi 1/72nd Ju 87D-3

  • Member since
    October 2007
  • From: Louisville, KY
Posted by pordoi on Wednesday, February 5, 2014 10:28 AM

waynec

here are sand bags i made from modeling clay for my syrian T-62.

Nice.  How long does it take you to form one and set it to shape on the vehicle?  I ask because the epoxy putties like Aves gives you about 2 hours or more working time and in the end will harden rock hard, so no issue with dings, etc. later on.  Seems like you could make permanent bags by just changing the medium that you use.

I will have to sit down and try my hand at sculpting things like tarps, sand bags, etc.  Get a little practice.

Don

  • Member since
    April 2006
  • From: Denver, Colorado
Posted by waynec on Wednesday, February 5, 2014 10:05 AM

pordoi

waynec

nice. how did you do the sandbags?

Wayne, I took the easy way out.  The sandbags are a resin kit made by Panzer Art for the PzIII.  My sculpting skills with Aves epoxy putty are not yet at the level that I can scratch build something like this. 

Don

a lot of good progress here. i fired up the airbrush in the bunker, though it is chilly down there, and got some paint on the truck and gun. tried engine gray with REAL DEAL dark rust overspray on the chassis this time and didn't like it so gave it a heavy wash with raw umber and i like that. i think raw umber mixed with dark gray is going to be my modern vehicle road grime color. should get second coat of sand and a lot of touch up today, maybe finish the 6ib ATgun. too cold to prime in he garage.

here are sand bags i made from modeling clay for my syrian T-62. will practice new ones with the tied top. nice think about modeling clay is it's easy to form and mold. texture iis stippled with toothbrush and painted ironically IDF khaki. bad tthing about clay is it never harden so any dings will "break through the paint" and show the clay color below.

Никто не Забыт    (No one is Forgotten)
Ничто не Забыто  (Nothing is Forgotten)


  • Member since
    January 2011
  • From: The Great North Woods, Maine
Posted by Chazzer on Wednesday, February 5, 2014 9:43 AM

Hey Guys, I am building an initial version of the Tiger I. I'm using the Tamiya kit. I am using Fruil tracks aftermarket tools, smoke grenade launchers, tool clamps and clasps, tow wire,  a boatload of scratch building and the list goes on! I think I am going to recreate tank 121 or 142. Research is the key! I am happy there is another builder of this great tank. I am always eager to learn.Cool!

Chazzer

ChazzerBlack Eye

  • Member since
    October 2007
  • From: Louisville, KY
Posted by pordoi on Wednesday, February 5, 2014 9:40 AM

waynec

nice. how did you do the sandbags?

Wayne, I took the easy way out.  The sandbags are a resin kit made by Panzer Art for the PzIII.  My sculpting skills with Aves epoxy putty are not yet at the level that I can scratch build something like this. 

Alan:  Nice progress on the M3A1.  The seating arrangement reminds me of the old Philadelphia subway cars, where nobody looks directly into another passengers eyes Smile.  As for the engine, I'd plan to leave it open for now; you can always decide to close it up later if you're still undecided.

also looking forward to seeing the two Tamiya Tunisian Tigers (say that three times fast....) take shape.  Who is going to do the green one?  Wink

Don

  • Member since
    April 2013
Posted by SchattenSpartan on Wednesday, February 5, 2014 6:56 AM

Don: Looking really good there!

Alan: Your scout car is shaping up nicely. For the windshield I'd suggest masking off the area that the wiper goes over and then spraying a very(!) light, misting coat of sand paint on the windshield. That should make it look dusty except in the area you masked off before. Just make sure you don't overdo it or it'll look out of place.

Dan: I remember you building that beuty of a Tiger! Great work!

Jack: Your and Dan's Tigers actually inspired me to get Tamiya's Africa version.

Bish: The AM barrel is already ordered at ma LHS and it should arrive tomorrow. As far a Tracks go, I'll just use that set of Friuls I have lying around here (I hope they are the right ones... ATL-25)

  • Member since
    April 2005
Posted by Thunderbolt379 on Wednesday, February 5, 2014 5:57 AM

Hi guys, I'm cruising with the 109, she should be assembled in a day or two. I painted the cockpit today, I'm letting some details harden off overnight and will get subassembly shots before putting the cockpit together and installing it tomorrow.

Here's the kit:

I'm adding just a few details as I go, and I have some Eduard masks in stock that should fit this one. I'm looking forward to the North Africa paintwork!

Build pics tomorrow,

Cheers, Mike

http://worldinminiature.blogspot.com/

  • Member since
    April 2006
  • From: ON, Canada
Posted by jgeratic on Wednesday, February 5, 2014 1:42 AM

udel09 - I like how your Matilda is coming along.  Antenna colour; I would just go with the basic vehicle shade.  I've never come across anything stating it was painted differently, only  one forum member elswhwere stated he thought he had read somewhere they could be pale blue, but nothing more came up of this discussion.

Gamera - lovely work on the Crusader

Don - the pre-shading and overall colour looking really nice there

Alan - great work on the scout car, and great weathering job on that steering wheel, looks convincing to me.

Tiger Tanks - even after a trio of these Tunisian Heavies were built for the Steel Cats GB, I look forward to seeing more here.  Other than the rare boxing by CyberHobby, Tamiya has the only full kit in town.  Even if you take an early Dragon kit, you will still have to do some kit bashing.  If I remember correctly, only  Tamiya has the proper fiefel dust bins.

regards,

Jack

  • Member since
    December 2002
  • From: Bury St Edmunds, Suffolk, England
Posted by Bish on Wednesday, February 5, 2014 12:35 AM

Pordoi, Alan, really nice work there.

Alan, that's what GB's are all about and one of the things that make them so addictive.

I am a Norfolk man and i glory in being so


On the bench: Airfix 1/72nd Harrier GR.3/Fujimi 1/72nd Ju 87D-3

  • Member since
    December 2002
  • From: Bury St Edmunds, Suffolk, England
Posted by Bish on Wednesday, February 5, 2014 12:33 AM

DantheMan85

Thanks Schatten Spartan, yes our two Tamiya Tiger's will be interesting.

The (3 in 1) 1.Kompanie s.Pz.Abt.501 DAK Tunisia 1942/43, cyber hobby.com  #6286

If there another one, for North Africa?

Right, a good old Cyber Hobby kit. Yes, those are hard to get hold off once they are gone, and very expensive even when released. The two Dragon labelled kits are both version of the very first Tiger's to go into service in the Leningrad area.

But that Tamiya kit is more than adequate, it will build up very nicely, but yes, I would go for an AM barrel and tracks.

I am a Norfolk man and i glory in being so


On the bench: Airfix 1/72nd Harrier GR.3/Fujimi 1/72nd Ju 87D-3

  • Member since
    April 2006
  • From: Denver, Colorado
Posted by waynec on Tuesday, February 4, 2014 10:19 PM

nice. how did you do the sandbags?

Никто не Забыт    (No one is Forgotten)
Ничто не Забыто  (Nothing is Forgotten)


  • Member since
    October 2010
  • From: Rockford, IL
Posted by AlanF on Tuesday, February 4, 2014 10:03 PM

Wow, I've been very impressed with all the builds and progress. There is so much to learn from everyone here.  Thanks for taking the time to help and to share.  It's very much appreciated.

Here's my M3A1 Scout update.

The interior is almost done. the first paint coat was Olive Drab followed by Desert Yellow. It's been weathered with an initial wash of Flory Dark Dirt, followed by Flory Sand, followed by dry brushing a 50:50 mix of Tamiya Flat Aluminum / Neutral Gray. This was done over a matt surface because I wanted it to stick to everything.  The only exception was the glossy steering wheel.

I tried scratch building a few hoses for the engine based on some Walk-Arounds of the M3A1.  I didn't put in any wiring since it probably won't be seen.  I'm not sure about the result so I'm still undecided as to whether to open 1 side of the hood or to close it off.

Thanks for the help in deciding how to paint the guns and tools.  They still need to be weathered but Tamiya Gun Metal looks good.

A few more odds and ends and then back to the airbrush to paint my version of desert camo based on a few B&Ws and a color drawing.

Now for a question.  Can anyone point me in a direction on how to model a sandy, dusty windshield with the windshield wiper pattern in it?  Thanks.

Alan

  • Member since
    April 2005
Posted by Thunderbolt379 on Tuesday, February 4, 2014 9:21 PM

Pordoi -- awesome! This model looks fantastic, the preshade comes through very well -- I'm thinking I should go the preshade route on my IV D as well.

Some progress on the Bf 109 F-4/Trop -- first pics coming later. Subassemblies are coming together, cockpit is in the detail painting stage. The way Hasegawa engineered the forward fuselage has been the only problem so far, to get maximum variants from the basic fuselage the cowling was made as separate parts and they really don't like to line u naturally, so there's been some "persuading" with glue, filler and styrene fillets.

I'm leaning toward doing a scheme featured on the Aeromaster decals included with this edition of the kit, but there's only basic information provided, a little extra research is indicated...

M/TB379

http://worldinminiature.blogspot.com/

  • Member since
    October 2007
  • From: Louisville, KY
Posted by pordoi on Tuesday, February 4, 2014 9:00 PM

A quick update:  first coat applied to the PzIIIJ.  Will let this cure for a day or so before spraying the camo.

....and painted the tracks with Vallejo burnt umber followed by dry brushing with Model Master steel metallic;

While this is curing, will do some detail work on the tools and storage boxes.

Don

  • Member since
    February 2006
  • From: Cincinnati Ohio
Posted by DantheMan85 on Tuesday, February 4, 2014 6:47 PM

Very nice Tiger armor86.

Yes I am looking into after market items for my Tiger.  You've given me some good ideas.  Smile

On my Work Bench: Tamiya Ford GT 1/24

Up Coming: ?


  • Member since
    May 2011
  • From: Illinois
Posted by armor86 on Tuesday, February 4, 2014 6:07 PM

Hey Dan, just build the same Tamiya kit last year for Steel Cats GB - I would suggest AM barrel and track for it. Also use the Voyager Model Photo Etch set. Vehicle No. 132. Enclosed photo. 

Dragon has several different Initial Production Tiger I - I have the 3 in 1 sPzAbt 502 Leningrad 1943 - 6252.  The DAK Tunisia Tiger I - Cyber Hobby #6286 is extremely hard to find - last look is listed on e-Bay for $400. 


Dan

  • Member since
    February 2006
  • From: Cincinnati Ohio
Posted by DantheMan85 on Tuesday, February 4, 2014 4:41 PM

Thanks Schatten Spartan, yes our two Tamiya Tiger's will be interesting.

The (3 in 1) 1.Kompanie s.Pz.Abt.501 DAK Tunisia 1942/43, cyber hobby.com  #6286

If there another one, for North Africa?

On my Work Bench: Tamiya Ford GT 1/24

Up Coming: ?


  • Member since
    December 2002
  • From: Bury St Edmunds, Suffolk, England
Posted by Bish on Tuesday, February 4, 2014 4:31 PM

Which Dragon kit do you mean. They have done a couple of Initial versions, I have 6252 as well as the Tamiya kit you have. Both nice looking kits, there's just less need for AM with the Dragon kits if your that way inclined.

I am a Norfolk man and i glory in being so


On the bench: Airfix 1/72nd Harrier GR.3/Fujimi 1/72nd Ju 87D-3

  • Member since
    April 2013
Posted by SchattenSpartan on Tuesday, February 4, 2014 4:19 PM

That's a very nice choice of kit, Dan! I'll build the exact same kit for this GB as well, so this will be interesting!

  • Member since
    February 2006
  • From: Cincinnati Ohio
Posted by DantheMan85 on Tuesday, February 4, 2014 4:16 PM

Thanks Bish & jibber.  I see that Dragon has also made a Initial Production kit, but it was a limited edition run.  The photo-etched parts, and the metal barrel look really nice.

On my Work Bench: Tamiya Ford GT 1/24

Up Coming: ?


JOIN OUR COMMUNITY!

Our community is FREE to join. To participate you must either login or register for an account.

SEARCH FORUMS
FREE NEWSLETTER
By signing up you may also receive reader surveys and occasional special offers. We do not sell, rent or trade our email lists. View our Privacy Policy.