Marc: Sorry to hear about the challenges from Wingnuts, but it looks like you have overcome them with grace. That's a great looking build so far.
RR: I love that scheme! The painting and weathering look first rate. Very convincing!
Rob: Wow! Your Roland is turning out to be a real show piece! I love the wood graining effect you have achieved (colored pencils, yes?), and the paint job is lovely. I am also amazed at how you can produce this nice work at a relatively quick pace (at least versus me). The engine and Spandaus look quite nice as well. Great tip regarding the rib tapes.
Mike: I am sure the time away from your Tripe will be well spent.
Steve & Dale: Looking forward to seeing your progress.
John: Very sorry to hear about your mishap, but the pictures look great! I hope the repair goes/went smoothly for you.
As for my build, I have been plodding along at my slow pace. Here is where I am now:


The pictures of the top and (particularly) the bottom are overly green due to poor color balance by me. The reflection from the flash also obscures much of the grunge on the underside of the fuselage.
All of the "fabric" surfaces received a coat of Alclad Matte to take down the gloss finish and blend the weathering into the surface. I finished the various leather grommets using Tamiya Red Brow, and added the oil leaks along the bottom of the airframe using a combination of MIG pigments (Russian Earth and Black Smoke), and thinned AK Interactive Fuel Stains enamel paint applied with a brush. I removed the masking from the metal work, and assembled the front end of the aircraft. I also added the trigger cable from the back of the control stick to the Spandau machine gun using EZ Line (it is currently attached below the cowling where the butt end of the gun will be.)

I have made a small start on the rigging process by drilling and adding eyelets made from fine wire to the undercarriage, and running monofilament elevator wires from the bottom of the control stick to the small opening where they re-enter the fuselage:

I ran a small piece of medium weight wire through the hole that I had pre-drilled through the control horn, and looped the control line over it. Additionally, I finished off the wing warping control lines that have been sticking out of the fuselage by attaching them to 1/48 scale Gaspatch turnbuckles. I closed the loops off using polyimide tubing to represent the wrappings.
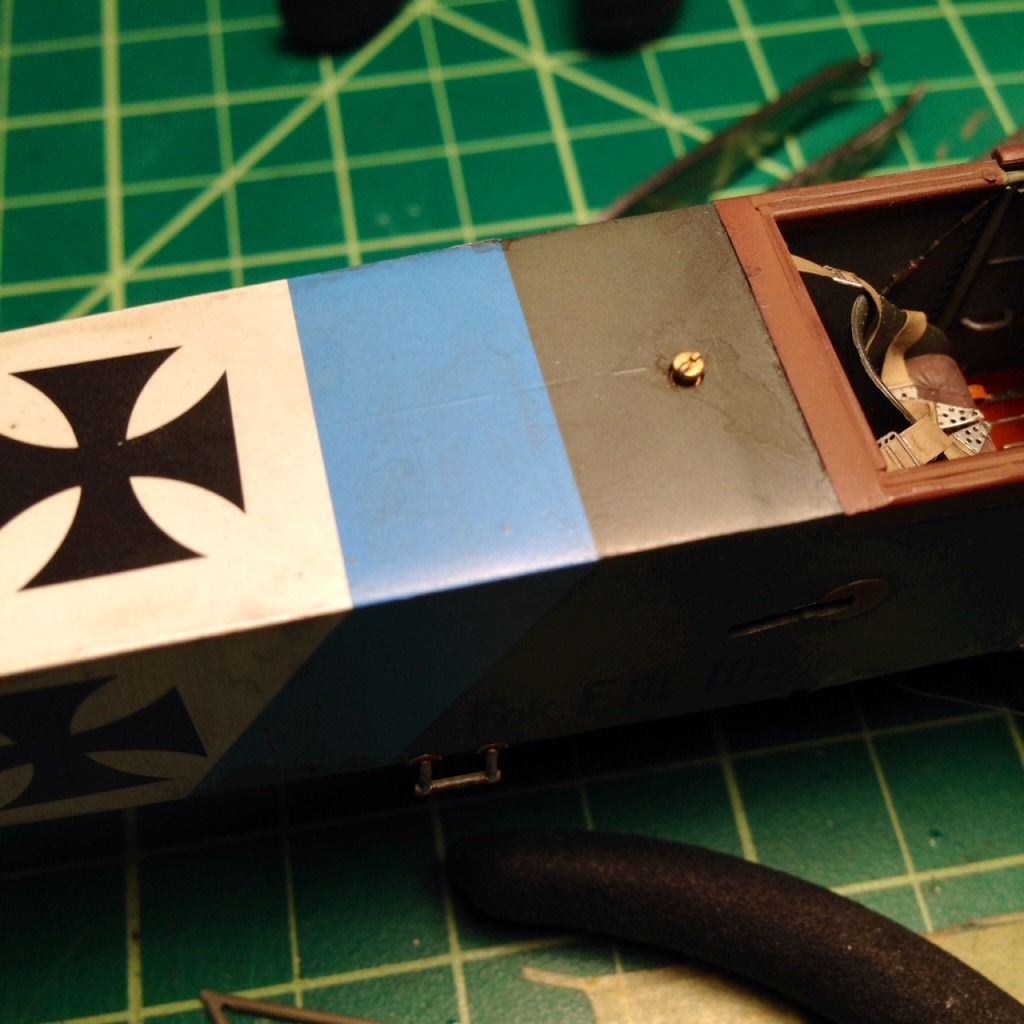
On a less positive note, the top seam where the fuselage halves meet seems to have reappeared at some point over the weekend:

I noticed it after dry fitting one of the wings. The fit is exceptionally tight, and I think in working the wing back and forth to insert and remove it, I must have put excessive pressure on the fuselage which unsettled the filler. It has a bit bummed out, and I am debating stripping the top down to repair it. I'd likely have to paint the blue band around the entire fuselage as I doubt I could match the color (not to mention that the white and black could be off as well), and I'd have a tough time getting the gray-green to match the sides given the oil washes etc. I would also have to either mask and paint or replicate the Iron Cross decal. I need to decide if I can live with the seam line before I continue on to rigging, because that would be a point of no return. Bummer.
That's all I've got to share at the moment. Comments, questions and advice are welcome.
Keep up the good work all!
Blue