SEARCH FINESCALE.COM

Enter keywords or a search phrase below:

50th Anniversary Vietnam War Group Build

78991 views
896 replies
1 rating 2 rating 3 rating 4 rating 5 rating
  • Member since
    November 2008
  • From: Central Florida
Posted by plasticjunkie on Wednesday, November 5, 2014 2:07 PM

Pawel - Thanks.

Bish - Yes I like QB sets are great. I also picked up a couple of sets for my P-38's.

 GIFMaker.org_jy_Ayj_O


Too many models to build, not enough time in a lifetime!!

  • Member since
    January 2011
  • From: Commonwealth of Virginia
Posted by Tal Afar Dave on Wednesday, November 5, 2014 7:08 PM

stikpusher

The suspension and tracks are better on the Italeri kit, except for perhaps the road wheels. The Italeri link and length tracks have better detail. Tamiya has sharper & better detail in the interior. The rest of the exterior is a toss up with both needing fine tuning. Both need the pioneer tools, Jerry cans and Ma Deuce replaced, mesh grills added to the engine deck, etc. And nobody's 113 kit comes with enough stowage!!! I know you understand what I speak of...

Thanks Stick; I was wondering about that.....and you know when you pack up your 'war wagon' you gotta take everything with you!!  I think I have a couple of the old Tamiya tracks, plus their newer ODS version, and the Vietnam era APC by Academy.....Always one of my favorite rides......"Death Before Dismount!!"

TAD

2022 New Year's Resolution:  Enter 1 group build and COMPLETE a build this year!!  Why Photobucket did you rob me of my one Group Build Badge???  Must be part of the strong anti-Monogram cartel!!!

 ]

  • Member since
    April 2010
Posted by Theuns on Wednesday, November 5, 2014 10:07 PM

Oh darn! the other kit decals are VC-7 red tails.......

On the same subject, the decals for my Thud are #60-0521 of 457'th TFS that says AFRES on the tail and the other is #62-4364  of the 354th FS .354th TFW

Any of these elegible for this GB??

Theuns

(EDIT) ok I the the 354th was there, but were the AFRES only "stateside"?

  • Member since
    July 2004
  • From: Sonora Desert
Posted by stikpusher on Wednesday, November 5, 2014 10:40 PM

What are the tailcodes on the 354th Thud?


F is for FIRE, That burns down the whole town!

U is for URANIUM... BOMBS!

N is for NO SURVIVORS...

       - Plankton

LSM


  • Member since
    April 2010
Posted by Theuns on Thursday, November 6, 2014 6:23 AM

354th has only "USAF and # 62-4364" on the base of te fin,no codes.

The 457th has a white "TH with AF and # 60-0521" on the fin aswell as AFRES on the reat fuse.

Theuns

  • Member since
    July 2004
  • From: Sonora Desert
Posted by stikpusher on Friday, November 7, 2014 1:23 PM

OK, the 354th scheme sounds like the early camo days so most likely it is in theater. Tail codes started showing up in late 66 early 67. The 457th is a stateside Thud. I dont know of any AF Reserve fighters serving in theater.


F is for FIRE, That burns down the whole town!

U is for URANIUM... BOMBS!

N is for NO SURVIVORS...

       - Plankton

LSM


  • Member since
    May 2009
  • From: Poland
Posted by Pawel on Friday, November 7, 2014 2:58 PM

Hello everybody!

Wanted to post an update on my scooter.

First, I started working on the front wheel and its strut. The kit has 'em molded as one piece - most 1:72 Skyhawk kits do, the exception is the Fujimi kit. In my kit I wanted to refine the front wheel, so what I did was I went through my spares box and I found some crappy looking wheels laying in the box for like 20 years - but not for nothing! After making one wheel from two halves and adding a rim made of fine copper wire ring the wheel I fabricated looks quite all right - let's look at the photos:

Now I'm going to add a black wash and paint the tire dark grey.

But I also painted the rest of the model gray, with preshading, added the slats and red intake edges - and now my model looks like follows:

How do you like it?

Thanks for reading and have a nice day

Paweł

All comments and critique welcomed. Thanks for your honest opinions!

www.vietnam.net.pl

  • Member since
    November 2008
  • From: Central Florida
Posted by plasticjunkie on Friday, November 7, 2014 4:35 PM

Exellent scratch work Pawel. Those are the details that elevate the build quality. The paint and shading look very good too.

 GIFMaker.org_jy_Ayj_O


Too many models to build, not enough time in a lifetime!!

  • Member since
    July 2004
  • From: Sonora Desert
Posted by stikpusher on Friday, November 7, 2014 4:39 PM

Looking real good there Pavel! Very nice bit of work on the nosewheel! And the overall painting is looking mighty fine as well. You guys who can do that level of work in 1/72 amaze me.


F is for FIRE, That burns down the whole town!

U is for URANIUM... BOMBS!

N is for NO SURVIVORS...

       - Plankton

LSM


  • Member since
    July 2004
  • From: Sonora Desert
Posted by stikpusher on Friday, November 7, 2014 7:45 PM

Some minor progress for me on my 113 today. I added the laterals (steering levers) to the drivers compartment floorboard, a piece of strip styrene to correct a gap at the front of the drivers compartment, and replaced the kit's .50 with one from an Academy Machine Gun set. That little beauty is a small kit of its' own.


F is for FIRE, That burns down the whole town!

U is for URANIUM... BOMBS!

N is for NO SURVIVORS...

       - Plankton

LSM


  • Member since
    February 2014
  • From: Michigan
Posted by silentbob33 on Saturday, November 8, 2014 2:43 PM

Looking great Pawel! 

I was able to get most of the major construction finished.  A little bit of filler here and there, but the fit wasn't too bad overall.  I stuck a large fishing weight in the nose to make sure it wasn't a tailsitter.  I also noticed after I got the fuselage together, that there was a bit missing on the vertical stabilizer just above the rudder.  A few pieces of styrene later (with just a bit of putty for the gaps) I was back in business. 

On my bench: Academy 1/35 UH-60L Black Hawk

  • Member since
    March 2010
  • From: MN
Posted by Nathan T on Saturday, November 8, 2014 2:50 PM

Very nice Gull gray paint work Pawel!

Bob- the Phantom looks pretty sweet. Nice repair on the tail. Whats your loadout gonna be?


  • Member since
    February 2014
  • From: Michigan
Posted by silentbob33 on Saturday, November 8, 2014 3:05 PM

Thanks Nathan.  Since I'm a bit limited in what I can do right now, I'll probably go with the loadout with the kit, 4 AIM-7 Sparrows and 4 AIM-9 Sidewinders.

On my bench: Academy 1/35 UH-60L Black Hawk

  • Member since
    January 2014
  • From: Toronto
Posted by Rob S. on Saturday, November 8, 2014 5:56 PM

Looks great Bob...got me some references for my Phantom, Big Smile

______________________________________________________________________________


On the Bench: Nothing on the go ATM

  • Member since
    October 2004
  • From: Northern Virginia
Posted by ygmodeler4 on Saturday, November 8, 2014 9:42 PM

Pawel, nice wheel and I'll echo what everybody else is saying, great looking paint!

Bob, nice fix on the tail, it'll look like it was there all along once you cover it up  with paint

-Josiah

  • Member since
    April 2010
Posted by Theuns on Sunday, November 9, 2014 9:11 AM

latest..

T

  • Member since
    July 2004
  • From: Sonora Desert
Posted by stikpusher on Sunday, November 9, 2014 10:32 AM

Starting to look like an F-105! ;) Did the instructions tell you to paint the wheel wells white? From photo's I have seen, I am pretty sure the wheel wells should be either aluminum lacquer or some sort of interior green. White came into use for USAF wheel wells later on.


F is for FIRE, That burns down the whole town!

U is for URANIUM... BOMBS!

N is for NO SURVIVORS...

       - Plankton

LSM


  • Member since
    April 2010
Posted by Theuns on Sunday, November 9, 2014 10:52 AM

Indeed they say white on this serial# and green on the one that has the large tail codes.

I suppose I can try do primer green although the nose wheel bay might be tricky to spary being "closed up" now.

Stick, I don't recall if you already told me, Did VC-7 (A-4e)fly in SEA?

Theuns

  • Member since
    July 2004
  • From: Sonora Desert
Posted by stikpusher on Sunday, November 9, 2014 11:41 AM

Sounds like they reversed the wheel well color orders... although I would still be a bit sceptical on having white in any F-105 wheel wells, it is possible that surviving F-105s were repainted into white post Vietnam at overhauls later in their service careers.

I will have a look about VC-7 and get back to you on that.


F is for FIRE, That burns down the whole town!

U is for URANIUM... BOMBS!

N is for NO SURVIVORS...

       - Plankton

LSM


  • Member since
    July 2004
  • From: Sonora Desert
Posted by stikpusher on Sunday, November 9, 2014 12:10 PM

I just looked up VC-7. They were stationed at Miramar NAS for their existance and did not deploy to SEA. But they did help train up squadrons that were deploying in theater (their job was to train them in air to air combat and gunnery), so under the rules of this GB, it would be acceptable. Aside from drop tanks, the only other ornance seen is towed aerial "dart" targets like those in the Hasegawa weapons sets.

I was looking over my Thud reference as well. The 354th had a long career in SEA first being TDY at Takhli in 1965, and later from 1965 thrun 1970 being PCSd to Korat.


F is for FIRE, That burns down the whole town!

U is for URANIUM... BOMBS!

N is for NO SURVIVORS...

       - Plankton

LSM


  • Member since
    March 2010
  • From: MN
Posted by Nathan T on Sunday, November 9, 2014 12:26 PM

Nice Thud Theuns! Can't wait to start seeing Camo being thrown on! Maybe try brush painting the wheel wells Interior green? ...that's if you feel like changing it. Gear legs themselves would be silver while in Vietnam though correct?

Decals for my F-100 came the other day. I'll post some box and sprue shots up soon!


  • Member since
    May 2009
  • From: Poland
Posted by Pawel on Sunday, November 9, 2014 4:28 PM

Hello everybody!

Thanks a lot for your kind words, glad you like my paint job. I thought a machine working as hard as this one needs a little shading to show wear. And I just HAD to modify that nose wheel. Now I'm working on the remainder of the landing gear. Adding some detail, too!

Bob - the Phantom is a real classic! Nice save with the tail!

Theuns - I like your F-105 a lot, too! Those long-time-used machines can really give you a headache when researching them. Take the frog (H-46) for example - most of the research give you the data of more recent machines, what was there during Vietnam War - nobody knows, or at least posts it on the internet.

Good luck with your builds and have a nice day!

Paweł

All comments and critique welcomed. Thanks for your honest opinions!

www.vietnam.net.pl

  • Member since
    January 2014
  • From: Toronto
Posted by Rob S. on Sunday, November 9, 2014 8:29 PM

Looking like your usual high caliber work Theuns!! Looking great. My Trumpy 105 called out white for the wheel well being white as well.

______________________________________________________________________________


On the Bench: Nothing on the go ATM

  • Member since
    January 2014
  • From: Toronto
Posted by Rob S. on Sunday, November 9, 2014 8:41 PM

I finally have some work to show of my 1/72 Hasegawa F-4B. I have the pit done with some beautiful Eduard painted PE. My first ever cockpit detail set and I'm not gonna lie, I'm hooked!! The detail is incredible. The IPs are mostly two part so there's depth in the guages (you can see the white underneath). Just wicked. Also, installed some crisp True Details resin seats.

Here's that epic Eduard set:

That tiny white spot on the right side set against the black is a guage face. I painted a dot of silver, then, glued that black clear piece down first to show the silver through:

You can just see the gauge face on the right side. The left side is installed.

There's about 10 PE pieces stacked up to build up both IPs. No decal can do this!! Really turned out better than I thought:

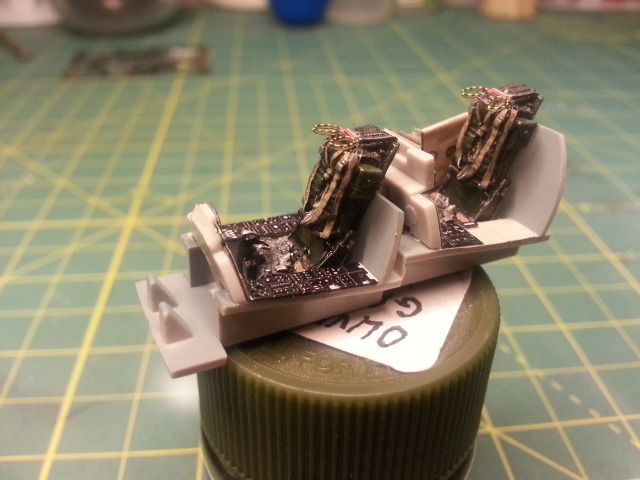
Resin seats, IP's installed:

Those PE painted ejection handles really pop:

The deep gauges really stand out:

The resin seats are quite 'busy':

Gonna mount the rest of the PE inside the sides of the fuselage halves tomorrow. Thanks for lookin'!!

______________________________________________________________________________


On the Bench: Nothing on the go ATM

  • Member since
    April 2010
Posted by Theuns on Sunday, November 9, 2014 10:29 PM

Dang that is one good looking office there Rob! Pe does make a huge difference :-)

As for the Thud, I will "green up" the wells......ca n't get away with a wrong model on this forum LOL!

What would the correct green be??

Standard interior green like on WW2 planes or the more "intence" green like zink chromate?

Stik, if I have enough time I will hopefully get time to do the scooter aswell, will let you know.

Theuns

  • Member since
    March 2010
  • From: MN
Posted by Nathan T on Monday, November 10, 2014 12:12 AM

Yellowish/green Zinc chromate, like Republic used for interior paint on the P-47...my best guess anyway...


  • Member since
    February 2014
  • From: Michigan
Posted by silentbob33 on Monday, November 10, 2014 7:18 AM

That PE really makes that cockpit pop!  I don't think I'd be able to work with PE in 1/72, great job

On my bench: Academy 1/35 UH-60L Black Hawk

  • Member since
    July 2004
  • From: Sonora Desert
Posted by stikpusher on Monday, November 10, 2014 3:12 PM

For the wheel wells I would suggest interior green or green zinc chromate, not the yellow shade. But looking at Photos of F-105s there seems to be a lot of variety there. Not hard fast rules to color that I can find a pattern of.


F is for FIRE, That burns down the whole town!

U is for URANIUM... BOMBS!

N is for NO SURVIVORS...

       - Plankton

LSM


  • Member since
    February 2014
  • From: Michigan
Posted by silentbob33 on Monday, November 10, 2014 8:08 PM

I have a quick question as I'm getting ready to start putting paint on. Was the camo on SEA Phantoms a soft edge or hard edge? I ask because I usually hand paint canopies because I don't trust my masking skills that much, and at the moment I can't afford to spring for a set of canopy masks. If it's a soft edge, I may have to suck it up and mask the canopy so I can keep the soft edge of the camo on the frame.

On my bench: Academy 1/35 UH-60L Black Hawk

  • Member since
    January 2014
  • From: Toronto
Posted by Rob S. on Monday, November 10, 2014 8:43 PM

Bob, have you ever considered masking with Bare Metal Foil? It's been my go to masking material for years. Cost about 10 bucks for a sheet that lasts for years. There's actually a tip about it in this month's issue of FSM.

______________________________________________________________________________


On the Bench: Nothing on the go ATM

JOIN OUR COMMUNITY!

Our community is FREE to join. To participate you must either login or register for an account.

SEARCH FORUMS
FREE NEWSLETTER
By signing up you may also receive reader surveys and occasional special offers. We do not sell, rent or trade our email lists. View our Privacy Policy.