SEARCH FINESCALE.COM

Enter keywords or a search phrase below:

The 2015 /16 Red Hot and Rollin Automotive Group Build--Ended

121084 views
2225 replies
1 rating 2 rating 3 rating 4 rating 5 rating
  • Member since
    January 2015
Posted by taaron76 on Monday, February 16, 2015 10:15 PM

Welcome aboard, J. Hockey Jr.!

  • Member since
    January 2015
Posted by taaron76 on Monday, February 16, 2015 11:48 PM

Being that tomorrow is a snow day (Federal) in the D.C. area, I bought some stuff to keep my busy for the next few days.  Before I started on my next two builds, I wanted to build a proper photo booth.  I bought some Elmer's foam board while out at Michael's today and that was my "build' for the night.  lol I've been wanting to make one for a while since I'm really into the presentation and picture taking of the models when they are complete.  The plan is to build/buy some diorama and swap scenes in and out, that's why I made it as big as I did.  A few people were asking me about my photos, etc, so if you are interested in knowing how I built the photo booth, or any of my pic techniques, just let me know.  

I just have to mount the lights in after I pick them up from Home Depot tomorrow.

Sorry... I know its not build related.

Tim

Just to give you an idea off the size.  It's pretty big, but should tolerate a few different diorama scenes in there.

  • Member since
    March 2012
  • From: Corpus Christi, Tx
Posted by mustang1989 on Tuesday, February 17, 2015 6:29 AM

Hey Tim. Don't apologize for that as it's constructive in nature and I'm curious how you are going to set that up anyways. I have a backdrop made out of white poster board and three different angles of lighting. lol

Well folks I made some small progress in the way of the fuel cap and outside rearview mirrors this morning. I drilled out the bottom of the mirror bases in order to pin the mirrors into the body later. I had to use mirror "glasses" from both of the spare kits I've bought for this build due to a large sink hole in one mirror from each boxing. Rather than use my AB or spray some clear gloss on the mirror housings, I opted to use the self-leveling feature of Future floor polish. They both came out great using this stuff. I also managed to finish the fuel cap after two applications of black wash. I accidentally scraped off some of the black background in the center of the fuel cap the night before last while trying to bring out the "FUEL" lettering. I've got it fixed though. The progress pic:

and after cleaning up and tidying up the piece, I opted to replace the original grill and start over. Got a couple of "upgrades" to do here.


 Forum | Modelers Social Club Forum (proboards.com) 

  • Member since
    January 2015
Posted by taaron76 on Tuesday, February 17, 2015 6:53 AM

Nice update, Joe!  Progress is always progress, and then you get to work on it some more.  :)

There are 4 lights that will go in the booth.  The top has two surfaces at different angles to shoot light from the top, front and back.  Both sides will have lights as well to cover all the angles, I just have to go buy the lights today and mount them in place.  I will probably wire them with a dimmer switch, maybe, depending on what type of light I buy.  Total dollar amount is less that $50.00 by the time its completed.

Tim

  • Member since
    January 2015
Posted by taaron76 on Tuesday, February 17, 2015 4:00 PM

 Just a quick pic of the intended stance of the '71 Cuda with the wheels I will be using.

Tim

  • Member since
    March 2012
  • From: Corpus Christi, Tx
Posted by mustang1989 on Tuesday, February 17, 2015 4:10 PM

Schuuuwwweeet!!!!!


 Forum | Modelers Social Club Forum (proboards.com) 

  • Member since
    February 2015
  • From: Canada
Posted by Belugawrx on Tuesday, February 17, 2015 5:53 PM

 Bruce Coy

  • Member since
    January 2015
Posted by MOPAR - D on Tuesday, February 17, 2015 7:18 PM

J. Hockey Jr.  welcome to our GB looking forward to see you build your Mack. There's lots of truck pictures in the Internet if your interested at looking at them for details.

Joe nice work on the details.

Welcome Bruce looking forward to see your 911.

Tim those wheels will look sharp on the Cuda.

  • Member since
    January 2015
Posted by taaron76 on Tuesday, February 17, 2015 9:24 PM

I'm glad this kit was cheap... I hate that everything is molded into the chassis.  Oh well, the engine, interior and body will come out good.

Tim

  • Member since
    March 2012
  • From: Corpus Christi, Tx
Posted by mustang1989 on Wednesday, February 18, 2015 4:03 AM

Welcome aboard Bruce!!! I'll get you right on the roster man!!! Freekin' cool to have you here too!!Yes

Thank you sir DanBig Smile

Man I'm tellin' you there Tim, I used to think AMT , Jo-Han and Ertl were crap and Monogram was "up there" in terms of kit quality. These days I'm finding quite the reverse is true. I have the same molded detail on the chassis of this Challenger. Not cool.No


 Forum | Modelers Social Club Forum (proboards.com) 

  • Member since
    March 2012
  • From: Corpus Christi, Tx
Posted by mustang1989 on Wednesday, February 18, 2015 5:14 AM

Bruce: You're on the roster and set to go bud! And again...Welcome aboard! Yeah

I almost forgot to add this yesterday. I showed you what the outside rearview mirrors looked like finished but what I didn't show you was what I started with for both mirrors.

 Without further ado .....Tadaa


 Forum | Modelers Social Club Forum (proboards.com) 

  • Member since
    January 2015
Posted by MOPAR - D on Wednesday, February 18, 2015 6:11 AM

Joe it's always a good feeling when you can turn crap into what it should be and have it look right. Keep the details coming!

  • Member since
    January 2015
Posted by taaron76 on Wednesday, February 18, 2015 7:11 PM

I worked on the Cuda suspension today in order to get the stance correct.  Luckily, there was lots of room to work underneath those big wheel wells, so not much modifying was needed to lower to get the stance right.

On the front suspension, I cut both spindles off and drilled new holes above where the old ones were.  The new spindles/axles are mounted as shown through the frame in order to make it more durable.

CudaFS3-vi.jpg

CudaFS1-vi.jpg

I originally thought I was going to have to cut the springs off the rear axle and use lowering blocks, but I only had to cut the old axles off and drill in the new one so the Pegasus 19" wheels would fit.  Not much to do on the rear to get the stance I was looking for.

CudaRS1-vi.jpg

CudaRS2-vi.jpg

Here's how she will sit once completed.

CudaStance4-vi.jpg

CudaStance3-vi.jpg

CudaStance2-vi.jpg

  • Member since
    March 2012
  • From: Corpus Christi, Tx
Posted by mustang1989 on Wednesday, February 18, 2015 7:55 PM

Neato dude!!!!! This looks totally awesome!!!


 Forum | Modelers Social Club Forum (proboards.com) 

  • Member since
    January 2012
  • From: Hatfield
Posted by Misty on Thursday, February 19, 2015 11:02 AM

Love the lowered suspension.

  • Member since
    March 2012
  • From: Corpus Christi, Tx
Posted by mustang1989 on Thursday, February 19, 2015 11:09 AM

I ended up looking at the kit instructions for probably the first time since I started this whole project to make sure I haven't missed anything and found two decals that I haven't noticed until today. I broke out the decal set and microsol and went to work with the decal/ placard on the L/H inner fender and on the radiator core support. They add a little bit more detail in there.


 Forum | Modelers Social Club Forum (proboards.com) 

  • Member since
    January 2015
Posted by taaron76 on Thursday, February 19, 2015 8:04 PM

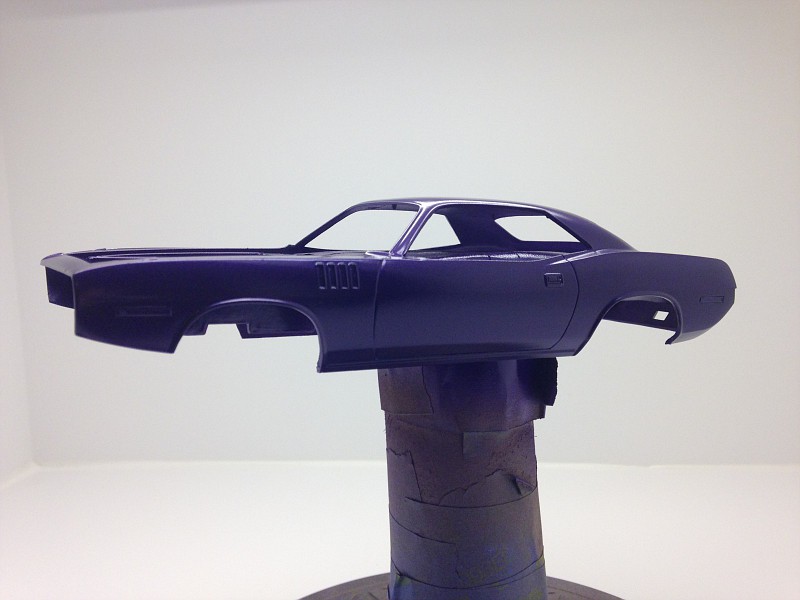
Today I got the Cuda primed and painted.  The base color is Testors Pearl Purple, followed up with 5 coats of Tamiya clear.  I was going to go with just plain old Tamiya purple, but figured I'd give it a little more life.  I also try to paint the body and body pieces right after I get the suspension modified and the wheels fit.  My logic is that since I put a few coats of base coat/clear coat (ok, 8 total coats), I like to bake it for 24 hours and then let it "gas" out for 10-14 days.  This will ensure that the surface is more than ready when I start wet sanding and buffing.

Tonight I tried something a little different from what I typically do with Tamiya paints.  After the first 2 clear coats, I started to thin eat clear coat with .5ml more of clear per coat.  So I started with 23ml of Tamiya clear, thinned with 8ml of denatured alcohol and ended up with 9.5-10ml of denatured alcohol total to let the last 2-3 coats of clear really lay down.  So far, it has seemed to work great!

I got to try out my new compressor that my wonderful wife bought me for Valentine's day.

New compressor:

Everything was painted @ 40 PSI:

3 Base coats of Testors Purple Pearl:
Clear coat 1:

Clear coat 2:

Clear coat 3:

Clear coat 4: 

Clear coat 5: As soon as I put it in the dehydrator, the paint will lay down a little more, so there shouldn't be any orange peel.  If there is, it won't be much, but this will wet sand and polish out nicely!

Clear coat 5 on the hood: 

  • Member since
    March 2012
  • From: Corpus Christi, Tx
Posted by mustang1989 on Thursday, February 19, 2015 8:40 PM

Oh my Gaaaaaaawwd!!!!  You sir...............aint from this here planet!!!!


 Forum | Modelers Social Club Forum (proboards.com) 

  • Member since
    January 2015
Posted by MOPAR - D on Thursday, February 19, 2015 9:04 PM

Taaron sweet. Thanks for sharing the step by step of your painting.

  • Member since
    January 2015
Posted by taaron76 on Thursday, February 19, 2015 9:14 PM

Joe - nah... Just a little crazy, here and there.

I know I'm not reinventing the wheel, but I like to detail my steps in case anyone need a tip or two.  Oh, and I always take lots of pics along the way. You can never have too many pics.

Tim

  • Member since
    September 2013
Posted by Raven728 on Thursday, February 19, 2015 9:43 PM

Looks awesome, Tim. Did you decant the Tamiya clear from a rattle can, or take it from a jar? I have a jar of X-22 but I'm not sure if it can be sprayed or not. 

- Steve

  • Member since
    January 2015
Posted by taaron76 on Thursday, February 19, 2015 9:53 PM

Steve - I never decant and only use acrylics.  Tamiya X-22 is the clear I use with my airbrush.  I have had amazing results with it when using denatured alcohol as the thinning agent.

Tim

  • Member since
    March 2011
Posted by ewheeler454 on Thursday, February 19, 2015 11:12 PM

Tim,

That's gonna look slick when it's done. Did you put in a dehydrator after each coat? And if so for how long?

L8TR,

Eric

  • Member since
    January 2015
Posted by taaron76 on Friday, February 20, 2015 4:59 AM

Eric - I put all the parts in the dehydrator for about 1 hour after the base coats are done.  This give the base coat time to harden up a little prior to shoot the clear.  I put the hood and front clip in the dehydrator between coats which is usually about 10-15 minutes between coats, but not the body until after all of the clear coats are down.  I don't want to mess with trying to take the body off of the painting base and something bad happen, so I wait until all the base coats are complete.  The way that I mix acrylics, they dry pretty fast, so you wouldn't necessarily have to put them in the dehydrator between coats.  Hope this helps...

Tim

  • Member since
    January 2015
Posted by MOPAR - D on Friday, February 20, 2015 1:23 PM

This mornings progress was working on the trim work on the cab. The bumper, head lights, side mirrors, side grab rails and the top lights. I was working on the turn singles and one of them just vanished off my work bench all on its own to wear ever so now I'm working on plan B.

Thanks for all the support and comments on my build.

  • Member since
    January 2012
  • From: Hatfield
Posted by Misty on Friday, February 20, 2015 6:26 PM

i have bits just disappear off my bench, but i suspect the cause of this purrs and sheds hair a lot and is called Misty (my lovely little puss cat :-) )

that rig is looking spesh!!

  • Member since
    January 2015
Posted by MOPAR - D on Friday, February 20, 2015 7:04 PM

I don't have any pets and it disappeared while I was setting there.

  • Member since
    January 2015
Posted by taaron76 on Friday, February 20, 2015 7:40 PM

Mopar-D That rig is looking sweet!Bow Down  I'm loving the progress pics!  Do you have any good '71 Hemi Cuda reference pics?  I'm looking for interior and undercarriage. Thanks!

BTW This is the color scheme of my '62 Impala, after the Cuda is complete..  I saw it on Bitchin' Rides on the Velocity channel and the lightbulb came on.

Tim

  • Member since
    January 2015
Posted by MOPAR - D on Friday, February 20, 2015 8:31 PM

Tim, check out this site they have 5 - 71 Cuda's with lots of pictures. They have one Hemi Cuda going for $1.9M. 

http://www.rkmotorscharlotte.com/sales/inventory/active#!/1971-Plymouth-Cuda/133269/188421

copy and paste in your web browser 

JOIN OUR COMMUNITY!

Our community is FREE to join. To participate you must either login or register for an account.

SEARCH FORUMS
FREE NEWSLETTER
By signing up you may also receive reader surveys and occasional special offers. We do not sell, rent or trade our email lists. View our Privacy Policy.