SEARCH FINESCALE.COM

Enter keywords or a search phrase below:

The 2015 /16 Red Hot and Rollin Automotive Group Build--Ended

121084 views
2225 replies
1 rating 2 rating 3 rating 4 rating 5 rating
  • Member since
    January 2015
Posted by MOPAR - D on Tuesday, November 22, 2016 12:14 PM

Joe glad to hear your wife is doing better I still keep you and her in my prayers. 

  • Member since
    March 2012
  • From: Corpus Christi, Tx
Posted by mustang1989 on Tuesday, November 22, 2016 1:01 PM

Thanks Dan.


 Forum | Modelers Social Club Forum (proboards.com) 

  • Member since
    January 2014
Posted by Seabe on Wednesday, November 23, 2016 9:14 PM

Mustang, there are much more important things in life - and one's wife is definitely one of them! I'm very glad there are continious improvement! 

Mopar, your plane Jane looks very smooth! Came out flawless!

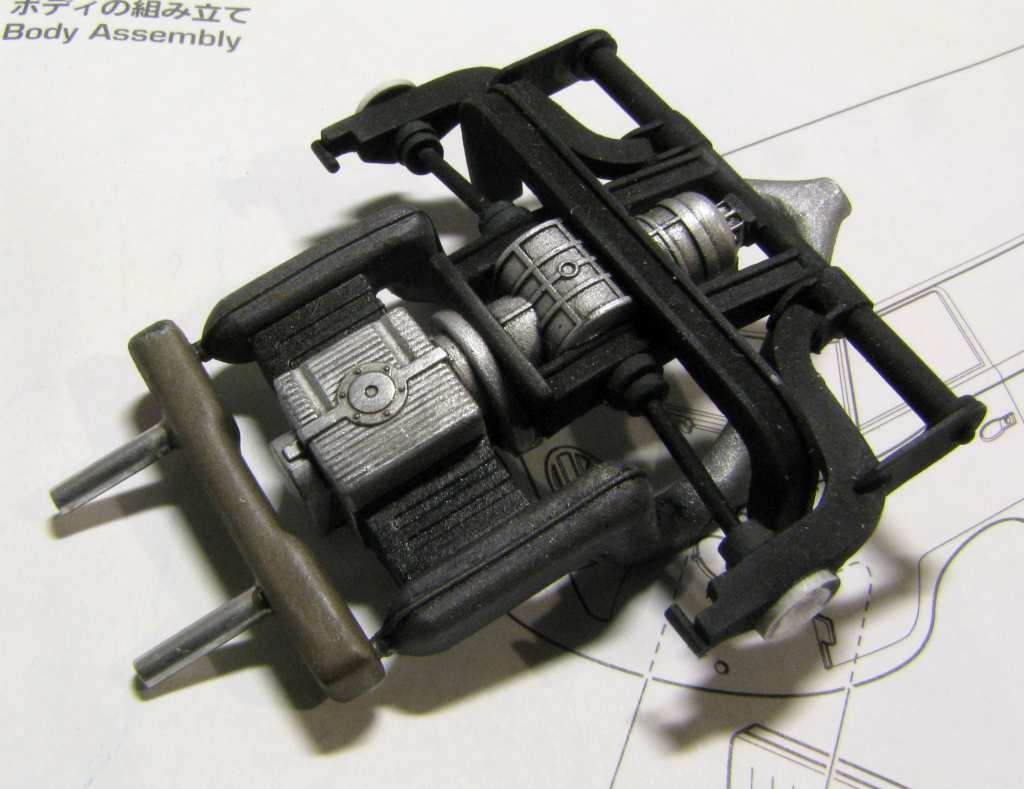
Small progress on the Honda engine (pic below). As everybody who has done one of these bikes know, more sub-assemblies have gone into this. Bit peeved with some joint points on certain items being really vague, but thusfar it has only come back to bite me once.

I've also gotten the front wing assembled. And the helmet hollowed a bit. So the three of them are basically ready for paint. Just planning to see if there's anything else that's sensible to paint in this round as well.

Engine progress:

  • Member since
    January 2015
Posted by MOPAR - D on Thursday, November 24, 2016 2:25 PM

Seabe thanks your engine is looking good. 

  • Member since
    January 2014
Posted by Seabe on Wednesday, November 30, 2016 11:16 AM

Okay, no major new happenings... I constructed the side winglets, added them to the "blue pool", along with mirrors. That, along with front and rear wing assemblies, went through the cycle of two white base layers and two (just now received the second!) blue layers. Oh wait - and the helmet! "Hollowed" that out a bit (I don't like full body figures, just helmets!) and Panis' helmet looked pretty darned much same shade of blue than the Ligier itself... bith being of French origin I would not have been surprised if he adapted his helmet colour somewaht to fit in with Ligier, though it was always blue. And heck, on this scale it would be hard to tell the difference if I can't mae much of a difference from photos!

Again, it seems minor. Trust me, along with the week I've had, this is a miracle... I think! Nothing on the Honda... but hopefully shortly, once all the preliminary painting on the Ligier has finished. 

Goodness, I just realised... Who else works on two such extreme scales?! 1:12 vs 1:43?! I know some aero guys have 144rd(?) and go up to a huge 32nd - of which I have to do...

  • Member since
    January 2015
Posted by MOPAR - D on Thursday, December 1, 2016 7:47 PM

Seabed I stay between 1/24 and 1/25 any others would be a challenge. 

Started anw build its a 62 Corvette gasser. I'm building it box stock but going to use finger nail polish that changes color in sun light. So inside it will be off white and red metallic in the sun. I'm still testing to find the best way to apply. I've started on the chassis and engine so far here's some progress pictures. 

%5BURL=http://s98.photobucket.com/user/Dan_Slade/media/62%20Corvette/IMG_3817.jpg.html%5D%5BIMG%5Dhttp://i98.photobucket.com/albums/l274/Dan_Slade/62%20Corvette/IMG_3817.jpg%5B/IMG%5D%5B/URL%5D  %5BURL=http://s98.photobucket.com/user/Dan_Slade/media/62%20Corvette/IMG_3818.jpg.html%5D%5BIMG%5Dhttp://i98.photobucket.com/albums/l274/Dan_Slade/62%20Corvette/IMG_3818.jpg%5B/IMG%5D%5B/URL%5D  %5BURL=http://s98.photobucket.com/user/Dan_Slade/media/62%20Corvette/IMG_3819.jpg.html%5D%5BIMG%5Dhttp://i98.photobucket.com/albums/l274/Dan_Slade/62%20Corvette/IMG_3819.jpg%5B/IMG%5D%5B/URL%5D

  • Member since
    January 2015
Posted by MOPAR - D on Friday, December 2, 2016 8:01 AM

Ok so some thing has changed and the methed I used to use to load pictures dose not work any more. Can some one help? Thanks. 

 %5BURL=http://s98.photobucket.com/user/Dan_Slade/media/62%20Corvette/IMG_3817.jpg.html%5D%5BIMG%5Dhttp://i98.photobucket.com/albums/l274/Dan_Slade/62%20Corvette/IMG_3817.jpg%5B/IMG%5D%5B/URL%5D

%5BURL=http://s98.photobucket.com/user/Dan_Slade/media/62%20Corvette/IMG_3818.jpg.html%5D%5BIMG%5Dhttp://i98.photobucket.com/albums/l274/Dan_Slade/62%20Corvette/IMG_3818.jpg%5B/IMG%5D%5B/URL%5D

%5BURL=http://s98.photobucket.com/user/Dan_Slade/media/62%20Corvette/IMG_3819.jpg.html%5D%5BIMG%5Dhttp://i98.photobucket.com/albums/l274/Dan_Slade/62%20Corvette/IMG_3819.jpg%5B/IMG%5D%5B/URL%5D

  • Member since
    March 2012
  • From: Corpus Christi, Tx
Posted by mustang1989 on Sunday, December 4, 2016 4:41 AM

Seabe: That motor is looking superb with all those details man!!! Wow!

 Dan....I dunno what's going on but I can't post those images on any of the forums I'm on but I'm still able to post mine. Can you repost hit the edit button and repost?

P.S. Great talking to you on Friday and hope everything is going well and that you and your family have a very Merry Christmas.


 Forum | Modelers Social Club Forum (proboards.com) 

  • Member since
    January 2015
Posted by MOPAR - D on Sunday, December 4, 2016 2:11 PM

Making some progress with the chassis and engine. Still testing my paint for the body but we are having rainy days and no sun so I can't see if the paint will change colors with clear coat on it. 


  • Member since
    May 2009
  • From: Poland
Posted by Pawel on Sunday, December 4, 2016 3:51 PM

Hello!

Seabe - that engine is lookin' good! Reminds me when I helped to sort out problems with the wiring of a Suzuki - GSX-R.

MOPAR-D - nice build! That engine sure looks radical with that roots compressor on it!

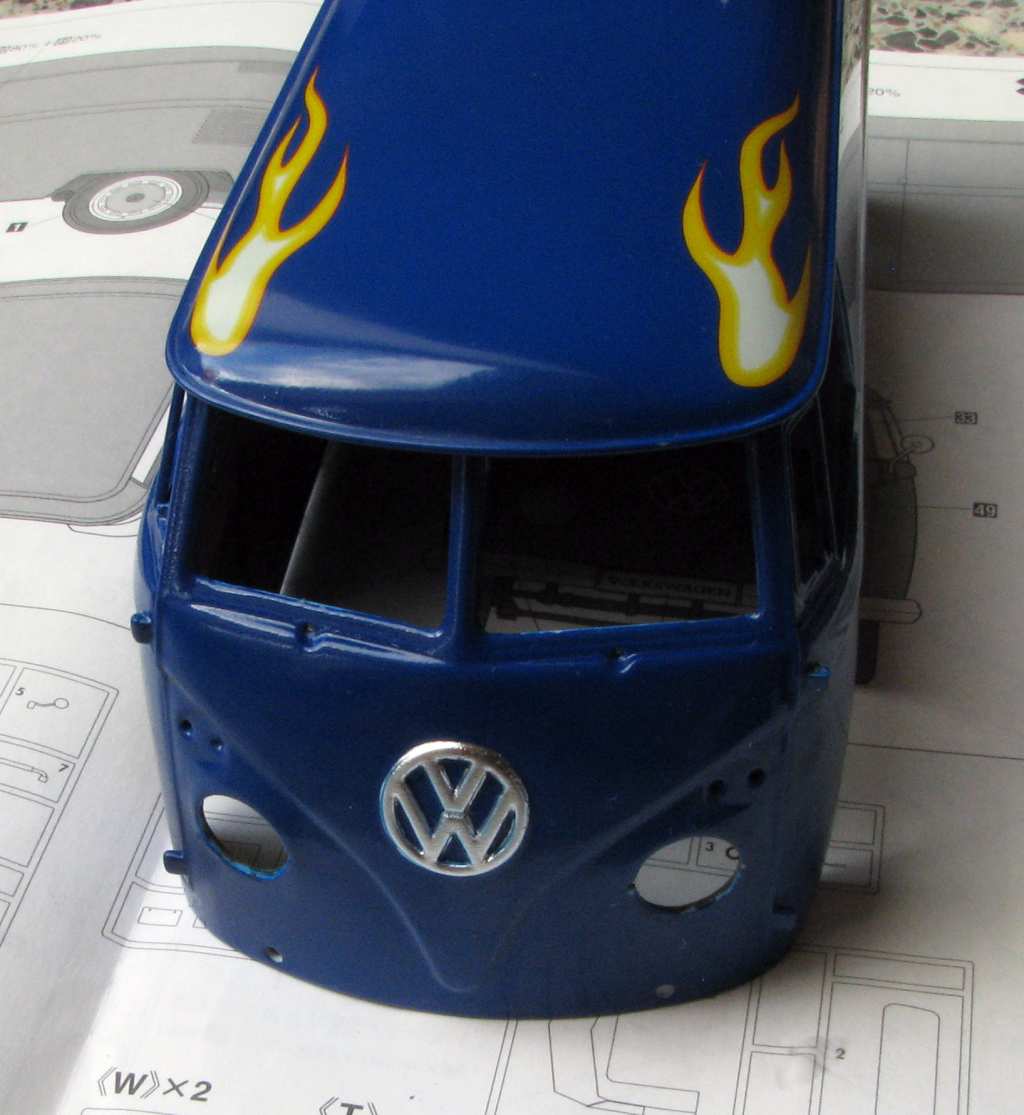
I have an update on my Bus.

As I expected, putting on the decals (it's Hasegawa!) didn't go as smooth as I wished. I still don't know how to work with them, I'll have to make it my next research project. What I know is you can use MicroSet on those decals, sparingly, but what you can't do is to soak 'em up in decal solution and wait for the solution to do it's work. This causes Hasegawa decals to wrinkle up badly and then they stay this way. Want to know how I found out?


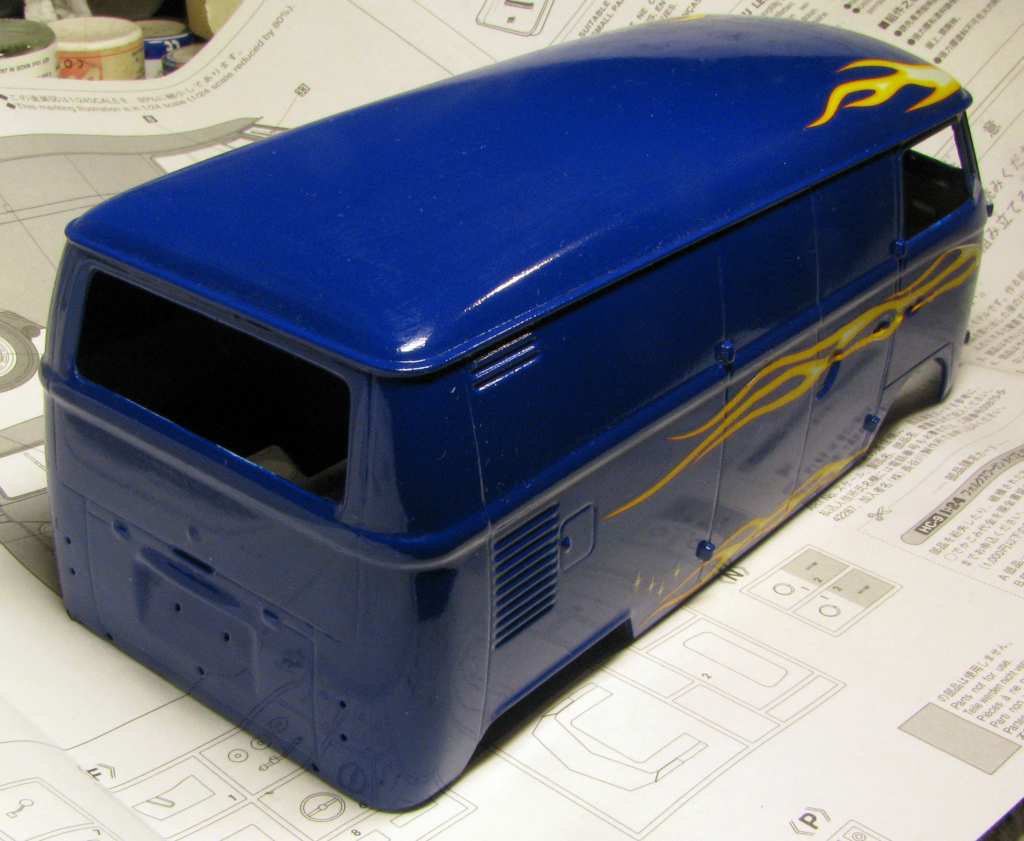
Here is my bus after putting the decals on:
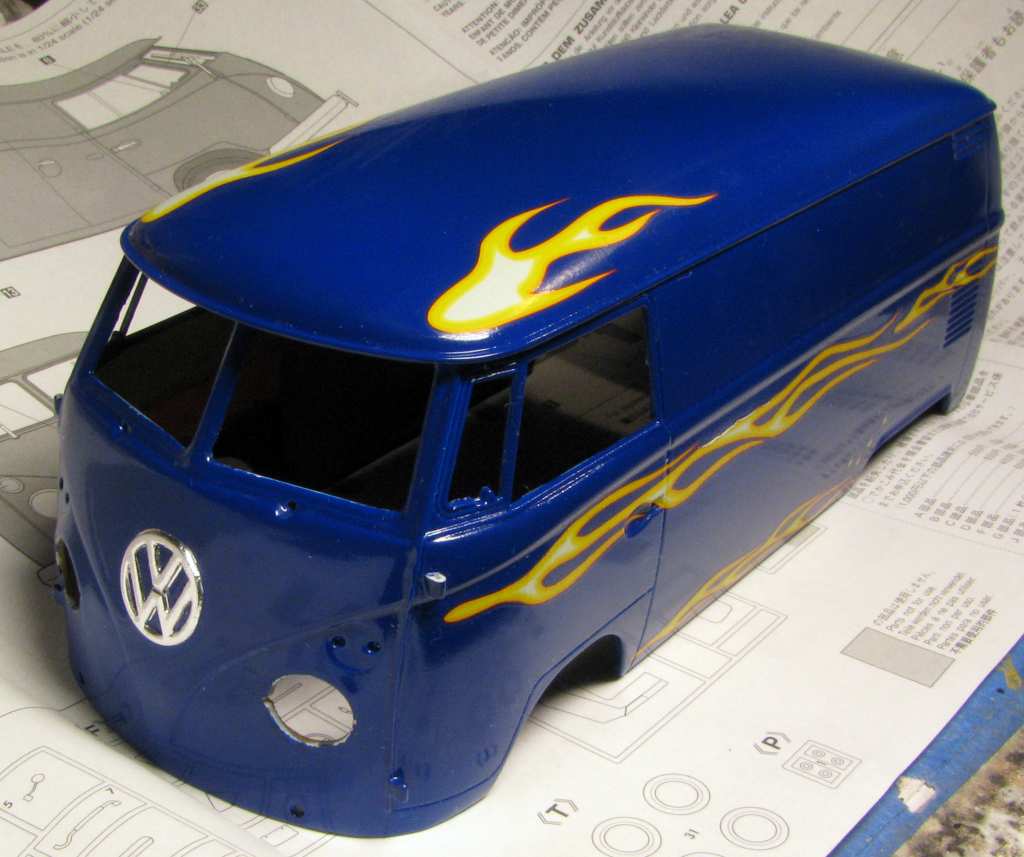
 

1:24 Hasegawa Volkswagen Type 2 by Pawel


1:24 Hasegawa Volkswagen Type 2 by Pawel


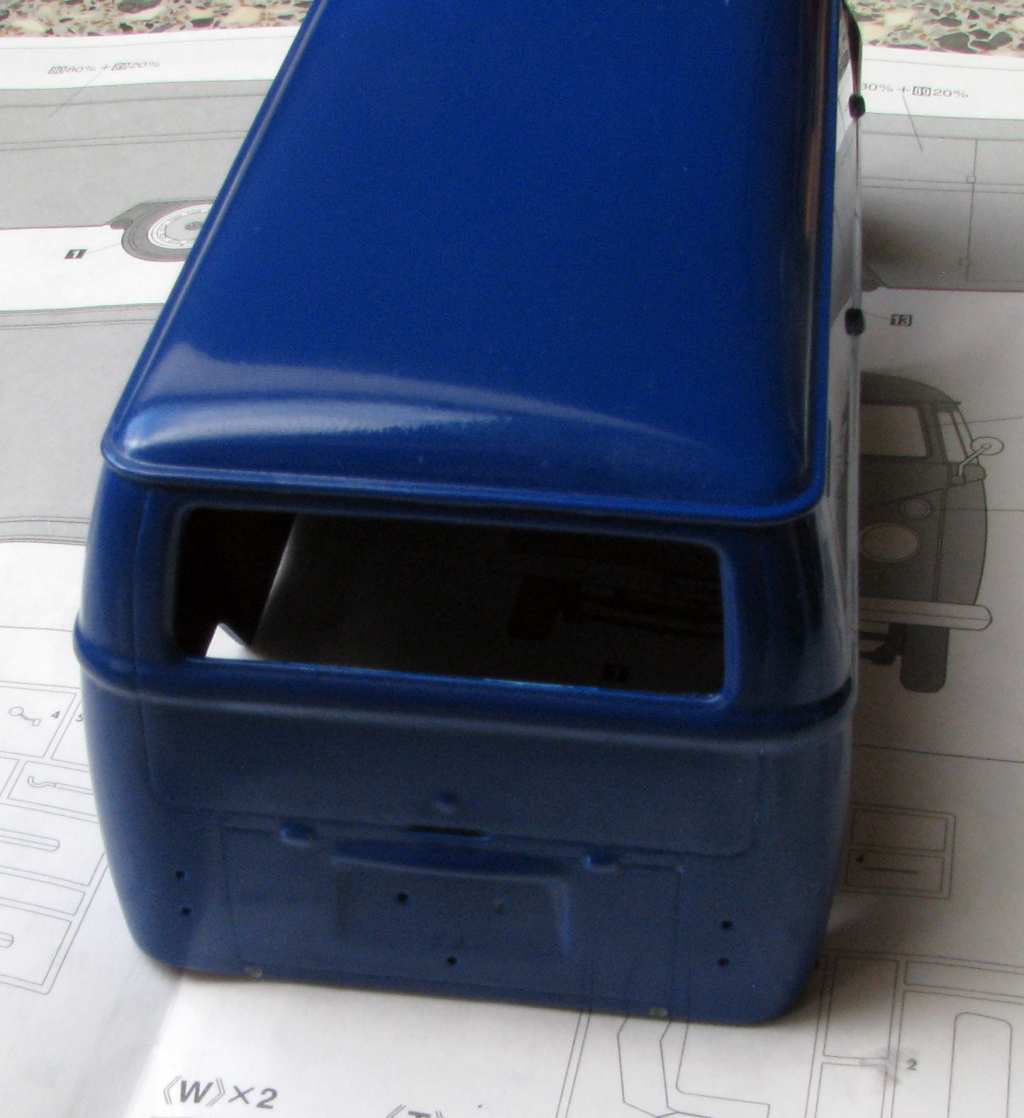
 Looks quite nice from far away, but once you look closer... Plus the rear flame wrinkled beyound any repair from MicroSet alone:
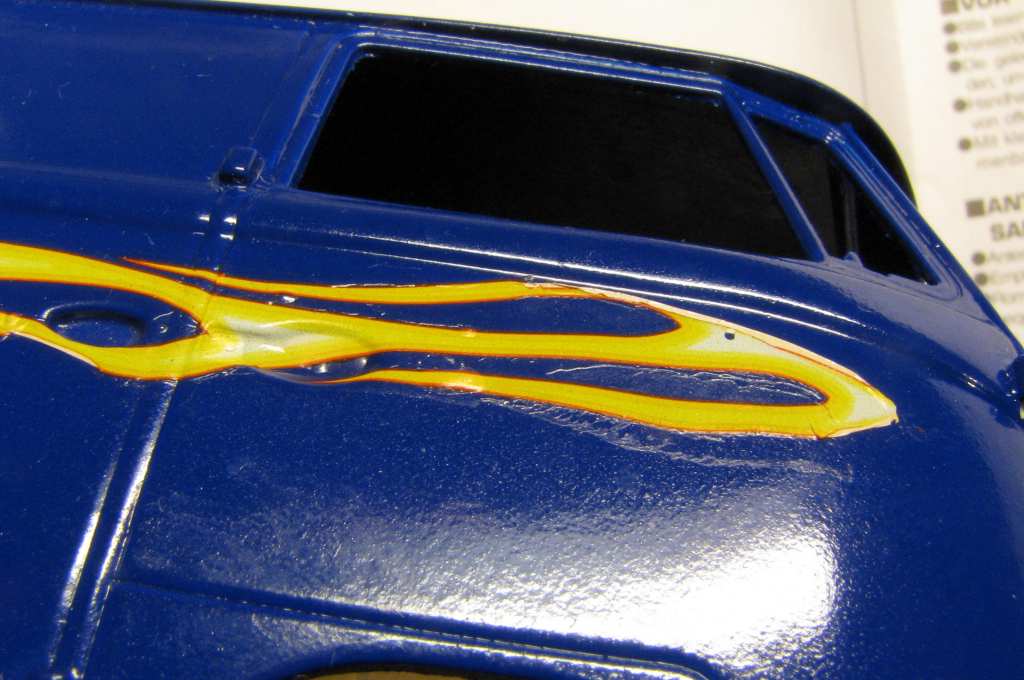
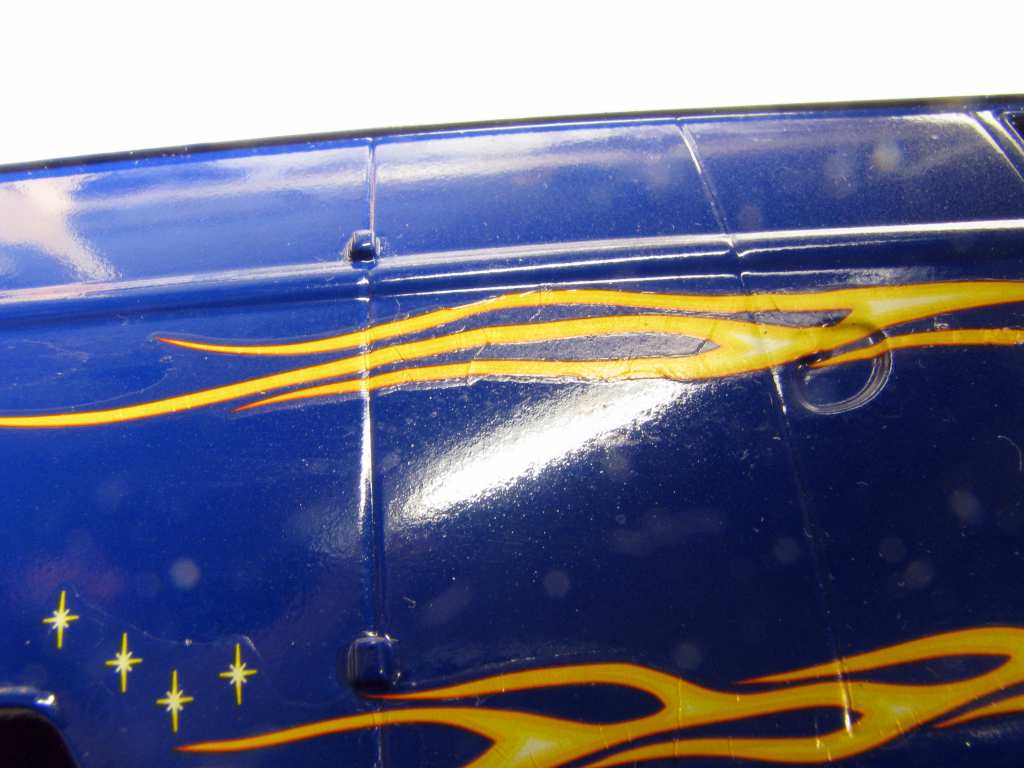
 

1:24 Hasegawa Volkswagen Type 2 by Pawel


1:24 Hasegawa Volkswagen Type 2 by Pawel


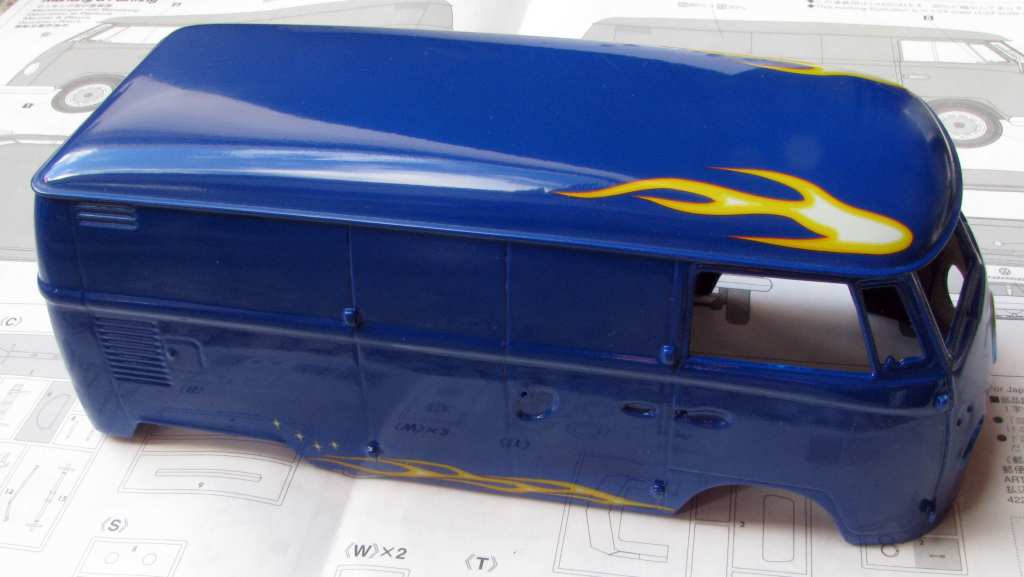
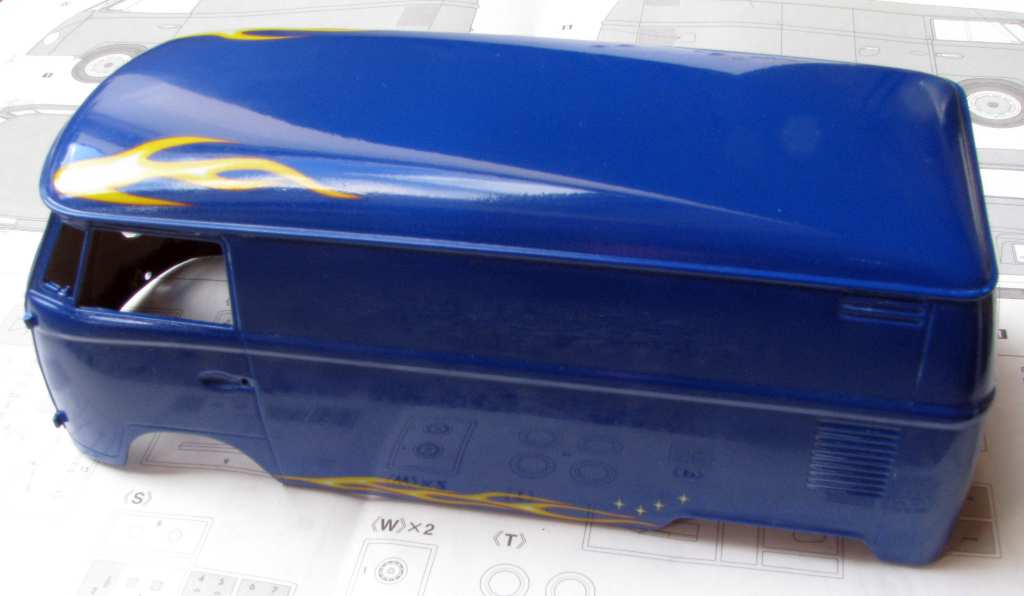
Here's when the time came for tough decisions. I decided to remove the "middle" flames and just keep the top and bottom ones, because they went on best. I figured less is more here. I soaked the decals to be removed with solvaset and took them down with an old toothbrush.


After that I put on about four layers of Gunze Top Coat Gloss from a spray bottle, with some sanding with 2500 grit sandpaper between the coats, trying to blend the somewhat thick decals in. Lots of drying time between the coats, too - this is why it took me so long to post the next update. After the last coat had a few days to dry I sanded the orange peel with 2500 grit sandpaper, let it dry one day more and then I polished the scratches out with "Tempo" polishing compound - it's a very nice compound made in Czech republic. Here are the results:
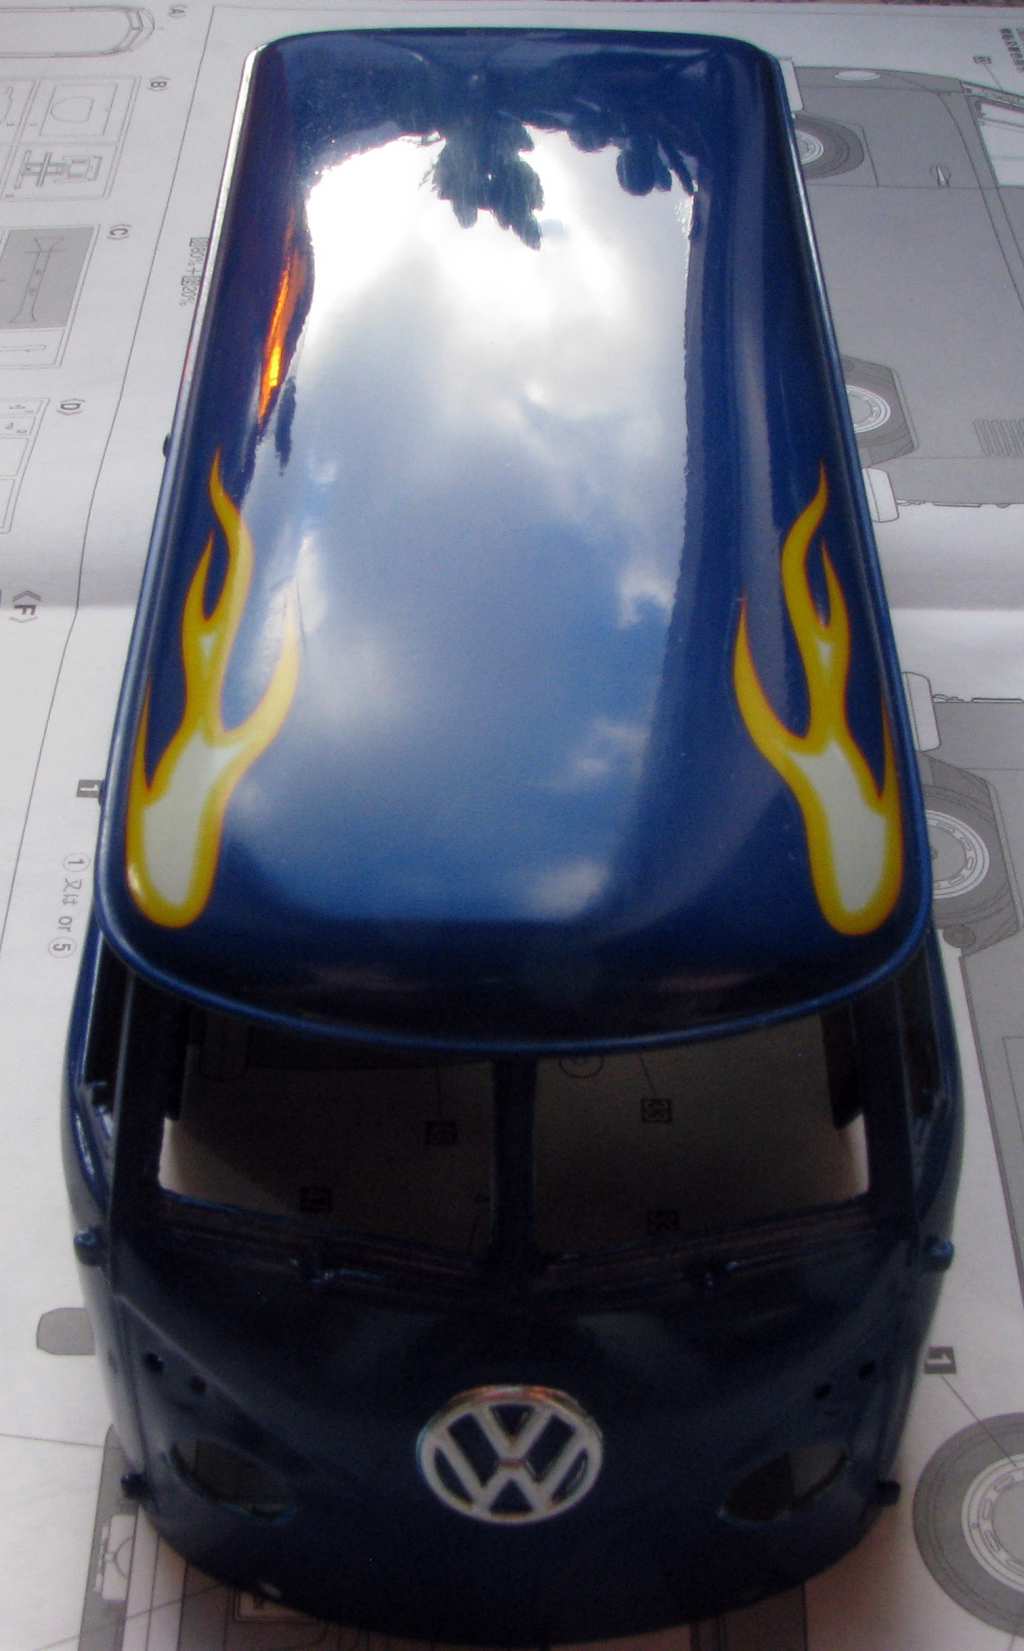
 

1:24 Hasegawa Volkswagen Type 2 by Pawel


Nice sky reflection, eh?


1:24 Hasegawa Volkswagen Type 2 by Pawel


1:24 Hasegawa Volkswagen Type 2 by Pawel


1:24 Hasegawa Volkswagen Type 2 by Pawel


1:24 Hasegawa Volkswagen Type 2 by Pawel

Now the paint (clear coat) was drying, I went on to do some outfitting.

Side mirrors - even though it is a Hasegawa kit, it was easier to scratchbuild new mirrors than to clean up (and rechrome!) the OOB mirrors. I made their posts out of wire and used my dremel to turn out the round parts. The mirrors themselves are BMF, and the chrome is a cheap spray paint:
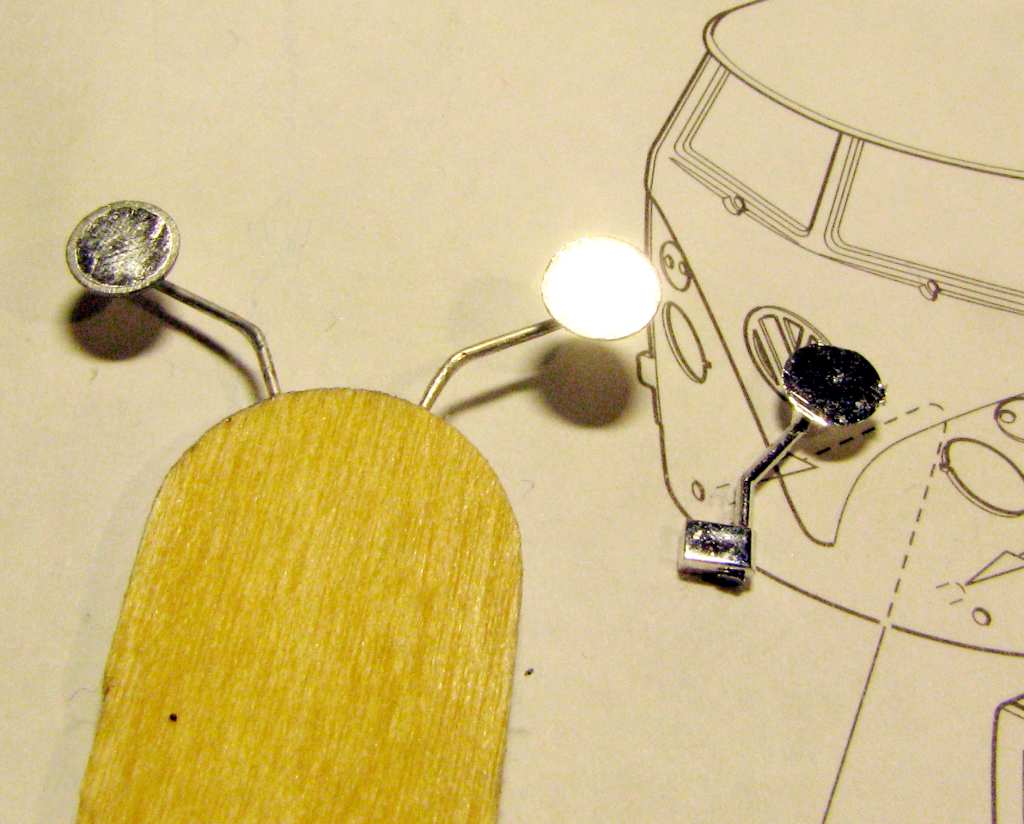
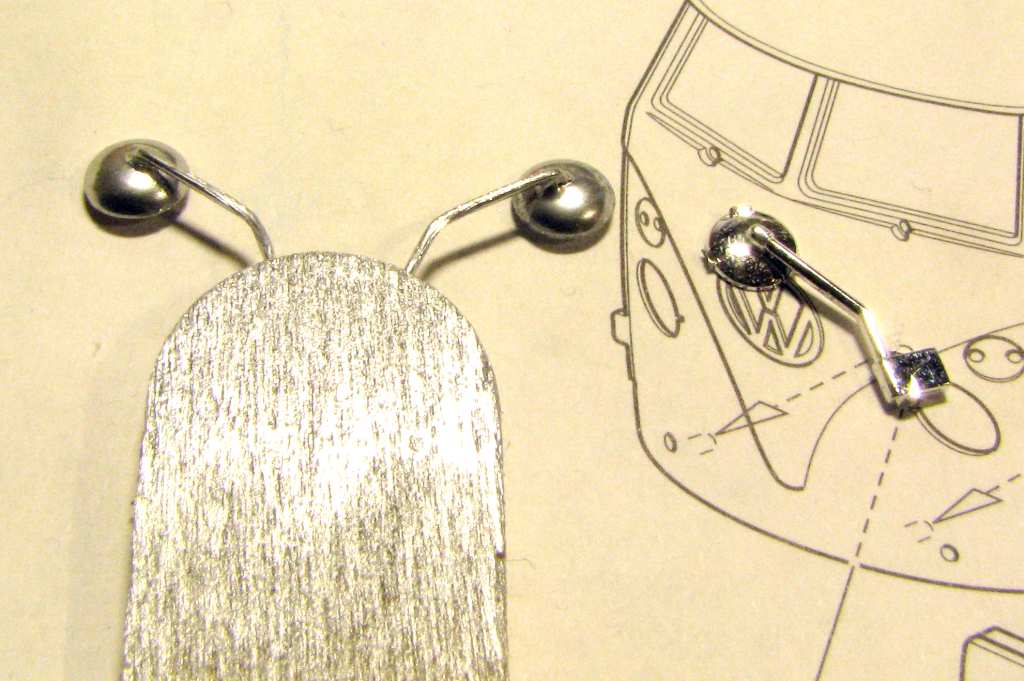
1:24 Hasegawa Volkswagen Type 2 by Pawel

1:24 Hasegawa Volkswagen Type 2 by Pawel

As you can see, the OOB mirror has a nasty sink mark, fairly large sprue attachment point and the worst - there is a hinge/mirror attachment point molded on. This little part should be body colour, not chrome. That's why I built the hinge out of 1,5mm styrene and painted it together with the body. It's pointed to in the picture below by the red arrow. On the same picture you can see the painted door window framing - that's Gunze Mr Metal Color chrome silver and Humbrol 33 black:
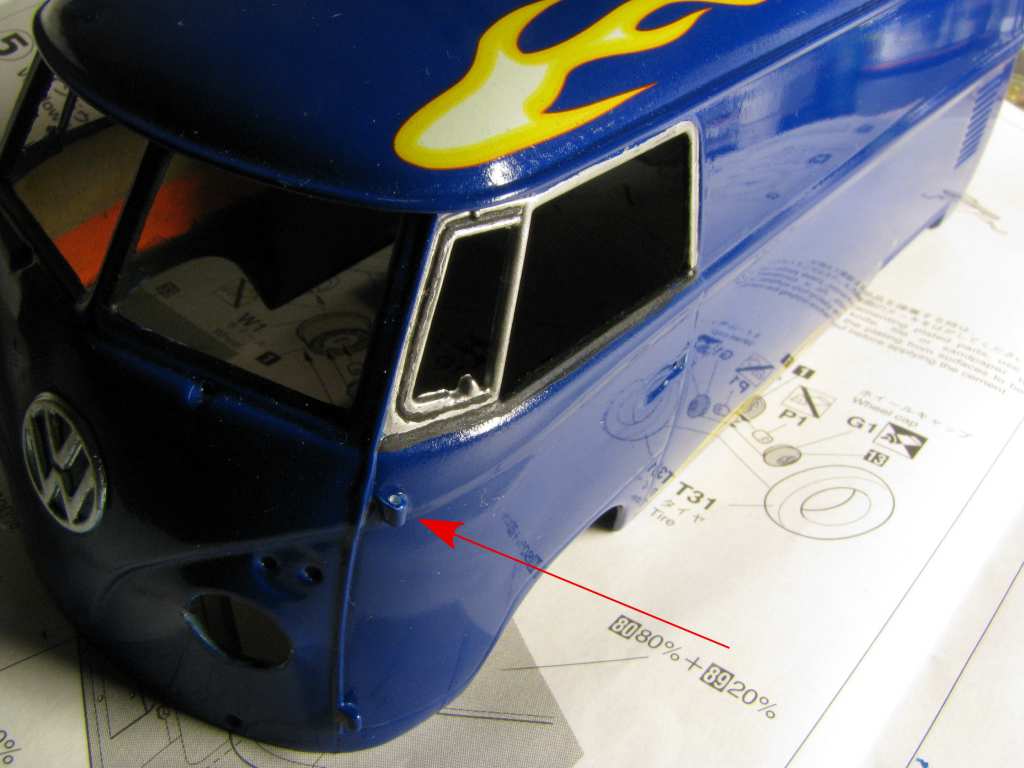
1:24 Hasegawa Volkswagen Type 2 by Pawel

I also finally made the exhaust, together with the final muffler. The muffler was painted with a mixture of Humbrol 53 Gun Metal and Humbrol 186 brown. The exhaust pipes are 2mm brass tubing painted with the same cheap spray:
1:24 Hasegawa Volkswagen Type 2 by Pawel

To mount it I had to modify the rear bumper. I didn't want to touch it because of the chrome, but I had to, anyway, because it had really nasty mold seams on its ends. It got the same cheap spray treatment the mirrors and the pipes got, but I think maybe I will have to redo it:

1:24 Hasegawa Volkswagen Type 2 by Pawel

And that's it for now - thanks a lot for reading and have a nice day

Paweł

All comments and critique welcomed. Thanks for your honest opinions!

www.vietnam.net.pl

  • Member since
    March 2012
  • From: Corpus Christi, Tx
Posted by mustang1989 on Tuesday, December 6, 2016 8:54 AM

Dan: Wow! That's cool seeing a Chevy built from you. Engine details look stellar as I'm sure the rest of the build is going to as well.

Pawel: Sorry to hear your luck with the decals. Been there and done that. Your paint is looking exceptional and polishing out verrrrrry nicely. As far as the bumper goes......Alclad is you friend. lol


 Forum | Modelers Social Club Forum (proboards.com) 

  • Member since
    January 2014
Posted by Seabe on Thursday, December 8, 2016 12:47 PM

Pawel - easy... don't take a close-up shot! Wink Those decals looks great from normal viewing distance, very cool. And the shine is suberb - anybody who looks past that, is just looking for something to nit-pick about! 

Engine is mounted on the Honda. Some minor fit issues, nothing that (I think at this stage...) couldn't be fixed. It will obviously become apparent a bit later on whether I fixed it correctly.

  • Member since
    January 2014
Posted by Seabe on Thursday, December 8, 2016 9:54 PM

Pipes are starting to get ready too! But not expecting much to happen on the building front this weekend. Running one of my big races tomorrow and expecting to be sleeping and recovering for the remainder of the weekend! A bout of gastro from Sat evening onwards did not help the prep much, going into it a bit shaky... 

Who was it that could not post pics? Mine I (still) do by clicking the insert image link and putting the "Direct" link in there. Method I followed since I've had issues previously.

Anyways - here's the pipes... (personally not worried about the sink holes on the box - inside and invisible)

  • Member since
    March 2012
  • From: Corpus Christi, Tx
Posted by mustang1989 on Thursday, December 8, 2016 9:57 PM

How'd you get that darker shade to simulate a worn in look on those exhaust pipes Seabe? Those look fabulous!!!


 Forum | Modelers Social Club Forum (proboards.com) 

  • Member since
    January 2014
Posted by Seabe on Friday, December 9, 2016 11:43 AM

I'll tell you... but then I'd have to shoot you! ;) 

Base layer - ironically very little can be seen of it! - of AS12 (Bare Metal Silver) felt right and matched pictures perfectly. Boxes were done in prescribed TS30, also looks right. 

Used Tamiya weathering set D. Long-time favourite. Sealed it with closest we have to Future, because it touches off. This did mess up the original look a little bit, but not too much. Weathering set is awesome for auto's, esp exhausts. It has a dark oily colour, gold and blue. Used a bit of all of them. Also used it to weather the Jag - obviously only the dark colour. And would have used it to a lesser degree in other builds. Even on 43rd I sometimes just touch the exhausts with this - colour selection depending on pics.

  • Member since
    January 2014
Posted by Seabe on Monday, December 12, 2016 10:53 AM

The pipes are in - and they are obviously also what made this bike rather different. Running high pipes in order to accommodate a low fuel cell...


Top view:

  • Member since
    January 2015
Posted by MOPAR - D on Monday, December 12, 2016 6:10 PM

Man that looks nice but I just have to say that it looks like that those pipes are going to be right under the seat or should I say "hot seat". 

  • Member since
    March 2012
  • From: Corpus Christi, Tx
Posted by mustang1989 on Tuesday, December 13, 2016 6:10 AM

Seabe: Thanks for that info. I'll be looking into that weathering set today.

Dan: Hot seat . .............lol


 Forum | Modelers Social Club Forum (proboards.com) 

  • Member since
    January 2015
Posted by taaron76 on Wednesday, December 14, 2016 12:54 PM

Joe -  Are you going to extend this build into 2017? I finally got back to the bench after not doing anything for 1 1/2 years, but I recently started one and would like to contribute.

1968 Shelby GT-500

Here is my latest update... stance and started cutting out the doors and trunk.  Lots left to do.

  • Member since
    March 2012
  • From: Corpus Christi, Tx
Posted by mustang1989 on Wednesday, December 14, 2016 1:31 PM

Well I'll be danged! If it aint ol' Tim!!! Man you betcha! I'll be in here with my forever in a day Volkswagon build along with a few others that are still building. Good to see you again BTW. Yes


 Forum | Modelers Social Club Forum (proboards.com) 

  • Member since
    March 2011
Posted by ewheeler454 on Friday, December 16, 2016 11:47 PM

Hidey Ho all,

Yep I'm still in the game. I've been working on one I promised a friend a year ago but have been procrastinating on. I hope to finish this one up tomorrow so I can get back to my other ones. Although I didn't add this one to the GB here's a few pics of it. It's a 53 Ford pickup. :)

L8TR,

Eric.

  • Member since
    March 2012
  • From: Corpus Christi, Tx
Posted by mustang1989 on Saturday, December 17, 2016 6:48 AM

Man that's some really nice work on that F-100 Eric. Can you elaboate on the bed metal stripping more? That looks great!!!Yes


 Forum | Modelers Social Club Forum (proboards.com) 

  • Member since
    March 2011
Posted by ewheeler454 on Saturday, December 17, 2016 11:08 PM

Thanks Joe.

It's a kit from Detail Master , DM-2900. It has real wood and photo-etch rails. After I cut it to fit, I coated it about 3 times with Johnson's floor wax until it had an even shine using a small sponge brush (lays down well with no streaks). Then I used double sided tape to hold it down and marked off where the rails needed to go, added another coat of floor wax and laid the rails directly in the wax. Once it was dry, I added another coat to seal them in. Here's a shot of the finished bed.

And here's the finished truck.

Thanks.

Eric


  • Member since
    January 2015
Posted by MOPAR - D on Monday, December 19, 2016 8:51 AM

Eric nice work on your Ford pick up your friend should be real pleased to have this very detailed model. That wood floor is awesom. 

  • Member since
    May 2009
  • From: Poland
Posted by Pawel on Monday, December 19, 2016 5:21 PM

Hello!

Seabe - thanks for your kind words! That bike chassis is lookin' good!

Tim - good to see you back here, lookin' forward to your next ultra shiny builds!

I started putting it all together - I have installed the glass and put on most of the chrome. Now it starts to look like a car:

1:24 Hasegawa Volkswagen Type 2 by Pawel

I have used white glue in places where spillage of other type of glue might mean a little disaster. I have managed to glue the door handles and winshield wipers (at their axles!) with CA glue, though. I removed the chrome from the contact points with a glass fibre pen. The next photo shows the model a little dusty - sorry about that:

1:24 Hasegawa Volkswagen Type 2 by Pawel

Now - on to finish the interior! Thanks for lookin' and have a nice day

Paweł

All comments and critique welcomed. Thanks for your honest opinions!

www.vietnam.net.pl

  • Member since
    March 2011
Posted by ewheeler454 on Monday, December 19, 2016 8:27 PM
Thanks Dan. I do hope it was worth the wait for him LOL. I had planned to do a few other things like wire the engine etc. but just ran out of time on it. I have about 3 in-progresses I would like to get done before the end of the year but ain't holdin' my breath hehehehehe. I'm itchin' to start a new one but forcing myself to finish these first.. L8TR, Eric

  • Member since
    January 2015
Posted by taaron76 on Monday, December 19, 2016 9:43 PM

Took some time and cut all of the doors and trunk out, then hinged them up.  I have to recreate the A-pillar vent window support because there isn't enough plastic there once you cut the doors out.  The hardest part of the build is definitely hinging, followed by making all of the fitment piece to cover the gaps on the interior side to include the door panels and door jambs.  Lots more to do before this one is even close to being ready for primer and paint, but one day at a time.  This one will be covered with Gravity Colors Ferrari Rosso Red and then Gravity Colors Clear.

Tim

  • Member since
    January 2014
Posted by Seabe on Tuesday, December 20, 2016 9:22 PM

Brilliant work on the hinges, Tim! That had to have been an interesting exercise!

Eric, love that truck! It's a beaut...

  • Member since
    March 2011
Posted by ewheeler454 on Tuesday, December 20, 2016 10:16 PM

Seabe,

Thank you.

Pawel,

That's a slick job on the paint.

Taaron,

I always enjoy the detail you put in yours.

Now I need some warm weather so I can get back to mine. Weekend is supposed to warm up some so I hope to spray the Road Runner and maybe finish the Camaro hehehehehe.

L8TR,

Eric. 

  • Member since
    January 2015
Posted by MOPAR - D on Wednesday, December 21, 2016 7:36 PM

I've been able to make some more progress with this build. I've painted the interior and have sprayed the body. The first picture is under regular lights and the second one is under UV light. There is a color change but not as much as I was hopping for. 


Regular light


UV light


I'm going to try it out in some sun light to see if it makes any difference. 


JOIN OUR COMMUNITY!

Our community is FREE to join. To participate you must either login or register for an account.

SEARCH FORUMS
FREE NEWSLETTER
By signing up you may also receive reader surveys and occasional special offers. We do not sell, rent or trade our email lists. View our Privacy Policy.