SEARCH FINESCALE.COM

Enter keywords or a search phrase below:

Mustang Build

80555 views
1582 replies
1 rating 2 rating 3 rating 4 rating 5 rating
  • Member since
    December 2009
Posted by ww2psycho on Thursday, March 26, 2015 8:06 PM

With some luck I'll have an update tomorrow.

  • Member since
    January 2015
Posted by Radial9 on Friday, March 27, 2015 5:59 AM

Theuns... Beautiful Bird!!  Thank you for sharing your knowledge and experience on this. A definite bookmark for when this newbie tries his first Alclad.

  • Member since
    April 2010
Posted by Theuns on Friday, March 27, 2015 7:16 AM

Alclad is really NOT difficult to use :-)

Just remember that you must have a flawless base before you start soraying alclad.

I found gloss black enamel to work way better than alclad's black promer.

Invest in a set of micro mesh pads, they are a must for pollising.

Just get a bottle of alclad and go for it, don't use it ob your most expensive model, get a "easier" o ne first and practice on that.

Once you see how easy it is you will not look back  :-)

Good luck

Theuns

  • Member since
    December 2009
Posted by ww2psycho on Friday, March 27, 2015 10:04 AM

I really have to try that alclad stuff, too bad I'm a sucker for mostly OD over NG planes.

Well I was hoping to have an update today but I think I'm going to wait for the Vacuform canopy for the A-36 to come in today. I don't like how the kit parts are fitting.

  • Member since
    September 2003
  • From: Northern hemisphere - most of the time-
Posted by blkhwkmatt on Friday, March 27, 2015 1:25 PM

I just purchased 7 of the shades of Alclad, and plan on using them with the two mustangs that I will build for this GB.  I have not used them before so have been reading up on all I can about them.  Think that I might grab a smaller cheaper kit from my stash to "practice" on, or go to Michaels this weekend and see what they have.

Small update - took about a month, buy Aires customer service came through with the missing part from the P-51B cockpit set that I had ordered, great company!  I should be able to clean that up some this weekend and perhaps get some paint on the cockpit.

I have also been slowly plugging away with the 1/32 Tamiya P-51D/K kit, have built the engine and am almost finished with the cockpit.  So far I have added the HGW textile seatbelts (those took about 4 hours to assemble, but are they ever worth the eye strain) added a resin life raft to the seat back, and have just finished two nights (3 hours worth) of adding the Baracuda cals placards to the cockpit.  I must say that they add some great detail to the build.  I hope to take some pictures tonight as I complete the washes and flat coating.

I have been looking on and I must say that there is some good stuff going on here, really like the finished look of the Phantom Mustang, and that is a great ending to a neat story as well.  I think that all the models that I had as a child are long gone.

<Matt

Quidquid latine dictum sit, altum videtur!!! - Anything said in Latin sounds profound!


  • Member since
    June 2008
Posted by lewbud on Saturday, March 28, 2015 7:38 PM

Some great stuff going on here.  Should be starting sometime next week.  Finally got my stuff in from Hannants.  It sat in the Customs warehouse longer than it did to cross the Atlantic!

Buddy- Those who say there are no stupid questions have never worked in customer service.

  • Member since
    July 2014
Posted by modelcrazy on Saturday, March 28, 2015 10:57 PM

Matt,

That's exciting with what you're doing with your cockpit. can't wait to see it.

lewbud,

Which kit are you going to start? The 1/72 Airfix P-51D in Dominican Republic markings or the 1/32 Tamiya Mustang? I'm anxious to watch you build either one.

Theuns,

Can't wait to see how that Korean bird turns out. I know I said this before, but it  sure looks sweet.

Steve

Building a kit from your stash is like cutting a head off a Hydra, two more take it's place.


http://www.spamodeler.com/forum/

  • Member since
    September 2003
  • From: Northern hemisphere - most of the time-
Posted by blkhwkmatt on Sunday, March 29, 2015 1:55 AM
Here is about where I am at with the Tamiya P-51. I am starting with the D/K kit with the pacific air forces decals, but will be using a decal set from the ETO so I am building this as a D. I must say that all in all I am impressed with the level of detail and workmanship that is in this kit. I decided to add the HGW textile belts to the seat, as the PE ones are made of stainless steel and are a bit stiff. I have used HGW belts before, and really like the way that they turn out. These ones were not laser cut as the Luftwaffe ones were, so that added a bit to the build, but turned out ok. I also substituted the Resin seatback life raft for the kit version. I then added the baracudacals placards to the cockpit to add some realism and amazing detail. I will also be adding the Eduard PE set for the machine gun bay and some barracuda resin main wheels. Here are the pictures:   Here you can see the HGW belts and life raft.     Thanks for looking. Comments and questions more than welcome.

Quidquid latine dictum sit, altum videtur!!! - Anything said in Latin sounds profound!


  • Member since
    June 2013
Posted by RobGroot4 on Sunday, March 29, 2015 3:07 PM

Matt,

 Your cockpit looks awesome!  The seat details and placards really add something.

Groot

"Firing flares while dumping fuel may ruin your day" SH-60B NATOPS

  • Member since
    January 2015
Posted by BrandonD on Monday, March 30, 2015 1:01 AM

Matt - your cockpit looks great. I'd love to try that big Mustang, but I'm not there yet. Glad to see you're handling it so well.

Theuns - That is coming along nicely. I really like the finish so far.

Plasticjunkie - Really nice job.

You all are making me want to get cracking' on my Tamiya Mustang and add something you can actually see to this build after the Phantom :)

-BD-

  • Member since
    September 2014
Posted by rooster513 on Monday, March 30, 2015 11:35 AM

Great looking cockpit blkhwkmatt! Real beautyYes Well that's a tough act to followBig Smile but here is my first update...this is Revell's 1/48 P-51C...not much to show, just got pit construction done and all painted up. Used the kit decal for IP. Overall not a ton of detail but works for me at this point. Still want to do a wash I think and I may try me hand at making a seatbelt. Anyway it's progress right!

-Andy

  • Member since
    September 2003
  • From: Northern hemisphere - most of the time-
Posted by blkhwkmatt on Monday, March 30, 2015 6:48 PM

Rooster,

That is none too shabby yourself!  1/48 is harder to detail and you have done well.  Which paint are you using for the interior green color?  I have the MM acrylic (and enamel) Green zinc Cromate but for the mustang I used the Color of Eagles (I think) US interior Green.  It has a bit darker color that to me at least looks better for the cockpits.  I still tend to use the Zinc Cromate for the wheel wells though.

Thanks for the thumbs up on my pit!  Much appreciated.

<Matt

Quidquid latine dictum sit, altum videtur!!! - Anything said in Latin sounds profound!


  • Member since
    September 2003
  • From: Northern hemisphere - most of the time-
Posted by blkhwkmatt on Monday, March 30, 2015 7:08 PM

Brandon,

There are a lot of small steps in each assembly step, I have been really just taking it slow and making sure that I don't miss anything.  There are a ton of parts, but all in all it isn't that much harder than the Tamiya 1/48 offerings.  I must say though that  I have done more dry fitting than ever before with this one, just because I want to make sure that I dont screw it up.

Quidquid latine dictum sit, altum videtur!!! - Anything said in Latin sounds profound!


  • Member since
    December 2003
  • From: Charleston, SC
Posted by sanderson_91 on Monday, March 30, 2015 8:55 PM

Wow, there are some really nice builds here!! I've started on m D and hpoe to get photos posted this week.

Steve


  • Member since
    July 2014
Posted by modelcrazy on Monday, March 30, 2015 9:15 PM

Matt and Rooster,

Your cockpits are awesome, I just hope mine turns out as well!

Brandon,

Can't wait  to see you get started on something you can't see though.

Steve,

Anxious to see your Ridge Runner III.

Steve

Building a kit from your stash is like cutting a head off a Hydra, two more take it's place.


http://www.spamodeler.com/forum/

  • Member since
    January 2015
Posted by BrandonD on Tuesday, March 31, 2015 2:46 AM

I did a bad thing today. I showed absolutely no restraint and bought a Tamiya 1:48 P-51B because it was there and because I just finished reading Woodbine Red Leader, which was written by a P-51B ace. While mine won't be in his markings, I am going to build the cover art plane, Done Gentile's Shangri-La.

Is it OK if I add that to my clear one and the other Tamiya one?

I did this tonight - found that my No. 11 blade would actually let me drill out the exhaust stacks on this one. I have only glued small bits so far like the scoop interior parts, IP to rudders and assembled the wings (sans flaps). I think I'll actually paint the flaps separate, as I don't want to deal with masking around them in the lowered position. Those stripes, though.... hmm... Anyone have any tips on the best way to handle that?

-BD-

  • Member since
    September 2014
Posted by rooster513 on Tuesday, March 31, 2015 8:20 AM

blkhwkmatt

Rooster,

That is none too shabby yourself!  1/48 is harder to detail and you have done well.  Which paint are you using for the interior green color?  I have the MM acrylic (and enamel) Green zinc Cromate but for the mustang I used the Color of Eagles (I think) US interior Green.  It has a bit darker color that to me at least looks better for the cockpits.  I still tend to use the Zinc Cromate for the wheel wells though.

Thanks for the thumbs up on my pit!  Much appreciated.

<Matt

Matt, I used MM acrylic Green Zinc Cromate for the cockpit. I painted it flat black first so that helped darken it up some, as you said it's seems a little to light for the cockpit straight out of the bottle. Thanks for the compliments! Looking forward to seeing more of your build!

-Andy

-Andy

  • Member since
    July 2014
Posted by modelcrazy on Tuesday, March 31, 2015 12:40 PM

BrandonD
Is it OK if I add that to my clear one and the other Tamiya one?

You got it Brandon.
I got it added to the roster 

Steve

Building a kit from your stash is like cutting a head off a Hydra, two more take it's place.


http://www.spamodeler.com/forum/

  • Member since
    June 2013
Posted by RobGroot4 on Tuesday, March 31, 2015 3:02 PM

Brandon, I fail to see how that's a bad thing!  Devil

I'm working on the same one(s) and they go together nicely.  

The kit does have decals for the white invasion stripes but I am painting my own so can't tell you how good they are.  I originally used white Tamiya primer before paint.  I wish I had masked before putting down the green as painting white over top has been "fun" (pronounced really tedious and frustrating Bang Head ).  The taping off isn't too hard, but I used thin strips of bare metal foil along the edges to hopefully reduce the ridge with Tamiya tape over the rest.  We'll see shortly how it turns out, but I'm about 4-5 coats in and despite having zero issues with the green, and handling the model only with gloves on after that, one of them had a big spot in the middle of a stripe.  It looked just like what I always seem to encounter in modern aircraft landing gear bays where the paint seems to have issues with not covering everything.  I've heard this is a mold release agent, but I still have the issue after washing and a rubbing alcohol cleaning before painting, so no clue.  I sanded lightly and got the paint to cover eventually.  I did add a little VERY light grey to the white that really hasn't affected tint and seems to be helping coverage (I think).

In any event, I can't wait to see what you do with Shangri La!

Edit: OK, I tried to quote Brandon's previous comment.  How does one get the little box with all or a portion of someone else's post? 

Groot

"Firing flares while dumping fuel may ruin your day" SH-60B NATOPS

  • Member since
    September 2003
  • From: Northern hemisphere - most of the time-
Posted by blkhwkmatt on Tuesday, March 31, 2015 3:25 PM

I have always painted the invasion stripes in the past.  I use the decals as a guide for width and placement.  I paint them first (kinda like the theater markings for german aircraft) and then mask over for the main colors.  Paint the white first, mask the white stripes and then lay down the black.   With the flaps I would tack them in place to get the outlines / spacing and then remove to paint as needed.  I use the same basic approach for the landing gear doors as well.

I do the same thing for the single white stripes that you see on some of the aircraft as well, just way less complex of a process.

Groot, to quote another post you must first click on the "use rich formatting" text just to the left of the reply buttion and then there will be an option to quote.  Hope that helps some.

Quidquid latine dictum sit, altum videtur!!! - Anything said in Latin sounds profound!


  • Member since
    September 2014
Posted by rooster513 on Tuesday, March 31, 2015 3:29 PM

RobGroot4

Edit: OK, I tried to quote Brandon's previous comment.  How does one get the little box with all or a portion of someone else's post? 

Groot

Groot, what you have to do is hit the blue "Reply" button under the post you want to quote from, then use "Rich Formatting". In that screen you should see a green "Quote" button under the text of said post. From there you can just start typing as normal under the. You can also delete out any text from the post that you don't want to quote. When you're done hit "Post" as normal and voila, you've got a quoteSmile Gotta love technologyWink

-Andy

-Andy

  • Member since
    January 2015
Posted by BrandonD on Wednesday, April 1, 2015 12:10 AM

Thanks for the tips, all. I think I'll try tacking them in place with a drop of white glue on each side, then masking the stripes. Fortunately it's just one white stripe per wing, top and bottom. It shouldn't be too hard. First, I'll use some Alclad duraluminum on the rotational joints for the flaps, as I found a color photo of Shangri-La that clearly shows those were bare metal, not olive drab or zinc chromate or something.

Groot, it's not really a bad thing, but I have three kits in this GB, (one finished), three 109s in that GB (two finished), and I just joined the 1945 GB because I got the Eduard Spitfire Mk XIII. Oh well, I suppose I do have a year :)

And on top of that, I worked on the P-51B a lot today (yay for living five minutes from work and having lunchtime airbrushing sessions).

I sprayed the wheel wells Testors zinc chromate, then picked out a couple of the detail bits and then washed and dry brushed them.I noticed the doors hold themselves in, so I guess I've got my paint masking figured out there.
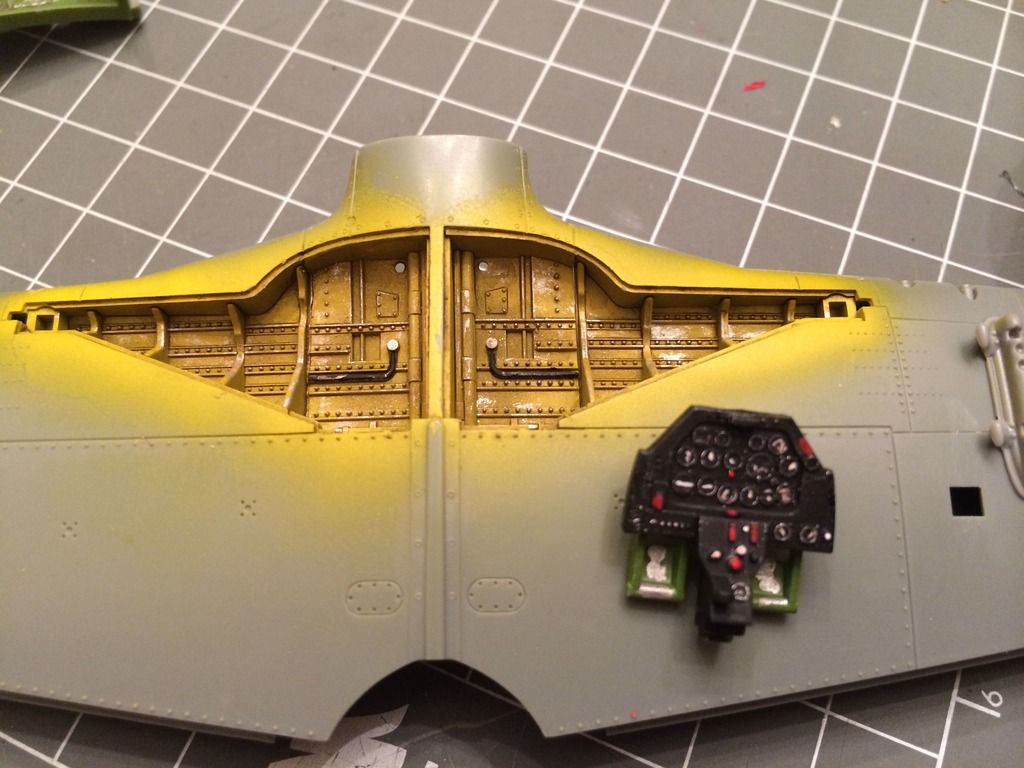
The cockpit got an overall coating of Model Master interior green, then detailed with Tamiya applied via brush. Then some simulated chipping on the floor and overemphasized on the rudder pedals (so it might actually show up down there). I finished that up with a wash.
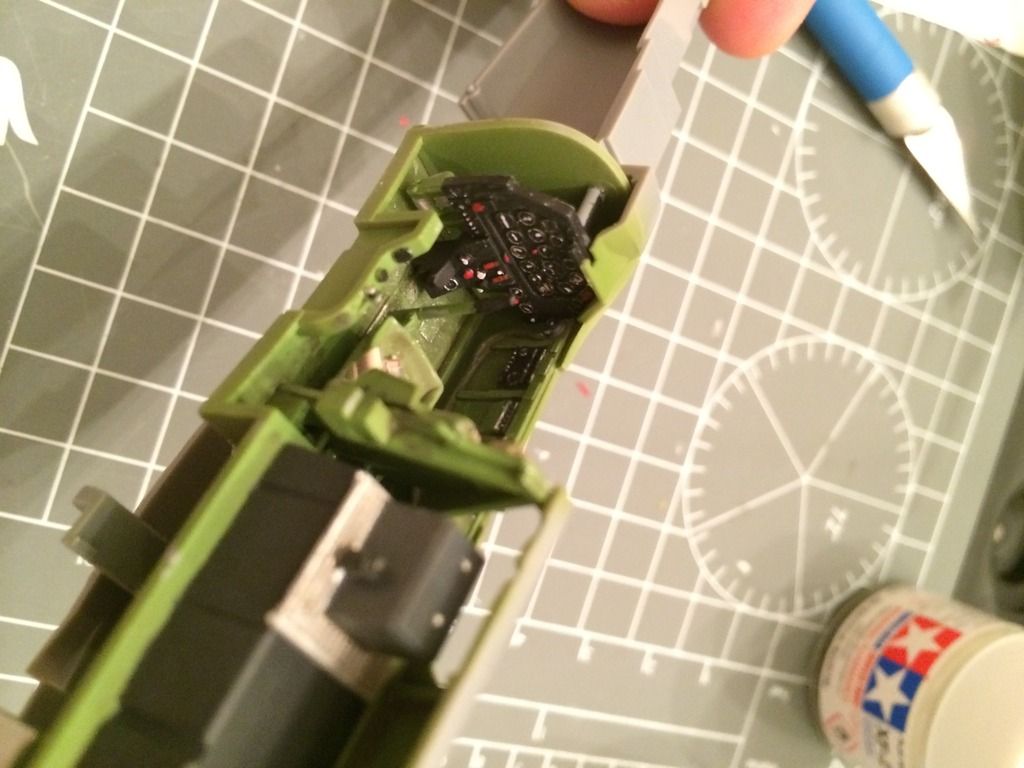
The IP doesn't have a decal, and there are no raised instrument dial surfaces to hit with dry brushing like Tamiya has on it's Wildcat, so I just threw in some suggestions to simulate gauges and left it at that. The colors are mostly random, but somewhat guided by the colors on the color PE set I have for the P-51D.

Lastly, I assembled and installed the Eduard color PE harness, because that seat looked too bar without one.
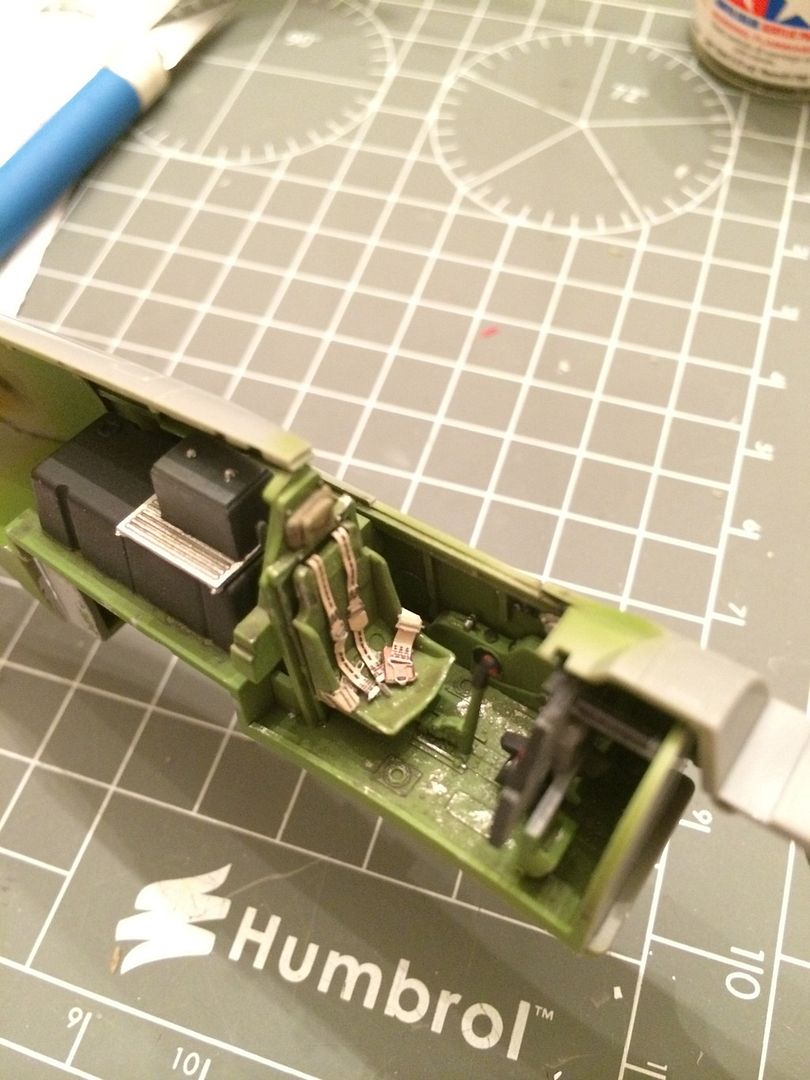
As of right now, the fuselage halves are together, and I have to say, you all weren't kidding - this kit is fantastic and falls together. I'm looking at filling very little, like maybe even just the small divots where the sprues attached on the underside.

Sad to think that this plane made it all of six-ish weeks before he crashed it.

-BD-

  • Member since
    November 2014
Posted by STX440 on Wednesday, April 1, 2015 6:39 AM

Finally got started on my kit

i16.photobucket.com/.../A477458F-0519-42AD-A173-C09FB6115BD8_zpshrwiixk5.jpg

Contents

i16.photobucket.com/.../5635A885-D6E1-46AB-BADB-AFABC29975E5_zpsuicl6jsk.jpg

Got the cockpit ready for paint

i16.photobucket.com/.../F3DD83D6-8860-4277-B5C1-DCBDA205F0D8_zpsib1wjwym.jpg

This is is my first group and looking forward to finishing it. Also my first 1/48 plane kit and only my 3rd plane kit overall.

  • Member since
    November 2014
Posted by STX440 on Wednesday, April 1, 2015 6:55 AM

Not sure what I did wrong but my pics didn't show. Will fix it after work. Sorry

  • Member since
    July 2014
Posted by modelcrazy on Wednesday, April 1, 2015 10:33 AM

STX440
This is is my first group and looking forward to finishing it. Also my first 1/48 plane kit and only my 3rd plane

Well just have fun STX. You've picked a great kit to build, and that's nice start on the pit.

To post you pictures, did you use "rich formatting" and use the little "insert image" icon? If not give that a try. If you're still having trouble let us know and we'll walk you through it.

Steve

Steve

Building a kit from your stash is like cutting a head off a Hydra, two more take it's place.


http://www.spamodeler.com/forum/

  • Member since
    December 2009
Posted by ww2psycho on Wednesday, April 1, 2015 1:13 PM

The B is a very nice kit, I'm building one too. As of right now I'm putting primer on the A-36 and B. Will try to do all the clean up before the end of the night.

  • Member since
    June 2013
Posted by RobGroot4 on Wednesday, April 1, 2015 7:37 PM

rooster513

RobGroot4

Edit: OK, I tried to quote Brandon's previous comment.  How does one get the little box with all or a portion of someone else's post? 

Groot

Groot, what you have to do is hit the blue "Reply" button under the post you want to quote from, then use "Rich Formatting". In that screen you should see a green "Quote" button under the text of said post. From there you can just start typing as normal under the. You can also delete out any text from the post that you don't want to quote. When you're done hit "Post" as normal and voila, you've got a quoteSmile Gotta love technologyWink

-Andy

Aha!  Thank you!  I totally didn't recognize that as anything other than text.

Brandon, what you've got thus far looks awesome!
Groot 

"Firing flares while dumping fuel may ruin your day" SH-60B NATOPS

  • Member since
    August 2014
  • From: Willamette Valley, Oregon
Posted by goldhammer on Friday, April 3, 2015 11:10 AM

Well, got my instruction sheet last night in the mail, but is for a different "D", in warbird trim.  Don't know how close the interior color callouts are going to be.  If anyone has a line on any color interior shots of the pit in Miss America's 1997 trim, let me know, or drop me a PM with a link.  Decals are yellowed pretty bad on the white portions.  If the light trick does not work will be looking at paint, and may do that anyway.

As soon as the Betty is done and I have a good start on the RF, I'll get going on the little friend

  • Member since
    July 2014
Posted by modelcrazy on Friday, April 3, 2015 11:22 AM

Well this is the best I have for an interior color. I know you wanted 97 but this is from 03 and 05. I'll try to write the owners and see if they can be of any help.

Steve

Steve

Building a kit from your stash is like cutting a head off a Hydra, two more take it's place.


http://www.spamodeler.com/forum/

  • Member since
    August 2014
  • From: Willamette Valley, Oregon
Posted by goldhammer on Friday, April 3, 2015 1:06 PM

Looks like they stayed with just bare alum when they got done ripping out all the un-needed stuff.  Appreciate it,  no big rush.  They might even have some shots you can use of the floor and stuff.........  Time frame is still good on those you put up, still the same paint job.

JOIN OUR COMMUNITY!

Our community is FREE to join. To participate you must either login or register for an account.

SEARCH FORUMS
FREE NEWSLETTER
By signing up you may also receive reader surveys and occasional special offers. We do not sell, rent or trade our email lists. View our Privacy Policy.