SEARCH FINESCALE.COM

Enter keywords or a search phrase below:

Floats and Boats: Amphibious Aircraft Group Build

28752 views
865 replies
1 rating 2 rating 3 rating 4 rating 5 rating
  • Member since
    January 2016
  • From: A Galaxy Far, Far Away
Posted by Hunter on Wednesday, April 6, 2016 2:54 PM

Hello Toshi,

Thank you buddy. Your Catalina turned out great! I really like the paint job. You the man Toshi Big Smile

Hunter 


  • Member since
    January 2016
  • From: A Galaxy Far, Far Away
Posted by Hunter on Wednesday, April 6, 2016 2:50 PM

Bish

Toshi, great job on the Cat.

Hunter, ooooooooooooo, that not good. But your a better man than me. If that was me, my other half would not hear the last of it for months, or at least until she bought me at least one kit. Big Smile

But i am just evil that way. Wink


My man Bish, I can always count on you for a great laugh. 


Hunter 


  • Member since
    January 2016
  • From: A Galaxy Far, Far Away
Posted by Hunter on Wednesday, April 6, 2016 2:44 PM

modelcrazy


Hunter
I did all that on the spot. I told her not to worry about it, that it was not life or death and I could fix it or not.


I figured you already did that. You are a good man.

PS Love your "new" GB badge.


Thank you friend...the threat has been neutralized(hint-hint Whistling)

Hunter 


  • Member since
    January 2016
  • From: A Galaxy Far, Far Away
Posted by Hunter on Wednesday, April 6, 2016 2:35 PM

Thanks Brandon.....I am definitely going to get another Albatross kit. This one is toast lol.

Hunter 


  • Member since
    December 2002
  • From: Bury St Edmunds, Suffolk, England
Posted by Bish on Wednesday, April 6, 2016 2:27 PM

Toshi, great job on the Cat.

Hunter, ooooooooooooo, that not good. But your a better man than me. If that was me, my other half would not hear the last of it for months, or at least until she bought me at least one kit. Big Smile

But i am just evil that way. Wink

I am a Norfolk man and i glory in being so


On the bench: Airfix 1/72nd Harrier GR.3/Fujimi 1/72nd Ju 87D-3

  • Member since
    March 2015
  • From: Streetsboro, Ohio
Posted by Toshi on Wednesday, April 6, 2016 1:49 PM

To Hunter,

I can relate to what has happen with your Albatross.  Normally, it is I that drops and messes up my builds.  The both of you were made for each other. You both overcame and made this a positive situation.  Good luck on your next build.

Toshi

On The Bench: Revell 1/48 B-25 Mitchell


Married to the most caring, loving, understanding, and beautiful wife in the world.  Mrs. Toshi


  • Member since
    March 2015
  • From: Streetsboro, Ohio
Posted by Toshi on Wednesday, April 6, 2016 1:38 PM

Here is my completed PBY Catalina.  I highly recommend this kit, the only issue here is the size of the Catalina.  Where are you going to put it?    Thank you all for having me in this GB.  It means so much to me.

Toshi


On The Bench: Revell 1/48 B-25 Mitchell


Married to the most caring, loving, understanding, and beautiful wife in the world.  Mrs. Toshi


  • Member since
    November 2008
  • From: Central Florida
Posted by plasticjunkie on Wednesday, April 6, 2016 11:09 AM

Hunter

Sorry to hear about this. Hey mierda happens sometimes so on to the next.

Sometimes one tries to help and disasters happen without a warning. I could just imagine how bad Mrs. Hunter felt. She meant well and was trying to do a nice deed for you. That poor lady Deserves another hug! 

I suggest salvaging what you can and start on another.


 GIFMaker.org_jy_Ayj_O


Too many models to build, not enough time in a lifetime!!

  • Member since
    July 2014
Posted by modelcrazy on Wednesday, April 6, 2016 9:53 AM

Hunter
I did all that on the spot. I told her not to worry about it, that it was not life or death and I could fix it or not.

I figured you already did that. You are a good man.

PS Love your "new" GB badge.

Steve

Building a kit from your stash is like cutting a head off a Hydra, two more take it's place.


http://www.spamodeler.com/forum/

  • Member since
    June 2014
Posted by BrandonK on Wednesday, April 6, 2016 9:32 AM

Hunter, I'm sure your wife has beat herself up more than enough for the accident. Hey, it's just a plastic kit and not a big deal. I can only imagine the horror she felt the instant she stepped on it. Again, not a biggie, these things happen. Press on with the other kit, you've got all year to make it happen.

BK

On the bench:

A lot !! And I mean A LOT!!

2024 Kits on deck / in process / completed   

                         14 / 5 / 2  

                              Tongue Tied

  • Member since
    January 2016
  • From: A Galaxy Far, Far Away
Posted by Hunter on Tuesday, April 5, 2016 8:06 PM

goldhammer

Oh man, that sucks big time. Crying Give her a hug and kiss, and tell her s... happens.  If you cant fix it, at least you got some good practice out of it.  Might be able to salvage enough to do a crash dio later.  If you do get another, now you have the horsepower to put it on top of the cabinets........Wink


Thanks GH....all is good on the home front. She is finally okay and not upset over braking it. 

Hunter 


  • Member since
    January 2016
  • From: A Galaxy Far, Far Away
Posted by Hunter on Tuesday, April 5, 2016 7:37 PM

modelcrazy

Hunter,

I feel so sorry for Jill. Give her a big hug and thank her for her thoughtfulness with all that she has done for you.

The kit is just a thing but feelings, relationships, and carrying is what is important. You will have many more kits to build and yes some will be dropped, stepped on, broken by the casual observer or wrecked by time. These are dust in the wind. A month from now you will have moved on and pretty much forgotten about it. At that time comes, remember back and think how far you have come with your skill.

Now put it aside as project you may or may not get back to, open the Cessna. Tell Jill everything is cool, give her a kiss and take her out to dinner.  She sounds like a woman that deserves it no matter what accident may befall her.

Steve 


Steve - 

I did all that on the spot. I told her not to worry about it, that it was not life or death and I could fix it or not. She is all good now....she was upset because of the time and the attention I gave to the build.

I told her this is just one build of many to come...and that it did not bother me one bit that it was broken. I told her I was more happy that she thought to get me something for my hobby, than the Albatross.

I went back to the bench to really look it over and I don't believe I'll be able to fix it. I did get her to laugh when I said how did a 115 pound woman kill plastic like that. Big Smile

Hunter 


  • Member since
    July 2014
Posted by modelcrazy on Tuesday, April 5, 2016 6:45 PM

Hunter,

I feel so sorry for Jill. Give her a big hug and thank her for her thoughtfulness with all that she has done for you.

The kit is just a thing but feelings, relationships, and carrying is what is important. You will have many more kits to build and yes some will be dropped, stepped on, broken by the casual observer or wrecked by time. These are dust in the wind. A month from now you will have moved on and pretty much forgotten about it. At that time comes, remember back and think how far you have come with your skill.

Now put it aside as project you may or may not get back to, open the Cessna. Tell Jill everything is cool, give her a kiss and take her out to dinner.  She sounds like a woman that deserves it no matter what accident may befall her.

Steve 

Steve

Building a kit from your stash is like cutting a head off a Hydra, two more take it's place.


http://www.spamodeler.com/forum/

  • Member since
    August 2014
  • From: Willamette Valley, Oregon
Posted by goldhammer on Tuesday, April 5, 2016 6:15 PM

Oh man, that sucks big time. Crying Give her a hug and kiss, and tell her s... happens.  If you cant fix it, at least you got some good practice out of it.  Might be able to salvage enough to do a crash dio later.  If you do get another, now you have the horsepower to put it on top of the cabinets........Wink

  • Member since
    January 2016
  • From: A Galaxy Far, Far Away
Posted by Hunter on Tuesday, April 5, 2016 5:54 PM

Jack,

She is coming along beautifully!! Wonderful job sir

Hunter 


  • Member since
    January 2016
  • From: A Galaxy Far, Far Away
Posted by Hunter on Tuesday, April 5, 2016 5:52 PM

Brandon and Steve,

I just home from work, and I was informed by my wife that she broke my Albatross. I kinda laughed(I was at the point of installing the engines 75% done) so we walked out to my workbench....I was taken back when I saw a pile of broken plastic. I looked over at my wife as she started to tear up with what she had done.

I told it was ok and asked what had happened. She had purchased me some items that she thought I might want and after placing them on my bench she turned and the remaining bags in her hand knocked the Albatross off the bench to the groung and she stepped directly on it crushing the fusilage and half the wing.

After looking it over I am doubtful that I can salvage it. Not sure?? I am going to withdrawl this kit and start on my other entry. After I complete that one I will try and fix the Albatross. Now I need to go and explain to her that's ok and to stop crying. Crying LOL.

If it comes down to it, I will repurchase this kit and start over. Bang Head Just hope I can fix it....do not feel like spending another $100.00


Hunter 


  • Member since
    December 2002
  • From: Bury St Edmunds, Suffolk, England
Posted by Bish on Tuesday, April 5, 2016 12:03 PM

Jack, impressive detailing there, really nice.

I am a Norfolk man and i glory in being so


On the bench: Airfix 1/72nd Harrier GR.3/Fujimi 1/72nd Ju 87D-3

  • Member since
    June 2014
Posted by BrandonK on Tuesday, April 5, 2016 11:06 AM

Jack, your correction of all the small bits is gonna pay off in spades when you are finished, giving you a totally stunning build.

BK

On the bench:

A lot !! And I mean A LOT!!

2024 Kits on deck / in process / completed   

                         14 / 5 / 2  

                              Tongue Tied

  • Member since
    April 2006
  • From: ON, Canada
Posted by jgeratic on Sunday, April 3, 2016 11:11 PM

Crown, coming along nicely - little details like that go far in creating a great piece.

----------------

Thanks guys, that last update was indeed a lot work, but so small that it's easily missed.

This week was easier on the eyes.  Switched over to the floats and some sculpting with green stuff putty.  The kit parts are devoid of any detail, but I noticed in one period photo of what appears to be some kind of access cover(s) on the tops of the pontoons.

1. - a trio of holes are drilled, final diameter being 2.5mm

2. - putty is pressed through from bottom, until a little dome forms.  This is lobbed off with a knife.

3. - smaller diameter bit is used to tamp down the centers.

4. - final detail involves a thin plastic strip straddling the hole made in step 3

5.  - just a shot of the underside, nothing fancy

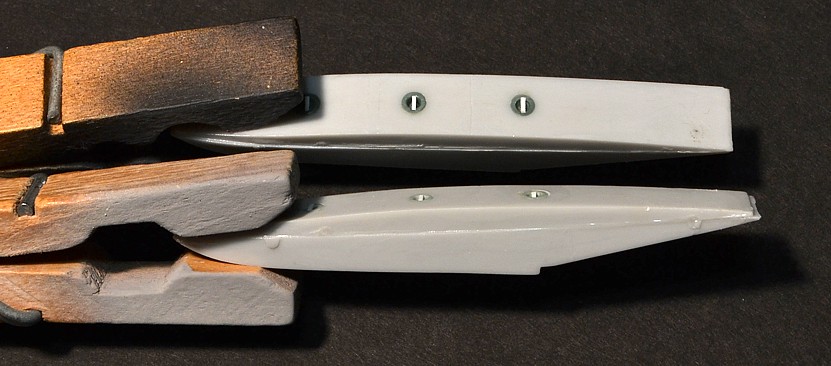
The putty requires 24 hours to cure.  Next day, bottoms of the floats were glued together, with a little extra clamping via clothes pins.  Yeah, a lot of seams to clean up.

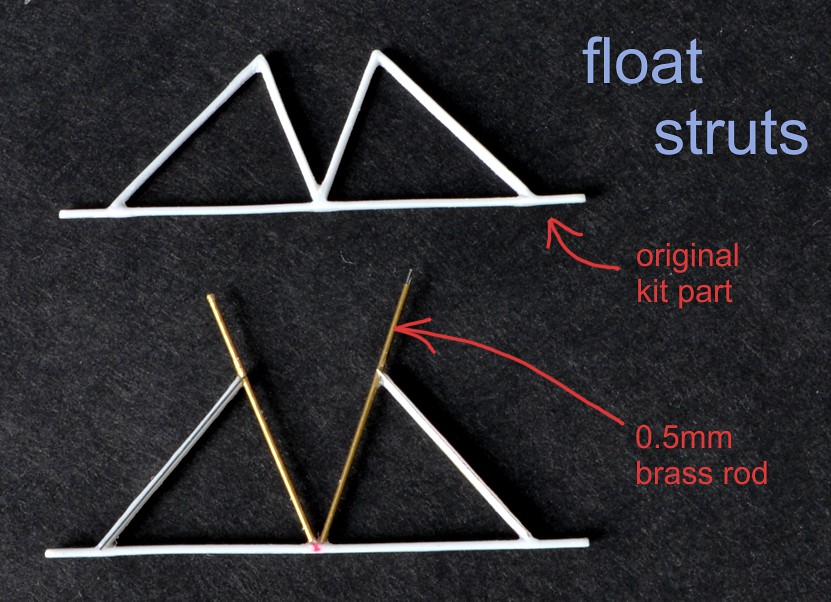
Bracework for the floats.  Again, referring to period photos, the inner struts look to be smaller diameter as well as rounder.  So those were replaced with 0.5mm brass rod.  The top ends still need to be trimmed, as well as bent facing straight up so they insert into holes in the fuselage.

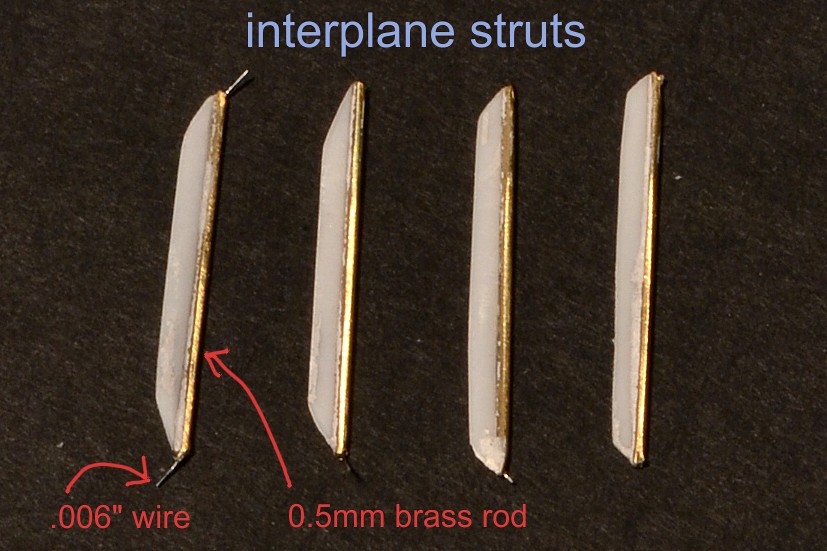
The main struts between the wings aren't that bad, but the plastic is kind of flimsy.  Being too thin to drill holes in, decided to chop the leading edges off, and grafted 0.5mm brass rods in place.  The thin wire protruding out the ends will be the actual points of attachment.

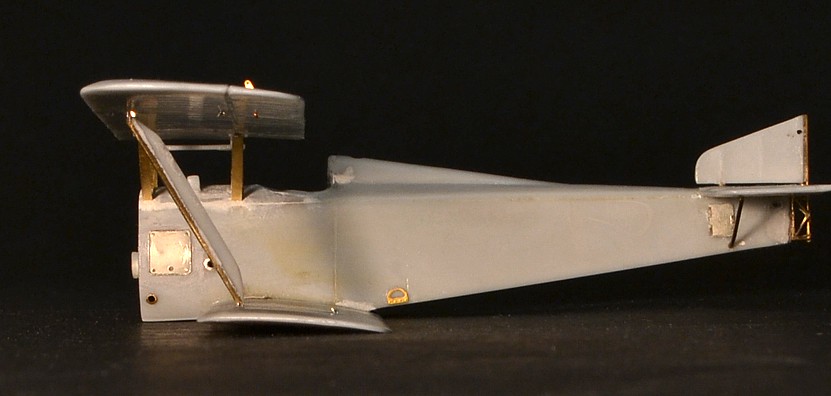
Dry fit with a single strut in place.

regards,

Jack


  • Member since
    June 2014
Posted by BrandonK on Friday, April 1, 2016 3:39 PM

Crown, I have the popcorn handy and I am really anticipating this one.

BK

On the bench:

A lot !! And I mean A LOT!!

2024 Kits on deck / in process / completed   

                         14 / 5 / 2  

                              Tongue Tied

  • Member since
    June 2014
Posted by BrandonK on Friday, April 1, 2016 3:38 PM

Jack, your attention to detail on that kit is quite amazing. I am really enjoying your build quite a lot. Keep it coming.

BK

On the bench:

A lot !! And I mean A LOT!!

2024 Kits on deck / in process / completed   

                         14 / 5 / 2  

                              Tongue Tied

  • Member since
    August 2015
  • From: the redlands Fl
Posted by crown r n7 on Thursday, March 31, 2016 8:46 PM

What I don't like about this kit is the props don't spin I'm an old timer but  is what it is . still a ways away from that 


 Nick.

  • Member since
    July 2014
Posted by modelcrazy on Thursday, March 31, 2016 8:30 PM

Looks good Crown. I'm intrested to see how this builds.

Steve

Building a kit from your stash is like cutting a head off a Hydra, two more take it's place.


http://www.spamodeler.com/forum/

  • Member since
    August 2015
  • From: the redlands Fl
Posted by crown r n7 on Thursday, March 31, 2016 7:47 PM

started on my PBM-5 with engines and cleaning up the seats. That is some major work that rigging


 Nick.

  • Member since
    April 2006
  • From: ON, Canada
Posted by jgeratic on Wednesday, March 30, 2016 11:43 PM

Another update, past week or so has been dedicated to PE details and scratch build on the fuselage and wings.

One of the few times using plastic rod on this one. Here it's been utilized to create the illusion of hinge points for the cabane struts.  Once glued and dried in place, only the ends are used, with the center trimmed out and cleaned up.

More underside work of the upper wing:

- brass loop added for later rigging the aileron control line

- holes drilled out for struts.  Also trying something different for the bracing wires, no holes drilled, but insert some metal strips as attachment points for later

-access cover better detailed, with a wire representing the hinge and even shorter piece as the latch

Rudder detail, a small trough is scribed into the plastic to give a better strength when gluing the control horns. (same idea done to the ones on the main wing).

Rigging wire location points on fuselage. There is a pair of holes made on both sides, and the PE instructions have you place metal rings over the area (PE parts boxed in red) .  I opted to place brass tubing instead - a lot easier to handle.  The forward location I was able to place a single rod running from side to side, but not the second set of holes as interior detail was in the way. 

regards,

Jack


  • Member since
    December 2003
  • From: 37deg 40.13' N 95deg 29.10'W
Posted by scottrc on Monday, March 28, 2016 7:34 AM

Thanks for the confidence everyone.  To answer Jack, I did sand down the bulkheads, but forgot I have to sand the #2 one a little bit more and didn't catch it.  I usually use black marker to mark the areas I need to sand down, I didn't do it this time, got distracted, and didn't have a cue to make me go back to where I left off.  Its good though, I was able to fill the gap with some styrene and some filler.  

I also noticed this morning that the seats don't line up to the windows.  Oh brother!

  • Member since
    July 2014
Posted by modelcrazy on Saturday, March 26, 2016 2:06 PM

Nice work on a tough kit Scott.

Steve

Building a kit from your stash is like cutting a head off a Hydra, two more take it's place.


http://www.spamodeler.com/forum/

  • Member since
    June 2014
Posted by BrandonK on Saturday, March 26, 2016 11:18 AM

Scott, All that work is gonna pay off is spades. I can tell already that this build is gonna be a stunning achievement. I am really enjoying watching this go together.

BK

On the bench:

A lot !! And I mean A LOT!!

2024 Kits on deck / in process / completed   

                         14 / 5 / 2  

                              Tongue Tied

  • Member since
    March 2015
  • From: Streetsboro, Ohio
Posted by Toshi on Saturday, March 26, 2016 10:57 AM

jgeratic

Toshi, I like the level of pre-shading you got going.  Not saying it is the correct way, but for me, it's just enough to see that it's there, without being over powering.

Scott, coming along nicely.  It appears you have things well under control.  What I might of tried for a better fit of the interior pieces is sanding the inside (or maybe you did this too?).  Even some carving where the bulkheads are could be an option, as the fuselage pieces looks to be fairly thick.

regards,

Jack


Thank you jgeratic.  I highly value your opinion. 

Toshi

On The Bench: Revell 1/48 B-25 Mitchell


Married to the most caring, loving, understanding, and beautiful wife in the world.  Mrs. Toshi


  • Member since
    March 2015
  • From: Streetsboro, Ohio
Posted by Toshi on Saturday, March 26, 2016 10:55 AM

ScottRC, with your issues explained, I am in awe of your build.  You have overcome every step, this is what a true modeler is about!

Toshi

On The Bench: Revell 1/48 B-25 Mitchell


Married to the most caring, loving, understanding, and beautiful wife in the world.  Mrs. Toshi


JOIN OUR COMMUNITY!

Our community is FREE to join. To participate you must either login or register for an account.

SEARCH FORUMS
FREE NEWSLETTER
By signing up you may also receive reader surveys and occasional special offers. We do not sell, rent or trade our email lists. View our Privacy Policy.