SEARCH FINESCALE.COM

Enter keywords or a search phrase below:

75th Anniversary of 1942 (World at War)

39074 views
860 replies
1 rating 2 rating 3 rating 4 rating 5 rating
  • Member since
    December 2002
  • From: Bury St Edmunds, Suffolk, England
Posted by Bish on Tuesday, October 3, 2017 4:04 PM

ManCityFan

Thanks all for the positve comments on the tracks.  This was a new experience for me.  More tedious than difficult, but I think it is a worthy upgrade. 

Bish, yes they are plastic, and don't have much weight.  I went for the less expensive route on this, as the Kaizen tracks are about 2/3 the cost of the friul.  Now that I have tried them, I will probably fork over the extra $12 to get Friuls if I get AM tracks in the future.  That said, these tracks are molded really well.

After testing the tension on the tracks, they are just a little bit off, and I think I can use CA to glue the tracks to the first and last running wheels, and she will look great.

D


I do like Fruils, i have almost 30 sets to use. But ye, they are pricey and i only replace rubber band tracks with them. I do like some of the plastic tracks, especially the Dragon magic tracks. I would not write the plastic tracks off completly. I have some Bronco plastic tracks to use on my AS90 i'll be doing in a couple of months, i am keen to see how those come out.

I am a Norfolk man and i glory in being so


On the bench: Airfix 1/72nd Harrier GR.3/Fujimi 1/72nd Ju 87D-3

  • Member since
    February 2006
  • From: Cincinnati Ohio
Posted by DantheMan85 on Tuesday, October 3, 2017 3:27 PM


My apologies for being away from the group build for so long, I finished my Revell 1/144 Junkers Ju 52/3M a few days ago. The decals went on with no trouble, the yellow band's two ends did not touch on the bottom so I touched it up with Tamiya XF-3 Flat Yellow.

From the aircraft being so small I rigged up a pole with fishing line to photograph the model outside against the blue sky. In photoshop I removed the wire and pole, and motion blurred the propellers.

 01 by Daniel Smith, on Flickr

 02 by Daniel Smith, on Flickr

 03 by Daniel Smith, on Flickr

 04 by Daniel Smith, on Flickr

 7 by Daniel Smith, on Flickr

 6 by Daniel Smith, on Flickr

Revell 1/144 Junkers Ju 52/3M along side Revell 1/48 Junkers Ju 52/3M.

 5 by Daniel Smith, on Flickr

Next up is Trumpter 1/32 Junkers Ju87 Stuka. Smile

 1 by Daniel Smith, on Flickr


On my Work Bench: Tamiya Ford GT 1/24

Up Coming: ?


  • Member since
    September 2016
  • From: Albany, New York
Posted by ManCityFan on Thursday, September 28, 2017 12:29 PM

Thanks all for the positve comments on the tracks.  This was a new experience for me.  More tedious than difficult, but I think it is a worthy upgrade. 

Bish, yes they are plastic, and don't have much weight.  I went for the less expensive route on this, as the Kaizen tracks are about 2/3 the cost of the friul.  Now that I have tried them, I will probably fork over the extra $12 to get Friuls if I get AM tracks in the future.  That said, these tracks are molded really well.

After testing the tension on the tracks, they are just a little bit off, and I think I can use CA to glue the tracks to the first and last running wheels, and she will look great.

D

Dwayne or Dman or just D.  All comments are welcome on my builds. 

  • Member since
    September 2003
  • From: AandF in the Badger State
Posted by checkmateking02 on Thursday, September 28, 2017 10:55 AM

Still without a living computer at home, so I'm behind in postings; but--

Jack:  really like your progress on the Spitfire; things are looking good!

rooster:  nice paintwork and detail on the 109; everything appears to be going your way

Dwayne:  those tracks will make a big improvement in appearance; nice job assembling them; I haven't built a vehicle in years, and when I did, they were the old rubber/plastic kit-included type--so I admire anyone that can invest the effort in individual links; well-done


  • Member since
    December 2002
  • From: Bury St Edmunds, Suffolk, England
Posted by Bish on Thursday, September 28, 2017 2:26 AM

D, thats coming on well. Not seen those tracks before, are they plastic? AsJack says, you may be able to strecth them a bit. It could simply be that they don't have enough weight to hold them down, thats why i like metal tracks.

I am a Norfolk man and i glory in being so


On the bench: Airfix 1/72nd Harrier GR.3/Fujimi 1/72nd Ju 87D-3

  • Member since
    April 2006
  • From: ON, Canada
Posted by jgeratic on Wednesday, September 27, 2017 10:34 PM

Looking very good there, Dwayne.

If the pins in the tracks have a slight malleable property, you probably can 'stretch' some extra length from the tracks.

regards,

Jack

  • Member since
    July 2004
  • From: Sonora Desert
Posted by stikpusher on Wednesday, September 27, 2017 9:56 PM

Yeah, looking at photos, they seem to be well tensioned in the field during operations.


F is for FIRE, That burns down the whole town!

U is for URANIUM... BOMBS!

N is for NO SURVIVORS...

       - Plankton

LSM


  • Member since
    September 2016
  • From: Albany, New York
Posted by ManCityFan on Wednesday, September 27, 2017 9:16 PM

Hey Stik, yes, they float just a little above the road wheels.  This kit gives the ability to adjust the idler, but to get the tracks to sit on the road wheels, the idler ends up rubbing against a wheel.  I will try again to see if I can loosen the tension.  I also tried adding one pair of links, but then they are way too loose.  I don't see any real sag between the road wheels in pictures of T-34's in the field.

D


Dwayne or Dman or just D.  All comments are welcome on my builds. 

  • Member since
    July 2004
  • From: Sonora Desert
Posted by stikpusher on Wednesday, September 27, 2017 9:11 PM

D, those tracks look great! They should give just the right appearance on your T-34. But I'm a bit confuse when you say they don't sit right. Are they unable to settle down into the tops of the roadwheels?


F is for FIRE, That burns down the whole town!

U is for URANIUM... BOMBS!

N is for NO SURVIVORS...

       - Plankton

LSM


  • Member since
    September 2016
  • From: Albany, New York
Posted by ManCityFan on Wednesday, September 27, 2017 9:04 PM

Jack and Rooster, both builds look good.  Looking forward to more updates.

So I got this in the mail last Wednesday:

Here is a picture of one pair of links done, and one of the pins,

I also finally got around to making the tow cables after cutting off the plastic cable pieces.

I finished the tracks this evening.  Here is a close-up.  The links are molded quite well.  There are 36 pairs of link per track.  De-spruing and clean up was easy due to the sprue connections being quite fine.  Getting the pin into the track was initially fairly frustrating, but I learned how to get the links set up just so, and the second track went together quickly.  Test fitting shows the tracks do not sit on the road wheels, but a little CA will take care of that.  These tracks are SO much better than the vinyl kit tracks.

Here is a side view.  Decals (all two of them) are on.  There are slogans included with the kit, but I read on Missing-Lynx that slogans were really only used for propaganda photos, so I stuck with simple unit designations.  Did a pin wash, and attempted a dot filter.  Dot filter will have to be done again, as I think I took too much of the oil paint off.  Easy enough to try again.  Made a mud "slurry" with PVA glue, mud color Polly S paint and some dirt from the garden.  Looks good as dried mud, so I may make up another slurry with a darker shade for wet mud.
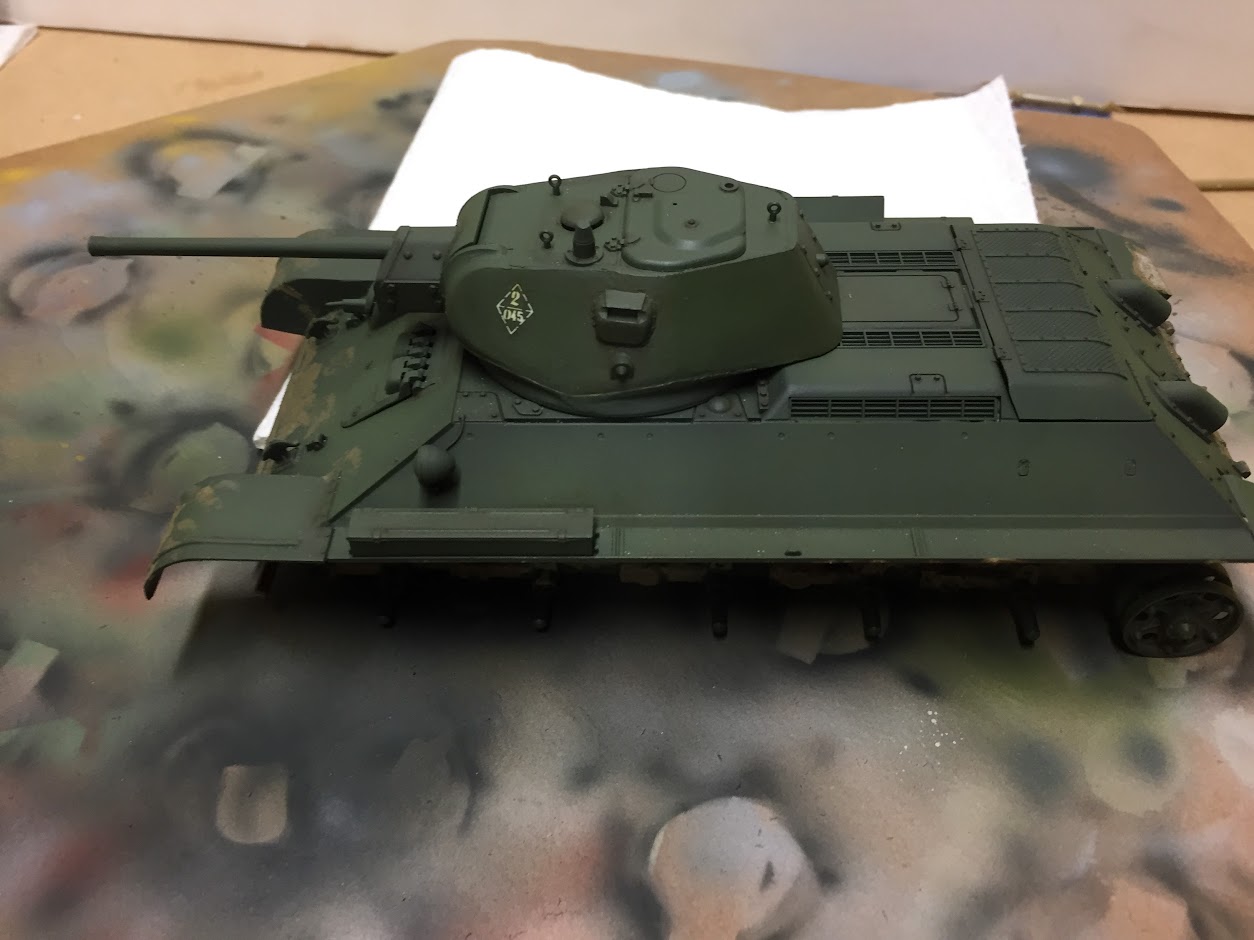
Here is a front view.

Still lots to do.  Have to paint and weather the tracks.  Pin wash for the grill, dry brushing, and some pigments to dirty her up.

A lot of first attempts on this kit.  AM tracks, making the tow cables, the mud slurry, pin wash, dot filter, and using Mission Models paint.  The paint was a joy to use, and I will be buying more. 

Thanks for looking,

D


Dwayne or Dman or just D.  All comments are welcome on my builds. 

  • Member since
    April 2006
  • From: ON, Canada
Posted by jgeratic on Monday, September 25, 2017 10:49 PM

Thanks Andy, and keen work on the interiors of your project.

Bish, you are quite welcome.

regards,

Jack

  • Member since
    December 2002
  • From: Bury St Edmunds, Suffolk, England
Posted by Bish on Monday, September 25, 2017 12:59 PM

Thanks for the heads up Jack. I think the one i plan on geting includes flaps as well as cockpit detail. I'll be geting it and the kit in Nov. I have used some of their PE ground equipment such as wheel chocks and ladders and really like them.

Really nice work there rooster, great job on the pit.

I am a Norfolk man and i glory in being so


On the bench: Airfix 1/72nd Harrier GR.3/Fujimi 1/72nd Ju 87D-3

  • Member since
    September 2014
Posted by rooster513 on Monday, September 25, 2017 11:21 AM

Jack, that looks like another great start!

Finally have an update on my 109...

Cockpit all painted up and fit inside the fuselage halves. Pretty nice detail for OOB cockpit. Made some lapbelts out of tape and wire.

With a little cutting and sanding I was able to pose the radiator flaps open...

And here it is with the finished engine and cowlings...

I'll be attaching the canopy and getting started on main painting sortly. Everyone keep up the great work!!


-Andy

  • Member since
    April 2006
  • From: ON, Canada
Posted by jgeratic on Monday, September 25, 2017 10:49 AM

Thank you Bish.

The Bregun PE is quite good and has nice detail.  I like the control stick (not in the above posted photo) which is bent over itself to give thickness and detail on both sides.

The only thing I found that needed to be modified was the headrest.  They  provided a flat disc to represent it - maybe it was just the base to which you add the plastic kit part after cutting it off, but the instructions didn't indicate to do that.

My main reason for adding the photo etch set is from past experience with another Sword kit.  It too was wheels up, but the landing gear doors were oversize and rested above the surface of the wings.  Using the PE ones will enable to have them sit flush.

regards,

Jack 

  • Member since
    December 2002
  • From: Bury St Edmunds, Suffolk, England
Posted by Bish on Monday, September 25, 2017 1:59 AM

Coming on nicely Jack.

How you finding that Brengun PE. I have their 72nd car door Typhoon on my Hannants shopping list and thinking about getting their own PE set for it.

I am a Norfolk man and i glory in being so


On the bench: Airfix 1/72nd Harrier GR.3/Fujimi 1/72nd Ju 87D-3

  • Member since
    April 2006
  • From: ON, Canada
Posted by jgeratic on Sunday, September 24, 2017 7:07 PM

Hi Check, thanks!

Got a bit done on the recon Spitfire, but this late September heatwave in north eastern Ontario is keeping me away from the bench.

regards,

Jack

  • Member since
    September 2003
  • From: AandF in the Badger State
Posted by checkmateking02 on Tuesday, September 19, 2017 2:13 PM

Jack:  I've updated the finished-build list with the photo.  She looks grand! 

Also updated the build-roster with your Spitfire.  Nice choice, and glad to have you sticking around for another addition to the GB.


  • Member since
    April 2006
  • From: ON, Canada
Posted by jgeratic on Monday, September 18, 2017 10:05 PM

Thank you Scott.  Beer


regards,

Jack

  • Member since
    December 2003
  • From: 37deg 40.13' N 95deg 29.10'W
Posted by scottrc on Monday, September 18, 2017 12:36 PM

Jack,

You really honed in and got her eyes and tones on her face.  Very well represented.

  • Member since
    April 2006
  • From: ON, Canada
Posted by jgeratic on Monday, September 18, 2017 10:38 AM

Thank you Check and Bish.

For the gallery either the first or second photo - for some reason I find the left side of her face more photogenic.

-------------------

I'm thinking to add one more build here, something to get back on track to military hardware.  So a quick (famous last words) build of a Spitfire.   Sword's Spitfire PR Mk.IV Trop in 1/72 scale.

regards,

Jack


  • Member since
    December 2002
  • From: Bury St Edmunds, Suffolk, England
Posted by Bish on Monday, September 18, 2017 10:24 AM

Jack, you have really surpasses yourself with that, and that says a lot. That is one stunning piece of modelling.

I am a Norfolk man and i glory in being so


On the bench: Airfix 1/72nd Harrier GR.3/Fujimi 1/72nd Ju 87D-3

  • Member since
    September 2003
  • From: AandF in the Badger State
Posted by checkmateking02 on Monday, September 18, 2017 10:17 AM

Outstanding, Jack.  What great results you achieved.

Do you have a preference for the finished photo?

Thanks for being part of the GB, Jack.  You're work is always a pleasure to view.

Sorry again for delays in posting.  Still the home computer issue.


  • Member since
    April 2006
  • From: ON, Canada
Posted by jgeratic on Tuesday, September 12, 2017 7:49 PM

Thank you Dwayne, Stik, and Steve.

For some reason, the blush on her cheeks really stand out on these digital photos.  Might have to tone those down.

regards,

Jack

edit, replaced finished photos with new set.  Gave a bit more exposure when shooting so don't have to lighten them as much with software.  Skin still looked overly red on the  screen (maybe it's my monitor), so adjusted the hue just a smidgen.

  • Member since
    July 2014
Posted by modelcrazy on Tuesday, September 12, 2017 3:01 PM

Ditto

That's remarkable Jack.

Steve

Building a kit from your stash is like cutting a head off a Hydra, two more take it's place.


http://www.spamodeler.com/forum/

  • Member since
    July 2004
  • From: Sonora Desert
Posted by stikpusher on Tuesday, September 12, 2017 2:49 PM

Superb work Jack! I really can not help but marvel at your talent.


F is for FIRE, That burns down the whole town!

U is for URANIUM... BOMBS!

N is for NO SURVIVORS...

       - Plankton

LSM


  • Member since
    September 2016
  • From: Albany, New York
Posted by ManCityFan on Tuesday, September 12, 2017 1:55 PM


Hey Jack, I don't think this really needs to be said, as it is obvious, but that is very well done.

Very interesting subject that really shows off your skills.   Yes Yes

D

Dwayne or Dman or just D.  All comments are welcome on my builds. 

  • Member since
    April 2006
  • From: ON, Canada
Posted by jgeratic on Tuesday, September 12, 2017 1:44 PM

Soviet Lieutenant

Red Army,  1942


A final photo stich of the start to finish progression:


regards,

Jack


  • Member since
    July 2004
  • From: Sonora Desert
Posted by stikpusher on Tuesday, September 12, 2017 10:52 AM

Yes, the rust forms on battle damage as a result of the paint burning away. The heat will oxidize the bared metal, with the natural environment doing the rest in short time afterwards. But if the paint is not burned away, it obviously will stay put. German paints applied at the factory were pretty robust, so all the chipping curently seen on many builds is more artistic fad that reality. The paint stands up well to most anything but high velocity impacts of bullets and shell splinters on the armor. And of course the sheet metal on stowage boxes and fenders will be more like to show such damage.

This Mk.IV at El Guettar shows massive battle damage but little oxidation in areas not burned


and this knocked out Semovente in Tunisia shows more oxidation from an obvious internal fire, but less obvious external damage


F is for FIRE, That burns down the whole town!

U is for URANIUM... BOMBS!

N is for NO SURVIVORS...

       - Plankton

LSM


  • Member since
    February 2010
  • From: Berkeley CA/St. Paul MN
Posted by EBergerud on Tuesday, September 12, 2017 2:31 AM
Question on tank forensics. It's certainly common to see a lot of rust on knocked out armor on color film - and the Iraqis provided quite a number of examples. I'm not sure though when it gets there. Some of the pics appear to show rust on a tank not that old - many pieces appear colored correctly. But I'm not sure if battle damage would cause oxidization. Could it be that the rust shows up because the paint is burned off and the victim rusts quickly? Primer perhaps? (German primer would be the right color, but I don't see why it wouldn't burn off too.) Advice helpful: very close to starting some serious weathering. But I'm not thinking of the PZIV as a deserted wreck - rather something knocked out within a few days or less. Rust would add interest, but if it doesn't belong, at least in large quantity, it shouldn't be there. Jack: waiting to see the finis. Eric


A model boat is much cheaper than a real one and won't sink with you in it.

  • Member since
    April 2006
  • From: ON, Canada
Posted by jgeratic on Sunday, September 10, 2017 1:36 PM

Thanks Check and Dwayne.

The bust is pretty much done, just going to put it aside for the day, and give it a final look over tomorrow before taking the final photos.  Below is how I setup to do the braids -definitely not something you'd see at a hair stylist shop:


36334713933_3ac983643d_b.jpg


A C-clamp holds the three strands together (already glued at that end) while a pipe wrench holds it all and provides some weighted resistance as it requires both hands free to do the braiding. 


36334708903_6c563ec6f7_b.jpg


 regards,

Jack


JOIN OUR COMMUNITY!

Our community is FREE to join. To participate you must either login or register for an account.

SEARCH FORUMS
FREE NEWSLETTER
By signing up you may also receive reader surveys and occasional special offers. We do not sell, rent or trade our email lists. View our Privacy Policy.