SEARCH FINESCALE.COM

Enter keywords or a search phrase below:

The 2017/ 2018 Too Little Too Late Group Build

41908 views
1197 replies
1 rating 2 rating 3 rating 4 rating 5 rating
  • Member since
    April 2005
  • From: Australia
Posted by taxtp on Friday, November 10, 2017 4:52 PM
That looks as it should Nick, which is a high compliment. Very nice work. Cheers Tony

I'm just taking it one GB at a time.

  • Member since
    April 2006
  • From: ON, Canada
Posted by jgeratic on Friday, November 10, 2017 9:44 AM

Hi Nick, that is a really great looking build, and nice clear photos too.  Yes

regards,

Jack


  • Member since
    April 2015
Posted by Mopar Madness on Friday, November 10, 2017 9:01 AM

OK now that’s a nice build! The final paint is outstanding and weathering is nice and subtle. A job well done! Beer

Chad

God, Family, Models...

At the plate: 1/48 Airfix Bf109 & 1/35 Tamiya Famo

On deck: Who knows!

  • Member since
    August 2015
  • From: the redlands Fl
Posted by crown r n7 on Friday, November 10, 2017 8:56 AM

The DO-335A is complete  fun kit tricky landing gear.


 Nick.

  • Member since
    August 2015
  • From: the redlands Fl
Posted by crown r n7 on Thursday, November 9, 2017 5:26 PM

Thank you taxtp almost done some odds and ends to do


 Nick.

  • Member since
    April 2005
  • From: Australia
Posted by taxtp on Thursday, November 9, 2017 5:05 PM

Your camo looks outstanding Nick.

Cheers

Tony

I'm just taking it one GB at a time.

  • Member since
    August 2015
  • From: the redlands Fl
Posted by crown r n7 on Thursday, November 9, 2017 2:26 PM

thank you rooster513 here are updated pics with clear flat and very weak landing gear.


 Nick.

  • Member since
    December 2002
  • From: Bury St Edmunds, Suffolk, England
Posted by Bish on Monday, November 6, 2017 2:11 PM

Thanks Andy.

I am a Norfolk man and i glory in being so


On the bench: Airfix 1/72nd Harrier GR.3/Fujimi 1/72nd Ju 87D-3

  • Member since
    December 2002
  • From: Bury St Edmunds, Suffolk, England
Posted by Bish on Monday, November 6, 2017 2:10 PM

Thanks Smeosky, and thanks for the heads up. I'll be getting to adding the upper win soon so will look out for that.

I am a Norfolk man and i glory in being so


On the bench: Airfix 1/72nd Harrier GR.3/Fujimi 1/72nd Ju 87D-3

  • Member since
    September 2014
Posted by rooster513 on Monday, November 6, 2017 11:33 AM

Crown - those decals are looking good!

Bish - loving that pit. The seatbelts look perfect!

Chad - great job with the primer. Looking forward to seeing paint go down!

-Andy

  • Member since
    January 2009
  • From: Austin, TX
Posted by smeosky on Monday, November 6, 2017 11:02 AM

Looking good, Bish. I am a little further along than you on the Hase Dora. I don't want to cast any gloomy shadows but my fun seemed to end once I joined the wings to the fuselage. The fit was pretty c rummy and i've spent the better part of a month filling and sanding everything in and the rescribing. I won't get into the noodling I committed to re scribing. Nevertheless I am out of the woods and primed it yesterday (ill send current photo soon). Looking forward to seeing yours witht he gun bays visible!

2017-11-06_10-49-09

2017-11-06_10-48-54

  • Member since
    December 2002
  • From: Bury St Edmunds, Suffolk, England
Posted by Bish on Monday, November 6, 2017 9:29 AM

Thanks Nick.

I amliking that 335, really nicely done with the wash.

I am a Norfolk man and i glory in being so


On the bench: Airfix 1/72nd Harrier GR.3/Fujimi 1/72nd Ju 87D-3

  • Member since
    August 2015
  • From: the redlands Fl
Posted by crown r n7 on Monday, November 6, 2017 9:00 AM

mopar madness that 262 is looking good . Is that vallejo liquid mask gooey? and bish nice work on that 190 pit . I finish pin wash on the 335 but used decals for the harness dosent look as good as your 190 but some day I'll use after market suff. 


 Nick.

  • Member since
    December 2002
  • From: Bury St Edmunds, Suffolk, England
Posted by Bish on Monday, November 6, 2017 1:54 AM

Cheers Tony.

I am a Norfolk man and i glory in being so


On the bench: Airfix 1/72nd Harrier GR.3/Fujimi 1/72nd Ju 87D-3

  • Member since
    April 2005
  • From: Australia
Posted by taxtp on Sunday, November 5, 2017 6:12 PM

I was admiring the harnesses too, then saw that everyone else was as well. Nice work Bish.

Cheers

Tony

I'm just taking it one GB at a time.

  • Member since
    December 2002
  • From: Bury St Edmunds, Suffolk, England
Posted by Bish on Sunday, November 5, 2017 1:49 PM

MM, the belts are as they come. They are fiddly to put together, but i think worth it.

Really liking how that 262 is coming along.

I am a Norfolk man and i glory in being so


On the bench: Airfix 1/72nd Harrier GR.3/Fujimi 1/72nd Ju 87D-3

  • Member since
    April 2015
Posted by Mopar Madness on Sunday, November 5, 2017 1:29 PM

Bish - I love those belts. Did you have to apply anything to acheive that look or were they installed as-is?


Crown - Love the camo on your 335.


A quick 262 update.  All glass has been masked with Tamiya tape and Vallejo liquid mask. It’s been primered and the bits painted.  She’s ready for final paint.


Chad

God, Family, Models...

At the plate: 1/48 Airfix Bf109 & 1/35 Tamiya Famo

On deck: Who knows!

  • Member since
    February 2014
  • From: Michigan
Posted by silentbob33 on Sunday, November 5, 2017 1:00 PM
I've been slacking on building and checking all the forums here and there's been a lot of good work here.

On my bench: Academy 1/35 UH-60L Black Hawk

  • Member since
    December 2002
  • From: Bury St Edmunds, Suffolk, England
Posted by Bish on Sunday, November 5, 2017 12:18 PM

Been able to get quite a bit done on the 190 since my last update. Got the pit finished off, includeing HGW seat belts. I removed the back piece as i decided to fit the pit after the fuselage halves were together and this was easier without it. Also missing is the throttle which kept coming off so i'll ad that after the pit is fitted.
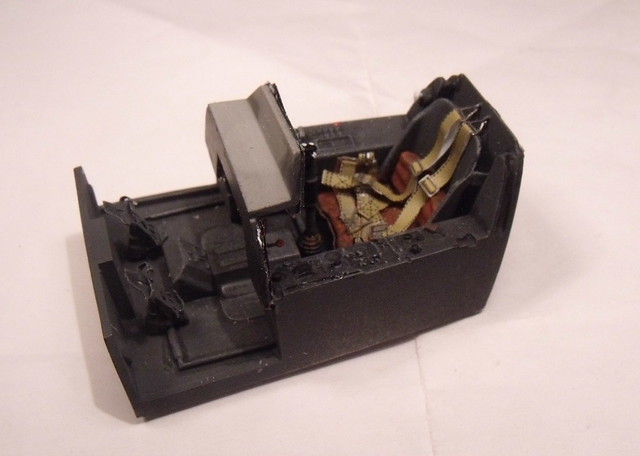
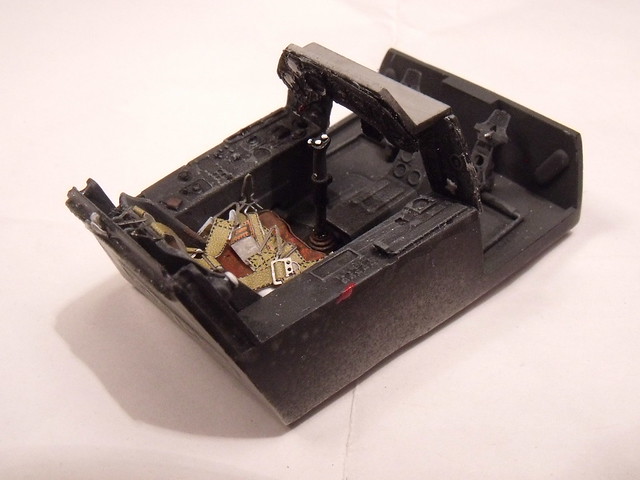
And with the fuselage together and pit in, the lower wings and tail were added. The wings took some work to get in place but fit nicely. The join between the tail and fuselage did need some filler.
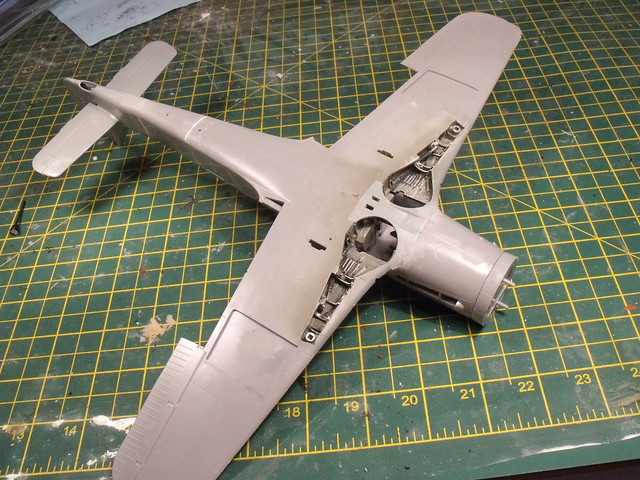
The upper wings have been left off until the wing guns have been fitted. I had hoped i could do this later, but they won't go in with the uper wings fitted without some contortions and i didn't want to risk breaking them.
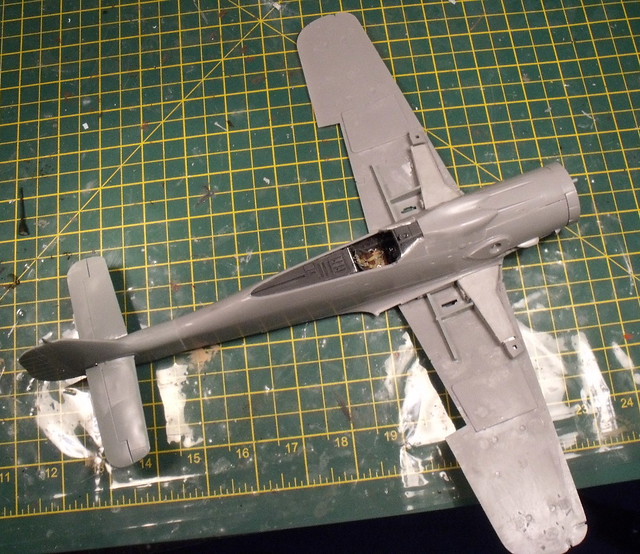
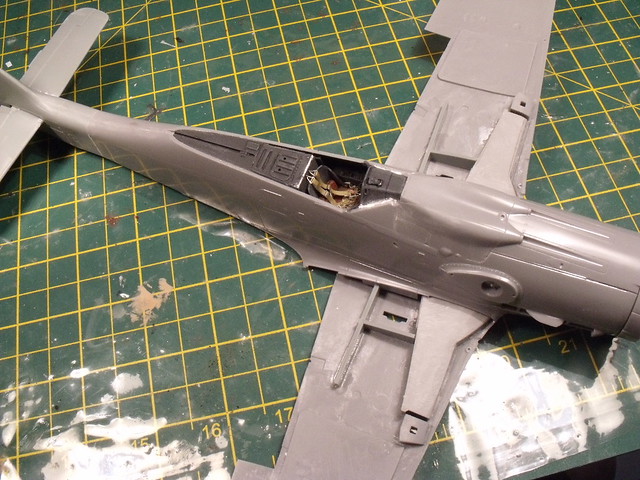
Thanks for looking, more to follow.

I am a Norfolk man and i glory in being so
 

On the bench: Airfix 1/72nd Harrier GR.3/Fujimi 1/72nd Ju 87D-3

  • Member since
    March 2006
Posted by simpilot34 on Saturday, November 4, 2017 7:43 AM

GREAT WORK Theuns and Crown!!! Lovin' your guys work!!

Cheers, Lt. Cmdr. Richie "To be prepared for war, is one of the most effectual means of preserving the peace."-George Washington
  • Member since
    April 2010
Posted by Theuns on Friday, November 3, 2017 12:21 PM

Very nice clean paintwork on the 335 :-)


Theuns

  • Member since
    August 2015
  • From: the redlands Fl
Posted by crown r n7 on Friday, November 3, 2017 9:06 AM

nice work Theuns . finished up with decals some setting time then weathering


 Nick.

  • Member since
    April 2010
Posted by Theuns on Thursday, November 2, 2017 11:26 PM

For the fuel lines I could not find thin enough solreswire so I used some silver coloured streched sprue. Gives a nice coroded /weatherd alluminium look .


Theuns

  • Member since
    April 2005
  • From: Australia
Posted by taxtp on Thursday, November 2, 2017 10:41 PM
The engine looks terrific Theuns.

I'm just taking it one GB at a time.

  • Member since
    April 2015
Posted by Mopar Madness on Thursday, November 2, 2017 8:49 PM

Wow, nice job on recreating those fuel lines!

Chad

God, Family, Models...

At the plate: 1/48 Airfix Bf109 & 1/35 Tamiya Famo

On deck: Who knows!

  • Member since
    April 2010
Posted by Theuns on Thursday, November 2, 2017 12:42 PM

Ta, the headrest looked to "plastic" so I stained it with watercolours to look like leather.


Theuns

  • Member since
    September 2014
Posted by rooster513 on Thursday, November 2, 2017 12:31 PM

Thuens that engine looks nice! Like what you did with the headrest too!

-Andy

  • Member since
    April 2010
Posted by Theuns on Thursday, November 2, 2017 10:09 AM

Engine is done, I added some more fuel lines and electrical looms.

 . by Theunis van Vuuren, on Flickr

 . by Theunis van Vuuren, on Flickr

seat pan was shafed using hairspray tecnique, I used some left over PE buckles and tamiya tape for the seatbelts. The looked to "flat" so I added some shading with water colours.

 . by Theunis van Vuuren, on Flickr


Theuns


  • Member since
    April 2006
  • From: ON, Canada
Posted by jgeratic on Wednesday, November 1, 2017 8:42 PM

Glad that worked out for you.  Was hesitant to suggest anything other than water because some people dip their canopies in clear acrylic.

regards,

Jack

  • Member since
    March 2017
Posted by Armor_Aficionado on Wednesday, November 1, 2017 12:03 PM

Actually, Jack, I used a q-tip soaked with isopropyl alcohol, and that worked really well.

JOIN OUR COMMUNITY!

Our community is FREE to join. To participate you must either login or register for an account.

SEARCH FORUMS
FREE NEWSLETTER
By signing up you may also receive reader surveys and occasional special offers. We do not sell, rent or trade our email lists. View our Privacy Policy.