SEARCH FINESCALE.COM

Enter keywords or a search phrase below:

RAF 100th Anniversay GB

85457 views
3404 replies
1 rating 2 rating 3 rating 4 rating 5 rating
  • Member since
    June 2010
  • From: Rochester, New York USA
Posted by rocker286 on Monday, October 16, 2017 9:48 PM

Nick - Can't wait to see the paint job on your Meteor!

Scott - You've got patience, bud. That looks like one tough kit and you're turning it into a masterpiece!

Gamera- Great progress on your Tempest!


I spent some time on my Defiant again tonight. I attached the tail fin, stabilizers, air intake and radiator. Every piece went on without any fuss, though I'll have to use a bit of filler around the air intake. I ended up having to show my progress to the "boss" for his approval.

2017-10-16_09-23-54

2017-10-16_09-27-44

4badges

  • Member since
    November 2009
  • From: SW Virginia
Posted by Gamera on Monday, October 16, 2017 8:01 PM

I just find that amazing Scott- I'd probably end up going sucidal and hanging myself with the thread...... Dead


BTW: My apologies for the lack of photos but I think I said the lens on my phone broke and I replaced it but it won't focus properly now. I finally got my camera up and working so now I can use it. Though it has fewer megapixals I still think it takes better photos.

Anyway here's the Tempest with the leading edge ID stripes. I masked them off the other day and sprayed the grey undersides this weekend. Hopefully I'll have some photos of that up soonish.

"I dream in fire but work in clay." -Arthur Machen


  • Member since
    December 2003
  • From: 37deg 40.13' N 95deg 29.10'W
Posted by scottrc on Monday, October 16, 2017 9:52 AM

Thanks all for the supportive comments, this kit has been insane as far as fit.  

Its not great, but its together, here are the pics of the wing now fully attached and glued up.  I could not have completed this without the jig, it was a huge help.   Now the rigging will commence.


  • Member since
    November 2009
  • From: SW Virginia
Posted by Gamera on Monday, October 16, 2017 7:26 AM

That looks awesome to me Scott. I'm amazed just to see how you work with all that rigging. 

"I dream in fire but work in clay." -Arthur Machen


  • Member since
    December 2002
  • From: Bury St Edmunds, Suffolk, England
Posted by Bish on Sunday, October 15, 2017 12:15 PM

Quite a task you have there Scott, look forward to seeing how you fix it.

I am a Norfolk man and i glory in being so


On the bench: Airfix 1/72nd Harrier GR.3/Fujimi 1/72nd Ju 87D-3

  • Member since
    December 2003
  • From: 37deg 40.13' N 95deg 29.10'W
Posted by scottrc on Sunday, October 15, 2017 11:40 AM

 Started the installation of the upper wing.  As I suspected and had experience with Roden's Albertross, nothing aligns nor is correct in length.  The center struts are a good 3/16" too long.  Outer ones have warpage.  Thank goodness for making this jig, otherwise I would have sent this kit to the compactor.  Now to start cutting and shaping new struts and hopefully get this wing on without losing my sanity. 

  • Member since
    August 2015
  • From: the redlands Fl
Posted by crown r n7 on Saturday, October 14, 2017 4:59 PM

Thank you I try to trace the putty to the camo on the paper 


 Nick.

  • Member since
    November 2009
  • From: SW Virginia
Posted by Gamera on Saturday, October 14, 2017 4:17 PM

Ohhh, cool job there on the masking.

"I dream in fire but work in clay." -Arthur Machen


  • Member since
    December 2002
  • From: Bury St Edmunds, Suffolk, England
Posted by Bish on Saturday, October 14, 2017 10:46 AM

Good to see this again Nick, looking forward to seeing the scheme.

I am a Norfolk man and i glory in being so


On the bench: Airfix 1/72nd Harrier GR.3/Fujimi 1/72nd Ju 87D-3

  • Member since
    August 2015
  • From: the redlands Fl
Posted by crown r n7 on Saturday, October 14, 2017 10:40 AM

its been awhile here are my lastest pics.


 Nick.

  • Member since
    November 2009
  • From: SW Virginia
Posted by Gamera on Wednesday, October 11, 2017 7:38 AM

Scott: WOW, not sure I'd have the patience to rig something like that. Looks awesome! 

Rocker: I didn't know about the retractable fairing either- nice progress. 

"I dream in fire but work in clay." -Arthur Machen


  • Member since
    December 2002
  • From: Bury St Edmunds, Suffolk, England
Posted by Bish on Wednesday, October 11, 2017 1:50 AM

Looks good rocker, i didn't know it had a retractable fairing. Nice touch by Airfix.

I am a Norfolk man and i glory in being so


On the bench: Airfix 1/72nd Harrier GR.3/Fujimi 1/72nd Ju 87D-3

  • Member since
    December 2002
  • From: Bury St Edmunds, Suffolk, England
Posted by Bish on Wednesday, October 11, 2017 1:49 AM

Scott, great idea for tyhe rigging, and love that jog. Really coming together.

I am a Norfolk man and i glory in being so


On the bench: Airfix 1/72nd Harrier GR.3/Fujimi 1/72nd Ju 87D-3

  • Member since
    June 2010
  • From: Rochester, New York USA
Posted by rocker286 on Tuesday, October 10, 2017 10:32 PM

Scottrc:  That's a neat looking jig you've got there for your SE5- good luck with the rest of the rigging!


Thanks for the decal tips, everybody! Gamera I think I'll try elmer's glue next time like you suggested- I doubt it'll melt the decal like the super glue did!


I did a bit more work on my Defiant tonight. I cemented the fuselage and wings together, and added the retractable fairing behind where the turret will be. The kit came with two options for the fairing- one in the "up" position and one in the "down" position.  

2017-10-10_10-47-26

4badges

  • Member since
    December 2003
  • From: 37deg 40.13' N 95deg 29.10'W
Posted by scottrc on Monday, October 9, 2017 8:03 AM

I had a little time this weekend to work on the SE5.  I got all the lines tied up and ready to rig when I set the top wing on.  I decided to pre-tie the rigging this time for the last Roden kit I built, the Albatross, the wing braces were too weak to put tension on when tying the lines.  This process is reminding me a lot like when I built a ship in the bottle.  

  • Member since
    November 2009
  • From: SW Virginia
Posted by Gamera on Monday, October 9, 2017 7:32 AM

Lewbud: Those invasion stripes look awesome! I'm a little embaressed to admit I partly chose the scheme for mine due to her being a post-war aircraft with no invasion stripes to screw up! 

Rocker: That blows but as you said it shouldn't be too visible. I brush a little diluted white glue like Elmer's on decals when I have an issue like that. 

"I dream in fire but work in clay." -Arthur Machen


  • Member since
    December 2002
  • From: Bury St Edmunds, Suffolk, England
Posted by Bish on Monday, October 9, 2017 3:22 AM

Look forward to seeing the markings on lewbud. I have used printscale a couple of times and i like them. But i know Eagle had issues with his.

I am a Norfolk man and i glory in being so


On the bench: Airfix 1/72nd Harrier GR.3/Fujimi 1/72nd Ju 87D-3

  • Member since
    December 2002
  • From: Bury St Edmunds, Suffolk, England
Posted by Bish on Monday, October 9, 2017 3:21 AM

rocker, nice jopb getting the fuselage together, bad luck about that decal. Are these the cartograf decals. I have noticed they don't need to soak for long.

I am a Norfolk man and i glory in being so


On the bench: Airfix 1/72nd Harrier GR.3/Fujimi 1/72nd Ju 87D-3

  • Member since
    June 2008
Posted by lewbud on Monday, October 9, 2017 2:32 AM

Rocker, 

Bummer about the decal. I'm with Theuns, the good thing about divine scale cockpits is that they're hard to see into when they're done. I've got this kit (and the ancient original as well) in my stash, but probably won't get to it this group build. One thing I do know is that I'll be getting Eduard's canopy mask for sure.

Bish, Tony, Rocker thanks.  I started the decals tonight, first time using Printscale Decals so I don't know what to expect.  Just added the roundels on the bottom of the wings. Not much, but I'm always amazed at how much life even a couple of decals can add to a model.

Buddy- Those who say there are no stupid questions have never worked in customer service.

  • Member since
    April 2010
Posted by Theuns on Sunday, October 8, 2017 11:28 PM

Bad luck with that decal, I am sure when inside the fuse it will not be noticable.

I have , in the past, on dodgy old decals used a thinned PVA glue/water mix brushed onto the model as a setting base. It is just sticky enough to help keep the decal on.


Theuns

  • Member since
    June 2010
  • From: Rochester, New York USA
Posted by rocker286 on Sunday, October 8, 2017 8:33 PM

Theuns - Great job on that Mossie! Seeing that made me wonder...why don't I have one of those in my stash?? Hmm

Lewbud - Can't wait to see what that Tempest will look like finished!

Bish -  Thank you sir! I'm glad I finally got this thing going as well.


So far I have the cockpit and fuselage together, and I cemented the wheel wells to the bottom portion of the wings tonight.
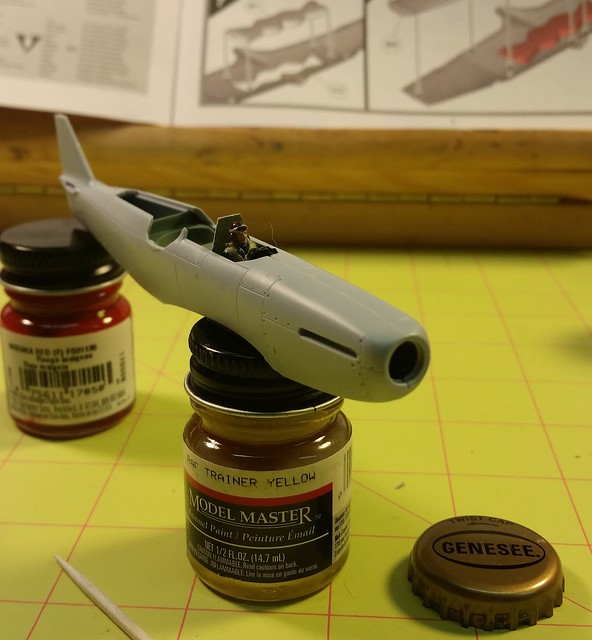
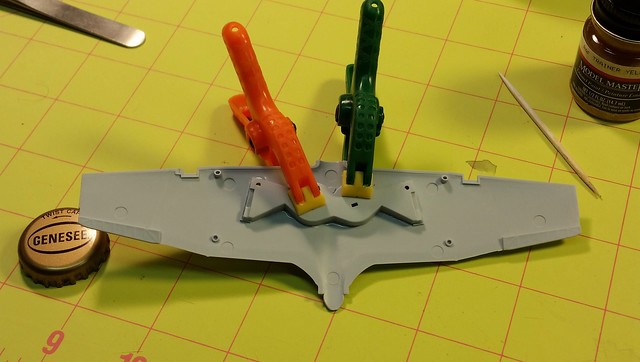
2017-10-08_08-49-27

2017-10-08_08-49-41


I DID however have a decal mishap, and as much as it pains me to share it with all of you...I'm going to share it anyway. You could call it a cautionary tale. The decal in question is the instrument panel decal for my Defiant. I cut it off the sheet and dipped it in water for about twenty seconds. Well these new decals apparently don't need more than a few seconds in water before they come off of the paper- I looked down and saw that the decal was floating at the bottom of my water cup! I had to fish it out of the cup, and ended up dragging it along the inside of said cup....and I think most of the adhesive was rubbed off of the back during this process. No matter how much setting solution i put on this decal, it would not adhere to the piece it was supposed to go on. I'd leave it for an hour and come back to find that it had curled up! So i decided to use a bit of super glue on it....and then foolishly touched the decal while the super glue was still drying. As a result, some of it melted off on my fingertip!  
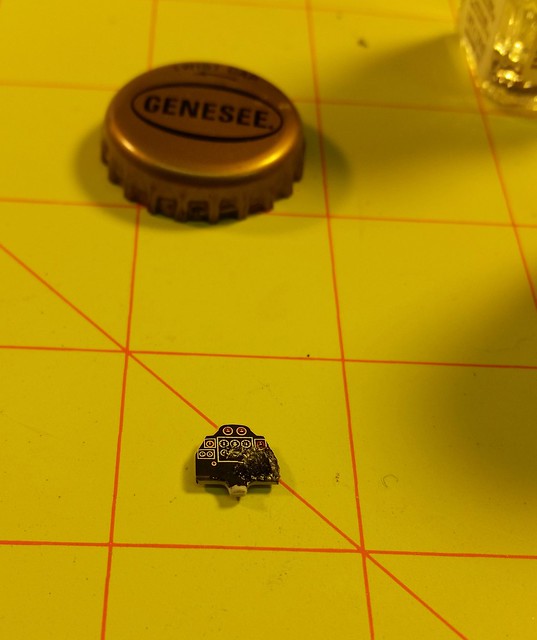
2017-10-08_03-09-12

Needless to say, I wasn't happy. But i did my best with a very fine paintbrush to try and replicate what was on the decal. Let's just say I'm happy that this one goes on the inside of the plane where it will be less noticeable!

4badges

  • Member since
    April 2005
  • From: Australia
Posted by taxtp on Sunday, October 8, 2017 8:32 PM

Nice Mossie Theuns. They look good in PRU Blue, don't they.

Good work on the Tempest too Lewbud, that's an aircraft that I like a lot.

I'll get back to my pilot figure shortly Bish, with his pet dog.

Cheers

Tony

I'm just taking it one GB at a time.

  • Member since
    December 2002
  • From: Bury St Edmunds, Suffolk, England
Posted by Bish on Saturday, October 7, 2017 3:57 AM

I am likeing that lewbud, really nice work.

I am a Norfolk man and i glory in being so


On the bench: Airfix 1/72nd Harrier GR.3/Fujimi 1/72nd Ju 87D-3

  • Member since
    June 2008
Posted by lewbud on Saturday, October 7, 2017 12:32 AM

Got an update on the Tempest.  Basically, I'm running out of things to paint.  All that's left are the landing gear, actuator struts, and the canopy.  Here's my first attempt at painting invasion stripes.  Not IPMS perfect, but not too bad.

Put your mask on, there's gonna be a paint fight.

I waited to shoot until I saw the whites of his wings.

Five stripes and you're out.

Will shoot some gloss after I wake up, hopefully start the decals on Sunday.

Buddy- Those who say there are no stupid questions have never worked in customer service.

  • Member since
    June 2008
Posted by lewbud on Friday, October 6, 2017 5:37 AM

Nice recovery on the Mossie Theuns!  It looks great.

Buddy- Those who say there are no stupid questions have never worked in customer service.

  • Member since
    December 2002
  • From: Bury St Edmunds, Suffolk, England
Posted by Bish on Thursday, October 5, 2017 2:43 PM

Front page updated, thanks again.

I am a Norfolk man and i glory in being so


On the bench: Airfix 1/72nd Harrier GR.3/Fujimi 1/72nd Ju 87D-3

  • Member since
    April 2010
Posted by Theuns on Thursday, October 5, 2017 11:19 AM

Jack, yes it is of 540 Sqn RAF based from what I could read up on Gibraltar, hence the heavy fading in the Med.


Theuns

  • Member since
    April 2006
  • From: ON, Canada
Posted by jgeratic on Thursday, October 5, 2017 9:57 AM

Hi Theuns, extremely well done Mossie. Yes

Any backdrop info for the unit the aircraft represents?

regards,

Jack

  • Member since
    April 2010
Posted by Theuns on Thursday, October 5, 2017 9:19 AM

cool, thanx for hosting.


Theuns

  • Member since
    December 2002
  • From: Bury St Edmunds, Suffolk, England
Posted by Bish on Thursday, October 5, 2017 9:06 AM

Great build Theuns, really well done on that. Thqanks for shareing with us. I'll will update the front page tonight.

I am a Norfolk man and i glory in being so


On the bench: Airfix 1/72nd Harrier GR.3/Fujimi 1/72nd Ju 87D-3

JOIN OUR COMMUNITY!

Our community is FREE to join. To participate you must either login or register for an account.

SEARCH FORUMS
FREE NEWSLETTER
By signing up you may also receive reader surveys and occasional special offers. We do not sell, rent or trade our email lists. View our Privacy Policy.