SEARCH FINESCALE.COM

Enter keywords or a search phrase below:

RAF 100th Anniversay GB

85455 views
3404 replies
1 rating 2 rating 3 rating 4 rating 5 rating
  • Member since
    July 2014
Posted by modelcrazy on Thursday, June 22, 2017 3:29 PM

Have fun and go to the Sistine Chapel for me. I missed it due to reconstruction when I was there in the 90's

Steve

Building a kit from your stash is like cutting a head off a Hydra, two more take it's place.


http://www.spamodeler.com/forum/

  • Member since
    January 2017
Posted by damouav on Thursday, June 22, 2017 4:44 PM

Rigidrider - Very nice work you have done, dam shame about the fit... Nothing less enjoyable than spending hours filling & sanding... But in the end she will be another masterpieace.

PJ - Another excellent turned out pit you have created and another super build on the way. I must source another Spit for me collection as the one I have is a little, pathetic.


In Progress
1/48 Tamiya P47-D Bubbletop
1/48 Hobby Boss TBF-1C Avenger (on hold)
Pending
1/48 Roden S.E.5a
1/48 Airfix Walrus
  • Member since
    October 2008
  • From: Georgia
Posted by Rigidrider on Thursday, June 22, 2017 6:32 PM

Fred, Damian.... Thanks guys! Guess thats just part of our hobby... LOLOL... I've started the filling of the gap, it'll just take a day or so to get it filled and smoothed out. Like you said... nothing like it! lol...

Doug


When Life Hands You A Bucket Of Lemons...

Make Lemonade!

Then Sell It Back At $2 Bucks A Glass...

  • Member since
    July 2014
Posted by modelcrazy on Thursday, June 22, 2017 11:08 PM

Here's an update of the Tornado. I painted the tail and spine gloss black. Next will be painting the exhaust areas, a little touch up adding the gear and other bits.

Steve

Building a kit from your stash is like cutting a head off a Hydra, two more take it's place.


http://www.spamodeler.com/forum/

  • Member since
    January 2017
Posted by damouav on Friday, June 23, 2017 3:07 AM

Whipping that Tornado into shape Steve, great work.

In Progress
1/48 Tamiya P47-D Bubbletop
1/48 Hobby Boss TBF-1C Avenger (on hold)
Pending
1/48 Roden S.E.5a
1/48 Airfix Walrus
  • Member since
    November 2003
  • From: Naples, FL
Posted by tempestjohnny on Friday, June 23, 2017 6:05 AM
Looking good Steve. While searching around I have noticed there are a lot of cool schemes for Tornadoes


  • Member since
    September 2014
Posted by rooster513 on Friday, June 23, 2017 7:50 AM

Looking very nice Steve!

-Andy

  • Member since
    November 2009
  • From: SW Virginia
Posted by Gamera on Friday, June 23, 2017 8:03 AM

Doug: Wow, now that is rough! Looking forward to seeing how you tackle this. 

Steve: Yeah, that's a great job on the Tornado- she's really coming together. 

Bish: Have a safe trip and enjoy your holiday! 

"I dream in fire but work in clay." -Arthur Machen


  • Member since
    January 2017
Posted by damouav on Friday, June 23, 2017 8:06 AM

Bish,

Avere un viaggio sicuro e avere un vino o due.
In Progress
1/48 Tamiya P47-D Bubbletop
1/48 Hobby Boss TBF-1C Avenger (on hold)
Pending
1/48 Roden S.E.5a
1/48 Airfix Walrus
  • Member since
    September 2003
  • From: AandF in the Badger State
Posted by checkmateking02 on Friday, June 23, 2017 10:37 AM

Fred:  good looking pilot; looks just like Bader!

Doug:  great cockpit--nice work on all those little tabs, buttons and dials

mc:  slick gloss finish on your Tornado; well done

Ciao, Bish; have fun, be safe!


  • Member since
    October 2008
  • From: Georgia
Posted by Rigidrider on Friday, June 23, 2017 6:01 PM

Thanks CMK, Gamera. Yup. I've got it puttied up and had to reapply earlier today due to the initial application cracking. That's ok though, I did apply a bit heavy trying to get deep into the gap. I'm growing to be a big fan of the Mr. Liquid Putty. It applies fairly easy, and removes fairly easy also. Maybe tomorrow I can begin three file work and get it shaped. Thanks again guys...

Doug

When Life Hands You A Bucket Of Lemons...

Make Lemonade!

Then Sell It Back At $2 Bucks A Glass...

  • Member since
    November 2008
  • From: Hatboro, PA
Posted by Justinryan215 on Friday, June 23, 2017 8:18 PM

Dang guys...as usual, I step away for a bit and then it takes forever to get caught up again!


Great builds going on here!  I can only hope that my Lanc will look as good!

"...failure to do anything because someone else can do better makes us rather dull and lazy..."

Mortal as I am,I know that I am born for a day.  But when I follow at my pleasure the serried multitude of the stars in their circular course, my feet no longer touch the Earth...


  • Member since
    July 2014
Posted by modelcrazy on Saturday, June 24, 2017 12:12 AM

Rigidrider
I'm growing to be a big fan of the Mr. Liquid Putty.

Doug, I've been using Mr Surfacer 500 and Mr Dissolved Putty for some time now and love it. I can smooth it with denatured alcohol and a Q-tip or wet sand it using denatured alcohol and it knocks it right down.

Steve

Building a kit from your stash is like cutting a head off a Hydra, two more take it's place.


http://www.spamodeler.com/forum/

  • Member since
    May 2017
Posted by Fredthefoot`s Models on Saturday, June 24, 2017 5:02 AM

Checkmate  thanks :)

Modelcrazy  lokking great mate :)

Douglas Bader sitting in waiting for me too finish cutting the wings up , i broke a gun will fix later , he a bugger went awol he flew across my cave without his parachute took me 2 hours searching inch by inch till i found him lol :)


  • Member since
    October 2008
  • From: Georgia
Posted by Rigidrider on Saturday, June 24, 2017 11:19 AM

MC... Yeah, I like the disolved putty more and more. I'll try the denatured alcohol. The regular tube putty I would use Acetone(fingernail polish remover) to begin smoothing after removing the tape guides, but you had to be real careful not to melt plastic. Thanks for the tip!

Doug


When Life Hands You A Bucket Of Lemons...

Make Lemonade!

Then Sell It Back At $2 Bucks A Glass...

  • Member since
    September 2003
  • From: AandF in the Badger State
Posted by checkmateking02 on Saturday, June 24, 2017 11:20 AM

Nice work, Fred.  With guns and other appendages molded into wings, etc., you can almost always be sure something will break off during construction.  It's a pain when it happens, especially after painting.

Some progress on the Hampden:

nose canopy painted and unmasked

along with the replacement after market Lewis gun for the above; detail is better than the kit guns

the lower  and upper canopies also painted up


  • Member since
    July 2014
Posted by modelcrazy on Saturday, June 24, 2017 1:12 PM

Fred thanks, Your coming along nicely as well. I saw a Hasegewa 1/32 Douglas Bader Spit yesterday but the price was a little too rich for me at the time.

Doug, It takes around 30 sec for the alcohol to start working but it won't dissolve the plastic.

Check, nice masking.

Steve

Building a kit from your stash is like cutting a head off a Hydra, two more take it's place.


http://www.spamodeler.com/forum/

  • Member since
    September 2003
  • From: AandF in the Badger State
Posted by checkmateking02 on Saturday, June 24, 2017 1:37 PM

Thanks, mc.

Got the Hampden painted up
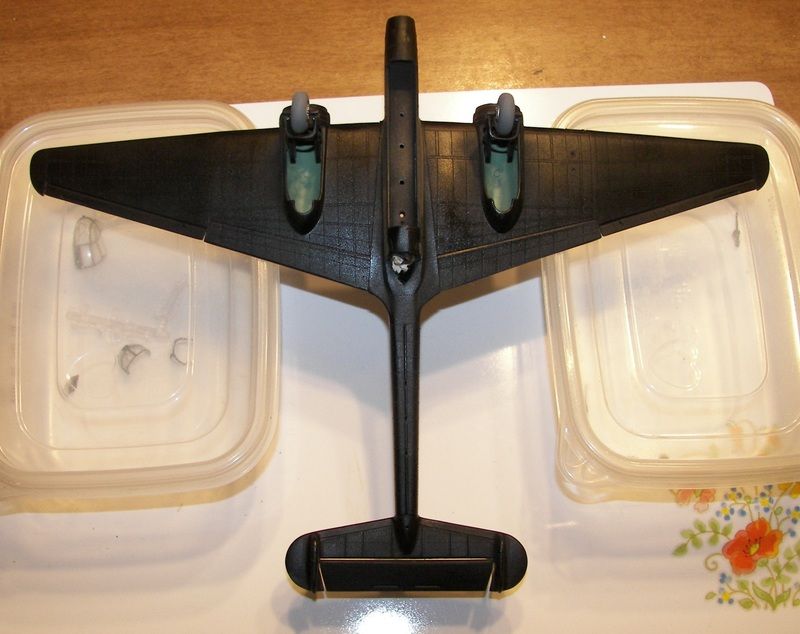
colors look somewhat off, probably due to the room lighting; I used Colourcoats from WEM before they sold off to Sovereign
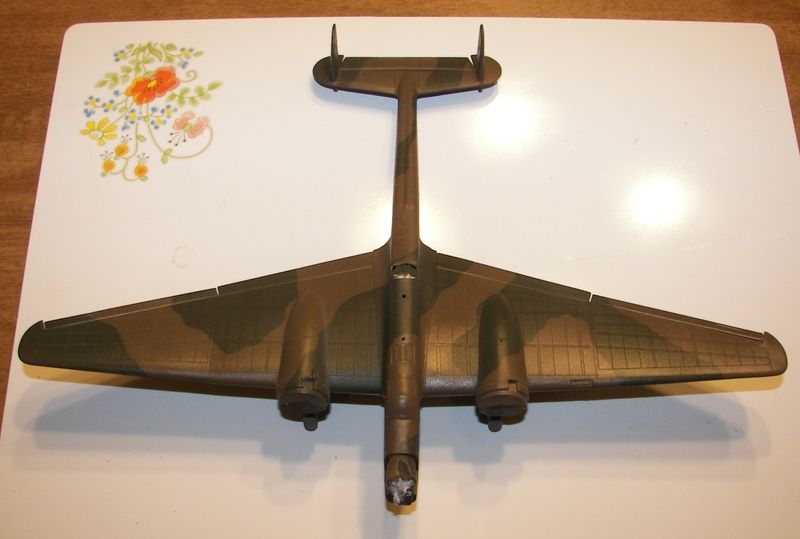
nice collection of rivets, there

decaled it yesterday and did some touch-up where the fin stripe markings don't quite meet; then went to the basement today to apply a matte finish coat, and found this!
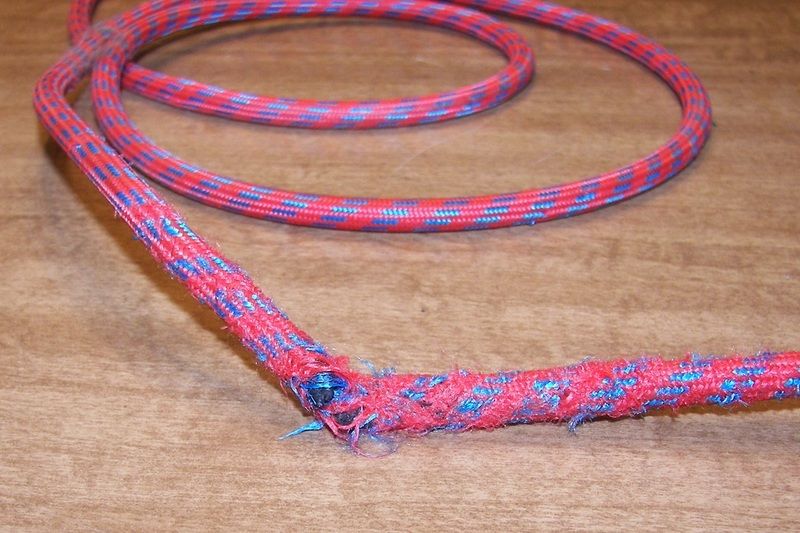
One of the cats must have been bored and had a high old time chewing through the airbrush hose.  And to think I just bought them a nice selection of new toys last week! Ungrateful wretches!  Even the dog knows better than this!

Wilted Flower

I ordered a new one straight-off from Amazon, but it'll take a week to get here.  

Meantime, I'm stymied.


  • Member since
    May 2017
Posted by Fredthefoot`s Models on Saturday, June 24, 2017 2:08 PM

checkmate canopys look awsome i still need to practice masking , dam shame about the hose mate :)

Modelcrazy a saw that spit too rich for me anytime lol :)

i`m have the same luck as Checkmate cut all the wings , sanded and glued them  where i want and the panels  , build is now on hold as the wheel struts are missing and i dont have any spares GRRRRR was going well too  a mate saw my post on facebook and happy to say he has spares so now have to wait till near the end of next week for postman before i can carry on :)


  • Member since
    October 2016
  • From: .O-H-I-O....
Posted by DasBeav on Saturday, June 24, 2017 4:13 PM

checkmateking02

Thanks, mc.

Got the Hampden painted up

colors look somewhat off, probably due to the room lighting; I used Colourcoats from WEM before they sold off to Sovereign

nice collection of rivets, there

decaled it yesterday and did some touch-up where the fin stripe markings don't quite meet; then went to the basement today to apply a matte finish coat, and found this!

One of the cats must have been bored and had a high old time chewing through the airbrush hose.  And to think I just bought them a nice selection of new toys last week! Ungrateful wretches!  Even the dog knows better than this!

Wilted Flower

I ordered a new one straight-off from Amazon, but it'll take a week to get here.  

Meantime, I'm stymied.


Looking good, Checkmate. Never done a Hampden...still creep me out how narrow they were. I always heard if the pilot died/wounded...rest of the crew was SOL. My cats haven't done the wire thing but have woke up with parts missing and/or chewed up....

 Sooner Born...Buckeye Bred.


  • Member since
    September 2003
  • From: AandF in the Badger State
Posted by checkmateking02 on Saturday, June 24, 2017 5:16 PM

Thanks, Fred and DB.

The Hampden has a kind of insect-look to it, I think.  

As for the cats. . .I tried some patchwork with electrical tape, and when I tried it out, discovered even more holes along the hose.  They were pretty busy.


  • Member since
    January 2017
Posted by damouav on Saturday, June 24, 2017 5:32 PM

Fred - The Hurricane is coming along beautifully, annyoing about small parts getting broken.

CM - What a briliant job you did with the masking, and a skill I'm yet to excel in. I notice some builders add their canopies before painting the fuselage and some don't. I will try adding after, as I belive you get way to much paint build up with the canopy masks.

As for your build over all, 10/10!

Animals are funny things, one moment they can do really bad things (chew the lounge up) and the next time they can snuggle up with you (self presevation) on those cold nights.


In Progress
1/48 Tamiya P47-D Bubbletop
1/48 Hobby Boss TBF-1C Avenger (on hold)
Pending
1/48 Roden S.E.5a
1/48 Airfix Walrus
  • Member since
    July 2014
Posted by modelcrazy on Sunday, June 25, 2017 12:24 AM

A short update,

Started placing the decals. The Xtradecals I got are fantastic. Thin enough to set nicely with setting fluid but not so thin to break or curl while removing them. I still have several to install.

Steve

Building a kit from your stash is like cutting a head off a Hydra, two more take it's place.


http://www.spamodeler.com/forum/

  • Member since
    January 2017
Posted by damouav on Sunday, June 25, 2017 3:59 AM

Steve - That's some mighty fine work on the decals, very nice.

In Progress
1/48 Tamiya P47-D Bubbletop
1/48 Hobby Boss TBF-1C Avenger (on hold)
Pending
1/48 Roden S.E.5a
1/48 Airfix Walrus
  • Member since
    November 2003
  • From: Naples, FL
Posted by tempestjohnny on Sunday, June 25, 2017 6:29 AM
Great work by all.


  • Member since
    March 2017
Posted by Armor_Aficionado on Sunday, June 25, 2017 7:24 AM
Rigidrider, how did you get the radio antenna wire on your Hurricane to look so good? I always try using real wire (very thin metal electrical wire, such as that wound around electromagnets in small appliances), but can never get it taut enough; my wires always sag quite a bit. Yours looks great, so how do you do it?

  • Member since
    November 2008
  • From: Central Florida
Posted by plasticjunkie on Sunday, June 25, 2017 7:53 AM

Armor_Aficionado
Rigidrider, how did you get the radio antenna wire on your Hurricane to look so good? I always try using real wire (very thin metal electrical wire, such as that wound around electromagnets in small appliances), but can never get it taut enough; my wires always sag quite a bit. Yours looks great, so how do you do it?


I believe Doug used a product called EZ Line. It's very easy to attach with ca. I recently was introduced to it by another modeler from this forum and love using it.

 GIFMaker.org_jy_Ayj_O


Too many models to build, not enough time in a lifetime!!

  • Member since
    March 2017
Posted by Armor_Aficionado on Sunday, June 25, 2017 7:58 AM

Latest progress:  filling the gaps on the 1/72 Spitfire  https://www.pinterest.de/pin/55450639145781791/

And the sub-assembies are coming together on the Albion refueler; almosttime to start trowing them together on the chassis:  https://www.pinterest.de/pin/55450639145781792/

  • Member since
    June 2014
Posted by BrandonK on Sunday, June 25, 2017 11:18 AM

Steve, your tornado is looking very nice. I have a special markings kit in my stash. I hope it looks half as good as yours when I finally get around to it.

BK

On the bench:

A lot !! And I mean A LOT!!

2024 Kits on deck / in process / completed   

                         14 / 5 / 2  

                              Tongue Tied

  • Member since
    September 2003
  • From: AandF in the Badger State
Posted by checkmateking02 on Sunday, June 25, 2017 12:55 PM

damouav

Fred - The Hurricane is coming along beautifully, annyoing about small parts getting broken.

CM - What a briliant job you did with the masking, and a skill I'm yet to excel in. I notice some builders add their canopies before painting the fuselage and some don't. I will try adding after, as I belive you get way to much paint build up with the canopy masks.

As for your build over all, 10/10!

Animals are funny things, one moment they can do really bad things (chew the lounge up) and the next time they can snuggle up with you (self presevation) on those cold nights.


Thanks, Damian.

Normally, I attach canopies before painting--as with fighter aircraft.

With the Hampden, three of the canopies have guns protruding through them, and that would have created masking issues I didn't want to deal with, if attached before painting.

I did attach the cockpit and upper fuselage canopies before painting, so the Hampden is a mix of both procedures. 

Thanks for your generous comment!

As for the cats--we are still on speaking terms!

mc:  very attractive markings!  Well-done!


JOIN OUR COMMUNITY!

Our community is FREE to join. To participate you must either login or register for an account.

SEARCH FORUMS
FREE NEWSLETTER
By signing up you may also receive reader surveys and occasional special offers. We do not sell, rent or trade our email lists. View our Privacy Policy.