SEARCH FINESCALE.COM

Enter keywords or a search phrase below:

Russian Armor Group Build November 2017 - November 2018

38259 views
940 replies
1 rating 2 rating 3 rating 4 rating 5 rating
  • Member since
    July 2014
Posted by modelcrazy on Thursday, January 25, 2018 8:22 AM

Thanks guys,

SD, I would say maybe around a month, working on it a couple hours 4 or 5 times a week.

Steve

Building a kit from your stash is like cutting a head off a Hydra, two more take it's place.


http://www.spamodeler.com/forum/

  • Member since
    November 2009
  • From: SW Virginia
Posted by Gamera on Thursday, January 25, 2018 7:51 AM

Nick: Thanks! I'm going to drag out a old test model and give that a try! 

Steve: Think I'm going to go look over your USS Puffer diorama again. Great job, it's worth the time for me to stare and drool once more! 

"I dream in fire but work in clay." -Arthur Machen


  • Member since
    August 2015
  • From: the redlands Fl
Posted by crown r n7 on Thursday, January 25, 2018 6:55 AM

Bow Down

That’s fantastic 


 Nick.

  • Member since
    September 2017
  • From: Netherlands
Posted by Sailing_Dutchman on Wednesday, January 24, 2018 10:42 PM

WOW! That is an amazing dioroma, how long did it take?


  • Member since
    July 2014
Posted by modelcrazy on Wednesday, January 24, 2018 9:31 PM

Thanks D, here's the WIP link if you wanted to take a peek.

http://cs.finescale.com/fsm/modeling_subjects/f/7/t/170521.aspx

Steve

Building a kit from your stash is like cutting a head off a Hydra, two more take it's place.


http://www.spamodeler.com/forum/

  • Member since
    September 2016
  • From: Albany, New York
Posted by ManCityFan on Wednesday, January 24, 2018 9:28 PM

Steve, you are killing me.  That is an incredible diorama.  Bow Down Bow Down

Dwayne or Dman or just D.  All comments are welcome on my builds. 

  • Member since
    July 2014
Posted by modelcrazy on Wednesday, January 24, 2018 9:17 PM

crown r n7
modelcrazy with all that mudddy water you gotta have some dirt on the tools lol

I must admit that I've never done dirty water before. I like pushing my limits. My biggest push was the Puffer launch.

Steve

Building a kit from your stash is like cutting a head off a Hydra, two more take it's place.


http://www.spamodeler.com/forum/

  • Member since
    August 2015
  • From: the redlands Fl
Posted by crown r n7 on Wednesday, January 24, 2018 7:54 PM

Griffin25 thank you its been a change using vallejo I hadnt had much luck with their paints but the pigments work very well.

modelcrazy with all that mudddy water you gotta have some dirt on the tools lol

gamera I mix it until it looks like muddy water and spray at 15 or so lbs. to build up slowly this stuff is very forgiving. I had a harder time applying it dry


 Nick.

  • Member since
    November 2009
  • From: SW Virginia
Posted by Gamera on Wednesday, January 24, 2018 6:43 PM

Nick: So I'm guessing you mixed the pigment and sprayed it? I've tried pigments before and never got it to look the way I wanted it. Yours turned out terrific!

Steve: That looks great! I too wouldn't have thought of doing a muddy river. Looks amazing.

"I dream in fire but work in clay." -Arthur Machen


  • Member since
    July 2014
Posted by modelcrazy on Wednesday, January 24, 2018 5:38 PM

Thank you. Hmmm, it looks like I need to dirty up the tools just a scoch.

Steve

Building a kit from your stash is like cutting a head off a Hydra, two more take it's place.


http://www.spamodeler.com/forum/

  • Member since
    May 2015
Posted by Griffin25 on Wednesday, January 24, 2018 4:44 PM

modelcrazy

Nick, that looks fantastic man!! Bow Down I'll HAVE to remember that trick.

The base painting is complete and the vehicle is in its place. I started to add some cotton for the splashes at the front, sides and rear wake. I'll add more coats of acrylic varnish to deepen the wet water look then add some more cotton. Eventually I'll add the thrust tails from the jets.

Steve


Steve! Amazing work. You don't see muudy water effects too often and that looks great!


Griffin

  • Member since
    May 2015
Posted by Griffin25 on Wednesday, January 24, 2018 4:41 PM

Oh ya that looks terrific Nick, just figured out your name. That pigment binder did the trick. Great looking T-62!


Griffin

  • Member since
    August 2015
  • From: the redlands Fl
Posted by crown r n7 on Wednesday, January 24, 2018 3:48 PM

yes it did lighten up and it dries up pretty tough. I hear you   on the freezing .


 Nick.

  • Member since
    September 2016
  • From: Albany, New York
Posted by ManCityFan on Wednesday, January 24, 2018 3:24 PM

Hey Nick, that Beast keeps looking better with every picture!  I think the pigment will lighten up, but even if it doesn't, that just looks great.  You have the desert look down!

Gonna have to pick up some pigment binder when it warms up enough for it not to freeze in transit. 

Dwayne or Dman or just D.  All comments are welcome on my builds. 

  • Member since
    September 2016
  • From: Albany, New York
Posted by ManCityFan on Wednesday, January 24, 2018 3:21 PM

crown r n7

Modelcrazy that looks fantastic!Bow Down 


Ditto I know, Right?  Watching that dio come together is way fun!

Dwayne or Dman or just D.  All comments are welcome on my builds. 

  • Member since
    August 2015
  • From: the redlands Fl
Posted by crown r n7 on Wednesday, January 24, 2018 2:45 PM

Modelcrazy that looks fantastic!Bow Down 


 Nick.

  • Member since
    July 2014
Posted by modelcrazy on Wednesday, January 24, 2018 2:21 PM

Nick, that looks fantastic man!! Bow Down I'll HAVE to remember that trick.

The base painting is complete and the vehicle is in its place. I started to add some cotton for the splashes at the front, sides and rear wake. I'll add more coats of acrylic varnish to deepen the wet water look then add some more cotton. Eventually I'll add the thrust tails from the jets.

Steve

Steve

Building a kit from your stash is like cutting a head off a Hydra, two more take it's place.


http://www.spamodeler.com/forum/

  • Member since
    August 2015
  • From: the redlands Fl
Posted by crown r n7 on Wednesday, January 24, 2018 1:06 PM

Gamera thanks bud placed tracks in.removed  some of the dust and sprayed the binder

mancityfan thank you it takes some getting used to but it comes off easy with a soft brush.

looks kind of dark it should lighten back up I hope   ?


 Nick.

  • Member since
    July 2014
Posted by modelcrazy on Wednesday, January 24, 2018 9:30 AM

Sailing_Dutchman

How did you do the dot filters? I would like to, but I don't know how.


Hi SD.

Dot filters are easy. I use oils for them because for me, oils are much easier to deal with.

Dot filters are literally dots of differing colors placeall over a surface. I uesd yellow,  white, red, umber, and green. I use a toothpick to "dot" these colors all over the surface. I then take a wide artists brush to blend the colors by pulling them down or up if on a vertical surface. I will also use thinner remove the bulk of what I put on. This takes some time to get the effect I'm looking for but it can be heavy or light.

You can use any medium, but like I said, I prefer oils.

There are also several good videos by YouTubers

Steve

Building a kit from your stash is like cutting a head off a Hydra, two more take it's place.


http://www.spamodeler.com/forum/

  • Member since
    September 2016
  • From: Albany, New York
Posted by ManCityFan on Wednesday, January 24, 2018 8:49 AM

Wow, there is so much great stuff happening in the GB!  Hard to keep up.

Steve, the modulation on that kit is outsanding, and the decals pull it together wonderfully.  This is going to be a masterpiece when in the water dio.

wayne, I have had the same problem with filler showing after painting despite several applications.  I never seem to be able to get the filler as smooth as the plastic.  It usually sorts itself out after multiple applications and much foul language.

Nick, the Beast is looking great!  I had never thought of airbrushing pigments, but the results you obtained makes me want to try it.  It gives a nice, even, layer of dust.  Well done!

Dwayne or Dman or just D.  All comments are welcome on my builds. 

  • Member since
    November 2009
  • From: SW Virginia
Posted by Gamera on Wednesday, January 24, 2018 7:24 AM

Steve & Nick: Those look fantastic guys! 


"I dream in fire but work in clay." -Arthur Machen


  • Member since
    September 2017
  • From: Netherlands
Posted by Sailing_Dutchman on Tuesday, January 23, 2018 9:24 PM

How did you do the dot filters? I would like to, but I don't know how.


  • Member since
    August 2015
  • From: the redlands Fl
Posted by crown r n7 on Tuesday, January 23, 2018 3:59 PM

the dusty beast ? we will see what happens next with the pigment binder


 Nick.

  • Member since
    August 2015
  • From: the redlands Fl
Posted by crown r n7 on Tuesday, January 23, 2018 3:19 PM

gamera thanks that creature is a lot of fun. I'm still working on another creature with the girl its been shelved for a bit. Im sure yours will come out great.

modelcrazy nice smooth finish and decals top notch


 Nick.

  • Member since
    May 2015
Posted by Griffin25 on Tuesday, January 23, 2018 2:20 PM

That looks really sharp!! So well balanced and the decals look great.


Griffin

  • Member since
    July 2014
Posted by modelcrazy on Tuesday, January 23, 2018 2:16 PM

After some dot filters and washes, I finished the weathering. I need to add the tools and MG and also need to complete the base.

Steve

Building a kit from your stash is like cutting a head off a Hydra, two more take it's place.


http://www.spamodeler.com/forum/

  • Member since
    November 2009
  • From: SW Virginia
Posted by Gamera on Tuesday, January 23, 2018 7:22 AM

Wow guys great work all around! So much progress here I'm afraid I'd leave someone out if I try to single out everyone...

I will single out Nick here, love that Creature! I'm very slowly working on one here and hope mine turns out half as good as yours. Yes

"I dream in fire but work in clay." -Arthur Machen


  • Member since
    August 2015
  • From: the redlands Fl
Posted by crown r n7 on Tuesday, January 23, 2018 6:44 AM

Bufflehead thank you, but I do have a hulk figure still in the box its a 60's thing my kid bought a few of them for me . some more weathering on the t62


 Nick.

  • Member since
    July 2006
  • From: San Francisco Bay Area
Posted by bufflehead on Monday, January 22, 2018 11:10 PM

Nick - the MG is looking good, so are the tracks!  And great CFtBL figure!  Quite the different take on "green and wet"!!Big Smile

modelcrazy - great shading on the PT-76!  The green is mean! (will Nick bust out a Hulk figure??)  I think I know where you're going with the brown base paint for the water....eagerly awaiting more updates!!


Ernest

Last Armor Build - 1/35 Dragon M-26A1, 1/35 Emhar Mk.IV Female


Last Aircraft Builds - Hobby Boss 1/72 F4F Wildcat & FW-190A8


  • Member since
    April 2015
Posted by Mopar Madness on Monday, January 22, 2018 7:45 PM

modelcrazy


bufflehead
Soon it will be green and wet!


The first thing I thought of the Creature form the Black Lagoon LOL.

Thank you Bufflehead,Gam and Nick.

I sprayed a few shades of green and this is where it's at now. Time for some washes and some detailing while I work on the base some more.
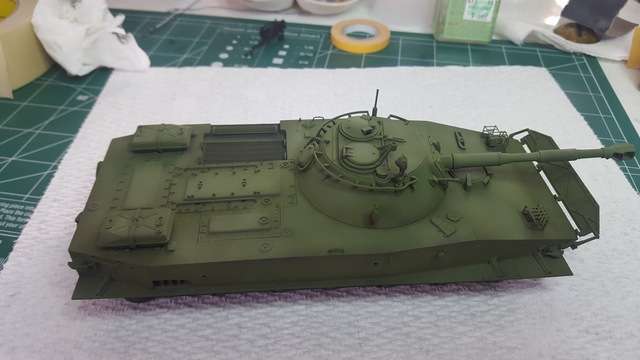
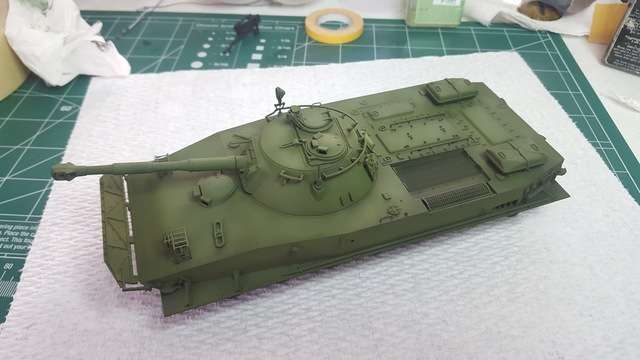
 

Great paint modulation!

Chad

God, Family, Models...

At the plate: 1/48 Airfix Bf109 & 1/35 Tamiya Famo

On deck: Who knows!

JOIN OUR COMMUNITY!

Our community is FREE to join. To participate you must either login or register for an account.

SEARCH FORUMS
FREE NEWSLETTER
By signing up you may also receive reader surveys and occasional special offers. We do not sell, rent or trade our email lists. View our Privacy Policy.