SEARCH FINESCALE.COM

Enter keywords or a search phrase below:

Aircraft of the Commonwealth GB

44689 views
1113 replies
1 rating 2 rating 3 rating 4 rating 5 rating
  • Member since
    November 2009
  • From: SW Virginia
Posted by Gamera on Monday, September 17, 2018 11:25 AM

Looks fantastic to me BD. Yes

"I dream in fire but work in clay." -Arthur Machen


  • Member since
    January 2015
Posted by BrandonD on Monday, September 17, 2018 11:23 AM

Ok, a week (or two) later than I'd hoped to, but I finally got the 1/48 Airfix Hurricane into paint. Isn't that always the way?

This kit's fit issues at the leading edges of the wings meant I took off a decent amount of plastic. Not enough to notice, but enough to make the landing light lenses stand proud. So I installed them, then sanded them down to fit th eprofile of the wing, then polished them and masked them.

I used to be terrified of sanding clear parts, but it's actually really easy, and you can buff out the scrathces really well. Unfortunately no pics, so you'll have to see it on the final build.

Untitled

So that's it all assembled and primered. It's not perfect, as the front wing root and cowl join is less than ideal, but fixing it would be a nightmare, and it's not too noticeable.

I started paintwork with Model Master Azure. And honestly, I hated working with the paint. I think I'm going to trash my remaining enamels after this build. I've just gotten too spoiled off Tamiya, Gunze and Mr. Paint.

I shot the top colors with Gunze Dark Earth and Middle Stone. I masked the blue but shot the rest freehand. For colors, I was going off a Berna Decals color guide, but it only has the left-hand side on it. For the right, I hunted and hunted for a right hand color guide but couldn't find a pic of the particular aircraft or guide, so I based it on another French plane I found in the same scheme.

Untitled

I remember when I started modeling again, I thought the desert scheme looked stupid, and figured I'd never build one. But here I am building two in this group build - this Hurricane and my 1/72 Spitfire - and one of my favorite finishes of all time is a 1/48 Spitfire in US markings in this scheme. Who would have thought?

This thing is far from finished, as now it's time to clear it, decal it, and then get to weathering.

-BD-

  • Member since
    December 2002
  • From: Bury St Edmunds, Suffolk, England
Posted by Bish on Sunday, September 9, 2018 3:24 AM

Eric, nice work on the P-40 and some great info, thank you.

I am about to start on the Phantom, hopefully 3rd lucky in this GB and it goes together with the issues of the otehr 2 builds.

And in case you were woundering, i have asked one of the guys from the model club if he can help with the Apache canopy. He does a lot of reviews on Brit Modeller so i am hopeing he can get one through his contacts. I won't see him until Oct so will have to wait until then.

I am a Norfolk man and i glory in being so


On the bench: Airfix 1/72nd Harrier GR.3/Fujimi 1/72nd Ju 87D-3

  • Member since
    February 2010
  • From: Berkeley CA/St. Paul MN
Posted by EBergerud on Saturday, September 8, 2018 2:59 PM
Gamera: Yea, the P-40 and F4F/FM2 were in service throughout the war, although production of P40s halted in late 44. The P39 also served throughout, although in other people's air forces. The Rooskies famously found a good role for it in the low altitude air war in the Ost. Free French and "our" Italians had P-39 squadrons. When I wrote Fire in the Sky I stumbled on a very neat document published in an obscure aviation journal. In 1944 Lockheed did an internal study about the production of the P-38. They concluded that the development of the P-38, began in earnest in 1939, had put a big hole in Lockheed finances. When the war in Europe began the French and Brits thought they could convert the Lockheed Electra air liner into a light scout bomber which the RAF called the Hudson. The allies would buy every Hudson Lockheed could produce. Lockheed decided to make a profit and dedicated their limited facilities to Hudson production and put the Atlanta (what the US would have called the 38 - the Brits called it Lightning: didn't matter though - US pilots that I talked to always called it the "38" just as I never heard Warhawk or, worst of all, SkyTrain: it was "P-40" and "C-47 or Goony") on the backburner and worked on the plane's many bugs. Lockheed concluded that had they told the RAF they'd have to do with way fewer Hudsons in 1940, and put full effort into getting the 38 into production it would have been appearing in US squadrons a full year earlier - that would be April 1942. Bad business too. The 38 was costly to the USAAF because of its twin engines so profits were high and Lockheed ended up selling a lot of them. (Production stopped just before war's end. The P-38L was a wonderful plane - Germans must have thought we were piling on by late 44 as the 38 flying from Europe had the same effective range as the Mustang and were widely used. Postwar production wasn't considered because a twin engine plane had so much extra maintenance) I'm sure the Japanese were glad Lockheed made Hudsons or they would have been facing Army 38s on Guadalcanal. And with a year's extra production something like the P38L could have been escorting B-17s well into Germany by mid-43. Eric


A model boat is much cheaper than a real one and won't sink with you in it.

  • Member since
    April 2006
  • From: ON, Canada
Posted by jgeratic on Saturday, September 8, 2018 10:58 AM

Eric, she looks good.

It's been almost two years since the release of this Airfix kit, so would have to brush up on what has been said about this kit.   Just quickly found that the trim tab on the rudder is not scribed on one side:

Easiest fix would be just to cut the tab out and replace with some plastic card.  Also the hinge at the top should be removed on the starboard side.

There was also some talk about two panel lines below the cockpit should really be rows of rivets.


regards,

Jack

  • Member since
    November 2009
  • From: SW Virginia
Posted by Gamera on Saturday, September 8, 2018 9:14 AM

Eric: She's looking good! Great to see her ready for primer.


The P-40 may have never been the best fighter but I believe she was one of the few US fighters to serve the whole war from start to finish. The F4F is the only other fighter I can think of that could say the same.


"I dream in fire but work in clay." -Arthur Machen


  • Member since
    February 2010
  • From: Berkeley CA/St. Paul MN
Posted by EBergerud on Saturday, September 8, 2018 3:26 AM


Progress report on Tomahawk.


I've following a build log I found on a nice site called iModeler. Glad I did. The gent alerted me to a very bad fit on the leading edge wheel well fairings (the little knobs that protrude over the leading ledge from the wheel wells). Right he was. At least I was forewarned. It was like working on an old Zvezda kit - just a botch by Airfix. The soft plastic they use does make surgery a little easier and it was needed here. I plugged it with Gunze's melted plastic putty and some very thin plastic rod: should be okay. The gent did say it was clear sailing from there on - maybe he's right. I got the tail together with little trouble. (Checked a lot of photos - it looks like most P-40s on the ground had their flaps in flight position - except for the ones that were up or down. So straight it is.) My guru also complemented Airfix on a solid landing gear - let's hope he's right there. I'll try to get gear covers to lay down there so they'll get painted too. Don't think I'm going to put on a bomb or fuel tank.


So here it is more or less ready for the black primer. I usually paint the canopy separately - I could put it on after primer I suppose - a soak in Lysol with clear it of any acrylic products, but not Duplicolor automotive lacquer.


 unprime2 by Eric Bergerud, on Flickr


 UnPrime1 by Eric Bergerud, on Flickr


There are plenty of ways to screw it up, but I think it's looking okay. The P-40 was a very useful aircraft and served throughout the war. It certainly wasn't our best. In general pilots I talked with liked the plane for its reliability and ruggedness. One of our earliest P-40 aces was Jim Morehead - was introduced to air combat in in June 1942 on Java. (He made a very interesting comment. He said when he first deployed he and his mates all thought they'd be invincible. But when they were hit by the Japanese tide at flood, the mood changed instantly. Then everyone thought they'd die the next mission.) Morehead did survive and got kills in the early defense of Darwin. He said the P-40 was adequate. He also said as an American he thought our pilots deserved the best and adequate wouldn't win wars. It's no real news that the US wasn't ready for war in December 1941 - and nobody had quite understood the staggering wastage inherent in modern war, so it was hard to have too many aircraft. And Desert Air Force certainly got good use from it. So until the second generation fighters showed up in early 1943, the P-40 (we were flying P-40Es soon) and the Wildcats were the only game in town. They did hold the store. Indeed, by the beginning of 1943 Wildcats and P-40s had both established a favorable combat kill ratio against Japanese aircraft. And even the Tomahawks did nicely until Macchi 202s and BF-109Fs started to show up. But the early 38 was so tricky that the P-40 was probably the best US plane in North Africa until our squadrons started getting SpitVs and IXs in reverse lend lease. The Luftwaffe did give us some bad days, but in the end, they lost.


But hell with the operational record and the stats. The P-40 in my eyes really looks the part of a fighter. It's got very nice lines. (Much better in my eyes than the P-47 or Corsair: even the P-51 reminds me of a guppy.) I've seen several because the Allison engine planes were good warbirds for early collects a generation back, and they look and sound lethal.


Eric


A model boat is much cheaper than a real one and won't sink with you in it.

  • Member since
    January 2015
Posted by BrandonD on Thursday, September 6, 2018 5:10 PM

Thanks, all!

Eric - yeah I'll be using EZ Line. I have used it on my 1/48 biplanes and really like how it handled. For the anchor points, since it's the dual-wire setup, I sprung for the RB Productions RAF rigging points set, which should help. I'm not going to worry about EZ line bieng round and not aero wire.

I've built Airfix's P-40B and Hurricane Mk.I before, and I agree - the P-40 is a little more polished. The first Hurricane I built didn't have the issues with the leading edges of the wings lining up that I am having on this one, so i don't know what's the norm. On my last one, I had an issue with a step at the lower fuselage-to-wing join, and this one doesn't appear to have that issue, even though it's theoretically the same parts from the same mold.

Thanks for the info on the P-40s - I am envious that you got to talk to a double ace on the P-40! My hurricane will be in Free French markings that I got from Bossman on here.

-BD-

  • Member since
    December 2002
  • From: Northern California
Posted by jeaton01 on Thursday, September 6, 2018 2:32 PM

All very nice , Brandon.

John

To see build logs for my models:  http://goldeneramodel.com/mymodels/mymodels.html


  • Member since
    February 2010
  • From: Berkeley CA/St. Paul MN
Posted by EBergerud on Wednesday, September 5, 2018 11:02 PM
Brandon I've heard mixed reviews of the Airfix Hurricane I. Have heard fit problems with the cockpit - the engineering on the P-40 is quite different. Others give it a thumbs up. Probably a good kit to be careful with - a lot of dry fitting, look for little errors etc. Certainly has been the case with the P40. And I sold the Tamiya/Italieri to buy the standard Hurricane I, so I'm rooting for you. The "Trop" versions of any of the fighters really make them ugly and it must have hammered its performance. The Tomahawk was considered a poor choice for use in England, but even the early versions sent to the desert were considered a real improvement over the Hurricane. Actually the Hurricane had seen its day during the Battle of Britain and served as a suitable interceptor. But it only found another place when they threw canon on the thing and used it for ground attack for Desert AF - finally replaced by the Typhoon. Operational matters meant a lot. The head of the US Fighter Program, Gen Ben Kelsey, wrote after the war that he had flown a SpitV across the US in 1942, showing it to everyone who wanted to see one (like every pilot in the USAAF). He said the plane was impossible not to like. He also said the P-40 was a better plane for the US because it could stand up to the huge variations of conditions and climate found in US territories - from Panama to Alaska. And US planes didn't need Trops for that reason. P-40 actually had a good kill/loss ratio - a good pilot could get a lot out of it. I interviewed Robert DeHaven, a 5th AF ace who said he like the P-40 better than the P-38 because it was so rugged and he knew it (a double P-40 ace: not many of them). He took up the 38 because of its superior range - it was the only game in town in the PTO after late 43 if you wanted to get to the enemy. (Who is going to be the first company to come out with a new tool P-38? I think Tamiya or Airfix would make a bundle on it. Both the Academy/Minicraft and Hasegawa kits are old and supposedly very hard builds.)


A model boat is much cheaper than a real one and won't sink with you in it.

  • Member since
    November 2009
  • From: SW Virginia
Posted by Gamera on Wednesday, September 5, 2018 9:12 PM

Brandon: All three of those look fantastic!!!

Esp love the wood grain look you got on the SE.5 cockpit.

"I dream in fire but work in clay." -Arthur Machen


  • Member since
    December 2002
  • From: Bury St Edmunds, Suffolk, England
Posted by Bish on Wednesday, September 5, 2018 1:58 PM

BD, you really are keeping busy, nice work on all 3. Very much looking forward to the WNW build.

I am a Norfolk man and i glory in being so


On the bench: Airfix 1/72nd Harrier GR.3/Fujimi 1/72nd Ju 87D-3

  • Member since
    February 2010
  • From: Berkeley CA/St. Paul MN
Posted by EBergerud on Wednesday, September 5, 2018 1:37 PM
Always nice to see a bipe. As I recall the SE5 is another of the RAF planes with double rigging wires - always fun. What's for rigging? I see WNW now recommends EZ Line. The last bipe I built a couple of years back was rigged with 2lb mono on the recommendation at the time from Des Delatorre. It actually works very well - if you run some lit incense under it, giving it just a little heat, it will tighten right up. If you're curious, Des Delatorre has a build log for WNW SE5 at his splendid site .ww1aircraftmodels.com. Des is one of the best bipe gurus on the planet and a really nice gent - forum is very helpful and the builds of exceptionally high quality. I think of ship builders everytime I look there. A lot of fanatics. Eric


A model boat is much cheaper than a real one and won't sink with you in it.

  • Member since
    January 2015
Posted by BrandonD on Wednesday, September 5, 2018 12:04 PM

And now for project three for this group build, my 1/32 Wingnut Wings SE.5a.

I'm at really early stages on this one, with just some cockpit work done and some work on the MG.

The cockpit was painted Tamiya Desert Yellow, then slathered with raw umber oils, and then I dragged a sponge across it to make the wood grain. Once dry, I mixed 1:1 clear orange and clear yellow to spray over the top.

Gauges are decals from the kit, and I'm waiting on some Gunze brass to come in so I can pick out some of the details.

Untitled

As for the cowl machine gun, this is one of the older Wingnut Wings kits, and the barrel and shroud are molded together, but the barrel shroud should be hollow. It's a quick fix - I cut off the barrel, drilled out the shroud, ran some Tamiya Extra Thin Cement around inside to smooth it out, then painted it gunmetal. Next step will be to use styrene tube protrude from the depths to the front through the PE part that serves as the triangular wire front of the barrel, then cut ot off flush and reattach the kit barrel part.

Untitled

After that, it's on to the engine, seat and belts, then some rigging.

-BD-

  • Member since
    January 2015
Posted by BrandonD on Wednesday, September 5, 2018 11:54 AM

Project Two of mine for this build is the 1/72 Hasegawa Spitfire where I had the decal issues. But my new decals came in, and I pulled the top roundels to replace the ones that shattered from the kit.

Also, if anyone wants a sheet of 1/72 decals for Czech Spitfire Mk.IX airframes without two upper wing roundels, let me know, as they'll likely just sit in my drawer unused.

Untitled

-BD-

  • Member since
    January 2015
Posted by BrandonD on Wednesday, September 5, 2018 11:52 AM

Ok, so I got some work done on the 1/48 Airfix Hurricane Mk.I Tropical.

Airfix is certainly not up to Tamiya or Eduard standards, and after I took this pic, I added the tops of the wings, which took a lot of massaging to get the fit close enough to be able to sand as little as possible. I still think it's a good kit, and since the "Tamiya" one is Italeri, I'll stick with the Airfix for future builds until Eduard releases one (They have said on social media they plan to do a full Hurricane lineup, but no idea when).

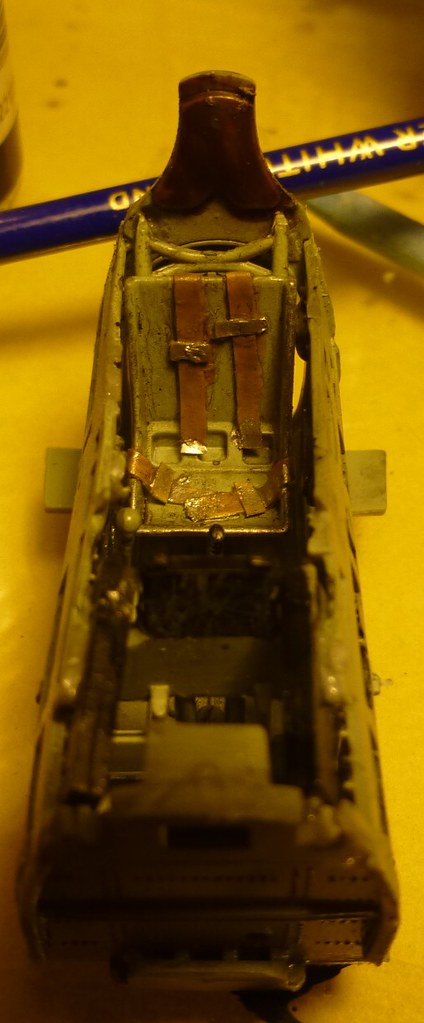
Anyway, here is my cockpit. These were aluminum painted with aluminum, so I wanted to do some chipping on the seat to show that. The belts are Eduard Steel Belts, which are thinner than th enormal PE ones and require less assembly, which is nice. 

Untitled


Anyway, I will hopefully get the airframe assembled in the next few days and move on to paint this weekend.

-BD-

  • Member since
    January 2015
Posted by BrandonD on Wednesday, September 5, 2018 11:47 AM

ModelCrazy - nice work so far. I love the Swordfish, so I can't wait to see it come together.

Have you ever read "To War in a Stringbag"? It's good inspiration for a Swordfish build.

Eric - nice work so far. I am glad we finally have a modern P-40B. I built the Pearl Harbor one, and the thing went together well. I'll do another in Flying Tigers livery at some point.

As far as PE - have you seen the newish Eduard Steel Belts? I used some on my Hurricane, and they're much thinner and more realistic, while still giving depth. See next post.

-BD-

  • Member since
    February 2010
  • From: Berkeley CA/St. Paul MN
Posted by EBergerud on Tuesday, September 4, 2018 12:53 AM
Anyone who wants to learn the selective use of PE really should do a ship or two. Many PE sets supply details that would require the hands of a 21 year old surgeon to employ and a powerful magnifying glass to see them. I do hate the stuff even though I have very good PE tools from Small Shop. (Their clear plexiglass PE "Cut-Out" Set is invaluable as is their mini-Folder. I also like the Xuron PE cutters.) You do need it for railings and ladders on ships - funnel caps are nice. And good PE can make nice cranes. Simple grills are ok for a tank. I can't imagine buying PE for an airplane. I did use some PE belts not long ago on something, but I remember them being very unsightly - no more realistic than decals. Most AC PE is for the cockpit, and I've expressed my heresy concerning that topic.


A model boat is much cheaper than a real one and won't sink with you in it.

  • Member since
    July 2014
Posted by modelcrazy on Monday, September 3, 2018 11:43 PM

Thanks Bish and Gam,

Gamera
my attitude typically comes out 'I paid for it, I intend to use it.

Yep, that's my attitude....unless I just can't get something on or if you're not going to see it, then I don't bother.

I closed up the fuselage today. BTW, the IP was a little bugger to get in. It's only attached to the gun, which is in turn attached to the fuse wall. The PE set has you remove the attachment point to the gun from the IP for some reason so I had to improvise...."For Experts" as they said. 

Steve

Building a kit from your stash is like cutting a head off a Hydra, two more take it's place.


http://www.spamodeler.com/forum/

  • Member since
    November 2009
  • From: SW Virginia
Posted by Gamera on Monday, September 3, 2018 7:50 AM

Steve: Love the cockpit there, fantastic detailing on the kit and great job there on paintng it all up. The thing about PE is of course you don't have to use all of it. But in the end my attitude typically comes out 'I paid for it, I intend to use it.' Sad

Eric: She looks really good! I've built the new Airfix USAAF ground crew set and was very happy with it. As you said the plastic is really soft and I ended up sanding away too much in some cases until I noticed and switched to a finer grade sandpaper and a more ginger approach. Looking forward to more, I want one of these new P-40s myself (hopefully after I work down the stash a little more). 

"I dream in fire but work in clay." -Arthur Machen


  • Member since
    December 2002
  • From: Bury St Edmunds, Suffolk, England
Posted by Bish on Monday, September 3, 2018 6:47 AM

Nice work there Eric.

I am about to start my Phantom later this week, like you it will be the first time i have built one of their new tooled kits. And looking over it, i can already agree with some of what your saying. I also noticed that the sprue connections were rather large and i have noticed the same on the other kits i have got.

From what i can tell without yet building one, Airfix have improved a lot of detail, my 72nd He 111 is way ahead of the hasegawa kits, Airfix still need to refine some of the engineering. Overly deep panel lines seem to be another area, though yours seem to look ok.

I have noticed that there seem to be a lot of stages in the build when compared to pther companies, but each stage has less parts which i am guessing will help. It also interesting that they hightlight the part you added at the previous stage in red.

I am a Norfolk man and i glory in being so


On the bench: Airfix 1/72nd Harrier GR.3/Fujimi 1/72nd Ju 87D-3

  • Member since
    February 2010
  • From: Berkeley CA/St. Paul MN
Posted by EBergerud on Monday, September 3, 2018 3:28 AM

MC: good luck on the Swordfish. I've heard that you're building one of the Tamiya's greatest kits (right up there with the Storch) - that should mean a fun build.


Progress report on the Airfix Tomahawk.


First, I finished the cockpit and because everybody shows cockpit pics, I will too. You'll note it's not very detailed - that's because cockpits don't torque my cookies at all. I admire modelers that will work hard on detail that only they and the camera will see, but I'm not one of them. You'll just have to trust me that the instrument panel looked fine after a drybrush. As you can see it's pretty complex - and the cage guarantees that most of it will be invisible. However, even I do seat belts. I'm always on the look-out for a simple scratch belt and I think I'm pretty close to a good one courtesy of a gent on YTube. I took some aluminum foil and covered it on both sides with 6mm Tamiya tape, then cut it into very thin strips and painted it with khaki. Next time I'll do the metal parts thinner, but I think it looks fine. I'll try to remember to take a photo of the interior color from underneath the plane. Suffice it to say, Curtis painted RAF Tomahawks at their factory. The interior green is a pretty light green-gray: much less eye-catching than normal RAF interior green, and lacking the yellow oxide tinge found in US interior green. I have a sample of the Dupont paints used by Curtis and I think the Dark Earth and Middlestone look very close to the RAF original. (I have a file from uber-color guru Nick Milman on RAF colors. He moderates the very neat list Aviation of Japan and has several IJ aircraft books under his belt.)
 

 cockpit by Eric Bergerud, on Flickr


General impressions of the kit so far. This is important because I have six other kits from "new" Airfix in the stash. There is bad news and good news. The bad news is that although the engineering is excellent (it reminds me a lot of the new 1/48 Tamiya Ki-61 and BF-109G which I own) the kit is not made by Tamiya. I like the soft plastic, But there are several irritating sink marks. Airfix uses overly thick connections of all parts to the sprue gates. (I'm very glad that I own good Tamiya sprue cutters and a pair of God Hand single blade nippers. So far it has prevented any part damage and because both cut so close to the part, it cuts sanding time a lot.) There is a lot of very subtle flash, but enough to mean that most parts do need preparation - that slows me down and the part count on this kit is well over 100 parts. Here's a pic of the instructions - it will give you an idea of how complicated the build sequence is - thankfully the instructions are pretty good:


 Instruct by Eric Bergerud, on Flickr


Just to give you an idea of what difference exists between the Airfix "pretty good" and the Tamiya "shake and bake", I learned a lot about seams. Despite all of the components inside the fuselage, the two halves fit together nicely. I'm thinking: sweet - almost no filler. On a second look it was obvious that one half was just an iota larger than the other (way less than a mm) - but it caused a seam. So I'm thinking about putty or something else. Luckily I got out my high power modeling glasses and checked the think out closely. Usually one thinks that a seam results because the two parts don't join quite right and there's a gap. In this case, I had a very slight overlap. Had I tried to use putty, it would have been difficult. Instead, I found out that after sanding the "proud" side the fit became just fine and no filler. (Heaven knows how often I've made that mistake in the past. Had I noticed it earlier I could have simply sanded down the larger half just a bit and had a very good fit.)


So that's the good news. If you stick to the basics the kit appears to be pretty good indeed. You have to prep the parts; dry-fit; look at where the tabs are to orient on the parts (not always clear from the instruction) and in general be careful, you're in good shape. On a bad kit, you could do all of those things and there would still be major fit problems requiring major surgery. Knock on wood, but so far things are working - even if it's taking longer than I hoped. Below is the fuselage (actually nearly half done with the kit) - I'm reasonably sure that any irregularities will disaper under my Duplicolor automobile black lacquer rattle can. Need that regardless because this plane begs for black basing.


 fuselage1 by Eric Bergerud, on Flickr


BTW: if anyone is curious there's a very fine US rendition of the Airfix P-40B on iModeler. I hope that not all of the warnings there will be true, but nothing too bad. The weathering is absolutely splendid rendition of black basing with standard USAAF oliver drab/gray.


http://imodeler.com/2017/03/airfix-148th-p-40b-warhawk-build-review-part-2/


Eric


A model boat is much cheaper than a real one and won't sink with you in it.

  • Member since
    December 2002
  • From: Bury St Edmunds, Suffolk, England
Posted by Bish on Monday, September 3, 2018 1:52 AM

Very nice work on the pit Steve. For experts, i like that. PE does add time to a build, but i have found not as much as scratchbuilding.

I am a Norfolk man and i glory in being so


On the bench: Airfix 1/72nd Harrier GR.3/Fujimi 1/72nd Ju 87D-3

  • Member since
    July 2014
Posted by modelcrazy on Sunday, September 2, 2018 10:33 PM

I completed the cockpit but still have a several things to do before closing the fuse.

Oops, this is something I didn't read before I purchased them......too late.

I've come to the conclusion that PE adds 5 to 10 fold to the build time.

Steve

Building a kit from your stash is like cutting a head off a Hydra, two more take it's place.


http://www.spamodeler.com/forum/

  • Member since
    November 2009
  • From: SW Virginia
Posted by Gamera on Friday, August 31, 2018 11:27 AM

Brandon: Ouch!!! Good luck on getting the new decal sheet. 


And that SE.5 sounds cool!!! 

"I dream in fire but work in clay." -Arthur Machen


  • Member since
    December 2002
  • From: Bury St Edmunds, Suffolk, England
Posted by Bish on Friday, August 31, 2018 1:56 AM

BD, nice addition, i'll get that added to the roster. Hope those decals don't take to long.

I am a Norfolk man and i glory in being so


On the bench: Airfix 1/72nd Harrier GR.3/Fujimi 1/72nd Ju 87D-3

  • Member since
    December 2002
  • From: Bury St Edmunds, Suffolk, England
Posted by Bish on Friday, August 31, 2018 1:56 AM

So there was a second carrier involved, thanks for the correction guys.

I am a Norfolk man and i glory in being so


On the bench: Airfix 1/72nd Harrier GR.3/Fujimi 1/72nd Ju 87D-3

  • Member since
    January 2015
Posted by BrandonD on Thursday, August 30, 2018 2:58 PM

Well, I got my 1/72 Spitfire painted, added the decals, and the wing roundels crunched up and shattered when I applied Micro Sol.

So I've got some coming in from eBay because it seems easier than painting them, which is what I should really do, and I will add when I get them.

I'd also like to add a 1/32 Wingnut Wings SE.5a to this build.

-BD-

  • Member since
    July 2014
Posted by modelcrazy on Thursday, August 30, 2018 2:49 PM

Thanks for that link Jack. I remember I had read that article several years ago and that's where I remembered about the Victorious. While it did launch an attack earlier, that attack didn't apparently accomplish any results according to Adm Lutjens radio report.

Reading further, Anthony Beale (My maternal great Grandmother's name Huh?) flew 2P of 810 squadron, and struck the port side amidships.
John Moffet, who flew 5C of 818 squadron, is widely accreted with striking the crippling rudder blow.

So, long story short, I guess I'm building Sub-Lt Anthony William Duncan Beale's Stringbag.

Too bad Tamiya didn't do as much research as Jack did. Other than that, I understand it's an outstanding kit.

Steve

Building a kit from your stash is like cutting a head off a Hydra, two more take it's place.


http://www.spamodeler.com/forum/

  • Member since
    April 2006
  • From: ON, Canada
Posted by jgeratic on Thursday, August 30, 2018 11:50 AM

Fairly detailed account here around the Swordfish and Bismarck:

http://www.kbismarck.com/article2.html

They do mention aircraft fuselage codes, but unfortunately no serials.  2P is associated with pilot Beale as seen in the above link.   According to a post at Britmodeller, the likely serial with this particular Swordfish would be L2826, while the serial provided by Tamiya (V4371) was of his aircraft that he flew in 1942?

https://www.britmodeller.com/forums/index.php?/topic/235040283-fairey-swordfish-underwing-racks/


regards,

Jack

JOIN OUR COMMUNITY!

Our community is FREE to join. To participate you must either login or register for an account.

SEARCH FORUMS
FREE NEWSLETTER
By signing up you may also receive reader surveys and occasional special offers. We do not sell, rent or trade our email lists. View our Privacy Policy.