SEARCH FINESCALE.COM

Enter keywords or a search phrase below:

C-47 Skytrain/Dakota/DC-3 GB

30965 views
664 replies
1 rating 2 rating 3 rating 4 rating 5 rating
  • Member since
    August 2016
Posted by Keyda81 on Saturday, January 12, 2019 8:35 PM

Quite a bit of progress to report today.  I got to spend all day at the bench! 

I finished up the engines yesterday. 

Started off the day with putting the first of Mini Whiskey's markings on.  I had a mask for the "R", but turns out it was too small.  So I went the masking tape route.  Turned out pretty well I think.

Painted the wing walkways. 

Interior of the flaps.

Scratch built the gust locks and pitot tube cover. 

I've broken the pitot tubes off three times now, so I'm leaving them off until final assembely.

Tomorrow I'll do the rest of the markings tomorrow.  Those will all be decals.  Then it's onto weathering and final assembely.  I still have some things to scratch build as well. 

GAF
  • Member since
    June 2012
  • From: Anniston, AL
Posted by GAF on Saturday, January 12, 2019 8:42 PM

Gregbale>  That's looking very nice, and you're right about the MM primer.  Looks smooth!

On my own project, the Walthers HO scale DC-3 / C-47, I thought I would get a small start on it and check the fit on the major parts.  After some clipping and sanding, I taped the fuselage and wings and stuck the horizontal stabs together.  I must say that I'm impressed by the fit.  There's hardly any gaps at the wings or the stabilizers.  The fuselage has a minor gap just in front of the lower wing section, but not something that requires a lot of work.  The only other problem I see fit wise is the top of the vertical stabilizer.  It has a slight gap, but can be pressed together and once glued will be fine.  What bothers me is that its top seems rather "flat", and I will probably need to sand it down some.  Not sure if the vertical stabilizer is actually rather flat on top or more "rounded" as the other surface edges are.  I need to check that.  Here's what she looks like now.

One problem with the kit that I should mention, and that is it seems to be missing a part for the rear tail-wheel.  There should be a "boot" that fits into the hole at the rear of the fuselage, but the part is incorrect.  I've checked the number, but it corresponds to a fastener for the propellers instead of the boot part.  So it looks like I'm going to have to scratch-build something to hold the tail-wheel.  If anyone has a photo of the inside of the tail wheel assembly for the DC-3 or C-47, please drop me a link.  I've checked around the internet and can't seem to come up with a good shot of the interior of where the tail-wheel is fastened.  Don't know why I can't find anything!

That's it for now.

Gary


  • Member since
    August 2016
Posted by Keyda81 on Sunday, January 13, 2019 9:03 AM

Gary, glad you won't have many fit issues to deal with.  Bummer about the missing part though.  I don't have any pictures of that area on Whiskey.  The part in my kit was pretty well a bowl shape with a hole in it for the tail wheel strut.  As for the tail, here's a few pics of Whiskey's that might help.

  • Member since
    March 2003
  • From: Towson MD
Posted by gregbale on Sunday, January 13, 2019 9:42 AM

GAF
If anyone has a photo of the inside of the tail wheel assembly for the DC-3 or C-47, please drop me a link. I've checked around the internet and can't seem to come up with a good shot of the interior of where the tail-wheel is fastened. Don't know why I can't find anything!

Gary, not entirely sure what you mean by the 'inside' of the assembly, but this picture from the New England Air Museum's restoration may help. As Keyda said, it's really sort of a bowl-shaped depression in the underside, with the strut's 'mechanics' sticking out in much the way that a model's tailwheel would be pegged into a kit fuselage.

Keyda, dazzling work on those engines, and your paint and decals. That's an impressive combination of color-tones to reproduce. You did an excellent job!Yes

Greg

George Lewis:

"Every time you correct me on my grammar I love you a little fewer."
 
  • Member since
    August 2016
Posted by Keyda81 on Sunday, January 13, 2019 8:23 PM

gregbale


Keyda, dazzling work on those engines, and your paint and decals. That's an impressive combination of color-tones to reproduce. You did an excellent job!Yes


Thank you Greg! 

I had another very productive day with Mini Whiskey 7.  I started off the morning with decals, and a few of them didn't go over so well.  I had major issues with the "W"s I cut out of decal paper.  All they wanted to do was curl.  Next issue was the National Insignia going over the black portion of the invasion stripe.  You could see the black underneath.  So I landed up painting it white in those areas.  It was a very frustrating morning, but I managed to pull it together. 

All the markings done, engines and props installed.

Landing gear installed, and I weathered the underside.  It is dirtier than it looks, the camera flash washed it out.  I was told by the A & P mechanic/Whiskey's pilot that he was worried it was going to be to clean!

On her own feet.

Tail light installed.

Scratch built wheel chocks.

Hopefully I can have her finished up in the next few days.  Not sure if I can get back to the bench tomorrow though.  Fingers crossed.  I still have some weathering to do on the topside, a few more items to scratch build, and a lot of little fiddly bits to attach.


  • Member since
    April 2003
  • From: USA
Posted by keavdog on Sunday, January 13, 2019 10:32 PM

That's looking really good K!

Thanks,

John

  • Member since
    August 2016
Posted by Keyda81 on Monday, January 14, 2019 8:37 AM

Thanks John!  She's really looking the part now, lol.  Certainly the most detailed build I've ever done, and probably will ever do!

  • Member since
    December 2003
  • From: 37deg 40.13' N 95deg 29.10'W
Posted by scottrc on Monday, January 14, 2019 9:27 AM

Keyda, fanstastic job!  Lots of spirit in this build.  I really like the gusts locks.  Those are a great touch.

  • Member since
    May 2017
  • From: Denver, Colorado
Posted by MrStecks on Monday, January 14, 2019 10:08 AM

Keyda, great job on all the scratch building!  All those detail items are really making your build stand out.  Yes

Cheers,
Mark


On the bench:  Revel 1/48 B-25J Mitchell

In the queue: Tamiya 1/48 F4U-1A Corsair

  • Member since
    September 2012
Posted by GMorrison on Monday, January 14, 2019 10:16 AM

A C-47 on a non scheduled passenger flight crashed at Shelter Cove CA in 1971, because the crew failed to do an adequate pre-flight and the rudder and elevator locks were not removed. Unable to climb after takeoff, the aircraft hit a building, regained flight and plunged over a cliff into the ocean.

It was a sales tour for a planned seaside development. 17 of 24 onboard died in the crash, effectively also ending any plans for the project.

 Modeling is an excuse to buy books.


GAF
  • Member since
    June 2012
  • From: Anniston, AL
Posted by GAF on Monday, January 14, 2019 11:17 AM

Gregbale and Keyda>  Thanks for the images!  That tells me what I need to know.  As for "interior", I suppose I should call it the "wheel-well".  Also, Keyda's photo of the bottom of her model shows me how it should look.  Great work on W7 BTW!

It does appear that I will have to round the top of my vertical stabilizer a bit.  Just too flat as it is now.

Gary

  • Member since
    August 2016
Posted by Keyda81 on Monday, January 14, 2019 1:36 PM

Thanks Scott!  I'm sure it will be the most detailed build in my collection, lol.

Thanks Mark!  A bit of a challenge I gave myself.  I haven't really done much scratch building.  I did a little bit on an F-16 I built, but no where near what I'm doing with Whiskey.  I'm actually really enjoying it.

GMorrison, It was also speculated that might of been the cause of the Blue Bonnet Belle crash last summer. 

Gary, No problem!  Thanks! 

  • Member since
    March 2003
  • From: Towson MD
Posted by gregbale on Monday, January 14, 2019 3:26 PM

Keyda, your 'Whiskey' is looking really superb! Can't wait to see it with all its 'bells' on.

Got the basic colors on my tiny RCAF bird complete. Before panel lines and weathering I'll do a bit of contrast shading--picking out a few panels with regular graphite or silver colored art pencil for variation, and going over the control surfaces with the greyer dull aluminum tone that this era of Dakotas seem to show on those fabric-covered bits. Then it should be ready for gloss and decals in a few days.

Greg

George Lewis:

"Every time you correct me on my grammar I love you a little fewer."
 
  • Member since
    December 2003
  • From: 37deg 40.13' N 95deg 29.10'W
Posted by scottrc on Monday, January 14, 2019 4:39 PM

Nice work Greg.

I have a question regarding de-icer boots on the leading edges?  I can't decide to paint them before or after the main coats.  My specific plane had them. 

  • Member since
    March 2003
  • From: Towson MD
Posted by gregbale on Monday, January 14, 2019 5:04 PM

scottrc

Nice work Greg.

I have a question regarding de-icer boots on the leading edges?  I can't decide to paint them before or after the main coats.  My specific plane had them. 

Thanks Scott.

I usually find it easier to mask the boots and paint them last, all other things being equal. Also, since they are 'on' the wing on the real a/c, they generally look more realistic that way.

Greg

George Lewis:

"Every time you correct me on my grammar I love you a little fewer."
 
  • Member since
    March 2008
  • From: Charleston, SC
Posted by kg4kpg on Monday, January 14, 2019 5:06 PM

Okay, finally some progress on my little Minicraft. I’ll gloss the green and move on to decals next, then finish the detail painting and the small parts. 

  • Member since
    August 2016
Posted by Keyda81 on Monday, January 14, 2019 8:27 PM

Thanks Greg!  Hopefully tomorrow.  I can't wait myself!  Your paint job looks great!  I always hate painting white.  I did use some pencil on the raised panel lines on the underside of Mini Whiskey.  Worked pretty well to bring them out. 

Scott, I would typically paint them last as well.  But in my case I was afraid to really mask over the acrylic craft paint, so I left that for last.  Turns out I could mask over the craft paint no problem anyway, but I wasn't willing to take the chance to start with, so I did the de-icer boots first. 

Looking good kg4kpg! 

  • Member since
    February 2010
  • From: Berkeley CA/St. Paul MN
Posted by EBergerud on Tuesday, January 15, 2019 3:00 AM

Model is looking very sweet Kedra. The Whiskey 7 guy probably knows that radial engines in WWII had a sizeable "carbon footprint" - and that underneath a service plane would have been a fat and thick exhaust stain coming out of the exhaust - and a nice "ring around the collar" on the engine nacelles. Ugly stains on reconditioned planes flying today are easy enough to find. 

SNAFU is a WWII term - you all know what it means. That describe my work. I was thinking that I could see the lights of town and was planning the last stages of this campaign. Then I noticed that - and I'm not quite processing this yet - that I put the engine cowls on the wrong side - that means both exhuasts would have been missing or put on exactly the wrong place. I'm not a perfectionist, but that's too much. So I sawed them off. Lord. I live with a crater somewhere between my ears and I know it. Thus I pay pretty close attention to the instructions - to avoid putting the cowls on the wrong side or something like it. This was a gross case of driver negligence and I feel, .... stupid. A couple of weeks back Andy at Andy's Hobby HQ assembled the new Tamiya Spitfire I (it joins their A6M3, A6M5, IL2, Ki-61 and BF-109G in their jaw-dropping kits out in the last three years. We can all say a prayer - or sacrifice a chicken - and hope they do a P-38.) He commented that the kit has "keyed" parts - to keep idiots from putting them on backwards. (This was true in a Tamiya Panzerjager I built last year.) I guess I'll need help. And how nice to know I get to do some scratch building to fix a mistake that you might forgive - if it was done by a champanzee or a dolphin. I do hope Aves Apoxie Sculpt will do the job.

 SNAFU by Eric Bergerud, on Flickr

Eric


A model boat is much cheaper than a real one and won't sink with you in it.

  • Member since
    April 2003
  • From: USA
Posted by keavdog on Tuesday, January 15, 2019 4:03 AM

Cool work!  Looks like a few getting close to the finish line! 

Eric - I can imagine your frustration.  I had a tough time with my build as well.  Marshall on!

Thanks,

John

  • Member since
    March 2003
  • From: Towson MD
Posted by gregbale on Tuesday, January 15, 2019 5:41 AM

EBergerud
Then I noticed that - and I'm not quite processing this yet - that I put the engine cowls on the wrong side - that means both exhuasts would have been missing or put on exactly the wrong place.

I did precisely the same thing...but was too much of a goober to mention it!

I was mentally patting myself on the back for how easily the part slid into place...held my little gem up at arm's length, admiring my craftsmanship...and then idly thought, "Hey, I wonder what that odd projection is? Hadn't noticed that before...."

CLANG.

[Luckily it was only the first one, and the Tamiya Thin Cement hadn't completely 'grabbed' yet. I wrenched it off desperately and quickly screwed it onto the proper side...where, of course, it didn't fit nearly so well...and wiped the little trailing 'threads' of cement-and-styrene away as best I could. I then sheepishly looked twice at the 'other side' part to make sure, before attaching it. No more mental 'pats on the back' that day!]

It happens to all of us. Just glad you caught it before that perfect, 'once in a lifetime' paint-and-decal job was finished.Wink

Greg

George Lewis:

"Every time you correct me on my grammar I love you a little fewer."
 
  • Member since
    August 2016
Posted by Keyda81 on Tuesday, January 15, 2019 7:46 AM

Eric, Thanks!  Yep Whiskey has her dirty spots, lol.  I managed to snag some pics off the internet that show the underside of the plane, and even some that were taken from a drone or quadcopter.  So I could replicate the staining.  I was so afraid I was going to do the same thing with my engine cowlings.  I triple checked them before putting them on.   When it was time to actually glue them in place I seperated them so I couldn't grab the wrong one.  But I have certainly installed my fair share of parts backwards, hence the reason I was so cautious about the engine cowlings.  I was expecting to mess it up.  I love Apoxie Sculpt.  Works great for filling large seams, and it smooths out real nice with water.


  • Member since
    December 2003
  • From: 37deg 40.13' N 95deg 29.10'W
Posted by scottrc on Tuesday, January 15, 2019 7:47 AM

Thanks for your opinions Keyda and Greg.  I built a few B-17s and had a bad experience with the de-icer boots, so I'm a little shy on painting them.  I  know, crazy, but some things are hard to get over LOL.

Since I got all the pre-shading done in flat black, I might try to mask off the boots and leave them to see what happens.  Greg is correct, they are on top of the wing sheeting and would be strange to have them look recessed below the top coats.  Although, its 1/72, so it may not be noticable.  Next is some shading with light tan, then an attempt at some olive top coats. 

  • Member since
    June 2017
Posted by UnwaryPaladin on Tuesday, January 15, 2019 9:58 AM

Great build thread, some really nice work on display. 

I'm putting in the windows and lights, getting her ready to prime. Mine has a clear dome piece on top of the fuselage, looks like a skylight. I can't find a good picture of it on an actual aircraft, I guess it's above the sightline of a photographer on the ground. 

What is that clear dome? On my kit it just sits on top, should there be a hole in the fuselage where it goes?  

Joe

  • Member since
    March 2003
  • From: Towson MD
Posted by gregbale on Tuesday, January 15, 2019 10:26 AM

UnwaryPaladin
What is that clear dome? On my kit it just sits on top, should there be a hole in the fuselage where it goes?

Joe, it was originally an astrodome (or 'astral' dome) for the navigator to use...since the cockpit didn't have any 'skylight' type canopy windows. Usually seen only on military versions, since civil a/c of the time navigated mostly by visual checkpoints and/or radio beacons.

Even many military a/c had them removed after the war. The '50s-'60s-era RCAF birds of the sort I'm doing still had the 'base' part...covered over...but the domes themselves were removed.

I've seen all three configurations in gunship photos over the years: no dome (or original installation faired flush), just the base remaining, or dome present...you'll have to check photos of the bird you're doing, if available, or just make a 'best guess.'

BTW, here's a nice shot of what they looked like, complete with base mount fairing:
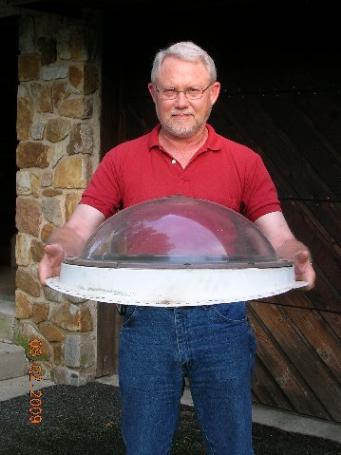
(Props to Massey Air Museum for the photo; more photos of the same on real a/c here:

https://www.masseyaero.org/projects/dc3/dc-3dome.html

Cheers

Greg

George Lewis:

"Every time you correct me on my grammar I love you a little fewer."
 
  • Member since
    September 2012
Posted by GMorrison on Tuesday, January 15, 2019 10:35 AM

That is the navigator's observation dome, sometimes called the astro dome.

As that explains, it was used by the navigator to make star shots, or noon sun sightings.

Definitely bolted down over an opening in the top of the fuselage. It could be detached for an escape hatch, but was not otherwise opened.

 Modeling is an excuse to buy books.


  • Member since
    June 2017
Posted by UnwaryPaladin on Tuesday, January 15, 2019 11:00 AM

Greg, GM, thanks! Amazing what one can learn on this site!

  • Member since
    October 2005
  • From: New Port Richey
Posted by deattilio on Tuesday, January 15, 2019 5:29 PM


Whiskey 7 is really looking the part!!  Appears I am limping along in trail on this build.
All the major pieces are together and it finally looks like “Gooney.”  I even got some color applied to couple outside parts/areas.  Although not all the Rhodesian C-47s had beacons and, those that did appear to be smaller than the normal one provided in the kit based on the photos I’ve come across I was not going to split hairs over that detail.  Also got the landing lights painted and installed.  I drilled depressions and installed MV Products lenses to simulate the actual lights.
Still have some sanding, filling and re-scribing to accomplish before the first coat of primer gets sprayed.


WIP:
Trying to get my hobby stuff sorted - just moved and still unpacking.


"Gator, Green Catskill....Charlie On Time"


  • Member since
    August 2016
Posted by Keyda81 on Tuesday, January 15, 2019 9:07 PM

Scott, No problem!  Looks like you'll be ready for paint real soon!  I have yet to try my hand at pre-shading. 

Thanks deattilio!  I always get stuck at the putty and sand phase, lol.  Doesn't look like you'll have too much of that to do though.


Mini Whiskey 7 is all done!  Took me quite a few hours to finish attaching all the fiddly bits, and there are a lot of them.  I'm pretty happy with how she turned out.  Here's a bunch of pics!

This is typically how she's set up at the air show.  The stairs and the donations bomb.  Thanks again to GMorrison for the idea to include the bomb!

A few close up detail pics.

I had a lot of fun building Mini Whiskey, and I honestly didn't know I was capable of scratch building, and paying that close of attention to detail.  I suppose it really helped that I simply love Whiskey 7, and this build will be the only one I've ever flown on the real thing! 

  • Member since
    December 2003
  • From: 37deg 40.13' N 95deg 29.10'W
Posted by scottrc on Wednesday, January 16, 2019 11:04 AM

Great work Keyda, the compassion you have for W7 really paid off and its a wonderful tribute.  You have tried new painting techniques and scratchbuilding and the results are very satisfying.Toast

  • Member since
    August 2016
Posted by Keyda81 on Wednesday, January 16, 2019 1:22 PM

Thanks Scott!  I was really leary about attempting it.  I knew it would test my limits, but now I know what I'm actually capable of.Big Smile

JOIN OUR COMMUNITY!

Our community is FREE to join. To participate you must either login or register for an account.

SEARCH FORUMS
FREE NEWSLETTER
By signing up you may also receive reader surveys and occasional special offers. We do not sell, rent or trade our email lists. View our Privacy Policy.