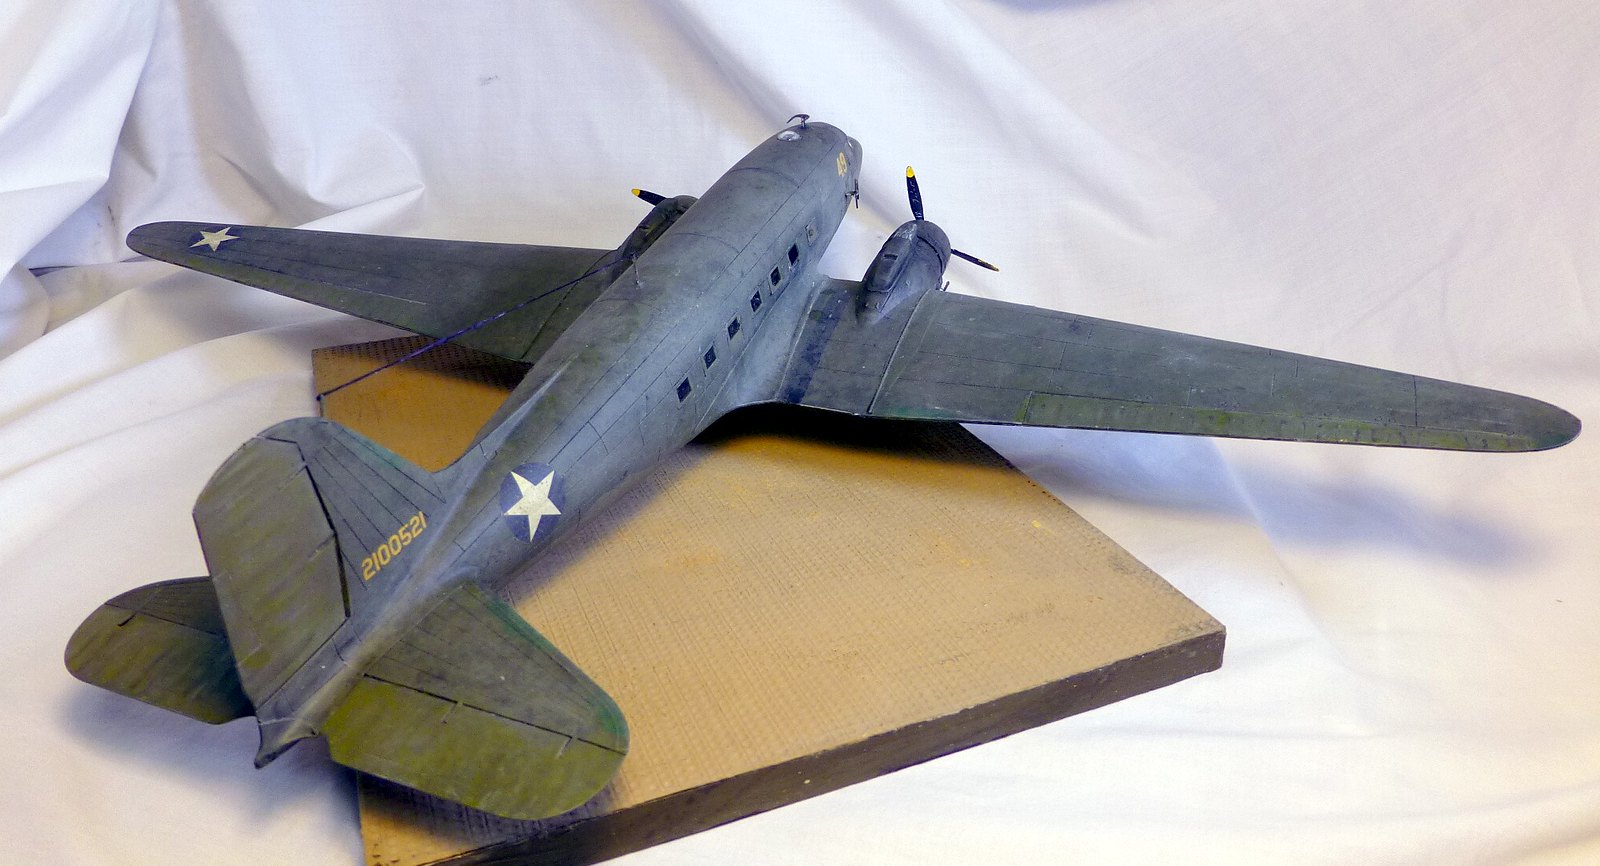
OK, one C-47 a wrap.
1/72 Airfix C-47
Paints: Mission Model, Golden High Flow
Weathering: Salt Fading; oil dot fading (Wilder & Gamblin oils, Windsor Newton Transparent White), Iwata Com.Art paints - panel lines, fluids, overall filter. Sennelier & Gamblin pigments.
 01Tsili by Eric Bergerud, on Flickr
 02rftE by Eric Bergerud, on Flickr
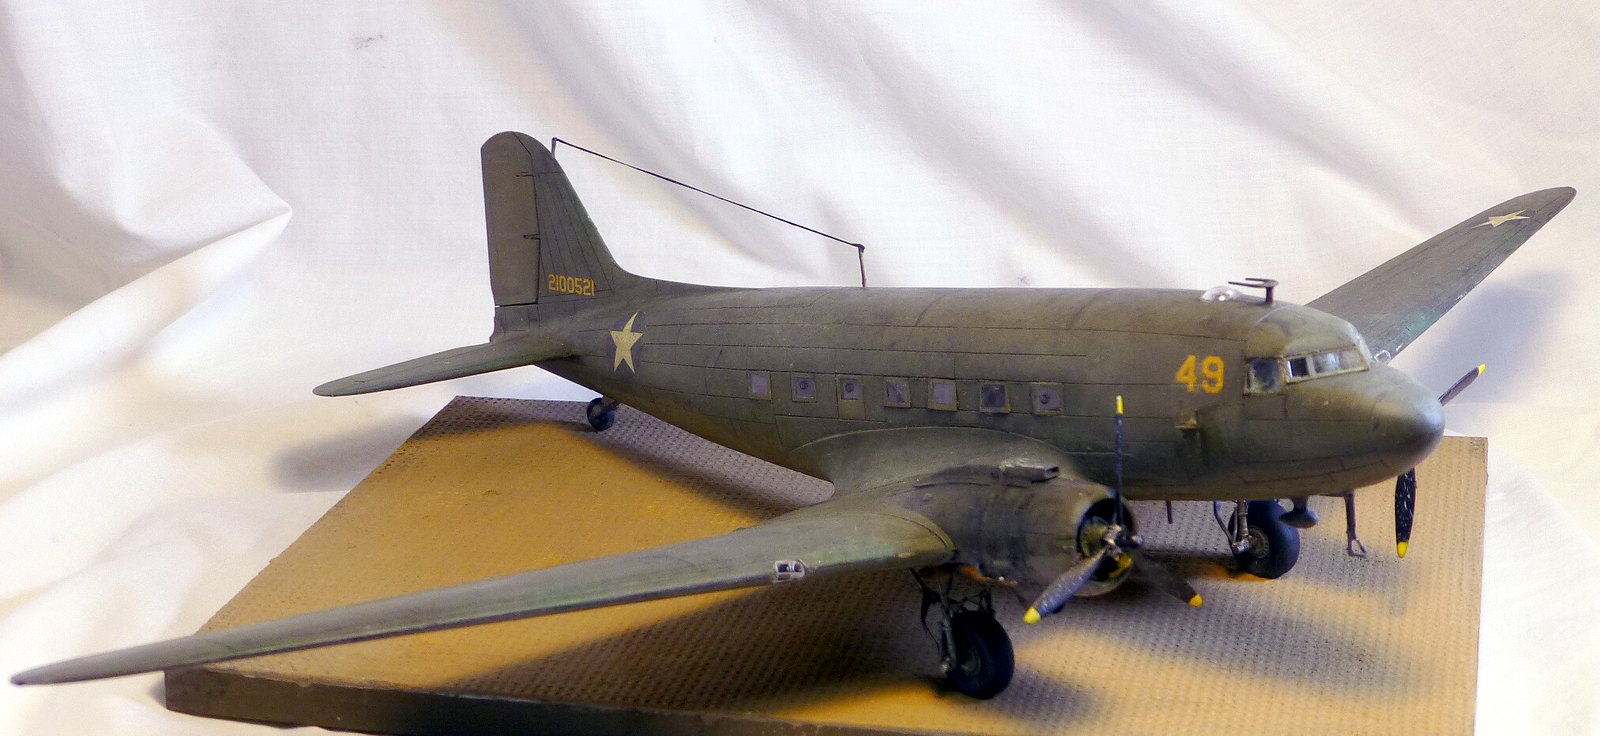
Here I'll describe the last weathering steps taken to complete the model and present a series of pics. I wrote two books about WWII in the South/Southwest Pacific, so I included a note on historical context after the kit photos if there are history fans.
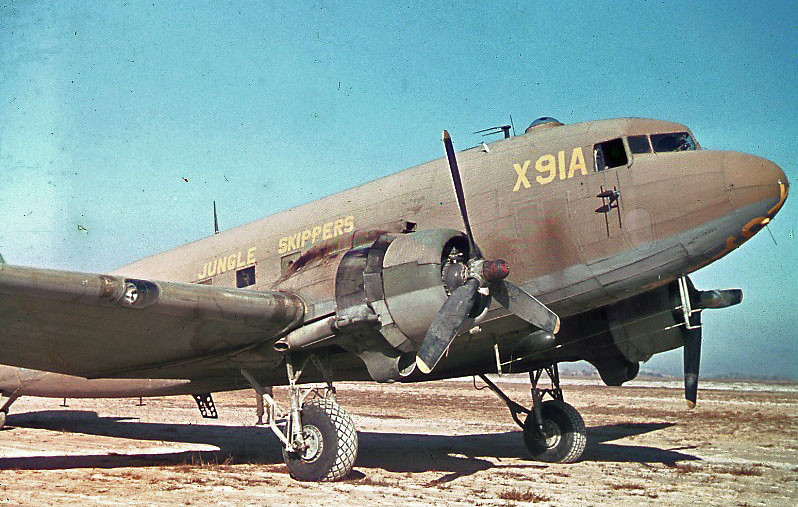
Because C47s played a unique role in the late 1942-early 43 campaign in New Guinea, I am definitely thinking of a very heavily used plane. The weather in NG was beastly (unless you were a germ or a mosquito) with heavy rain almost every day. The sky would clear and the heat dry the ground - men saw mud turn into dust storms if the wind was up. (Vietnam vets talked about the same thing.) There were no hangars in New Guinea - ground crew sometimes rigged some canvas for shade, but that was it. So the planes were in the air almost every day - often more than once - and assaulted every day by broiling sun, mud/dust and water. Most bases were near the ocean so salt could appear too. The maintenance schedule during the early war was more or less thrown away by ground crew - the troops simply needed supplies and evacuation so badly. Pilots didn't measure service in terms of missions - instead it was hours - as in several hundred or low thousands. No combat plane would have been in the air as long as a C47. Do note that wartime Olive Drab was a very unstable paint if made without cadmium (almost always) and would fade as well as pick up a patina of dust/mud at every take-off or landing. These planes would have had a heavily mottled surface in very short order, and some of these planes were in service for the entire war. I don't see lots of chipping, although you see it on the props and nose in close-ups. There were lots of fluids. All radial engines burned oil - even a rebuilt DC3 today will show a nice black streak underneath. So I did much to give the plane a very uneven and mottled surface with lots of fluid stains. Had I chosen I could have faded it even more than I did - probably should have. WWII color pics are not always perfecto - but this one will give you the idea:
 colfade-pi by Eric Bergerud, on Flickr
Here are two in black and white:
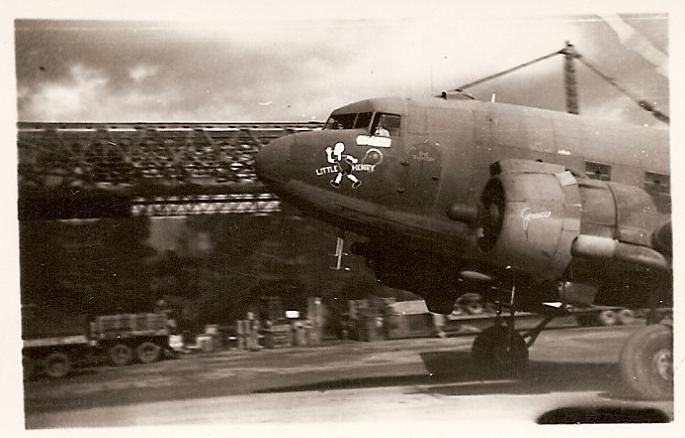 fadenad by Eric Bergerud, on Flickr
 PTMsby by Eric Bergerud, on Flickr
I should note that choosing an C-47 of late 1942-early 43 vintage mandated the decals used. The single star was used for several months in late 42-early 43. Sometime in mid-43 the standard blue/white rectangle borders around the star was used. I found the decal used in a set designed for early B-24s. (It's a hard decal - no matter how you look at it - it looks out of alignment - even if it isn't. Ever try to draw a five point star?) I used the yellow numbers on the tail from the kit. I raided the yellow numbers on the nose from a P-40 kit. I also grabbed "Dottie II" as almost every wartime C-47 photo I've seen shows some kind of nose art. The very elaborate bit from the kit was much more typical of an ETO bird than a PTO, so I grabbed a simple phrase. It may be a little out of scale - but nose art was not standard.
As reported in my last post, I had to amputate both engines and switch them to get the exhausts in the correct place. It took me several days to regain the will - I've never made a perfect kit, but blunders like this one are not part of my modeling world. I literally had to saw them off - luckily I have very good hobby saw blades from CK. For repair, I put in circles of sheet styrene, and filled the gaps with Gunze and Vallejo putty. Fortunately, there were major panel lines on real C-47s at this place, and because the entire engine area was badly soiled by exhaust and fluids, I was able to bury most of my blunder with the weathering I would have done anyway.
This experience started the last stage of completing the model. In retrospect, this kit was one that I had to fight during many steps. Although the engine fiasco was driver error, a better engineered kit would have had a simple tab as part of the insert process and made an error like that impossible. Landing gear are always a good place to see how well done a kit is. This kit required slightly altering the length of major pieces - not a good sign if the kit engineers chose to make a complex and detail heavy assembly. I was very disappointed with the clear parts. Their fit was not good. I was warned in a build review of this model to put the side cockpit windows on before closing the fuselage because the window piece might fall inside - a real pickle. (I shouldn't have worried - in many pics of C-47s from New Guinea - the side cockpit windows are open - it would have been simple to build a little frame.) I also found that the Montex clear part masks I used fit very well, but left an unusual amount of adhesive remnant. I was able to get most of it off (the front windscreen was a dicey fit, but luckily very clear). I also put on the decals that were to simulate the firing ports put through the side windows so crew of soldiers could fire sub machine guns out. Those little decals all got on, but were some of the worst I've ever applied. Anyone who put on the whole stencil series - a step I skip - would have been forced to toil for hours because everyone required several minutes in warm water to loosen. They really weren't needed because from almost every angle you can't see the side windows as clear at all - unless you have a profile, the dark interior makes the clear dark too. This is quite evident in the pictorial record also. Because I was displeased with the fit of the side cockpit windows, I removed and reset them (they were attached with white glue so it was easy.) And, one almost fell inside. If I did another Airfix C-47 I would have far less trouble. I think part of the wing spar could have been eliminated - it fit badly and wasn't visible. The landing gear would have been much easier to assemble if you ignored the instructions and attached the small pieces first rather than last. The clear parts should have been painted separately and installed at the end. That's what I've done with the best canopies I've created. If something doesn't work right, strip the paint with Lysol (takes about a minute) and do it over. Ultimately the kit worked. I'd rather do an Airfix than a Roden. But as one of the reviews noted, the Airfix is the newest kit, but anyone who owned an Italeri should build it. (Maybe so, but I did a new tool Italeri Sunderland and it was another kit that I had to fight. Heavens do I like Tamiya.) The C-47 is not the latest of the "new" Airfix kits, and I had much better luck with the recently released P-40B, so I'm hoping they're improving. Just in case, however, I'm going to sell my Airfix BF-109E and replace it with the late 90s Tamiya version.
Enough whining. In earlier posts I showed the black basing, salt fading and oil dot fading that helped create a somewhat faded plane with a pretty mottled surface - exactly what was intended. The remain steps were panel lines, filters and pigments designed to give the plane not only an uneven surface, but one that was both evidenced grime and a kind of grainy texture. I did use a Flory "Grime" clay wash underneath to emphasize the dirt that would have built up landing on mud/dust a few hundred times. But the major weapon were Iwata Com.Art paints.
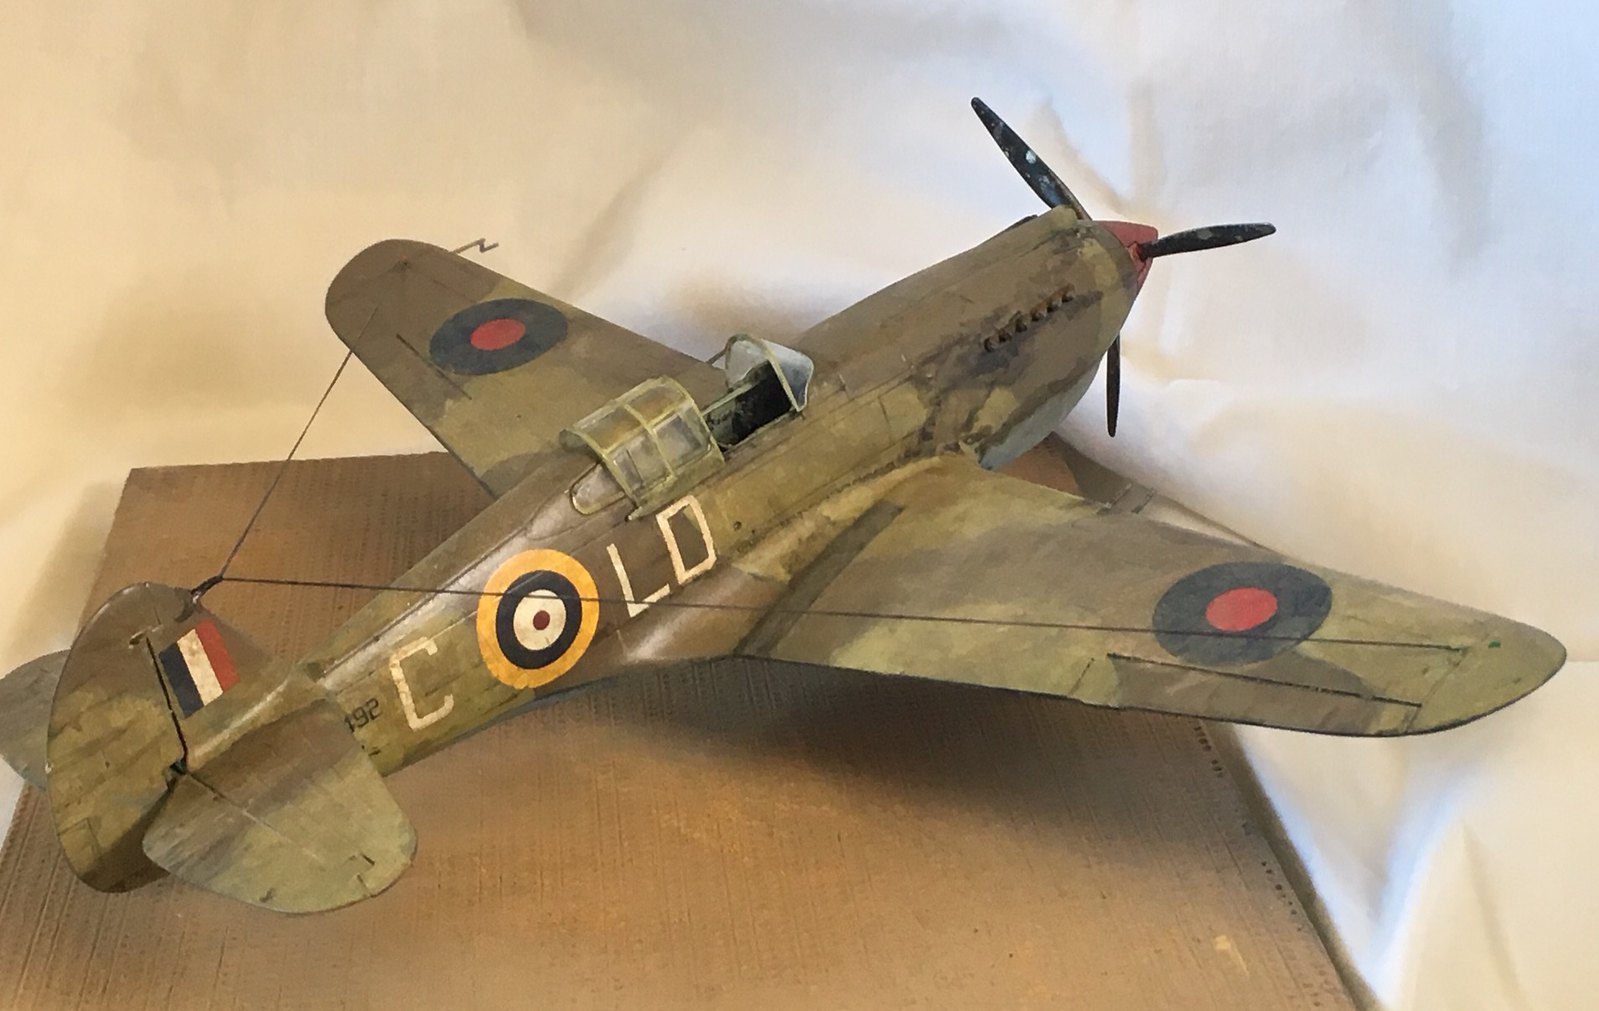
I have trouble describing how I approach this because outside of the model railroading world, I may be the only modeler who uses Com.Art. Simply put, black basing - no matter what is done after it is designed to create irregular surface variations and color shifts. There can be some regularity - top surfaces are more faded than side or bottom - but real planes don't weather along panel lines and black basing doesn't either. Not only does fading and the accumulation of dirt and fluids take place in irregular patterns, but the human eye when gazing at a large object has to make sense of a huge range of colors produced by subtle changes in light and shadow. (Try this if you want. Get a digital photo image like a JPG loaded into a paint program, set the cursor to display the RGB settings of the pixels, and start running the cursor over the side. Even on areas where the color appears uniform, the RGB numbers change notably even in zones comprising very few pixels. So that color you see, is a kind of average - and when you consciously observe, you'll see the variant. Just to prove the point replace the photo with a simple "fill" of a single color. It looks entirely different.) In a way its helpful to show what one tries to do with black basing by showing what you're trying to avoid. Below is a pic of a very good build of an Airfix 1/48 Spitfire V. However, to my eye the preshading and panel line emphasis creates a surface that is far too regular in variance and with overdone panel lines:
 03badpanel by Eric Bergerud, on Flickr
Compare it to an Airfix P40B done by yours truly a couple of months back that uses the same camo scheme. My build is nowhere near as clean as above. But I think the blackbasing and muted panel lines looks more authentic. (You may certainly disagree. We're only talking model airplanes.)
 iprr! by Eric Bergerud, on Flickr
Com.Art paints are acrylics made for airbrushing onto porous surfaces like fabrics. They come in transparent and opaque colors - for weathering I use only transparent. (Actually, a well primed model would hold Com.Art opaque paints - they spray so well, it's tempting to try it sometime. But HighFlow is so good, I'm not looking for a replacement.) For panel lines I use transparent smoke - figure black. I did a clear coat with Vallejo gloss varnish, because you don't want much of the Com.Art to stick. I put a light brush of paint right on the panel lines - after drying for a couple of minutes, I try to take off most of the paint outside the panels. Com.Art paints, because of their water based solvent, can be easily manipulated after drying. If they don't come off with a moist brush or towel, you can use some Vallejo airbrush thinner. In practice I don't want all of it off - so I drag some excess downward along the airflow. Some panel lines that are very fine - or oddly placed - might call for a little more emphasis. A Verithin black pencil does the job very nicely. After the panel lines are done, I do a kind of filter on the entire olive drab surface. This is a combination of transparent black and transparent yellow which creates a kind of Com.Art olive drab. I take this brew and stipple it (not brushed - kind of tapped on) over the planes surface. I use a lighter filter on top of the wings and fuselage. This creates and even more irregular surface and gives the model it's soiled look. Next, I use Com.Art transparent blue-black smoke and put on exhaust stains. Underneath there's a thick black streak going across the wing - something I've seen on photos of modern restored DC-3s: WWII era radials did burn oil. I also stipple an extra dose over the engines. I could stop here and it would look fine. However I've found that an extremely light dusting with pigments works nicely, adding some extra irregular fading. The pigments are applied after the final matte varnish and are so light that they need no fixing. (The Matt Varnish I use is from Windsor Newton Oil Based - its the best varnish I've ever used. Thin it slightly with Tamiya or Gunze lacquer thinner. The stuff is made to seal paintings worth thousands of dollars, so it does work. It's the only non-water based product used outside of the splendid Duplicolor black primer in the rattle cane. The pigments are artist grade from Sennelier and Gamblin: because you buy them at an art supply store instead of a model site, they cost about half what you'd pay for MIG or AK.) Almost done. I now take some Transparent "Old Oil" paint and mix it with Pledge and put it over areas where fuel is added and very lightly on parts of the engine. Last is the antenna. I use "large" EZ Line. It's out of scale, but I like it because you can see the thing from ten feet away.
Here are some detail shots of the model. I think you can see the mottled and grainy surface and also the "Com.Art" style panel lines.
 reardetE by Eric Bergerud, on Flickr
 lengdetE by Eric Bergerud, on Flickr
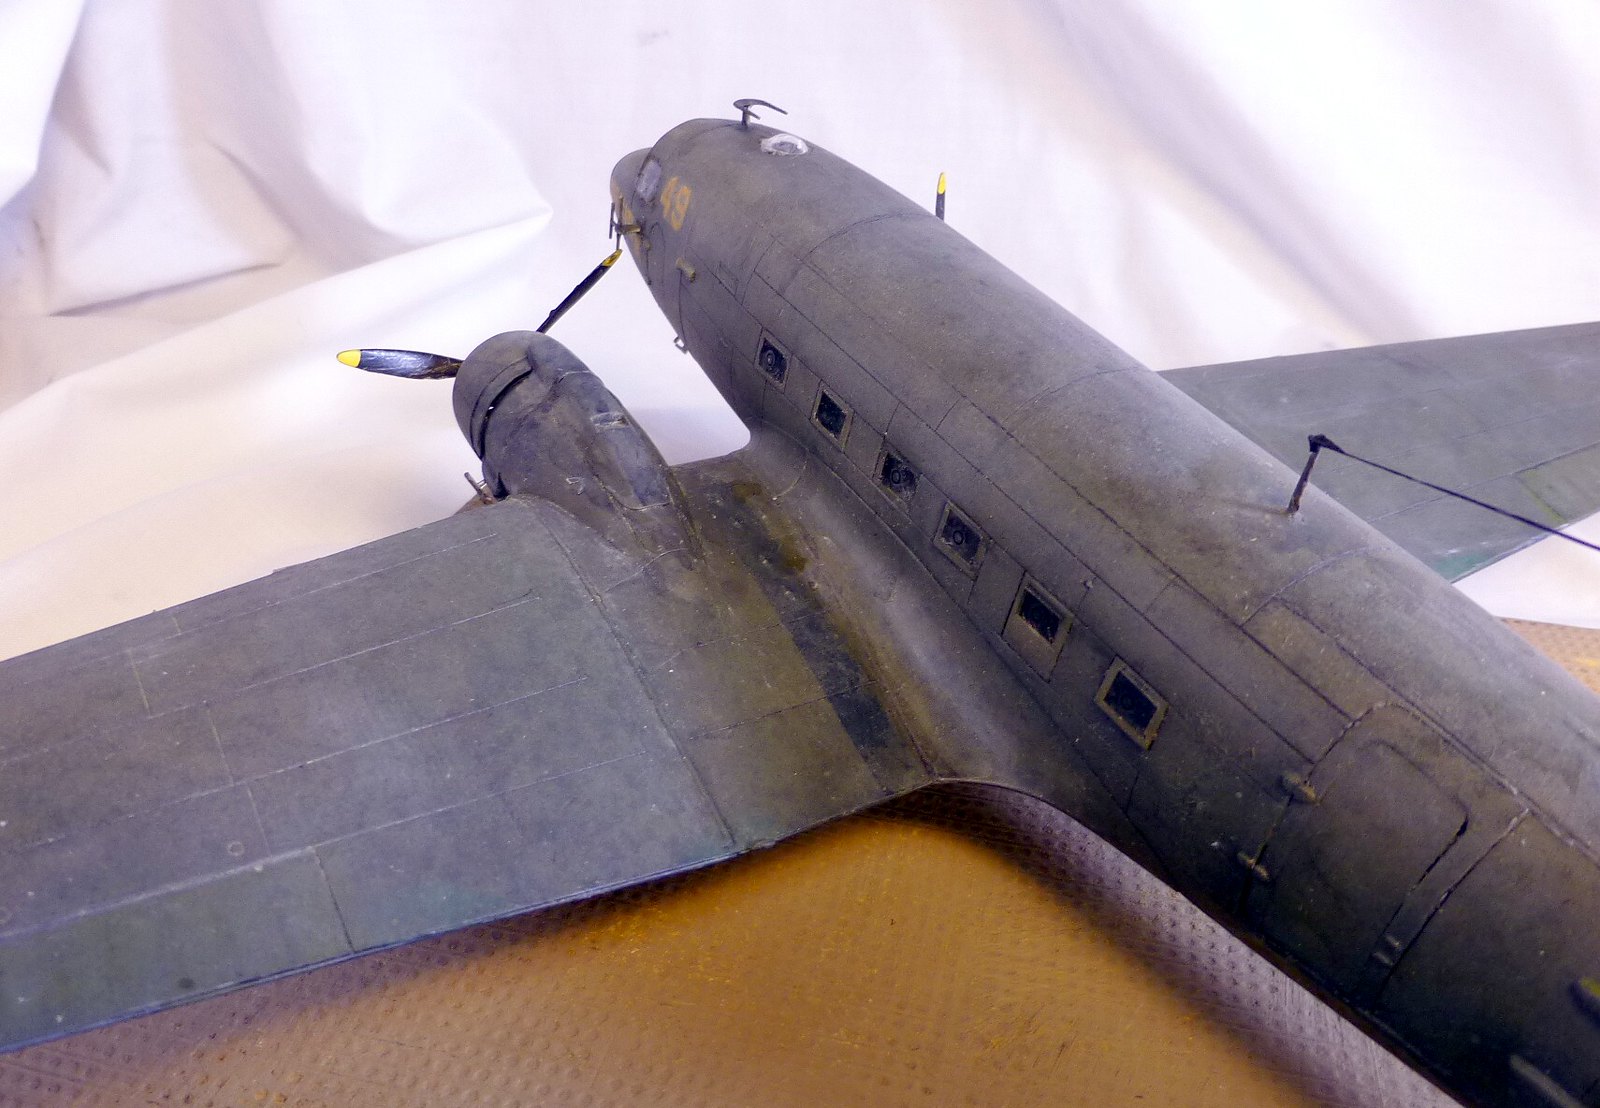 fusDetE by Eric Bergerud, on Flickr
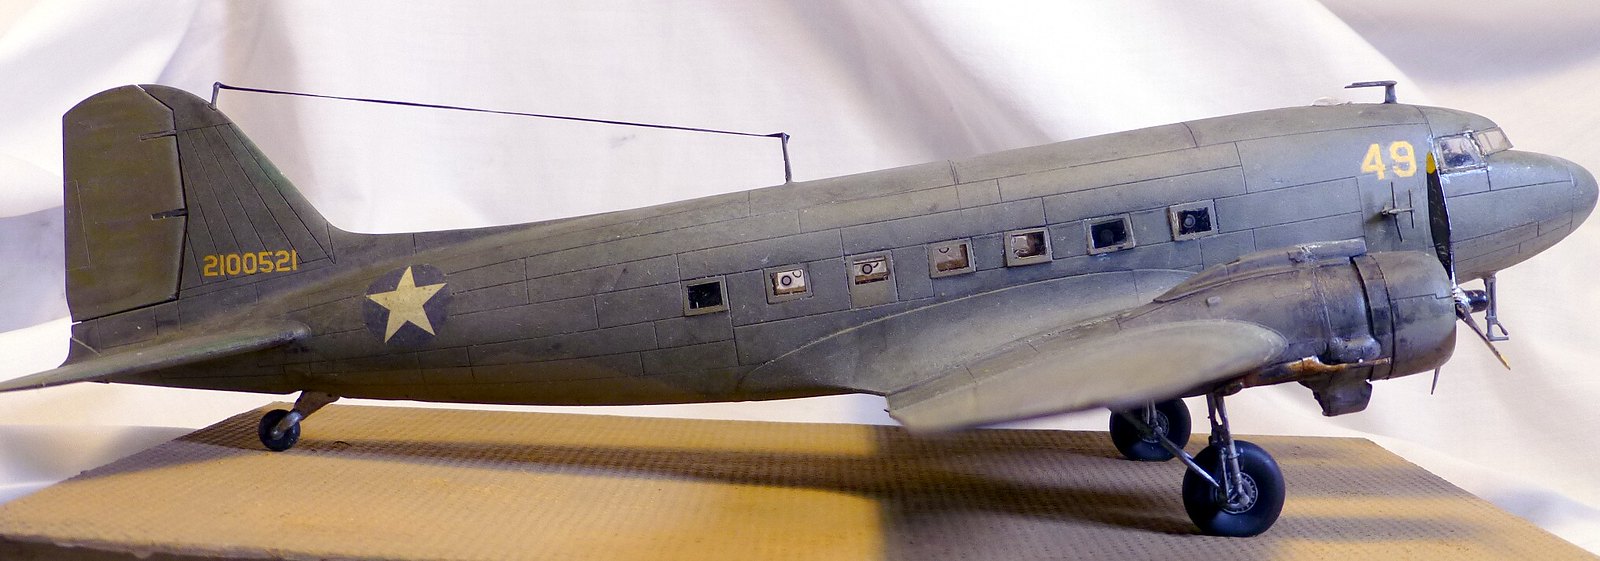
Here are some shots of the kit:
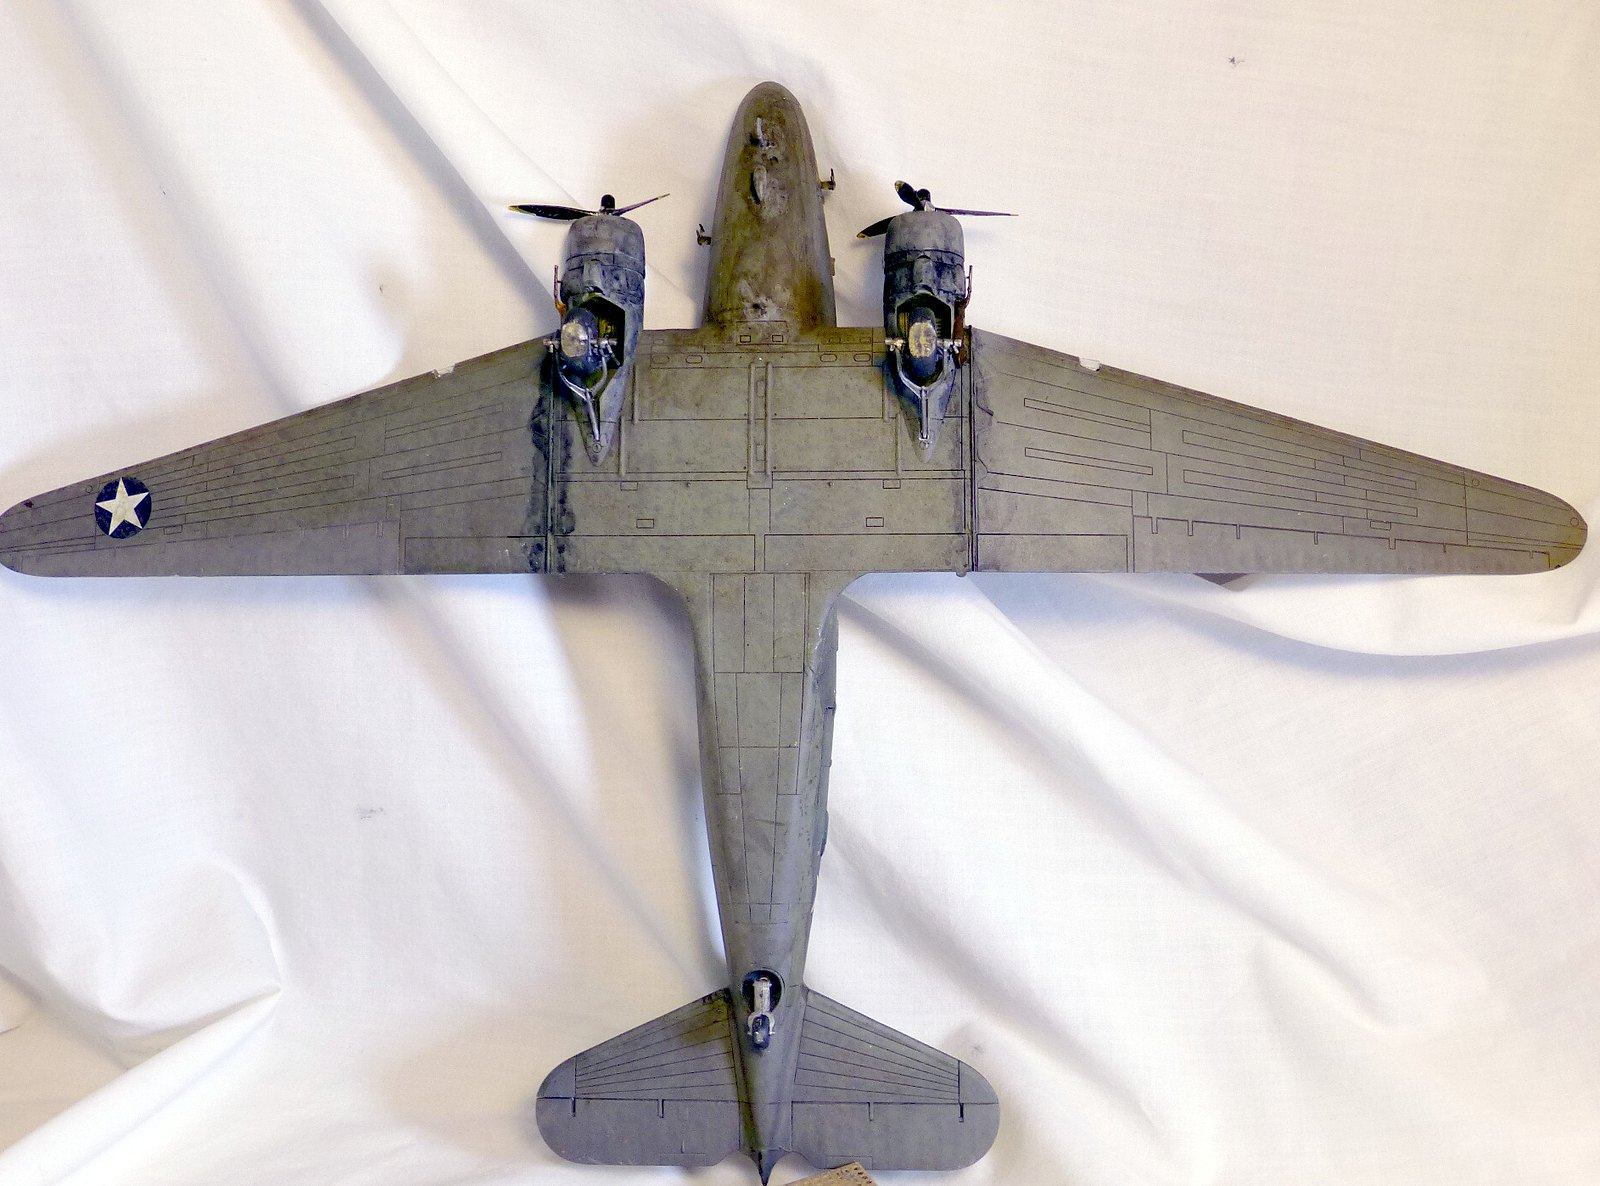 BotE by Eric Bergerud, on Flickr
 leftE by Eric Bergerud, on Flickr
 lft-rE by Eric Bergerud, on Flickr
 rightE by Eric Bergerud, on Flickr
 rt-rE (2) by Eric Bergerud, on Flickr
 rt-rE by Eric Bergerud, on Flickr
02rftE by Eric Bergerud, on Flickr
Altogether this was not a great kit and I did not do a great build. But from the all important view from five feet away, it looks pretty good. And I certainly did need a C47 in the collection.
Eric
C-47s and the New Guinea Campaign - Historical Context
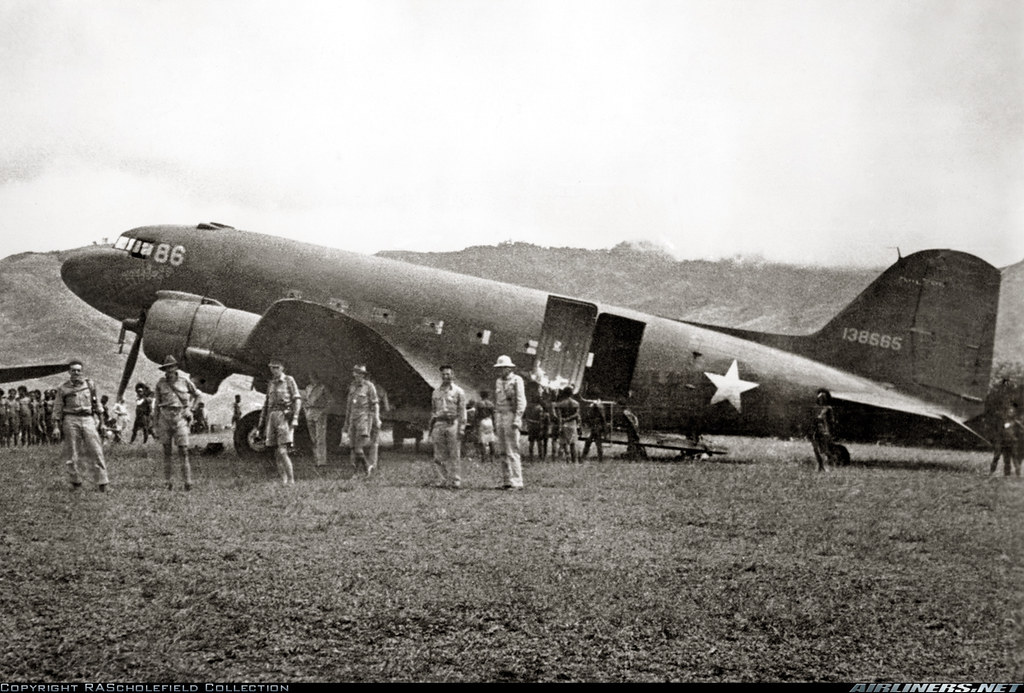
C-47s were priceless aircraft in every theater of war, but it is impossible to see how MacArthur's entire campaign in the SW Pacific could have been fought without them. This was particularly true during the first and most violent of the New Guinea campaigns was fought to eject the Japanese from their fortified zone on the southeastern coast of Papua running from Gona-Sananda-Buna. It was from Buna that the Japanese launched their brazen attempt to capture the last allied base in New Guinea (Port Moresby) by an overland campaign over the Owen Stanley Mountains via the Kokoda Trail. After some very bad moments, the Japanese ran out of steam and were ordered to retreat because all IJ efforts were diverted (temporarily it was hoped) to the Guadalcanal slugfest. By November 1942 crack Australian and not so crack American units were back over the trail and the decision was made to erase the IJ base to prevent a replay. As nobody had any idea how the Guadalcanal campaign was going to end - the decision was made with the full support of the Australian command and supported by MacArthur. But there was a serious problem. The USN and RAN both refused to escort ships to the Buna coast because it wasn't charted. (That didn't stop the Japanese Navy.) That meant the whole campaign had to be supplied by air - everything - until somebody found some old freighters and barges and discovered the will to get them near the battlefield. The Aussies man hauled enough supplies to get up the Kokoda track in pursuit of the Japanese. (Air drops on the trail - a real problem - were essential to keep men in small arms ammunition and rations.) An offensive, however, was impossible with only support of the "biscuit bombers." MacArthur is not everyone's cup of tea, but the man's ingenuity was impressive. He had seen the problem within weeks of his undignified arrival in Australia in March. In early June he instructed one of his best subordinates - the brilliant combat engineer General William Casey - to send a small team of engineers to Buna and find a place for an air strip. There was one there, but suitable for only small aircraft. But Casey's men quickly found strategic gold on the fringe of a New Guinea tidal swamp (about the worst place on earth to be - and a campaign was fought in it) where several acres of porous clay was concealed by ten foot high and razor sharp kunai grass. The Japanese walked right over it and didn't notice anything on their drive to Moresby. But as soon as the allies got back in early November, in ten days US engineers had a major air base operating at a hole in the map called Dobodura. ("Dobo" hosted four fields and was a major base for allied efforts until 1944.) Once the C47s available (maybe 24 to begin with - around 36 at the end if my memory serves) began landing there they could bring in vital supplies, reinforcements and take out wounded. Larger campaigns in Russia were sustained for short periods by air drop - but those planes were supporting armies that had brought with them thousands of tons of supplies. In the Buna campaign the allies measured their supplies in thousands of pounds - and the armies started with nothing. (Fortunately US 5th Air Force, although unable to bomb the Japanese out of their positions, was able to isolate the battlefield and the Japanese ended up starving by campaign's end in January 43.) But this still meant a campaign on a shoestring - and a campaign in a malarial swamp. (The US 32d Division suffered about 600 kia - but nearly 8,000 malaria victims. The 7AIF division suffered far worse but the battle deaths were dwarfed by weaponized mosquitoes. It's safe to say there were no healthy Japanese defenders. One of the last battles was fought in a Japanese hospitals - with Japanese patients shooting from their beds and using the dead as barricades. There were more violent campaigns in the war than Buna, but none that was more miserable - barring perhaps, fighting on the Russian front in sub-zero temperatures. They did play for keeps.) But because there was no maritime supply and no landing craft, it was not possible to give allied troops artillery. So the whole blinking mess was fought with infantry small arms. At most the allies were three miles from the sea in November - it took them until January to see water. But they didn't run out of ammunition, or food, or medicine. They did get Australian and US reinforcements periodically. Almost everything came on the C-47s. And every plane returned loaded with casualties to hospitals in Moresby-Australia. The pic below is an early war C-47 - perhaps from Dobodura, maybe from Port Moresby - the men involved certainly wanted what was being carried:
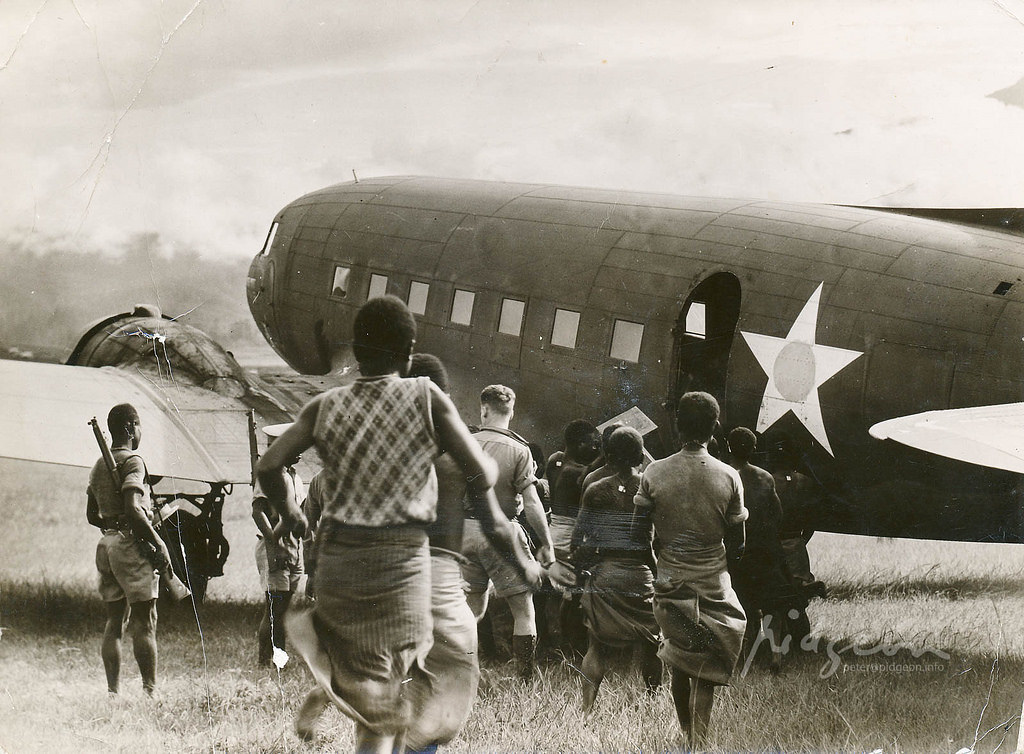 NG44 by Eric Bergerud, on Flickr
For what it's worth the allied victory at Buna shook the Japanese Command badly - much more so than Guadalcanal. Both Buna and "the Canal" were a long way from Japan, but when it dawned on Tokyo that the allies were planning a major effort in NG - it was also obvious that, unless stopped, the allies would be able to leap forward to either the East Indies (and the essential oil fields taken by Japan in the first weeks of the war) or the Philippines which would sever LOCs between the Indies and Japan. The next year and a half saw the Aussies and Americans - now supported by 7th Fleet (often called "MacArthur's Navy") out fight and out think the Japanese. Tokyo poured in 200,000 men and 600 planes from the Japanese Army Air Force - with mobility provided by 7th Fleet the allies annihilated or bypassed Japanese forces in six major campaigns and dozens of smaller ones. The C47s were there all the way, even supplying one of the few completely successful paratroop drop in WWII. The allies lost more casualties at Kokoda-Buna in 1942 than in all the remaining fighting in New Guinea which was over in July 1944. Counting the Japanese troops bypassed in New Guinea, the Solomon Islands and their fortress base of Rabaul, there were 350,000 Japanese in WWII's larges POW camp. (Communications ended with Japan and Tokyo assumed that all men were lost. After surrender, Tokyo found there were some 250,000 men waiting to be repatriated - the only good news in September 1945 for Japan.)
Back to the C-47s. About 20 years back I interviewed dozens of men who flew, flew in, or dropped things out of C-47s. Everybody loved the plane - it was perfect for the theater, and so reliable that it functioned well and safely even when not receiving the kind of maintenance that allied planes got later in the war. I think the C-47 has lovely lines - almost classic really. But the snout does look a bit like a beak - or so I was told by a pilot - and many men called them "Gooney Birds or Goonies." Not one man uttered the "Sky...." heresy. There are two very nice hour long documentaries about the C-47 on YouTube - and no "Sky...:" The Brits were very keen on names for planes and they did call it the Dakota. Maybe because of the baseball mania of the period, American pilots and crews usually referred to the mounts by number. There were no WarHawks in the USAAF - but thousands of "P40s." The nickname often used in American circles was "Jug"; and there also a few "Forts." But by and large, Army airmen of that generation kept to numbers. Navy planes, however, were usually called by their names. For one thing, if not, Marine and Navy pilots would have had to deal with two F4s and a F6. I'm not even sure the SBD or TBM/F had numbers. On the other hand, the USN were spoil sports when it came to nose art - whereas USAAF crews were allowed nose art galore. In 8th AF, some of the "girls" that decorated the heavies were painted by professional artists. Do note, the immature use of shark's teeth was a German invention, copied for some reason by both US and especially RAF pilots in the desert. They also were known in the otherwise classy 5th AF B-25 "strafers" which made an art form out of destroying ground targets and small ships for generals Kenney and MacArthur. Those talents were best on display over the JAAF's major base in New Guinea at a field complex called Wewak. 5th AF gave them the whole treatment and demolished the base and some 300 planes in three days in early 1944. "Wewak" then became a verb. If 5th AF "Wewaked" a target - it was pretty much gone. By 1945 there were Wewaked Japanese ex-bases across the Pacific. Japan really did pick a bad opponent in WWII.