SEARCH FINESCALE.COM

Enter keywords or a search phrase below:

German Armor GB 2019-2020

23521 views
485 replies
1 rating 2 rating 3 rating 4 rating 5 rating
  • Member since
    March 2017
Posted by Armor_Aficionado on Friday, December 13, 2019 11:04 AM

Okay, final reveal, she's DONE!  Whoever's running this GB now, please use the first picture here as the picture on the front page completion gallery.  Thanks.


  • Member since
    November 2009
  • From: SW Virginia
Posted by Gamera on Friday, December 13, 2019 9:51 AM

Tony: That's cool! What year is it? I don't think I've ever seen the Esci logo in that format.

"I dream in fire but work in clay." -Arthur Machen


  • Member since
    April 2005
  • From: Australia
Posted by taxtp on Thursday, December 12, 2019 4:06 PM

It's an interesting subject, looking good.

I thought I'd releive this thing of it's position in my garage, and build it. I should comfortably get it done by the end of the year.

Cheers

Tony


I'm just taking it one GB at a time.

  • Member since
    December 2002
  • From: Bury St Edmunds, Suffolk, England
Posted by Bish on Wednesday, December 11, 2019 1:52 PM

Nice work AA, likeing that.

I am a Norfolk man and i glory in being so


On the bench: Airfix 1/72nd Harrier GR.3/Fujimi 1/72nd Ju 87D-3

  • Member since
    November 2009
  • From: SW Virginia
Posted by Gamera on Wednesday, December 11, 2019 11:45 AM

She looks good AA, just needs a little weathering and mud!

"I dream in fire but work in clay." -Arthur Machen


  • Member since
    March 2017
Posted by Armor_Aficionado on Tuesday, December 10, 2019 5:56 PM

Well, after finally getting the tracks finished, I've been able to make a good pace with the rest of the model, to the point it's almost done.


  • Member since
    November 2009
  • From: SW Virginia
Posted by Gamera on Tuesday, December 3, 2019 10:12 AM

Real G: That looks real good! Love the PE panels- they look waaaay better than the plastic mesh material. 

AA & Robert: Sorry to hear about your woes. Seems sometimes the small simple looking projects turn out to be the biggest pains in the tush... 


Here I'm STILL applying Silly Putty to mask off the earth brown splotches on the Leopard 2. 

"I dream in fire but work in clay." -Arthur Machen


  • Member since
    March 2017
Posted by Armor_Aficionado on Tuesday, December 3, 2019 6:05 AM

Gamera

Robert: The Panther/M10 looks good! And the Wiesel is coming along great!

AA: Sorry missed your post- I'm on vacation/holiday. Did you get the tracks finished?


Hey Gamera,

Yeah, FINALLY got the tracks finished, and they were a HUGE pain in the butt!  The fit was horrible.  The individual links wrapped around the rear sprocket okay, but by the time I added the assorted links and lengths and got to the front sprockets, none of the individual links would fit with the adjacent links AND the sprocket teeth.  Had to cut a lot of the teeth off in order to just get the links to lay down and approximately join the adjacent links.  Compared to this model, the ancient ERTL/ESCI BMP-2 I did months ago which also had link and length tracks (and was my first attempt at such) was a veritable masterpiece!  If you really want to engage in self-abuse, go ahead and buy this kit and try these link & length tracks.    Bang Head

  • Member since
    February 2005
  • From: Nashotah, WI
Posted by Glamdring on Monday, December 2, 2019 9:30 PM

Please forgive me for this mini rant session...I just need to vent on this thing.

I am on the verge of tossing this kit back on the shelf of woe!  If anyone has this original kit in their stash, I strongly recommend offloading it as soon as possible.  Supposedly they resolved the track and PE issue when they rereleased the kit a couple years back though.

The rubber bands have been stretched on, qute literally as they appear to be two to three links short for a smooth fit.  First one went on flawlessly by some miracle.

The other side saw the rear road wheel snap right off, and repeated attempts with my strongest CA was unable to hold it in place once the track was streatched back on.  I ended up pulling the track apart and glueing it to the road wheels to hold it, but this unfortunately leaves that 2-3 track gap smack in the middle.  

I'm trying to brainstorm a way to resolve this.  I'm thinking of just cutting an old gift card to the dimensions and gluing this in that space.  

After that crisis, that brings me to the next sore point, the steel PE.  This stuff barely bends and certainly won't hold a square bend.  Of course if you work it too much, one piece is now two.  This is one of the screens that covers the exhaust system.  It started off as one piece, but is now 3:

For such a small subject, this kit is really kicking my behind.  Doesn't make sense now to pour money into it for AM replacement partes though, because I am so fed up with it, I can't wait to be done!   

Robert 

"I can't get ahead no matter how hard I try, I'm gettin' really good at barely gettin' by"

  • Member since
    May 2011
  • From: Honolulu, Hawaii
Posted by Real G on Monday, December 2, 2019 4:28 PM

Just a quickie update.  I test fit the PE screens to the fold-down side gates and everything looks good.

I now realize the awful mess of parting lines on the gates will be hidden by the screens, so I'll just be giving them a stern swipe with the edge of a knife and calling cleanup done!

“Ya ya ya, unicorn papoi!”

  • Member since
    December 2002
  • From: Bury St Edmunds, Suffolk, England
Posted by Bish on Monday, December 2, 2019 2:23 AM

Thanks Gamera.

I am a Norfolk man and i glory in being so


On the bench: Airfix 1/72nd Harrier GR.3/Fujimi 1/72nd Ju 87D-3

  • Member since
    December 2002
  • From: Bury St Edmunds, Suffolk, England
Posted by Bish on Monday, December 2, 2019 2:23 AM

Real G

Nice work guys, I hope to catch up!  I'm still battling ejector pin marks, but I think I'm winning!  Stick out tongue

I have made progress since these pics were taken.  Still, they are relatively easy to deal with compared to the M107's.

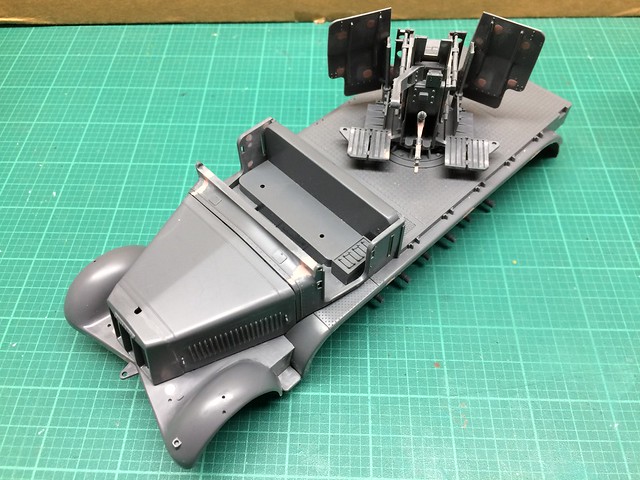
I got a PE cutter recently and so I wanted to try it out.  The anti-skid floor plates do a nice job of dressing up the featureless cab interior.  I'm not going bananas with the PE, as a lot of it is excessively fiddly and 2-D.  Actually, the only reason I bought the Eduard PE set was to get the metal screens on the fold-down sides of the fighting platform.  I'm keeping the build as simple as possible.


You certainly are winning from hat i can see, thats looking very nice.

I am a Norfolk man and i glory in being so


On the bench: Airfix 1/72nd Harrier GR.3/Fujimi 1/72nd Ju 87D-3

  • Member since
    November 2009
  • From: SW Virginia
Posted by Gamera on Sunday, December 1, 2019 5:22 PM

Bish & G: Those look great guys!!!

"I dream in fire but work in clay." -Arthur Machen


  • Member since
    December 2002
  • From: Bury St Edmunds, Suffolk, England
Posted by Bish on Sunday, December 1, 2019 8:54 AM

A bit more progress on the Tiger. I got the fuel tanks and fans painted as this will be seen though the grills.

The turret was finsihed off with spare track hangers and other small bits.

And the top deck has been added and then most of the PE has been fitted. The track guards took quite some time to do. The kit ones are nice but i need this movable so it been worth it. I still have to do the rear ones. Thats tonights main effort.

And i have started on the Fruil tracks. One is done just a few more links to add to the other.

I can feel the paint stage coming on son and then i can start puting the figures together.

I am a Norfolk man and i glory in being so


On the bench: Airfix 1/72nd Harrier GR.3/Fujimi 1/72nd Ju 87D-3

  • Member since
    May 2011
  • From: Honolulu, Hawaii
Posted by Real G on Friday, November 29, 2019 12:51 PM

Nice work guys, I hope to catch up!  I'm still battling ejector pin marks, but I think I'm winning!  Stick out tongue

I have made progress since these pics were taken.  Still, they are relatively easy to deal with compared to the M107's.

I got a PE cutter recently and so I wanted to try it out.  The anti-skid floor plates do a nice job of dressing up the featureless cab interior.  I'm not going bananas with the PE, as a lot of it is excessively fiddly and 2-D.  Actually, the only reason I bought the Eduard PE set was to get the metal screens on the fold-down sides of the fighting platform.  I'm keeping the build as simple as possible.

“Ya ya ya, unicorn papoi!”

  • Member since
    November 2009
  • From: SW Virginia
Posted by Gamera on Thursday, November 28, 2019 8:44 AM

Well, here are two photos of my Leopard 2. I finished up the black camo pattern before I left on vacation/holiday. Now I need to get the earth brown blotches added. 

BTW: The left PE engine cooling fan screen came off so that's why you see a big white circle where the primer is showing underneath it. 


"I dream in fire but work in clay." -Arthur Machen


  • Member since
    April 2005
  • From: Australia
Posted by taxtp on Wednesday, November 27, 2019 11:31 PM
I did zimmerit on the AFV Club 1/48 Sturmtiger using putty. The provided a P/E tool, but I thought the pattern it created was overscale so I made a simple tool myself. I thought it was fun, must do that again. Cheers Tony

I'm just taking it one GB at a time.

  • Member since
    December 2002
  • From: Bury St Edmunds, Suffolk, England
Posted by Bish on Monday, November 25, 2019 12:58 PM

I have done a pre zimmed kit, and while it does look nice, its just to pristine and i think it would be hard to create damage. I wil be interested to see how the decals work and if i can create a worn look with them.

I am a Norfolk man and i glory in being so


On the bench: Airfix 1/72nd Harrier GR.3/Fujimi 1/72nd Ju 87D-3

  • Member since
    November 2009
  • From: SW Virginia
Posted by Gamera on Monday, November 25, 2019 11:30 AM

Good idea on the practice. I used to do it that way back in the '80-'90s before they made photoetch and resin zimmerit. Still think the putty generally looks better. Last subject I built with zimmerit I did cheat and use the resin stuff. 

"I dream in fire but work in clay." -Arthur Machen


  • Member since
    December 2002
  • From: Bury St Edmunds, Suffolk, England
Posted by Bish on Monday, November 25, 2019 7:37 AM

Thanks G. I should do t more often really, keep my hand in.

I am a Norfolk man and i glory in being so


On the bench: Airfix 1/72nd Harrier GR.3/Fujimi 1/72nd Ju 87D-3

  • Member since
    November 2009
  • From: SW Virginia
Posted by Gamera on Monday, November 25, 2019 7:36 AM

Bravo Bish!!! Love the zimmerit! I used to do this all the time! 

"I dream in fire but work in clay." -Arthur Machen


  • Member since
    December 2002
  • From: Bury St Edmunds, Suffolk, England
Posted by Bish on Monday, November 25, 2019 3:14 AM

Thanks Robert. It is a pain, took me 4 or 5 days to get it done working in stages.

I am a Norfolk man and i glory in being so


On the bench: Airfix 1/72nd Harrier GR.3/Fujimi 1/72nd Ju 87D-3

  • Member since
    February 2005
  • From: Nashotah, WI
Posted by Glamdring on Sunday, November 24, 2019 10:03 PM

Very nice on that Zim!  I have never successfully completed a model doing it by hand myself.  Closest I ever came was using some resin pieces on an Elefant.

Robert 

"I can't get ahead no matter how hard I try, I'm gettin' really good at barely gettin' by"

  • Member since
    December 2002
  • From: Bury St Edmunds, Suffolk, England
Posted by Bish on Sunday, November 24, 2019 10:17 AM

Made a start on the Tiger 2 weeks ago, only my second Tiger I and my first in 11 years. Been a bit slower than i expected, largely due to the zimm taking longer than i thought. But its progressing well now.

I am adding a Voyager PE set, Aber metal barrel and Fruil metal transport tracks.

Started with the lower hull and the working suspension.

Then got started on the zimmerit useing Miliput white. Been a few years since i did this. Its messy and tedious but it still gives the best results that i have seen IMHO.

Once that was done, i got the turret together, including metal barrel.

And started fitting out the rear.

Got a bit of patching up to do on the zimm once the rest of the PE is fitted. main thing to do now is the PE track guards. I need to keep than workable for the dio. Once there done, i can crack on with the rest.

I am a Norfolk man and i glory in being so


On the bench: Airfix 1/72nd Harrier GR.3/Fujimi 1/72nd Ju 87D-3

  • Member since
    November 2009
  • From: SW Virginia
Posted by Gamera on Saturday, November 23, 2019 4:37 PM

Robert: The Panther/M10 looks good! And the Wiesel is coming along great!

AA: Sorry missed your post- I'm on vacation/holiday. Did you get the tracks finished?

"I dream in fire but work in clay." -Arthur Machen


  • Member since
    February 2005
  • From: Nashotah, WI
Posted by Glamdring on Saturday, November 23, 2019 2:36 PM

I finally have some shots of the Wiesel:

Interior, that will be mostly unseen once glued together:


Mocked up profile:


Profile with the TOW added:


To add a sense of scale, here it is next to a 1/72 Leopard 2A6:


Finally, here's the Dragon 1/35 Ersatz M10, with R Models' Early Panther metal tracks:


These tracks were great, they came with turned brass pins that just slipped right into the holes in the links.  There were some warped links that were unusable, but they had about 20 extra in the baggie so it wnded well in the end!  Tracks were soaked in Mig's Burnishing Fluid for 20 minutes.  Highly recommend them, but they are only sold on Ebay out of Hong Kong and China as far as I know, but even so arrived 1.5 weeks after the order was placed. 

This was shown at the MMSI show in October, the Larry Peters Classic Show in Milwaukee, and the Butch O'Hare IPMS Show in November.  Took a Merit, a Silver and Bronze respectively.  Nobody was shocked more than me, since these were my first "real" shows!  

Robert 

"I can't get ahead no matter how hard I try, I'm gettin' really good at barely gettin' by"

  • Member since
    December 2002
  • From: Bury St Edmunds, Suffolk, England
Posted by Bish on Monday, November 18, 2019 3:16 PM

Nice work there AA.

I am a Norfolk man and i glory in being so


On the bench: Airfix 1/72nd Harrier GR.3/Fujimi 1/72nd Ju 87D-3

  • Member since
    March 2017
Posted by Armor_Aficionado on Monday, November 18, 2019 3:05 PM

Latest progress on the 35(t):


Starting on the Link-and-length tracks:

  • Member since
    November 2009
  • From: SW Virginia
Posted by Gamera on Sunday, November 17, 2019 4:33 PM

Tony: Oooooooohhhhhhhhhhh, that's some nice work!!! I'd swear she was 1/35th if you didn't say so! 

Robert: Those sound cool, would love to see some photos of the Wiesel and Panther/M10!

G: She's coming along great- gee friggin' whiz I hate friggin' injection pin marks...

"I dream in fire but work in clay." -Arthur Machen


  • Member since
    April 2005
  • From: Australia
Posted by taxtp on Thursday, November 14, 2019 5:09 PM
Nice to see all the hard work with the Pin Ejection marks Real G. Cheers Tony

I'm just taking it one GB at a time.

JOIN OUR COMMUNITY!

Our community is FREE to join. To participate you must either login or register for an account.

SEARCH FORUMS
FREE NEWSLETTER
By signing up you may also receive reader surveys and occasional special offers. We do not sell, rent or trade our email lists. View our Privacy Policy.