SEARCH FINESCALE.COM

Enter keywords or a search phrase below:

German Armor GB 2019-2020

23520 views
485 replies
1 rating 2 rating 3 rating 4 rating 5 rating
  • Member since
    May 2011
  • From: Honolulu, Hawaii
Posted by Real G on Monday, August 19, 2019 1:12 PM

I felt like doing something mindless, so I assembled the Modelkasten tracks for the Flakvierling.  After an afternoon of work, they were done.

MK's plastic is very hard and brittle, and I noticed some segments I had assembled earlier had stress cracks in the rubber blocks.  So I used liquid cement to grease the blocks on to the pins molded into the track shoes to see if that helped.  I think I just push fit them in earlier.

I have not yet fitted the MK sprocket and wheels, so I left a couple of track segments off to see how the track tension is afterwards.  The sprockets are appreciably smaller than the kit's.

BTW, MK's claim that it is best to snap the tracks off the sprue to get the cleanest break is a bunch of hooey.  You'll get exactly what you would expect from tearing parts off the sprue.

“Ya ya ya, unicorn papoi!”

  • Member since
    September 2017
  • From: Netherlands
Posted by Sailing_Dutchman on Sunday, August 18, 2019 3:08 PM

Great work there everybody! I gust got back from my vacation and can now actively participate in this GB again. I have been looking through the past post and am amazed at the quality of the buils that are there. Keep up the good work and I hope to join you in my build soon.


  • Member since
    November 2009
  • From: SW Virginia
Posted by Gamera on Thursday, August 15, 2019 7:37 AM

I'm not surprised, they really look scrunched in there. Again great job there, love the camo, figures, and the groundwork. 

"I dream in fire but work in clay." -Arthur Machen


  • Member since
    January 2013
  • From: Athens, Greece
Posted by Zvezda1980 on Thursday, August 15, 2019 3:42 AM

Gamera: Yes, a little. I had to first install the gunner on his seat, then attach the loaders on their seats with some white glue and finally the guns+gunner assembly was installed & glued inside the turret, adjusting the position of the loaders from above (white glue had not dried yet). Guns assembly was glued by applying thin cement from the lower turret opening and let capillary do its job.

Some detail painting on the tools was done, an antenna of stretched sprue was installed and the kit is proclaimed completed.


  • Member since
    November 2009
  • From: SW Virginia
Posted by Gamera on Monday, August 12, 2019 11:19 AM

Zvezda: That looks great! Love the camo and base. Were there any problems getting the figures to fit inside the turret? 

"I dream in fire but work in clay." -Arthur Machen


  • Member since
    December 2002
  • From: Bury St Edmunds, Suffolk, England
Posted by Bish on Monday, August 12, 2019 6:45 AM

Cheers Zvezda. Nice work on the Wirbel, like the scene and nice job on the base.

I am a Norfolk man and i glory in being so


On the bench: Airfix 1/72nd Harrier GR.3/Fujimi 1/72nd Ju 87D-3

  • Member since
    January 2013
  • From: Athens, Greece
Posted by Zvezda1980 on Monday, August 12, 2019 3:21 AM

Bish, this is a true beauty shaping up.

Among heavy work time, earthquakes, heatwaves and other distracting events, I managed to finish assembly of the Flakpanzer and its crew.

The hull, tracks and wheels were dusted with a combination of brown/sand dry pastels. Tracks details were then picked up with a 2B pencil.

The base scenery was aurbrushed with several tones of green & green-yellow, until it looked good to the eye.

Tools and spare tracks were added to the hull with the aid of small blobs of white glue.

Some micro details painting and small corrections remain to be done.

The crew commander was placed at the forefront, scanning the horizon with his binoculars. The crew has the guns locked and loaded.


  • Member since
    December 2002
  • From: Bury St Edmunds, Suffolk, England
Posted by Bish on Sunday, August 11, 2019 3:44 PM

Thanks G. To be fair it was the aftermarket resin set which comes with all the stores molded on. I may have placed it a fraction to high. Once the top was on it went in perfectly.

I am a Norfolk man and i glory in being so


On the bench: Airfix 1/72nd Harrier GR.3/Fujimi 1/72nd Ju 87D-3

  • Member since
    November 2009
  • From: SW Virginia
Posted by Gamera on Sunday, August 11, 2019 3:37 PM

AA: The camo looks good!

Bish: Nice work there. I don't quite understand why companies put parts in there that you have to remove to get the darn thing to close up. Still you're doing great work there.

"I dream in fire but work in clay." -Arthur Machen


  • Member since
    December 2002
  • From: Bury St Edmunds, Suffolk, England
Posted by Bish on Saturday, August 10, 2019 2:43 PM

Got the rest of the interior fitted. Before i added the top i did some dry fitting and realised that the items on the left hand shelf were stoping the upper hull from fitting properly, so the shelf was removed.

Even with that removed the fit was still a bit tricky. I stared at the front and worked back keeping the top half in place. Its not very obvious, but the upper hull does slightly overhang the lower huill along the sides as it should. The left hand shelf was fitted as soon as the top was on.

The rear door fit is not brilliant. The hinges feel a bit flimsy. The doors don't pivot on them as on the real thing, a feature which is on the Dragon and AFV Ausf C kits. Also, when closed, the doors are skewed, they would need to be glued in place. Fortunatly, i am having them open on this. Come to think of it, all my previous 251's have either one or both doors open.

And finally the suspension. The axel arms have very small location parts and the fit is rather loose. You would ahve to be careful that the arms are all level if you are sitting it on a shelf. Fortunatly i can adjust the base i am doing if needed.

Thats all for now.

I am a Norfolk man and i glory in being so


On the bench: Airfix 1/72nd Harrier GR.3/Fujimi 1/72nd Ju 87D-3

  • Member since
    March 2017
Posted by Armor_Aficionado on Saturday, August 10, 2019 7:02 AM

Latest on the King Tiger: camo colors applied!  Very pleased with this; I used Ammo of Mig acrylics and a Harter & Steenbeck Evolution airbrush.  Didn't even need to use airbrush thinner or flow enhancer; the Ammo of Mig colors flowed perfectly.


  • Member since
    February 2016
  • From: Ice coated north 40 saskatchewan
Posted by German Armour on Thursday, August 8, 2019 10:04 AM

Nice job everyone! Bish, your 250 looks really good! AA, the tiger is coming along quite well!

I've ordered zimmerit for my kit, then will order PE for it.Just waiting for it to come in then start building! PE is goin' on! :)

 Never give up, never quit, never stop modelling.Idea


  • Member since
    November 2009
  • From: SW Virginia
Posted by Gamera on Thursday, August 8, 2019 7:59 AM

AA: Looks good, solid base there for the camo. 

Bish: Sorry, somehow I missed your last update. All that PE makes my head hurt. The figures look good, looking forward to seeing how they come out. 

"I dream in fire but work in clay." -Arthur Machen


  • Member since
    December 2002
  • From: Bury St Edmunds, Suffolk, England
Posted by Bish on Wednesday, August 7, 2019 3:05 PM

Looking good AA.

I am a Norfolk man and i glory in being so


On the bench: Airfix 1/72nd Harrier GR.3/Fujimi 1/72nd Ju 87D-3

  • Member since
    March 2017
Posted by Armor_Aficionado on Wednesday, August 7, 2019 2:58 PM


Latest progress: hull and turret are both done with construction, have had primary coat of Dunkelgelb applied, waiting to applying the green and red-brown camo layers:


  • Member since
    December 2002
  • From: Bury St Edmunds, Suffolk, England
Posted by Bish on Saturday, August 3, 2019 4:28 PM

I am really liking this 251 kit, its going together nicely. Quite a bit of filling but thats for the locations points for parts that will be repleaced by AM. I have also fitted the resin seat mounts from the MR Models set.

And finished puting together the front wheel suspension.

And all the inside parts for the upper hull fitted. One minus is that there are no clear parts for the vision ports, just solid plastic. The Eduard PE set replaces these and i'll just have to add some clear styrene.

And everything else added to the lower hull.

And some of the items to be fited after painting. This includes holders for 10 spare MG barrels. Thats seems a bit excessive but i'll fit them anyway.

Then time for some paint. After some Pz Grey, i did a very light dry brush and a couple of coats of Alclad Aqua gloss.

Next up will be some very light weathering, a wash and some streaks. 251 production only begain in June 39 so this vehicle would be 3 months old at most, so nothing to extreme. Also got plenty of smaller items to finish off.

And i have made a start on the figures, 10 in all. A mix of Dragon, Tamiya, Tristar and Miniart.


More soon.


I am a Norfolk man and i glory in being so


On the bench: Airfix 1/72nd Harrier GR.3/Fujimi 1/72nd Ju 87D-3

  • Member since
    November 2009
  • From: SW Virginia
Posted by Gamera on Tuesday, July 30, 2019 7:25 PM

Those look good! And getting a couple figures painted is a bunch of work so you're moving right along.

"I dream in fire but work in clay." -Arthur Machen


  • Member since
    January 2013
  • From: Athens, Greece
Posted by Zvezda1980 on Tuesday, July 30, 2019 7:36 AM

Very small progress with the flakpanzer, just the figures painted with Vallejo acrylics.


Hope to catch up within the next days.

  • Member since
    January 2013
  • From: Athens, Greece
Posted by Zvezda1980 on Tuesday, July 30, 2019 7:31 AM

This GB is getting more and more interesting.

AA:    Nice work with the beast.

Bish: All these pzkfdwbv vehicles are really beautiful. And this seems like a terrific kit. Very inspiring...

  • Member since
    November 2009
  • From: SW Virginia
Posted by Gamera on Saturday, July 27, 2019 6:09 PM

Looks good AA!!! Yes

"I dream in fire but work in clay." -Arthur Machen


  • Member since
    March 2017
Posted by Armor_Aficionado on Saturday, July 27, 2019 8:22 AM

More progress on the King Tiger.  Turret is done, except for placing extra track segments, commander's cupola MG, and possibly trying to add some zimmerit; lower hull and torsion bar assembly is complete and primered:


  • Member since
    December 2002
  • From: Bury St Edmunds, Suffolk, England
Posted by Bish on Friday, July 26, 2019 10:44 AM

Thanks G. Its not one you see a lt of, i can't find any pics of them in use in Poland, so going to have to make a best guess at that.

I am a Norfolk man and i glory in being so


On the bench: Airfix 1/72nd Harrier GR.3/Fujimi 1/72nd Ju 87D-3

  • Member since
    November 2009
  • From: SW Virginia
Posted by Gamera on Friday, July 26, 2019 8:55 AM

Oh that looks cool Bish! I'm not even sure I've seen that vehicle before, looking forward to seeing her come together. 

"I dream in fire but work in clay." -Arthur Machen


  • Member since
    December 2002
  • From: Bury St Edmunds, Suffolk, England
Posted by Bish on Thursday, July 25, 2019 2:46 PM

Being a 251 fanatic i know we are spoilt with Ausf C and D variants. But the A and B are different stories. Of course, Zvezda brought us an Ausf B back in 2006. But after Dragons promised Ausf A never saw the light of day i didn't think we would ever get the vehicle that started it all. So i was overjoyed last year when ICM released it.

So, now i finally get round to building one. I have not seen one built up or a build review of one, so, for those who may be interested, i'll try and go into as much detail as possable. My first impression of the kit was that the detail was very nice, deffinetly beyond Tamiya standard and not far off Dragon and AFV Club. Its also clear it builds up very differently from the others. Its also the first 251 kit i know of that comes with an engine. This looks very nice and while i won't be useing it on this one, i will when i do one of the /6 kits.

Its also clear that the box top is slightly misleading. It shows a very early vehicle on which the forward and rear gun mounts are the same and the antenna mount is on the left mudguard. The kit doesn't have these options and as i want to do a vehicle during the Polish campaign i need to fix thee things. The gun mount i can get from the spares box. The antenna i can leave out along with the radio. Its clear from pics that not all vehicles carried a radio until 1942, i believe it was just the platoon commaners vehicles and above which did before 42. And the this makes sense given the tactics for use by the 251 at the start of the war. And finally, the kit only comes with markings for the French and Russian campaigns. I'll use markings for one of the former and then add all white cross used in 39.

So, enoug of my first impressions and intentions, this is the kit, to which i am adding an Eduard PE set, MR Models resion set, Panzerart wheels and Hobby Boss tracks, if they fit. If they don't, i'll dig out some Fruils.

I started off on the lwer hull, and though it does not have the multitude of parts that Dragon kits have, its still nicely done.

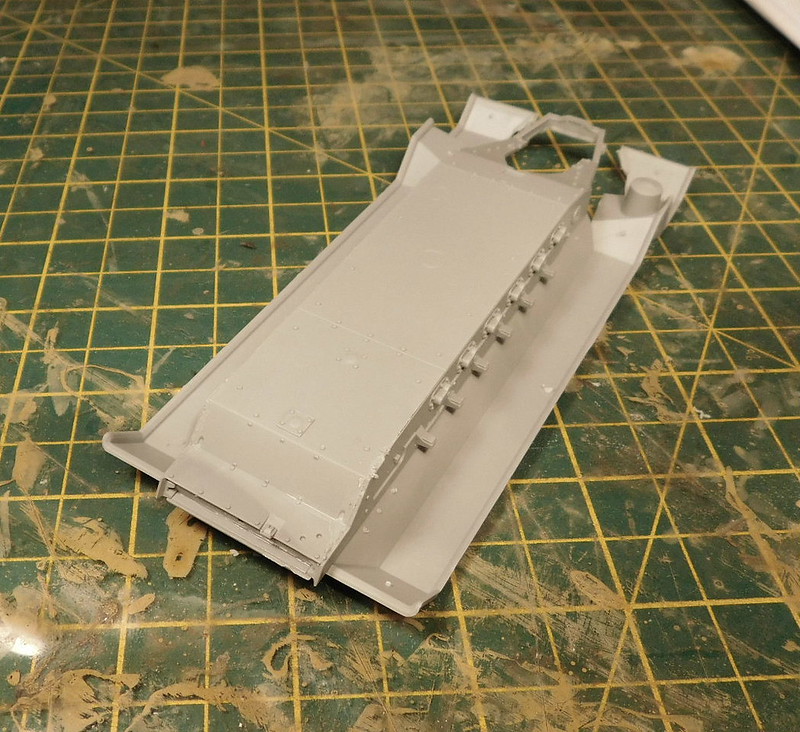
Then the floor, this comes with the track guards molded on, first bg differance to other kits.

Then got the other side all fitted. A few sink holes needed filling. And added a few other bits to the front.

So far, my impression is that this kit is first rate. Its quickly making its way towards the top of my favorite 251 kit list. Not far off AFV Club Ausf C level.

With 103 stages, the instructions do look daunting. But most of those stages only have 1 or 2 parts to fit. The above is about an hours work, not including PE, over a couple of nights and i am aleady at stage 14.

Thanks for looking, more soon.

I am a Norfolk man and i glory in being so


On the bench: Airfix 1/72nd Harrier GR.3/Fujimi 1/72nd Ju 87D-3

  • Member since
    November 2009
  • From: SW Virginia
Posted by Gamera on Sunday, July 14, 2019 9:06 PM

AA: Looks good!

"I dream in fire but work in clay." -Arthur Machen


  • Member since
    March 2017
Posted by Armor_Aficionado on Sunday, July 14, 2019 12:48 PM

Making progress on the King Tiger, turret is almost done:


  • Member since
    January 2015
  • From: Tumwater, WA.
Posted by M. Brindos on Wednesday, July 10, 2019 3:46 PM

Archangel Shooter

Well lets see if I can finish this before the end of the year?


I needed a 1/32 German tank for the same scale figure I purchased the other month and I got a pretty good deal on the tank from Hobby Lobby. 

The tank commander... doesn't look anything like Brad Pitt. Not sure if someone had used this pic as a previous GB badge in the past.


Rubber tracks, won't be fiddling with separate links here. Save that for the King Tiger.


Gave the parts a bath in warm soapy water and now drying out.


Being a newer release I don't believe the decals will be a problem.


Got the figure cleaned up and primed. She only has 3 pieces, the other few parts were the tank cupola, hatch and binoculars

Now to start putting it all together.


Wait, whuuuuuuut?!

That's a REAL figure?!

Where can I get that? I've had the artwork for years!

- Mike Brindos "Lost Boy"

  • Member since
    September 2017
  • From: Netherlands
Posted by Sailing_Dutchman on Wednesday, July 10, 2019 2:02 AM

Your kit is in the roster.


  • Member since
    December 2002
  • From: Bury St Edmunds, Suffolk, England
Posted by Bish on Tuesday, July 9, 2019 6:13 AM

Nice work there AA, likeing the base.

I am a Norfolk man and i glory in being so


On the bench: Airfix 1/72nd Harrier GR.3/Fujimi 1/72nd Ju 87D-3

  • Member since
    November 2009
  • From: SW Virginia
Posted by Gamera on Monday, July 8, 2019 8:00 PM

Zvezda: That looks cool!

AA: Sounds neat to me, hope it's ok by Dutchman.


Sorry, not much going on here. I have two GBs with deadlines coming up soon so the Leopard's back in the box.

"I dream in fire but work in clay." -Arthur Machen


JOIN OUR COMMUNITY!

Our community is FREE to join. To participate you must either login or register for an account.

SEARCH FORUMS
FREE NEWSLETTER
By signing up you may also receive reader surveys and occasional special offers. We do not sell, rent or trade our email lists. View our Privacy Policy.