SEARCH FINESCALE.COM

Enter keywords or a search phrase below:

Ships of the American Flag GB 2019 -2021

88090 views
2198 replies
1 rating 2 rating 3 rating 4 rating 5 rating
  • Member since
    July 2014
Posted by modelcrazy on Monday, March 23, 2020 7:20 AM

Supper detailing PE, nice. Yes, Eduard PE is thicker than other manufacturers and while that good/bad their instructions are #1 IMO.

The top od the tower dose look a wee bit tall be you need to know something about the Penn class BB to recognize that.

Your really making me want to work on the wreck version, but I just have too much on the bench.

Steve

Building a kit from your stash is like cutting a head off a Hydra, two more take it's place.


http://www.spamodeler.com/forum/

  • Member since
    January 2015
Posted by TheMongoose on Monday, March 23, 2020 10:57 AM

Ben you're giving a great tutorial, keep it up!

I would say yes, it looks too tall. The height below the windows is where it appears to need adjusted. If you've got another one coming then I'd say adjust it. If you're playing the cards you're delt I would do as MC says and not worry about it because those of us who haven't seen the picture would never know Wink

In the pattern: Scale Shipyard's 1/48 Balao Class Sub! leaning out the list...NOT! Ha, added to it again - Viper MkVii, 1/32 THUD & F-15J plus a weekend madness build!

  • Member since
    November 2009
  • From: SW Virginia
Posted by Gamera on Monday, March 23, 2020 11:27 AM

Ben: I dunno but it looks friggin' cool to me! Yes

"I dream in fire but work in clay." -Arthur Machen


  • Member since
    June 2018
  • From: Ohio (USA)
Posted by DRUMS01 on Tuesday, March 24, 2020 12:01 AM

Thanks Gamera...

Baby steps with the million piece PE, this time more on the control towers and work on the range finder platform. This was what the rear fire control tower looked like in my last post, notice the rather high profile on the top round house:

Image

Not satisfied with the height of the third tier I carefully sanded the PE down. In the process the walk-in access door got compromised just a little. The window treatment I added was removed as well. I finished the build-up of these knowing I had another set coming (it arrived today). Here it is cleaned up better; the round house lowered; and more PE stuff on both towers. I also closed the center windows on the rear of the front towers and front of the rear tower according to real photos (see below). I see in the first photo that I need to seal the tops of the fire control towers a little better, but here is where I am after a couple hours today:

Image

Image

This is the range finder platform with many added PE parts (and much more to still come):

Image

Image

I cannot believe how long this stuff takes. Tomorrow I hope to get started on the other (new replacement) towers as I have a couple more ideas, wish me luck....

v/r,

Ben

"Everyones the normal until you get to know them" (Unknown)

LAST COMPLETED:

1/35 Churchill Mk IV AVRE with bridge - DONE

NEXT PROJECT:

1/35 CH-54A Tarhe Helicopter


  • Member since
    July 2014
Posted by modelcrazy on Tuesday, March 24, 2020 9:19 AM

Excelent!

Steve

Building a kit from your stash is like cutting a head off a Hydra, two more take it's place.


http://www.spamodeler.com/forum/

  • Member since
    July 2014
  • From: Franklin Wi
Posted by Bakster on Tuesday, March 24, 2020 10:01 AM

PE looks excellent Ben.

  • Member since
    November 2009
  • From: SW Virginia
Posted by Gamera on Tuesday, March 24, 2020 10:11 AM

Great job there on shaving a little off Ben, looks much more like the photo! Yes

"I dream in fire but work in clay." -Arthur Machen


  • Member since
    June 2018
  • From: Ohio (USA)
Posted by DRUMS01 on Tuesday, March 24, 2020 7:24 PM

With lessons learned on the first fire control towers, I used the replacement PE to "tweak" a new pair. I think the new ones are much cleaner and have square and sharp angles compared to the first set.

NEW ONES:

Image

FIRST ONES:

Image

Range Finder:

Image

Image

Just some very minor clean-up and finish the second round turret with MG platform. I also have a new idea for the MG platform using PE and plastic (image soon). Thats it for now....

Stay safe, strong, healthy, and hopefully employed during the beer virus.

Ben

"Everyones the normal until you get to know them" (Unknown)

LAST COMPLETED:

1/35 Churchill Mk IV AVRE with bridge - DONE

NEXT PROJECT:

1/35 CH-54A Tarhe Helicopter


  • Member since
    July 2014
Posted by modelcrazy on Wednesday, March 25, 2020 9:11 AM

Ben, are the two sets from diffrent manufacturers?

Steve

Building a kit from your stash is like cutting a head off a Hydra, two more take it's place.


http://www.spamodeler.com/forum/

  • Member since
    November 2009
  • From: SW Virginia
Posted by Gamera on Wednesday, March 25, 2020 11:15 AM

That's a nice improvement Ben. They looked good before but I can see how much sharper the folds are in the replacements. 

"I dream in fire but work in clay." -Arthur Machen


  • Member since
    June 2018
  • From: Ohio (USA)
Posted by DRUMS01 on Wednesday, March 25, 2020 11:10 PM

Steve: no.. they are both Eduard and actually the exact same set. I changed some of my building methods and technique for the second set of towers based on the things I learned building the first ones.

Gamera: I think IMHO that the second set are sharper and cleaner. More PE work, it never ends with this one....Here is my second attempt at the primary control tower. 

The first attempt I ended up taking a couple window frames out, and over sanding it to the point of messing with the overall shape. I also had to be satisfied with the kits plastic MG birds nest as the PE one did not want to cooperate on the first one. 

OLD:
Image

In this "second" attempt I used some rectangular plastic to square the inside of the tower. This also created the inner rooms / devider for the windows. I also found out during the first attempt of adding the window armor it needs to be cut at the metal folds to avoid it wrinkling being waving inside. When looking at the visibility through the new windows I made a decision not to super detail inside. 

Regarding the top round turret, I found that adding the door before bending it into a circle gave the contact point more surface thus allowing the superglue to bond much better. This meant I could be a little more aggressive at making a good circle without fear of it separating at the seam. A also applied some window armor in the round top tower and sanded it down to a more appropriate height.

As far as the birds nest, I used the same methodology that I used on the round turret top. This consisted of shaping it correctly and then gluing it to a sheet of plastic. Once dry, I trimmed the plastic to shape and drilled the holes for the MG's. The next step was to folded four PE ammo containers and place them in the birds nest. Last was to add plastic rod behind the round top so it will support under the birds nest. Then I glued the birds nest to the primary fire control tower. I think the PE looks better than the thick plastic one (IMHO), what do you think?

NEW CONTROL TOWERS:
Image

Other than a couple other small PE items, the remainder of the day was dedicated to building the main gun # 3 catapult from PE. Obviously, the kit part is a crude plastic blob. The PE consists of roughly 15-16 pieces that once assembled looks the part. Many of the PE parts required numerous folds and the hand rails are very delicate. I am very happy with the end result.

Image

SITTING ON THE #3 TURRET (more PE behind the gun)
Image

Last thing I did today was work on the 5" superstructure guns (10 of them). Nothing really difficult, just remove the barrels, clean them up, added the tape for the canvas tarp weather shields, and add the metal barrels.

CLOSE UP
Image

STACK OF PE AWAITING PAINT:
Image

Still waiting for a couple good sunny days in a row so I can paint some stuff. Till then I still have plenty of PE to fold. Till next time....

Ben  

"Everyones the normal until you get to know them" (Unknown)

LAST COMPLETED:

1/35 Churchill Mk IV AVRE with bridge - DONE

NEXT PROJECT:

1/35 CH-54A Tarhe Helicopter


  • Member since
    July 2014
Posted by modelcrazy on Wednesday, March 25, 2020 11:30 PM

Lots of work Ben, I short stack of PE LOL.

Steve

Building a kit from your stash is like cutting a head off a Hydra, two more take it's place.


http://www.spamodeler.com/forum/

  • Member since
    July 2014
Posted by modelcrazy on Wednesday, March 25, 2020 11:31 PM

I got back on the North Carolina. Took and hour to figure out where I finished back in December.

Steve

Building a kit from your stash is like cutting a head off a Hydra, two more take it's place.


http://www.spamodeler.com/forum/

  • Member since
    November 2009
  • From: SW Virginia
Posted by Gamera on Thursday, March 26, 2020 7:52 AM

What do I think Ben? I think that catapult makes my head hurt... Dead

All joking aside you're doing a bang-up job there. 


And thanks, I'm learning a lot from looking at your progress without the headaches of doing it myself. 

"I dream in fire but work in clay." -Arthur Machen


  • Member since
    January 2015
Posted by TheMongoose on Thursday, March 26, 2020 9:15 PM

In the pattern: Scale Shipyard's 1/48 Balao Class Sub! leaning out the list...NOT! Ha, added to it again - Viper MkVii, 1/32 THUD & F-15J plus a weekend madness build!

  • Member since
    July 2014
Posted by modelcrazy on Friday, March 27, 2020 11:48 AM

That looks excelent Mongoose! Yes The waves and shadows are awesome!

Steve

Building a kit from your stash is like cutting a head off a Hydra, two more take it's place.


http://www.spamodeler.com/forum/

  • Member since
    November 2009
  • From: SW Virginia
Posted by Gamera on Friday, March 27, 2020 11:52 AM

Yeah that looks awesome Mongoose! 

Love the beach, thanks!!! HeartParadise

"I dream in fire but work in clay." -Arthur Machen


  • Member since
    December 2003
  • From: 37deg 40.13' N 95deg 29.10'W
Posted by scottrc on Friday, March 27, 2020 12:10 PM

Excellent work Ben.  All that brass is making your Arizona really shine (badda thump!)

Mongoose, very nice rendition of the brown water navy.  Great effects of the color transitions from the shallows to the deeper water. Thats not easy to do. 


  • Member since
    August 2009
  • From: MOAB, UTAH
Posted by JOE RIX on Saturday, March 28, 2020 6:19 PM

Hi Ho Shipmates. I have been absent from the GB for far too long and I have a whole lot of catching up to do. I've been through much of what has been going on here and each and every one of you been doing some amazing work. As such, I will endeavor to do my best to acknowledge each persons efforts.

As for myself, I'm on day 11 of my voluntary sheltering in place. Although I've been using the majority of my time working in the yard, I have managed to get back to doing a little work on the USS Oakland. I'll post my updates here in a bit. It's quite nice having the time to get back at my bench but, I'd prefer it was under much different circumstances.

With that, let's take wonder at what you all have been up to.

STEVE: Your finished OHP and Spruance are just simply imressive. Yet, it's your ability to construct such magnificent bases and water effects that just win the show. You really do have a remarkable skill at creating realism. There will come a time, soon hopefully, when I try my hand at it. I am grateful for your tutorials as they definitely provide some wonderful guidance and inspiration. I already have some materials on hand when I get to it. In addition to the Liquitex materials I also have some of the AK Interactive water gels which will be interesting to try out.

SCOTT C: You have done an absolutely admirable job creating a base for your Lex. I certainly hope my initial efforts come anywhere close to your excellent results. Your Kansas is also looking marvelous. You work on it is really outstanding and you are capturing the beauty of the ship superbly.

MONGOOSE: My belated congrats to you on getting your excellent build in the FSM Gallery. Very much well deserved. Bravo!

DRUMS01: Wow! Your Arizona is incrediblely epic. All that work on the PE and decking is immensely impressive and beautifully done. I'm looking forward to your progress.

I do hope I've touched bases on everyone's builds so far.

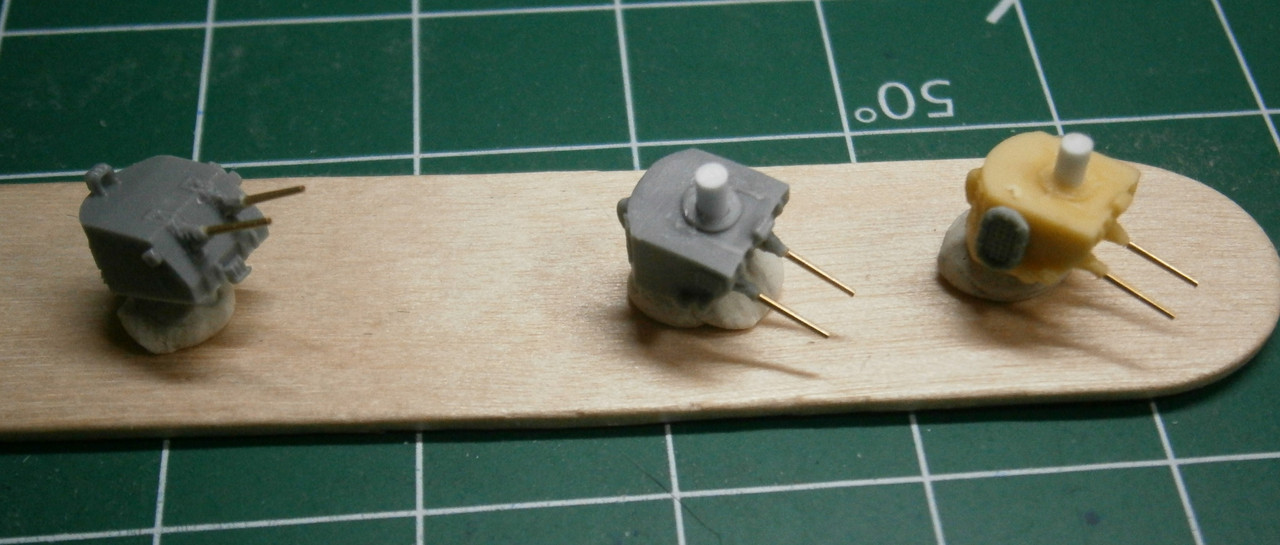
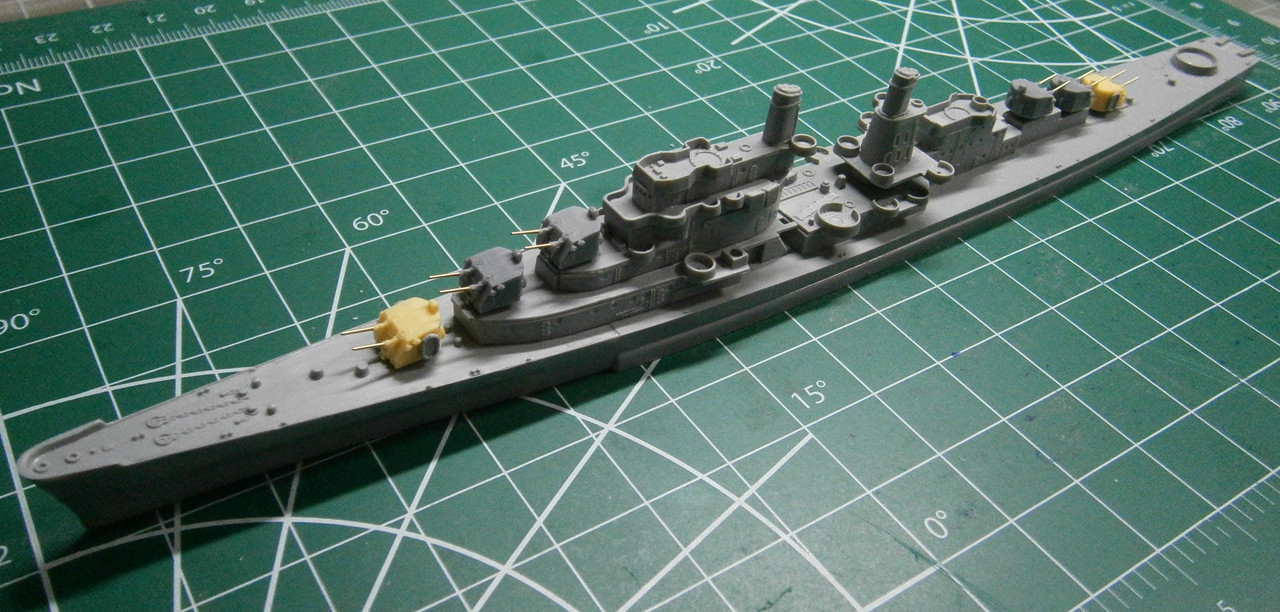
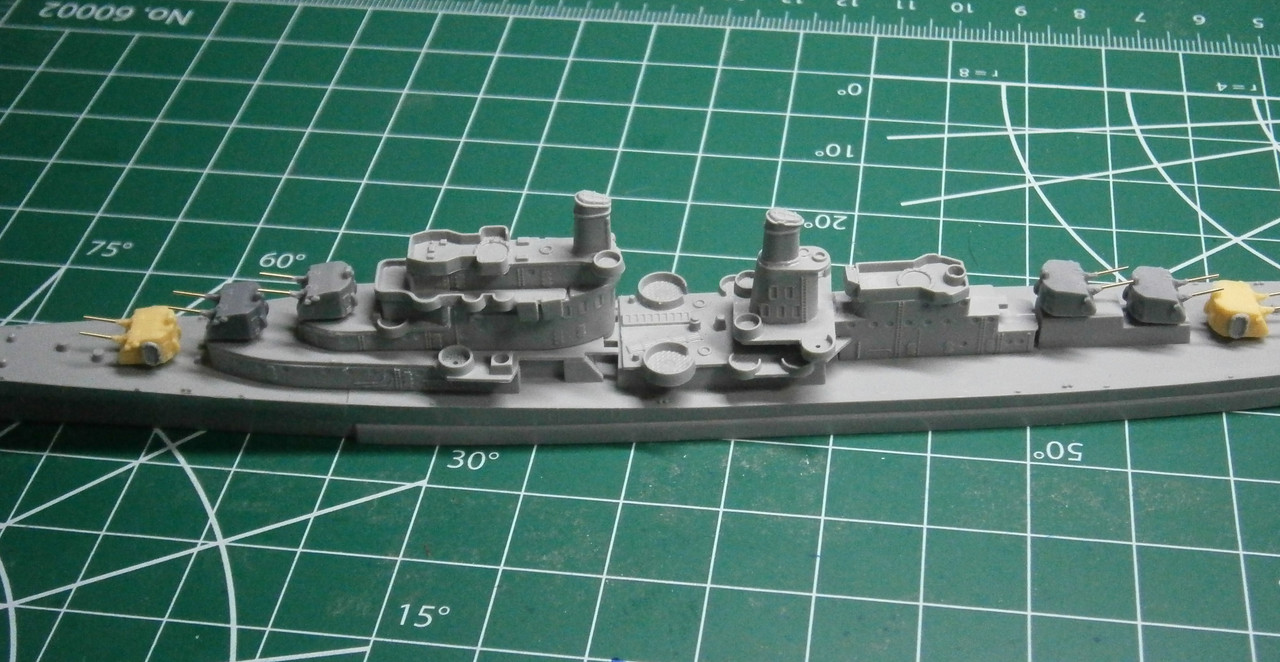
For now, I don't have a lot of progress on the Oakland but, I'm getting something done. I've got the resin 5 in gun turrets done. I had to drill out and mount a small piece of styrene rod on the bottom of each one in order to properly center them on the deck. Also, it was a careful and meticulous task to drill out the mounting holes for the gun barrels without damaging the blast bags too much. All in all, they look good. I'm currently working on all of the 40mm Bofors and 20mm Oerlikon AA guns.

Here's a few pics of the 5 in gun turrets and everthing set in place.
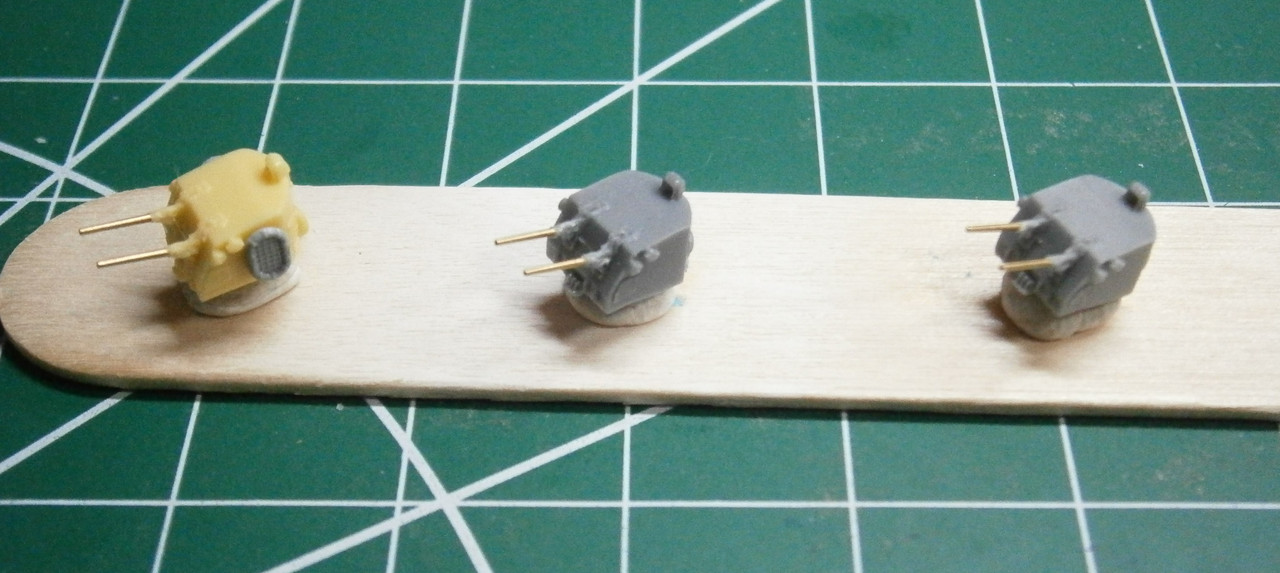
Glad to be back with you all. I hope to keep up with it.

Cheers, Joe


"Not only do I not know what's going on, I wouldn't know what to do about it if I did". George Carlin

  • Member since
    July 2014
Posted by modelcrazy on Sunday, March 29, 2020 12:13 AM

Thanks Joe, I'm glad your are able to make heads or tails out of my explanation. The 5" are looking good, I hope I can do as well on the North Carol.

Steve

Building a kit from your stash is like cutting a head off a Hydra, two more take it's place.


http://www.spamodeler.com/forum/

  • Member since
    November 2009
  • From: SW Virginia
Posted by Gamera on Sunday, March 29, 2020 5:08 PM

Joe: Nice work there on the turrets, she's coming along great!

"I dream in fire but work in clay." -Arthur Machen


  • Member since
    June 2018
  • From: Ohio (USA)
Posted by DRUMS01 on Sunday, March 29, 2020 7:36 PM

Joe, your detail on those guns look really nice....


I had a short break in modeling as my family and yard responsibilities took priority. With that said there is not a great amount to show. It has still been raining regularly so I am delayed at spraying color on anything.

I did start and finish the build of the rear catapult. The main piece was folded to square and glued. Then the ends folded down to finish the squaring of the PE and add strength (and glued). As with the turret #3 catapult, it requires the builder to add plastic/metal/solder to the brackets at the front of the launcher to simulate the shock absorbers (?), I used 0.9mm plastic stock. The mount for the aircraft which sits atop the catapult must be carefully folded. Too much fold towards the center and it will not sit on the catapult correctly. There were also two small PE boxes that were folded and added to the center of the catapult cradle. The pieces of PE bracing which is part of the base mount are very fragile so be very careful when cleaning the parts metal sprue or when attaching the catapult to the base. I found that even when carefully bending the bracing lines it can easily get out of square. My solution was to keep them separated by the width of an exact blade when bending them into their final position. Here is the result (please pardon the fingerprints):

Image

The stack was my next assembly. The Eduard instructions tell you to remove the molded in washboard looking ladders from the side of the funnel. Take care not to remove too much plastic as it will show in the final product.

Image

Eduard also instructs the builder to discard the plastic searchlight control structures on the side of the exhaust stack and replace them with PE. The complex bending and fitment require slow and careful incremental bends to make the fluid arching rounds of the front and rear of the structure. To aide me, I used a brass tube from my spares just a slight bit smaller than the bend required. Careful gluing and filing finish off the PE part. I noticed that by design one end of the rounded fold leaves a slight opening , as if to replicate a walk in from the outside platform. After looking at ships drawings I see that it is suppose to be there to gain access to the platform and then to some stairs which go from there to the Conning Tower Platform. Also, I want to bring our attention to the two different shapes of the search light control structures. The kits plastic part represents the smaller and more square structure used around the 1931-1939 era, while the PE parts are larger and are the correct shape for the 1939 - 1941 updates. So.... if you are wanting to build the earlier version of the ship, use the kit parts; if you are building a ship in the 39 - 41 era use the brass structures.

Image

Image

Still more to come with the exhaust funnel. 

Ben

"Everyones the normal until you get to know them" (Unknown)

LAST COMPLETED:

1/35 Churchill Mk IV AVRE with bridge - DONE

NEXT PROJECT:

1/35 CH-54A Tarhe Helicopter


  • Member since
    July 2014
Posted by modelcrazy on Sunday, March 29, 2020 11:13 PM

Beautiful work Ben. The removal of the laders on the stack are well done. The cat is a very delicate piece. Try it in 1/700 scale sometime Confused

Steve

Building a kit from your stash is like cutting a head off a Hydra, two more take it's place.


http://www.spamodeler.com/forum/

  • Member since
    January 2015
Posted by TheMongoose on Sunday, March 29, 2020 11:16 PM

modelcrazy

Beautiful work Ben. The removal of the laders on the stack are well done. The cat is a very delicate piece. Try it in 1/700 scale sometime Confused


throwing the gauntlet down for sure! lol


In the pattern: Scale Shipyard's 1/48 Balao Class Sub! leaning out the list...NOT! Ha, added to it again - Viper MkVii, 1/32 THUD & F-15J plus a weekend madness build!

  • Member since
    August 2009
  • From: MOAB, UTAH
Posted by JOE RIX on Sunday, March 29, 2020 11:36 PM

Thanks for the kind words of encouragement Steve, Gam & Ben.

Ben, you are a magician with PE. The catapault is amazing. You certainly seem to have a steady and patient hand. Beautiful work.

"Not only do I not know what's going on, I wouldn't know what to do about it if I did". George Carlin

  • Member since
    November 2009
  • From: SW Virginia
Posted by Gamera on Monday, March 30, 2020 7:36 AM

Ben: Everything looks good! Love the catapult!!! Heart

"I dream in fire but work in clay." -Arthur Machen


  • Member since
    June 2018
  • From: Ohio (USA)
Posted by DRUMS01 on Monday, March 30, 2020 8:40 AM

STEVE: I believe that a 1/700 catapult would result in 2 things, a scrap pile of PE and professional counseling as I would most likely loose it.....

SurpriseIndifferentBig Smile

Like I said earlier, some of you are artseans who create reality in scale, for me all of this is a struggle (and enjoyable one, but a struggle). After all, I am actually a car guy and most of them now are 1/20 or larger due to eye sight and fat fingers.

Thanks everyone for your motivational comments. You ship builders have my respect and admiration.....

Ben

"Everyones the normal until you get to know them" (Unknown)

LAST COMPLETED:

1/35 Churchill Mk IV AVRE with bridge - DONE

NEXT PROJECT:

1/35 CH-54A Tarhe Helicopter


  • Member since
    July 2014
Posted by modelcrazy on Monday, March 30, 2020 8:59 AM

DRUMS01
I believe that a 1/700 catapult would result in 2 things, a scrap pile of PE and professional counseling as I would most likely loose it.....

Oh, so that's what wrong with me. Propeller

Steve

Building a kit from your stash is like cutting a head off a Hydra, two more take it's place.


http://www.spamodeler.com/forum/

  • Member since
    June 2018
  • From: Ohio (USA)
Posted by DRUMS01 on Monday, March 30, 2020 1:09 PM

STEVE: I hope not as your work looks amazing regardless of scale. A ship in 1/700 is just something I would not enjoy building. While I really appreciate and enjoye the craftsmanship and finished products, 1/700 is not my build scale.

That is why I love these GB's, we have various scales and various subjects: subs, PT boats, battleships, frigates, carriers, etc. And it seems that everyone excells at the model they are building which is another great thing about these GB's. Learning together while enjoying others builds is definately a GB perk.

Ben 


"Everyones the normal until you get to know them" (Unknown)

LAST COMPLETED:

1/35 Churchill Mk IV AVRE with bridge - DONE

NEXT PROJECT:

1/35 CH-54A Tarhe Helicopter


  • Member since
    July 2014
Posted by modelcrazy on Monday, March 30, 2020 1:19 PM

DRUMS01
That is why I love these GB's, we have various scales and various subjects: subs, PT boats, battleships, frigates, carriers, etc. And it seems that everyone excells at the model they are building which is another great thing about these GB's. Learning together while enjoying others builds is definately a GB perk.

Thanks Ben, that's exactly why I started these series of GB's, (German this Sep, Japanese next). it gives members like yourself an opportunity, reason, excuse, chance, whatever you want to call it to build a ship with others who can help and support, and get out of their comfort zone.

I build all subjects but cars and armor are not my strong suit.

Steve

Building a kit from your stash is like cutting a head off a Hydra, two more take it's place.


http://www.spamodeler.com/forum/

JOIN OUR COMMUNITY!

Our community is FREE to join. To participate you must either login or register for an account.

SEARCH FORUMS
FREE NEWSLETTER
By signing up you may also receive reader surveys and occasional special offers. We do not sell, rent or trade our email lists. View our Privacy Policy.