SEARCH FINESCALE.COM

Enter keywords or a search phrase below:

F1 Group Build

38836 views
350 replies
1 rating 2 rating 3 rating 4 rating 5 rating
  • Member since
    March 2004
  • From: Paarl, South Africa
Posted by SeaBee on Friday, June 9, 2006 9:31 AM
Nice start on the F2001! Very nice CF on the steering wheel. Non-tobacco version I see - personally thought the Ferrari's looked horrible with those white blobs and empty noses... Even this year's effort looks much better!

R25 is clad in light blue. Might consider another layer over the weekend, but seriously doubt it. Onto finer stuff and clear coats...
The MP4/4 had a minor hickup. Strangely enough, with the decal applied and some MicroSol added, the edges decided to curl upwards instead of confirming to the "laws" and bend down towards the bodywork. Thanks to a standby call, I was not there to oversee the process and convince it which way is better. This being the fluo orange Marlboro markings ahead of the cockpit. So will have to coax it into settling.


But now... off to the 1st weekend of WC action!
  • Member since
    May 2006
Posted by F1champ on Friday, June 9, 2006 2:55 PM
I will be using the tobacco decals I got from SMS, I don't think i'm going to follow an exact GP version for this car with reguards to livery, I'll just go with what I like as far as looks. I plan on building this kit again sometime down the line with the super detail set after I have a little more experience with PE parts and then I might be a little bit more strict livery wise.
  • Member since
    March 2004
  • From: Paarl, South Africa
Posted by SeaBee on Saturday, June 10, 2006 2:03 AM
Aaah, okay. Just saw the magnyCours layout on the steering wheel and jumped to conclusions. Most likely not a decal included in replacement set. Not that it detracts from the great job though - somebody looking at it in the flesh, will not see the steering wheel that blown up anyways, esp once installed.
I've not even yet had the patience to attempt a CF steering wheel. Even on the R25, I just sprayed it metallick black to try and replicate the CF. Has a loock at it this morning and feels it shorts a bit of something - might add some clear yellow (looks yellowish on tv and my pics) and see what it looks like afterwards. Then again, not that the wheel itself is close to what the R25's wheel looked like, but I don't think you can blame the manufacturers for doing that.

Got the MP4/4's decal to look a bit better and started with the light blue on the one area on the rear wing where it is needed. Allready clad in the dark blue overall. The more I look at it, the more I feel the R25's light blue is just a tad too dark. Maybe just overly critical... will contemplate it a bit more over the weekend. Slow progress, but should be finished sometime during the F1 season, if all goes well!
  • Member since
    May 2006
Posted by F1champ on Saturday, June 10, 2006 6:09 PM
Yeah there aren't any replacements for the course display on the steering wheel, and so I figured it needed something there to add a little bit more realism, I'm dissapointed that the SMS decal det didn't come with a "Ferrari" decal to put under it on the wheel like it should be.

The CF on the wheel is only on the top I wasn't brave enough to do the whole face of it, so it wasn't too complicated. You have any pix of the two you're working on?
  • Member since
    March 2004
  • From: Belgium
Posted by DanCooper on Monday, June 12, 2006 5:56 PM
Hello again guys, just here to let you know, I'm still on my F1 not all that much change though, some progress pics will follow by the end of the week (I hope), since I'm having problems with my camera.
On the camera, the pics look good, but for some reason I can't get them on my pc, even tried a new cable but doesn't work.
Anyway, since this is one of the old-school cars, meaning they show a lot of the engine and suspension details unlike the almost "paranoide" closed cars of today, I will be trying to do something special with the suspension, if it doesn't work you'll probably never hear of me again.... banzai.....

On the bench : Revell's 1/125 RV Calypso

  • Member since
    April 2005
  • From: Australia
Posted by taxtp on Tuesday, June 13, 2006 9:12 AM
Hi,
Am I too late ??? I've got a Williams FW-11 about half way through. It's been one of those on again off again models and I'd really like to get it over the line this time. I can do some photos in the next day or so if you're interested.
Cheers
Tony

I'm just taking it one GB at a time.

  • Member since
    March 2004
  • From: Paarl, South Africa
Posted by SeaBee on Tuesday, June 13, 2006 9:34 AM
Never too late to join, Tony!


F1Champ - I actually do have some comic relief for you guys in the sence of some progress pics. Will try to upload tomorrow. Am a bit more happy with the R25 colour now, though...
  • Member since
    March 2004
  • From: Paarl, South Africa
Posted by SeaBee on Wednesday, June 14, 2006 2:09 AM
Attached the mentioned comic relief. Once again I was surprised at the harshness of photography! The MP4/4 nosejob looks a rather miserable effort on the pics - IRL it actually is hardly noticable! Also added a size comparison between the two, just for fun. Don't be too harsh - my first attempt at both 1:43 and multimedia kits!

R25 Paint as it stands now


R25 As it looks now - Overview of all the bits and pieces


MP4/4 Overview


1:20 R25 vs 1:43 MP4/4 - Size does matter!


  • Member since
    October 2005
  • From: Shoreview, MN
Posted by Il Leone on Thursday, June 15, 2006 9:32 PM
SeaBee:  Great work!  Thumbs Up [tup]  Color looks good on the McLaren and I see you are doing well on the Renault. 

At long last Blush [:I] those long promised photos.  My little corner of the modeling world, or to borrow a line, my happy place.  Still need to hook up the venting on the paint booth.  When completely finished, the spray booth will be a seperate room with its own ventilation. 


And I am actually making some progress.  Well, not really.  This is actually a move backward since I sanded off the silver down to the primer.  I'm trying the make up my mind if I want to re-prime it of just take a deep breath and go for color.  Since it will likely get two color coats, probably will do that.


On the other hand, I did say I was starting a 1/43 McLaren.  Here is the MP4/15 I decided to start.  As you can see, making pretty decent progress on this one.  Brakes are pretty much done and it is time to paint it up.  Paint it up, let dry and glue to together.  Easy huh?  Wink [;)]  Yea, I don't think so either. Since it needs a coat of primer, could just prime the 1/20 right?  Decisions, decisions....Confused [%-)]


SeaBee, if you look on the bottom of the 1/43, you will see the seam line that is covered in primer.  I brushed some on to check the finish, also did some around the chimneys.  Nasty little devils those chimneys. 

Got a little more time, better get back to the bench. 
  • Member since
    April 2005
  • From: Australia
Posted by taxtp on Tuesday, June 20, 2006 8:47 AM

Hi Folks,

Is there a logo for this GB ?

Thanks

Tony

I'm just taking it one GB at a time.

  • Member since
    March 2004
  • From: Paarl, South Africa
Posted by SeaBee on Wednesday, June 21, 2006 3:24 AM
Tony, no there's not one. Are you artistically inclined? *hint* Not many of those of us that started the GB is still participating, but the fun part is collecting hosts of new people along the way! Wink [;)]

Il Leone - lovely little place you've got there! I build in my study, not at all as nicely set-up as your place! Nice pics - good to see you're getting up to speed again. (Go for it, prime both! Evil [}:)] )

A quick question, since you have some 1:43 experience. The decals on the wheels - what's the best way to approach that chicken-and-egg scenario? Do you apply them before adding the wheels to the body of afterwards? Do they stay stuck or how do you "seal" them on the rubber?

Had a long weekend over here, but we went away, so no building. Tried the shading of the R25 yesterday, was not the biggest success story in the history of modelling. Will retry tonight. Thank goodness for TS13 over the paint.
  • Member since
    April 2005
  • From: Australia
Posted by taxtp on Thursday, June 22, 2006 7:05 AM
I've never attempted a logo before, but here is my first go. You're welcome to adopt it if you want.


I'm just taking it one GB at a time.

  • Member since
    April 2005
  • From: Australia
Posted by taxtp on Thursday, June 22, 2006 9:05 AM
Here's a photo of my Williams FW-11, from 1986, as it currently is.

Cheers
Tony

I'm just taking it one GB at a time.

  • Member since
    March 2004
  • From: Paarl, South Africa
Posted by SeaBee on Friday, June 23, 2006 1:08 AM
Aaah man, if you know how I've been looking around for that kit.... Looks good! Will be watching closely!

BTW, congrats on reaching the knockouts of the WC! Thumbs Up [tup] Had to cheer for the Roo's last night...
  • Member since
    April 2005
  • From: Australia
Posted by taxtp on Saturday, June 24, 2006 12:21 AM
Thanks Seamus. I was very happy with the Socceroos yesterday.
Any thoughts on the logo, can I improve it somehow ?
No progress on the Williams, got distracted by a small scale armored car. Should be back to it shortly.
Cheers
Tony

I'm just taking it one GB at a time.

  • Member since
    March 2004
  • From: Paarl, South Africa
Posted by SeaBee on Saturday, July 1, 2006 1:51 AM
After all this time I have very little to report back! At least the R25's steering wheel is almost done.

Most time was spent on the tyre decals of the MP 4/4. Don't laught, it's a multi-evening project for me! Clearcoat one side, cleacoat other side, Good Year and Eagle logo's one side, then other, next up rotation arrows on outsides, then then outside L/R markings and wheel itself. Then clearcoat over one side, then the other, which was done this morning. Still to follow will be decals on the running surfaces.


The World Cup does not help... Blush [:I]
  • Member since
    April 2005
  • From: Australia
Posted by taxtp on Saturday, July 1, 2006 9:00 AM
This is my fifth F1 car, and they do take a lot of work to complete nicely, but I really like the subjects. That said, it's taken me about 15 years to get to my fifth one.


I'm just taking it one GB at a time.

  • Member since
    March 2004
  • From: Paarl, South Africa
Posted by SeaBee on Thursday, July 6, 2006 2:02 AM
Quick update: I started with the part I dread the most (on any model!) Masking of the body has started for the dark blue areas bordering the yellow - basically over the nose and around the bottom. Not the best of missions to be on, but will hopefully complete it tonight and get the blue on over the weekend... just hoping I won't faint when I peel of that mask!

MP4/4 comiang along - might do the seatbelts over the weekend. Yes, I'm getting way to optimistic with the time I think I'll have available! Wink [;)] Let's see...
  • Member since
    May 2006
Posted by F1champ on Monday, July 10, 2006 11:01 PM
Alright guys here's some progress with the engine/rear suspension, it needs some touch up on a few places, and I plan on adding more details but here it is as of now.


  • Member since
    October 2005
Posted by gulfstreamV on Monday, July 10, 2006 11:27 PM
Very nice work F1 Champ, I'm Impressed. I need to start myWilliams F1 BMW 24 and try to do as good. Trying to develop that type of skill untill I start it...paid a few $$ for it. don't wan't to short change myself...............................Cool [8D]
Stay XX Thirsty, My Fellow Modelers.
  • Member since
    March 2004
  • From: Paarl, South Africa
Posted by SeaBee on Tuesday, July 11, 2006 1:21 AM
Very nice detail and super CF work F1 Champ! Which (whose) CF did you use on the rear wing? I have not as yet done one with that much CF.

As for my situation - I got through the masking of the body much much better than expected. Had only one small bit of seepage, which can be corrected easily. Even though it goes under a decal, yes - not sure how tranparent the yellow decal will be.
Completed the MP4/4 cockpit, so the upper parts are basically completed (bar the antennas which will be added at the last possible moment). So next up will be to do the suspension.
  • Member since
    May 2006
Posted by F1champ on Tuesday, July 11, 2006 3:05 AM
I used the SMS CF set that's specifically for the F2001. It comes with a few pretraced pieces but most of what you see I had to cut myself minus the actual rear wing. This is actually my first experience with CF decals, I plan on making this kit again some time down the road and hopefully can improve in my CF decaling.
  • Member since
    May 2006
Posted by F1champ on Saturday, July 15, 2006 2:12 PM
Here's the body with most of the livery done, some of the decals tore a little bit so i'm not 100% satisfied, but for a first time F1 build i'm happy enough with it. Needs some paint in a few areas and then clear coat which will have to wait until i'm back from vacation.


  • Member since
    March 2004
  • From: Paarl, South Africa
Posted by SeaBee on Saturday, July 22, 2006 1:37 AM
Looking good! Those SMS templated decals are just brilliant!

Been a bit ill of late, plus I'm doing an R390 (LM Nissan) alongside, which was masked (not as simple a scheme as it seems) and painted. So just completed my two most difficult masking jobs ever in the space of just more than a week!

On thge F1 side, I am busy doing the MP4/4's seatbelts, almost done. Maybe then, without being able to chicken out any more, I'll be forcing myself into the final few suspension parts. Oh, had a bit of a bugger-up with the fit of the base rear suspension and had to do some re-doing there to get all to fit. The R25 is in a scary state - sitting there, masking deficiencies rectified, clearcoated... begging for decals!
  • Member since
    March 2004
  • From: Paarl, South Africa
Posted by SeaBee on Monday, July 24, 2006 6:58 AM
In the words of Yoda: "Distressed deeply, I am". Very deeply.

After the lovely masking and all, I might've been better off painting the yellow by masking it as well. That'll teach me to take the "easy" way out. Maybe I missed the decals completely, but there are gaps of light blue between the yellow decals once the two sets' blue lining matches up - right at the joint between the sidepod and monocoque. Darnit!Banged Head [banghead] Some yellow painting to be done there, hoping very hard it will match the decals. Furthermore, the dark blue areas were masked too low (in accordance with how I thought the decla would go) right below that...

Sorry, just had to get it off my chest. I most likely screwed up the decal application, but since both decals have specific placed where it must be "inserted" into protrudincg bodywork parts (which was part of the mould, not something I added!) I can't imagine I could go that far wrong...

*Mumbles to himself, trying to find something to kick - and a yellow to match the decals!*
  • Member since
    April 2005
  • From: Australia
Posted by taxtp on Monday, July 24, 2006 8:15 AM
Disheartening news Seabee, may the force be with you.

Sincerely hope you can find a way out. Sometimes decals just don't fit.

Cheers
Tony

I'm just taking it one GB at a time.

  • Member since
    March 2004
  • From: Paarl, South Africa
Posted by SeaBee on Tuesday, July 25, 2006 1:14 AM
Haha, yeah thanks for the support... Apparently it was, in all the best ways. It kept me from finding something to kick. It also gave me good old X-8 (Tamiya's Lemon Yellow) as a great match! Where it has dried, it looks just fine. Of course, that was in places where I could afford to test and put it down thick to see the end result. This paint is notorious for needing a few layers when over something else. At least I have a solution! It may take a few days longer before I can continue on the main body, but much better than having slivers of blue amidst the yellow decal! I actually should've taken pics...

And to boot, I needed a matching yellow at any rate for the mirrors and the small fins next to the driver's head, which aren't decalled and thus need to be painted...
  • Member since
    October 2005
  • From: Shoreview, MN
Posted by Il Leone on Tuesday, August 1, 2006 11:58 PM
I'm Baaaaack!  Yes, I know it has been awhile since I have haunted these hallowed halls.  But fear not, progress is being made on my front.  Shock [:O]  Yeah, I know, but hey the ceiling wasn't painted in a month either.  Big Smile [:D]  Anyway, despite a record heat wave and the current humidity I have moved forward. 


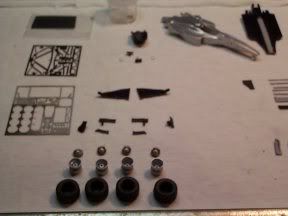
Here is the Tameo 1/43 McLaren MP4/15.  Gotta love these little jewels, in spite of the fact that building them is akin to watch repair.  The silver is on and believe it or not about 3 different shades of black.  Of course, when the black all dried they all looked the same.  Banged Head [banghead]  Spent all day watching races and painting on this, for that result. 


Even so, I was pleased with the result on the body.  Those little chimneys are a real Censored [censored] to work around.  Just try polishing those out.  1/43 may polish out fast, but it is like writing Shakespere on a grain of rice.


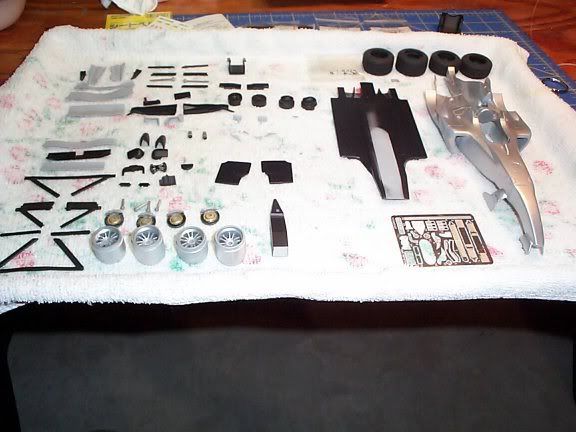
Meanwhile, the 1/20 MP4/19B is making progress as well.  Hey, why not build two McLarens at the same time!  Paint is the same right?  I must have been nuts...Eight Ball [8]  On this one I did 4 different shades of black, aircraft interior black, black chrome trim, semi-gloss black and a different semi-gloss.  Care to guess the result?  Censored [censored]  Oh well, it beats spending the day doing yard work, washing the dog...


The body did not come out as well on the 1/20.  But if you think I am going to show you people! Big Smile [:D]  All in all, not to bad so far.  Of course, now comes the real test.  That moment that seperates real modelers from those wanna be types.  Adding a second color!  Yes, that lovely gunmetal/metallic black wierd shade that McLaren had on the bottom during the West sponsered years.  That lovely shade that nobody, and I mean nobody, has yet to duplicate correctly.  Which has such lovely curves and angles, such a joy to mask.  If this works, will be my coolest car yet.  If it doesn't, I never heard of you guys, I never started to build this kit, I've been working on a BAR all this time.  Whistling [:-^] 

But I digress, F1 Champ, very sweet work there!  I have that kit sitting on the shelf, in 3 different scales.  SeaBee, glad to hear that you are still making slow progress there.  Sounds like you will beat me to the finish line.  Your story on the yellow is making me nervous here!  As an aside, I'm going to pull up my old trick on this one.  I photocopied the decals and then use that as the template for laying out the lines.  Not foolproof, but close.  I'm not good enough to freehand the lines. 

Til next time, and here's hoping that Hungary will be a close race.  And the championship will be even closer!

Il Leone

  • Member since
    March 2004
  • From: Paarl, South Africa
Posted by SeaBee on Wednesday, August 2, 2006 4:19 AM
Il Leone, some very nice work there! First off - 3 different scales F2001...? Don't tell me you've gotten the 1:12 MG or Matilde... (pity, no drooling smiley!)
Back to your builds. I agree on the chimneys - my biggest mistake was trying to attempt a modern F1 as my first multimedia project. Those winglets and chimneys are a pain in 1:20 even - I'm still cursing them! And the pain in 43rd scale - well, it will increase as the scale decrease. But just imagine doing that on the MP4/21 paintjob! I am staying well clear of that nightmare! Wink [;)] All I can say for your experience with the 4 (or 3) blacks... as the song goes: Black is black! But at least you tried. I've used the Tamiya-prescribed MS5 on my first MP4/13 and found that quite okay, but it seems you've gone through that and found it not good enough(?) And their TS metallic black (can't recall the number... TS40?) - how's that? Good luck on th masking. I sincerely wish you the best there - my tale is not one to aspire to!

As for my tales... The learning curve in 1:43 (on your first model) is close to 90 degrees! So used to check the instructions and just do it as it seems. Just two evenings ago, I got the powersurge and finished off the top parts of the suspension, to be added to the body itself. I was brave, you see, and, as seems on the instructions, I went ahead and added them to the body as well. Nicely alligned, holes were made big enough for the "axel" to go through, the works! (Hey, I learned that from phase 1!) Just to wake up in the middle of watching CSI with a Homer Simpson *DOH*... Shortly followed by my very own Censored [censored] Of course, the ends had to be bent down so the axels can pass through there, the brakes and then the wheels. Clever Charlie I was... obviously that can't work with the suspension attached to the body and the body not ehhrrr attached to the floopan yet! You live, you learn. You remove suspension arms again. You attach body to floorpan. In process, you have to fiddle a bit to make it fit nicely, so you end up breaking off the steering wheel. You put down model (gently!) and wait for a few days to repaint all the scratches you caused, mounting places you scarred, suspension parts you scraped. And that's where I am at currently! Body on (yes, I remembered to at least put the seat in beforehand...) and the scars of battle waiting to be healed via a paintbrush.

At this stage still trying to patch up the R25's decal lines, now moved on to the lower (dark blue) areas. Did a few layers of normal dark blue to get a base and will apply some extracted TS51 over that. And adding the odd decal on the wings, etc. Telefonica decal on the rear wing was a bit of a struggle, having allready built up the whole rear wing assembly, incl the supports between the wings, which made it particularly interesting.
  • Member since
    May 2006
Posted by F1champ on Thursday, August 3, 2006 1:40 AM
Finally have a nice update on the F2001, I've finished decaling and clear coating the body, at least as best as this iteration will be. I still have quite a few parts to finish, but it's actually starting to look like a racecar now.


JOIN OUR COMMUNITY!

Our community is FREE to join. To participate you must either login or register for an account.

SEARCH FORUMS
FREE NEWSLETTER
By signing up you may also receive reader surveys and occasional special offers. We do not sell, rent or trade our email lists. View our Privacy Policy.