SEARCH FINESCALE.COM

Enter keywords or a search phrase below:

The In My Stash GB

101966 views
2247 replies
1 rating 2 rating 3 rating 4 rating 5 rating
  • Member since
    May 2003
  • From: Staten Island, New York
Posted by kenny_conklin on Saturday, February 3, 2007 8:47 PM

Hey fellas sorry i havent been around for a bit a serious family tragedy happened this week in NYC. My wifes aunt was murdered so it may be a little while before i am back at the board. so dont worry not forgetting about you all just taking care of family business.

kenny

"Rakkasans Lead the Way!"
  • Member since
    February 2004
  • From: Second City
Posted by arki30 on Saturday, February 3, 2007 9:49 PM
Our condolences go with you....

Building Now:

1/48 Academy Bf-109G6 - 100%

1/48 Tamiya F4U-1A - 5%

Upcoming:

1/48 Revell F-14D

  • Member since
    September 2004
  • From: Vernon, BC, Canada
Posted by razordws on Saturday, February 3, 2007 10:58 PM
That's terrible news Kenny... take all the time you need.  Family first always.

Dave

  • Member since
    July 2013
Posted by IL2windhawk on Sunday, February 4, 2007 1:07 AM

WOW - My jaw is on the floor.

GOD be with you and your family, Kenny.

And may justice prevail.

  1/32 Revell Duo Discus
  1/32 Revell ASK-21
  1/48 Ardpol SZD-51 Junior
  1/48 Czech Models Grumman Goose
  1/144 FineMolds Millennium Falcon

  • Member since
    August 2006
  • From: Oromocto, Canada
Posted by Gun Tech on Sunday, February 4, 2007 9:30 AM

 jlwilliams wrote:
Some questions for an experienced armor builder:  How do you straighten the vinyl tracks that have been warped due to being longer than the box?  What is the best glue to use on vinyl?  Do you glue the ends together before putting it on the wheels and sprockets?

I got the same kit. I would wait and see after the running gear is installed. Maybe the tension in the track will make it stay straight. If not, you can probably use a hair dryer to lightly soften the part where it's warped, and then twist in the different direction.

I would use super glue on those tracks.

Jean-Michel    "Arte et Marte"

  • Member since
    August 2006
  • From: Oromocto, Canada
Posted by Gun Tech on Sunday, February 4, 2007 9:33 AM
 kenny_conklin wrote:

Hey fellas sorry i havent been around for a bit a serious family tragedy happened this week in NYC. My wifes aunt was murdered so it may be a little while before i am back at the board. so dont worry not forgetting about you all just taking care of family business.

kenny

Family first Kenny. Terrible news....... I hope the murderer will be caught and justice be done.

Jean-Michel    "Arte et Marte"

  • Member since
    August 2006
  • From: Oromocto, Canada
Posted by Gun Tech on Sunday, February 4, 2007 9:52 AM

I started the kit last night. I already kinda build the same kit a few years ago (Tamiya Panzer IV D) and I know I might  encounter some fitting problems with the exhaust and muffler. I have to do something about the fit of the rear panel to the hull.......    it's just horrible and present in all Panzer IV based kits from Tamiya from the 70s.     The lack of details on the underside is bottering me as well. I took the pic from a Wirbelwind in CFB Borden.

The Tamiya offering is bare flat. I think it will be noticeable when the model will be viewed from the front. I have a few Italeri Panzer IV based kits that have good deatils, so I will try to replicate them on the Tamiya hull.

In other words, a nice challenge Wink [;)]

Jean-Michel    "Arte et Marte"

  • Member since
    June 2006
  • From: Highland IN
Posted by TGregory on Sunday, February 4, 2007 11:01 AM
So sorry Kenny, condolences to the missus. What a tragedy, agian, sympathies.
Tony Gregory
  • Member since
    October 2004
  • From: Nelson, BC, Canada
Posted by paul_toz on Sunday, February 4, 2007 11:37 AM

Condolences Kenny. I wish you and your family the best over the coming days and weeks.

Sincerest regards

Paul 

  • Member since
    March 2004
  • From: Belgium
Posted by DanCooper on Sunday, February 4, 2007 2:52 PM

Sorry to hear that, Kenny, you and your family have my condolences...

As for my opdate on the build, I'm affraid it's more like a downdate, the left landingear has broken off, and because the attachement point are behind the avionics bay (that cheeck) I will need to find a way to remove that piece without damaging the fuselage too much, which will not be an easy task, in fact if I mess this up it will be the end of this chopper and the start on the number two voted kit in my stash. 

On the bench : Revell's 1/125 RV Calypso

  • Member since
    February 2003
  • From: Montreal, Quebec, Canada
Posted by superbear on Monday, February 5, 2007 8:16 AM

Kenny  My condolences to you and your wife, such terrible news I hope your wife is doing ok.

Take care


Bear

Marc
  • Member since
    October 2006
  • From: Iowa
Posted by Mist086 on Monday, February 5, 2007 8:56 AM
Condolences Kenny.  That has got to be rough on your wife.  You & your family have my thoughts and prayers during this tough time
  • Member since
    September 2006
  • From: Central Texas
Posted by NucMedTech on Monday, February 5, 2007 10:06 AM
Kenny, sorry to here about the tragic news. My prayers go out to your family. 

Most barriers to your successes are man made. And most often you are the man who made them. -Frank Tyger

  • Member since
    August 2006
  • From: GERMANY
Posted by HOOK DRIVER on Monday, February 5, 2007 2:35 PM

Kenny as with the rest of the fellas......I hang my head. Crazy world we live in my friends.

Well, some ok news. I started on the 162. My first major sugery of the build was the ejection seat. The stock seat in the kit is molded onto the rear cockpit bulkhead. That just won't do. I found a site out there that specializes in ejection seats and their history. Key for me was...plenty of photos! So I drank about 5 mountain dews and took to the bulkhead with a razor saw.Dinner [dinner] As I said earlier I wanted this build to be scratch built. So filled the hole in the bulkhead with styrene, cut and reshaped the headrest with putty and styrene, rebuilt the back cushion and rear pan with the same, thinned down the bottom pan and bonded it to the back, and what would an ejection seat be with out proper guide rails. The only thing I wasn't able to make myself were the buckles on the seat belts, I took those from my parts box. Sooo that is what I have so far. The first photo shows the bulkhead on the sprue, the second is the seat. Let me know what ya think fellas..............JOSH

P2050015.jpg

P2050038.jpg

We tip our glasses to future unforseen glory, and in doing so remain true to the victorious fallen.......Photobucket - Video and Image Hosting</a<a href="http://photobucket.com/" target="_blank">Photobucket - Video and Image Hosting
  • Member since
    October 2004
  • From: Nelson, BC, Canada
Posted by paul_toz on Monday, February 5, 2007 2:46 PM

Looks like an improvement to me Josh. Nice job, keep up the good work. What was the website that specialises in ejection seats?

Paul 

  • Member since
    April 2003
  • From: 41 Degrees 52.4 minutes North; 72 Degrees 7.3 minutes West
Posted by bbrowniii on Monday, February 5, 2007 2:47 PM

Kenny,

As with everyone else, I offer my condolences.


Josh,

That ejection seat you built is one nice piece of work.  Make a Toast [#toast]

'All that is necessary for the triumph of evil is for good men to do nothing' - Edmund Burke (1770 ??)


  • Member since
    April 2003
  • From: South Carolina
Posted by jlwilliams on Monday, February 5, 2007 2:58 PM

Kenny,

I offer my condolences to you and your family.  I shall add you to my prayer list.  My problems become petty when someone else has suffered a true tragedy. 

J. Lee Williams 2007 New Year's Resolution: Complete a group build 2008 New Year's Resolution: Complete a group build on time You load 16 tons and what do you get? Another day older and deeper in debt! In my stash gallery: http://pics.jamesjweg.com/gallery/3989211
  • Member since
    September 2004
  • From: Vernon, BC, Canada
Posted by razordws on Monday, February 5, 2007 9:30 PM
That seat looks pretty seet Josh, can't wait to see what you do with the rest of the model.

Dave

  • Member since
    August 2006
  • From: GERMANY
Posted by HOOK DRIVER on Tuesday, February 6, 2007 1:23 PM

Paul-

Here is the link to the ejection seat site. It is really amazing! Thanks for the kind words fellas, I am really trying to get this build on the road before my trip to the sand box..... but on the other hand I really like this aircraft ( I was secretly hoping to build it for this build). I will see what else I can homebuild for this thing.  Enjoy, JOSH

http://www.ejectionsite.com/frame_sg.htm

We tip our glasses to future unforseen glory, and in doing so remain true to the victorious fallen.......Photobucket - Video and Image Hosting</a<a href="http://photobucket.com/" target="_blank">Photobucket - Video and Image Hosting
  • Member since
    October 2004
  • From: Nelson, BC, Canada
Posted by paul_toz on Tuesday, February 6, 2007 4:41 PM

Josh - thanks for the link, lots of good info there.

Here's what i have done so far...

This is what I started with...
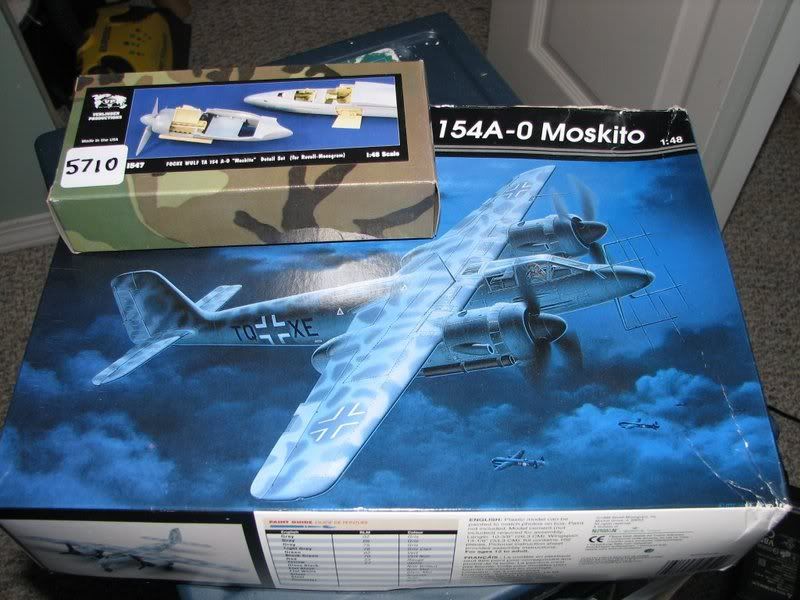
 Here's what was in the Verlinden resin set...
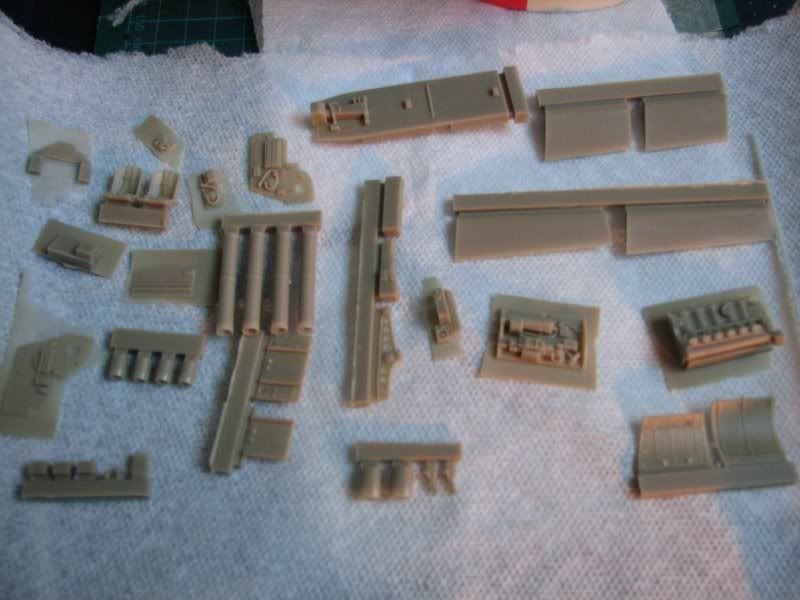
It consists of a new cockpit with the instrument panel having more depth to it making it easier to paint. No throttles though so I used the ones frmo the kit. The seats have moulded in harnesses which were completely missing from the kit. There are cockpit sidewalls which have a bit more detail than the kits as well. Also an engine and gun bay with cover panels and exhaust shrouds and a few other little bits. The joystick was broken in the resin set so I will use the kit one. Overall, the Verlinden set adds a little more detail in the cockpit, but the kit is pretty good anyways. The bonus for the resin is the engine and gun bay.

Here's the cockipt and some other bits.
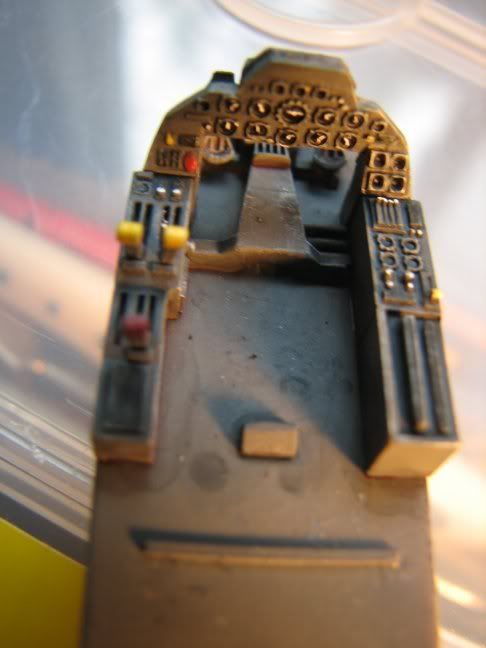
The paints are Lifecolour RLM66 with Tamiya red, white & yellow. It's had some drybrushing and a black wash and then a little bit of umber wash on the floor.

Questions:

  1. What's the best way to cut a panel out of the side to make way for the gun bay & engine? I have thought of either scribing, using a dremel with a circular cutter or chain drilling and then filling flat.
  2. What's the best way to remove interior detail - dremel?
Thanks...Paul
  • Member since
    March 2004
  • From: Belgium
Posted by DanCooper on Tuesday, February 6, 2007 4:56 PM

Guys, is it ok for me to move the Apache to the "Once I'll see what I can to save it"-stash and move to the second most voted for subject ?

At the moment I've tried to remove the cheeck to repair the landinggear, resulting in an ugly damage on the fuselage Boohoo [BH]

On the bench : Revell's 1/125 RV Calypso

  • Member since
    August 2006
  • From: Oromocto, Canada
Posted by Gun Tech on Tuesday, February 6, 2007 5:03 PM
 paul_toz wrote:

Josh - thanks for the link, lots of good info there.

Here's what i have done so far...

This is what I started with...

 Here's what was in the Verlinden resin set...

It consists of a new cockpit with the instrument panel having more depth to it making it easier to paint. No throttles though so I used the ones frmo the kit. The seats have moulded in harnesses which were completely missing from the kit. There are cockpit sidewalls which have a bit more detail than the kits as well. Also an engine and gun bay with cover panels and exhaust shrouds and a few other little bits. The joystick was broken in the resin set so I will use the kit one. Overall, the Verlinden set adds a little more detail in the cockpit, but the kit is pretty good anyways. The bonus for the resin is the engine and gun bay.

Here's the cockipt and some other bits.
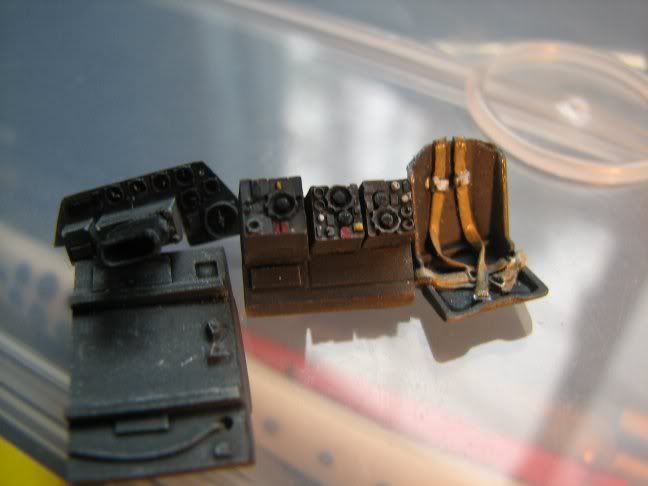
The paints are Lifecolour RLM66 with Tamiya red, white & yellow. It's had some drybrushing and a black wash and then a little bit of umber wash on the floor.

Questions:

  1. What's the best way to cut a panel out of the side to make way for the gun bay & engine? I have thought of either scribing, using a dremel with a circular cutter or chain drilling and then filling flat.
  2. What's the best way to remove interior detail - dremel?

Thanks...Paul

Looking good Paul.     I don't know what would be the best way, but if you use a Dremel tool, be sure the speed is not too fast or you will melt something.   I found that the hard way while cleaning my return rollers......

Jean-Michel    "Arte et Marte"

  • Member since
    August 2006
  • From: Oromocto, Canada
Posted by Gun Tech on Tuesday, February 6, 2007 5:06 PM
 DanCooper wrote:

Guys, is it ok for me to move the Apache to the "Once I'll see what I can to save it"-stash and move to the second most voted for subject ?

At the moment I've tried to remove the cheeck to repair the landinggear, resulting in an ugly damage on the fuselage Boohoo [BH]

That blows Dan....... i don't see any problems with it. I guess it make sense to take the 2nd highest one on the list.

Jean-Michel    "Arte et Marte"

  • Member since
    October 2004
  • From: Nelson, BC, Canada
Posted by paul_toz on Tuesday, February 6, 2007 5:15 PM
 DanCooper wrote:

Guys, is it ok for me to move the Apache to the "Once I'll see what I can to save it"-stash and move to the second most voted for subject ?

Don't see a problem Dan. Your second choice was the 1:144 Trumpeter USS Gato-class submarine wasn't it?

  • Member since
    March 2004
  • From: Belgium
Posted by DanCooper on Tuesday, February 6, 2007 5:28 PM
Yes, indeed the Gato only had 2 votes less than the Apache. On the third place ended the Heller 1/72 Sea King.

On the bench : Revell's 1/125 RV Calypso

  • Member since
    February 2004
  • From: Second City
Posted by arki30 on Wednesday, February 7, 2007 9:03 PM
Looks really nice, Paul.  For interior removal I use my Dremel.  Makes short work of most any task.  The advice to keep the speed low is good.

Building Now:

1/48 Academy Bf-109G6 - 100%

1/48 Tamiya F4U-1A - 5%

Upcoming:

1/48 Revell F-14D

  • Member since
    February 2003
  • From: Montreal, Quebec, Canada
Posted by superbear on Thursday, February 8, 2007 8:23 AM

Josh & Paul Nice work on your cockpit parts looks good.

Status report: Finished sanding & scraping the main gears they're ready for paint when the temp warms up, the nose gear is almost finished.  As for the fuselage I still have a couple of spots that need putty then it should be ready for a wash & primer.  Now the fun part (not) removal of the ejector pin marks from the pylons & gear doors and rescribing of the detail.  On a happy note the score in this build is Bear 2 Carpet Monsters 0, I sent a couple of bits flying and was sure I'd lost them however with the assistance of my trusty Labrador Zoe we were able to rescue the nose gear doors from the jaws of the evil carpet monstersBig Smile [:D] Thats it for now.

Cheers

Bear

Marc
  • Member since
    March 2005
  • From: Fort Worth, TX
Posted by flippersdad on Thursday, February 8, 2007 9:53 AM

May God be with you and yours Kenny and may justice swiftly.

Eric

A great lie - "I'm from the FAA and I'm here to help." Politics - Many blood sucking insects. Flying - Long periods of boredom puncuated by moments of stark terror.
  • Member since
    September 2004
  • From: Vernon, BC, Canada
Posted by razordws on Thursday, February 8, 2007 10:56 PM

Paul, great start on the pit! Thumbs Up [tup]

Bear, a Lab that retrieves plastic?  Awesome! Thumbs Up [tup]  I had a black Lab as a lad, used to go for walks in the bush with me all the time, liked to chase the jack rabbits even though he didn't have a hope in hades of ever catching one.  He got full marks for enthusiasm though Propeller [8-]

Wish I had some progress to report but work has me burnt out by the end of the day and the parents are here for an extended stay so not much happening at the moment.

Dave

  • Member since
    October 2006
  • From: Iowa
Posted by Mist086 on Friday, February 9, 2007 7:46 AM

Sorry i haven't been too active in this build yet, but i am almost done with my other 3 builds and with the B-25's details i don't want to rush it jsut to get it together.  I want to make this bird smokin hot, so i am gonna wait a bit more until i have time to solely work on her.  Hope that's ok with everyone


Jim 

JOIN OUR COMMUNITY!

Our community is FREE to join. To participate you must either login or register for an account.

SEARCH FORUMS
FREE NEWSLETTER
By signing up you may also receive reader surveys and occasional special offers. We do not sell, rent or trade our email lists. View our Privacy Policy.