SEARCH FINESCALE.COM

Enter keywords or a search phrase below:

The Airfix Welcome Back GB from Jan 07 to Dec 07

33827 views
228 replies
1 rating 2 rating 3 rating 4 rating 5 rating
  • Member since
    January 2003
  • From: 40 klicks east of the Gateway
Posted by yardbird78 on Saturday, February 3, 2007 8:44 PM

I finished my 1/72 IL-28 Beagle this morning and got my camera back this afternoon, so here's the results.  Model Master aluminum metalizer paint, early Egyptian markings from the spares box and pretty much OOB.  I added gun barrels to the lower nose gun troughs and the radio antenna wire, reamed out the jet exhausts and freehand painted the canopy framing.  The framing is way too thin, the cowl are too sharp of angle from the front to the bottom and the main landing gear is atrocious.  There is essentially no cockpit.  Just a blob for a seat and another for the navigator's postion.

Darwin, O.F. Alien [alien]

 ,,

The B-52 and me, we have grown old, gray and overweight together.

  • Member since
    September 2004
  • From: Vernon, BC, Canada
Posted by razordws on Saturday, February 3, 2007 10:55 PM
Nicely done Darwin Thumbs Up [tup], that's one crazy looking machine.

Dave

  • Member since
    October 2004
  • From: Nelson, BC, Canada
Posted by paul_toz on Sunday, February 4, 2007 11:35 AM

Congratulations on getting it finished. I know what you mean about these old Airfix kits, they are missing a lot of accuracy and detail. My Belvedere is held together by filler, not glue. Your IL-28 looks nice though, well done.

Paul 

  • Member since
    June 2003
  • From: Rowland Heights, California
Posted by Duke Maddog on Sunday, February 4, 2007 2:10 PM
Great job on that Beagle! I also built one of those about a decade ago. Didn't come out nearly as well as this one. Great job Darwin!
  • Member since
    October 2004
  • From: Nelson, BC, Canada
Posted by paul_toz on Tuesday, February 6, 2007 4:29 PM

Progress so far:

I'm sure that most of what you see is held together by filler. There is a blue cheat line to go between the silver and white. It was supplied as a decal but it dinsintergrated on contact with water - too old I guess. I was always doubtful as to whether I had the break between the 2 colours right anyways! I will have to do some tedious masking and paint it on I guess. The canopy I will make a vacuform one later on - when the 'to do' list is a little smaller. This one is always going to go slowly as it is a tedious and frustrating build.

Paul 

  • Member since
    December 2002
  • From: SF Bay Area
Posted by chasd25 on Tuesday, February 6, 2007 4:59 PM

hmmm....I'll have to dig through the stash, I think I have a Spit mk 22 in there somewhere, as well as  the Vulvan bomber (although I don't know where I'd put that one when finished).


Charlie 

 ;;;

  • Member since
    August 2006
  • From: South Coast NSW, Australia
Posted by Simon L on Thursday, February 8, 2007 2:59 AM

Okay  Guys


I'm in . I'll be doing the venerable De Havilland Heron. ( Obtained from the the Classic Civil Set).

I'm combining with the civil aircraft GB, which starts early March , so I'll start then.

Cheers

Simon

Simon


  • Member since
    April 2005
  • From: Australia
Posted by taxtp on Saturday, February 10, 2007 12:54 AM

Hi Guys,

No progress update from me as I've just got back from a 'sudden' business trip to Hyderabad. Not much modelling over there ! I'll try to get back to it soon.

Cheers

Tony 

I'm just taking it one GB at a time.

  • Member since
    November 2006
  • From: Bedfordshire, England
Posted by ollie on Sunday, February 11, 2007 10:32 PM

Re my entry,

Im on the hunt for either of the Airfix Seafire kits. If any of you have either of them please contact me either by email or by privite message on here and we can work something out. In fact even if you dont have all of a Seafire please contact me as my currant project could use that to.

Best regards

Oliver

www.overthefencephotography.co.uk - aircraft photos.
  • Member since
    June 2003
  • From: Rowland Heights, California
Posted by Duke Maddog on Monday, February 12, 2007 10:31 AM
That is sweet Simon! I can't wait to see that built. I was looking at that set also but I already have the Beaver and I think I have the other plane. What I really need to find is the original Heron. That will be a welcome addition to this Group Build.
  • Member since
    August 2006
  • From: South Coast NSW, Australia
Posted by Simon L on Monday, February 12, 2007 5:38 PM

You're right Duke, I bought the set mainly for the Heron, I remember building it when I was 9 years old, and getting glue all over the transparencies ( of course). Amazingly, the molds are in pretty good condition, especially considering the kit was apparently first isssued in 1959 ! The general fit is very good.

In relation to the Beaver, I intend to us the British markings, but you are welcome to the US ones, or I could scan the decal sheet so you could reconstruct the markings ?

 Regards

Simon

Simon


  • Member since
    June 2003
  • From: Rowland Heights, California
Posted by Duke Maddog on Monday, February 12, 2007 6:30 PM

Thank you for the offer. I already painted my Beaver in the pattern used by the British so I'll just see what I can come up with in the aftermarket range. You can see my Beaver in an earlier post
a couple of pages back in this Thread. I had to stop there because I have no decals for it. So the search continues while I also decide what other Airfix kit to build for this Group Build.


Looking forward to seeing your Heron. That is one kit I could never find or have ever built. This should be good. 

  • Member since
    December 2005
  • From: Germany
Posted by jeff on Tuesday, February 13, 2007 5:56 AM

Duke, Paul, Darwin, great work on your kits.  Sorry for being away for so long, but work, trips, and other projects have limited my building time.  I actually started prepainting some parts on the Seafire, but then discovered the canopy is short-shot and basically unusable.  So, the Seafire goes back on the shelf until I can get or fabricate a replacement. 

I'm now going with my second string, Airfix's ancient 1/72nd scale EE Lightning.  I'll post a box pic soon.  Going out now to track down paint for the air superiority scheme.

"Congratulations, gentlemen! You're everything we've come to expect from years of government training." Zed (Men in Black) [IMG]
  • Member since
    February 2003
  • From: Towradgi, near the beach!
Posted by traveller on Wednesday, February 14, 2007 8:19 PM
Hi to all!!, I have been out of it for a while, life keeps getting in the way!!!! I am working on my Super Etendard, and so far it has not been too bad. I have to cut out the moulded wing spoilers, and replace them with PE parts. My canopy front piece has an opaque injection mould flaw in it, it looks like the machine did not do the job proprerly. I will live with it, as I cannot find a replacement part, and I dont know how to make another one. I would love to post a few pictures, but my sister has my digital camera and says she does not knows where it is!!!!!!!! I just hope it has not been lost, otherwise I will be most upset!!! I will be building mainly Airfix this year, but I will have to get a F/A-18F to build into a RAAF machine!!! Tongue [:P]
  • Member since
    December 2005
  • From: Germany
Posted by jeff on Saturday, February 17, 2007 3:47 PM

Well, the Seafire is back on the shelf with a short-shot canopy, so as promised, I'm starting up on my 1/72nd E.E. Lightning.  Here's the box top:

The fuselage halves.  The instructions wisely call for the interior to be painted black.  The better to hide the empty cave that is the cockpit:

I've done a little more since these pics were taken.  The wing halves are glued together, and the L-shaped blob of styrene that passes for the ejection seat is painted and glued in.  This kit is definitely old-school Airfix, meant to be slapped together in an afternoon.  The shape looks correct, though, and I think with some seam work and a nice coat of paint, should turn out a nice addition to the collection.

"Congratulations, gentlemen! You're everything we've come to expect from years of government training." Zed (Men in Black) [IMG]
  • Member since
    July 2003
  • From: waynesboro va, via Ireland
Posted by sidure on Saturday, February 24, 2007 10:44 PM

Been kinda quiet here lately so I was wondering how it is going with you guy's. I have just got a little work done on my Seafire with the fuselage buttoned up and the wings together. Not much else done but hope to post some photos of it soon.

Steve

  • Member since
    December 2005
  • From: Germany
Posted by jeff on Sunday, February 25, 2007 1:10 AM
I've been spread out between too many builds, but I do have the Lightning almost ready to start painting. I'm trying to finish my build for the P-39 GB first, though, so it'll probably be a few weeks before a real update. 
"Congratulations, gentlemen! You're everything we've come to expect from years of government training." Zed (Men in Black) [IMG]
  • Member since
    June 2003
  • From: Rowland Heights, California
Posted by Duke Maddog on Sunday, February 25, 2007 1:15 PM
Still looking for another Airfix kit to build. I have three Armor kits in 1/76 scale I may just submit for this build, but I was actually looking for something that would take a little longer and be more involved. I'll let you know.
  • Member since
    December 2005
  • From: Germany
Posted by jeff on Saturday, March 3, 2007 4:07 AM

Here's a quick update on the Lightning.  Its a very simple kit, no cockpit to speak of.  Fit of the fuselage halves was not great, but after cutting off most of the locating pins, I was able to shift everything into relatively good shape.  Still had to use alot of filler on the spine and belly, though.  Wings fit pretty well, surprisingly.  A little sanding and trimming resulted in a great fit for the right wing, but the left will need a little filler.

"Congratulations, gentlemen! You're everything we've come to expect from years of government training." Zed (Men in Black) [IMG]
  • Member since
    August 2006
  • From: South Coast NSW, Australia
Posted by Simon L on Saturday, March 3, 2007 10:31 PM


Guys

The Heron is under way !

Here are some early pics. As stated the molds are in pretty good shape for a 40+ yr old !

The kit has large transparencies down either side of the fuselage, so departing from the rules of this group build, I scratchbuilt a floor and some passenger seats, to give an impression of an interior - you won't be able to see much through the fairly thick transparencies anyway. I have dipped all transparencies in 'klear', and they aren't too bad. Also  there is a solid bulkhead between the flight deck and the passenger cabin. References show an arched doorway , so I have carved that in as well.

The kit features movable ailerons and retractable undercarriage - with a nifty feature on the mains that 'clicks' the wheels in place when 'up' so they don't sag. However, I will be cementing them in the 'down and welded' position. Ailerons, whilst posed to indicate a slight roll, will be cemented. The kit also comes with an 'air stair' and some standing crew and passengers.
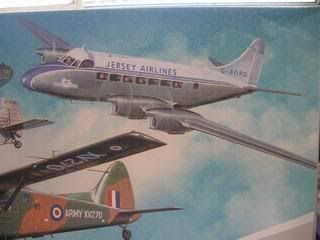
Box Art

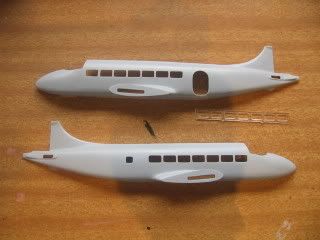
Fuselage halves, festooned with rivets - ahhh memories.

Kit flight deck and scratchbuilt cabin floor seats.

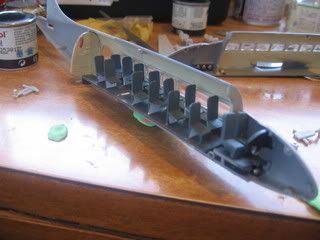
Installed in fuselage halves

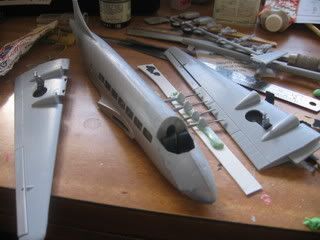
Fuselage persuaded to come together and wings assembled.

More progress pics to come !

Simon

Simon


  • Member since
    December 2005
  • From: Germany
Posted by jeff on Sunday, March 4, 2007 12:53 AM

Simon,

Nice job.  Really like the interior you built for it.  Well on your way to turning out a great model from a mediocre kit.

"Congratulations, gentlemen! You're everything we've come to expect from years of government training." Zed (Men in Black) [IMG]
  • Member since
    August 2006
  • From: South Coast NSW, Australia
Posted by Simon L on Sunday, March 4, 2007 3:08 AM

Thanks Jeff. Love your Lightning, one of my favourite jets. I've got one of these stashed away with the Aeroclub T5 conversion to get around to one day. Hmm - maybe a Military Trainer GB ?


The Heron continues apace - airframe finished and joint sanding proceeding. Main transparency is a very poor fit, especially around the rear, so I'll have to live with a 'step' there. Nacelle to wing joints are simple butt joints and leave a little to be desired - but hey it's an old airfix kit ! I should have the basic painting finished tomorrow. Propellors and undercarriage are painted, and there's not much more to it !

Simon


  • Member since
    September 2004
  • From: Vernon, BC, Canada
Posted by razordws on Sunday, March 4, 2007 5:19 PM
Jeff, Simon, nice progress for both of you.  I'm still a long way off from starting my Do 217 but I enjoy seeing your pics.

Dave

  • Member since
    August 2006
  • From: South Coast NSW, Australia
Posted by Simon L on Monday, March 5, 2007 4:12 PM

The Heron is now more or less complete. Missed out on a few progress pics as my wife was out with the kids and camera.

The wing/fuselage joint was surprisingly good.

Painting basic - silver all over, and a white fuselage top. I applied the kit decals which were good and include the curving cheatline on the nose, I then brush painted in Humbrol midnight blue in between the two decal lines.

 All it needs now are the doors ( undercarriage and cabin) installed and it's finished. More pics soon.

Simon


  • Member since
    July 2003
  • From: waynesboro va, via Ireland
Posted by sidure on Monday, March 5, 2007 9:59 PM

Jeff and Simon, very nice progress on the Lightening and Heron. They are really comming along great and cant wait to see them finished.

Steve

  • Member since
    August 2006
  • From: South Coast NSW, Australia
Posted by Simon L on Wednesday, March 7, 2007 6:21 PM
I have lost count of the number of BB shot I have superglued into the Heron's nose to stop it from being a  tailsitter ! There's some in the nacelles as well !

Simon


  • Member since
    March 2007
  • From: Carmel, CA
Posted by bondoman on Thursday, March 8, 2007 10:17 PM
I'm in with the 1/72 Ford trimotor. I haven't started it yet, but the little bugger looks like a test for these old eyes. Paint job to match the one in the Smithsonian. Still have no idea how to mask over corrugations! Scan to follow soon! Also have a Canberra B.2 but I'm not in the mood for that just yet.
  • Member since
    August 2006
  • From: South Coast NSW, Australia
Posted by Simon L on Friday, March 9, 2007 4:51 PM

Some nice work coming along there !


Here is the Heron. Still without doors and exhausts, tranparency masking still in place as I haven't sprayed any varnish as yet.

Next to a 1/72 Mini van I found.

Simon


  • Member since
    March 2007
  • From: Carmel, CA
Posted by bondoman on Sunday, March 11, 2007 7:54 PM

Here's my Tri motor. If anyone has any suggestions, it seems pretty straightforward.

I'll be building it to be this aircraft. Any historic knowledge is more than welcome!

Bondoman

  • Member since
    February 2003
  • From: Towradgi, near the beach!
Posted by traveller on Tuesday, March 20, 2007 5:52 AM

Hi to all!! I have been busy with things, so I have not kept up with this build!!! I have almost finished my Super Etendard, all that is left is the canopy to paint and fit, plus the underwing stores and small bits. Decalling and final gloss comes next. I lost the pylon for the Exocet, so I had to scratchbuild a new one!!!!! Fun!!!!! Anyhow, as soon as I get my camera back frommy sister, I will post some photo's. Now it will be a Sea Harrier in 1/48 scale.Smile [:)]

JOIN OUR COMMUNITY!

Our community is FREE to join. To participate you must either login or register for an account.

SEARCH FORUMS
FREE NEWSLETTER
By signing up you may also receive reader surveys and occasional special offers. We do not sell, rent or trade our email lists. View our Privacy Policy.