SEARCH FINESCALE.COM

Enter keywords or a search phrase below:

Fleet Air Arm Group Build

729074 views
11139 replies
1 rating 2 rating 3 rating 4 rating 5 rating
  • Member since
    September 2004
  • From: Vernon, BC, Canada
Posted by razordws on Saturday, April 18, 2009 6:24 PM

Okay, you guys are never going to believe this one.  Seriously... last night I was working on my Corsair and was touching up the white paint on the landing gear pieces when one of the pieces tweezerpulted off into never never land.  I spent hours looking for the piece (even found a piece that I had lost six months ago for another build) and no luck.  I hate that because I know that as soon as I scratch another one it's going to turn up.  So I bite the bullet this morning and make a new replacement piece and then open up the white paint to paint it.  GUESS WHAT I FIND!!!!!!!

Somehow it got onto the lid and I didn't notice it was there when I closed up the paint to look for the part.  Angry [:(!]Angry [:(!]Angry [:(!]Angry [:(!]Angry [:(!]Angry [:(!]Angry [:(!]Angry [:(!]Angry [:(!]Angry [:(!]Angry [:(!]Angry [:(!]Angry [:(!]Angry [:(!]

Unfortunately it got squished when I closed the lid so now I have to decide if it's worth fixing or if the scratched part is good enough.  What do you guys think?

Dave

  • Member since
    October 2007
  • From: Inland Northwest
Posted by Summit on Saturday, April 18, 2009 6:44 PM
Dave - I vote for the scratchbuilt one. Approve [^] It looks way better then the kit part to my eyes.. Maybe you should make up another unless you spent like all Day making it.
Sean "I've reached nearly fifty years of age with my system." Weekend GB 2008
  • Member since
    June 2008
Posted by lewbud on Saturday, April 18, 2009 8:06 PM
The scratchbuilt one, definitely.

Buddy- Those who say there are no stupid questions have never worked in customer service.

  • Member since
    March 2006
Posted by simpilot34 on Saturday, April 18, 2009 8:46 PM
Sign - Ditto [#ditto] Not to mention being such a small part, you will probably never get the shape right again either. Plus, as stated, it looks way better and will justify you using it because it's ready now, no reshaping!!!Thumbs Up [tup]
Cheers, Lt. Cmdr. Richie "To be prepared for war, is one of the most effectual means of preserving the peace."-George Washington
  • Member since
    October 2004
  • From: League City, Texas
Posted by sfcmac on Saturday, April 18, 2009 10:18 PM

 Uh I vote for the one with wheels!  Nice work on the scratch built one which is stellar work. Only Worry I would have is it going to make the other one stand out as different?

edit looking at it closer it looks so well done that painted it should be just groovy!

 Hmmmm 


  • Member since
    September 2003
  • From: South Central Wisconsin
Posted by Daywalker on Saturday, April 18, 2009 11:05 PM

Dave-

I'm with the other fellas!  Go with the scratchbuilt one.  And, as Sean said, if it's not too complicated build another one to match. Wink [;)]

Frank 


  • Member since
    September 2004
  • From: Vernon, BC, Canada
Posted by razordws on Sunday, April 19, 2009 12:14 AM
Thanks for the feedback guys.  I stripped the paint off the damaged part, pushed it back into shape and ran some Tamiya extra thin over the damaged areas and it held its shape so I'll think I'll go with that option.  The scratch built part took about an hour or so, most of that was spent hunting for parts in the spares bin with the right diameter. 

Dave

  • Member since
    September 2003
  • From: South Central Wisconsin
Posted by Daywalker on Sunday, April 19, 2009 12:36 AM

Glad to hear you were able to fix the matching one Dave!

Any new pics of your progress?

I have been messing around with painting mine this weekend, and so far have finished the bottom colors of white and medium blue.  I also did the top-side dark blue today, and hope to start on the black tomorrow. Thumbs Up [tup]

Frank 


  • Member since
    October 2004
  • From: League City, Texas
Posted by sfcmac on Sunday, April 19, 2009 1:10 AM

 Frank you are a machine!!!!  Sounds like your almost done!

 Dave it boggles the mind to think you went to all the trouble to ask for an opinion on which part to use. You get a unanimus response praising your work and decide to go with the exact opposite!  You are a man after my own heart. You got some big uns! LOL!  Thumbs Up [tup] Both look great! Look forward to the end result!

  • Member since
    September 2003
  • From: South Central Wisconsin
Posted by Daywalker on Sunday, April 19, 2009 1:17 AM

Almost done?  HA!

Not likely mate.  LOTS of weathering in store for this baby, as I have a couple of great photos of the real bird.  Looks pretty beat up in the photos!  Gotta step up the pace, as I have another Corsair waiting for the paint shop, then two 109's in line behind that.  Maybe I ought to invest in another spray booth, two more AB's, and a couple of dozen more holding clamps.  Start up my own assembly line! Big Smile [:D]

Frank 


  • Member since
    March 2006
Posted by simpilot34 on Sunday, April 19, 2009 6:53 AM
Well with two of this and two of that I'd say you already have an assembly line!!!!Smile,Wink, & Grin [swg]
Cheers, Lt. Cmdr. Richie "To be prepared for war, is one of the most effectual means of preserving the peace."-George Washington
  • Member since
    September 2003
  • From: South Central Wisconsin
Posted by Daywalker on Sunday, April 19, 2009 3:00 PM

Richie- LOL, you know- you're right! Big Smile [:D]

I finished the base colors today, ending with the black sides.  During the course of the painting, I opted to weather each color a bit before going on to the next.  I used a very thin NATO black color to darken the panel lines, and add a little shadow in deep recesses.  Then, I used a lightened version of the base color to lighten up the centers of the panels, as well as some overall splotchiness.  Overall, I am happy with how it is looking so far.

Don't worry, I will also weather that awful colored radome in due time. Smile [:)]

Frank 


  • Member since
    October 2004
  • From: League City, Texas
Posted by sfcmac on Sunday, April 19, 2009 3:26 PM
Sticks and Foam! Sticks and Foam!  Its got me foaming at the mouth!  Incredible looking Corsair I am all kinds of excited Woo Hoo!  Crash!!!  Sorry fell out my chair!  WooHOO! Bow [bow]
  • Member since
    September 2003
  • From: South Central Wisconsin
Posted by Daywalker on Sunday, April 19, 2009 3:59 PM

Thanks Aaron, you're making me blush! Blush [:I]

Glad you like the weathering, wait till I get it all on there!  Want this one to look a bit tired. Zzz [zzz] LOL...

Now, how 'bout some Ventura pics?  You gotta have some, right?

Frank 


  • Member since
    June 2008
Posted by lewbud on Sunday, April 19, 2009 5:03 PM

 sfcmac wrote:
Sticks and Foam! Sticks and Foam!  Its got me foaming at the mouth!  Incredible looking Corsair I am all kinds of excited Woo Hoo!  Crash!!!  Sorry fell out my chair!  WooHOO! Bow [bow]

Dee,

Tell Aaron to stop pilfering your meds.  He's loopy enough as it is.

Frank,

Really looking good.  Look forward to more.

Buddy- Those who say there are no stupid questions have never worked in customer service.

  • Member since
    October 2004
  • From: League City, Texas
Posted by sfcmac on Sunday, April 19, 2009 5:50 PM

 lewbud! It's all that dust from the Camel Poo I have been dremeling to create scale dirt! LOL!

 I got your scale dirt for ya! LOL!  Trying to get scale dried up vegitaian is another matter! 

 Frank Ventura Pics?  Maybe latter I think you've seen about all of the today LOL!  Still plugging away!  When I wrap up for the day I'll see if I have anything post worthy! Thumbs Up [tup]

 That Corsair paint job your doing is making me squeamish! LOL!

  • Member since
    December 2008
  • From: Goffstown, NH
Posted by New Hampshire on Sunday, April 19, 2009 6:48 PM

Frank, she is looking beautiful beyond description!  You are working some magic on that Corsair!

Brian

  • Member since
    October 2004
  • From: League City, Texas
Posted by sfcmac on Sunday, April 19, 2009 10:09 PM
 Daywalker wrote:

Thanks Aaron, you're making me blush! Blush [:I]

Now, how 'bout some Ventura pics?  You gotta have some, right?

Better add these before the XO gets back and does it for me!  He is such the tyrant!  LOL!

Ventura Update today!

Ok the Vacuform clear parts are kinda flimsy! They were kinda cloudy but a double dip let dry and dip again in future cleared them up pretty well! Thumbs Up [tup]

Now the issue is they are very soft and traditional masking methods can be frustrating. The detail is soft as far as the framework as well and uneven in spots. Bleeding and paint mess seemed un avoidable. Then Frank Mentioned the old fast frames stickers that were pre laser cut stickers that you painted the color and simple stuck on maeuvering with soapy water. Haven't seen them lately but they worked well.

 Anyways I made my own. I simply airbrushed the color on some scrap decal paper. I sealed it with the ink bonder as you would the decals and to my surprise it worked! All I had to do was cut the edge where the paint met the paper and they work fine. Here is what started as an experiment.
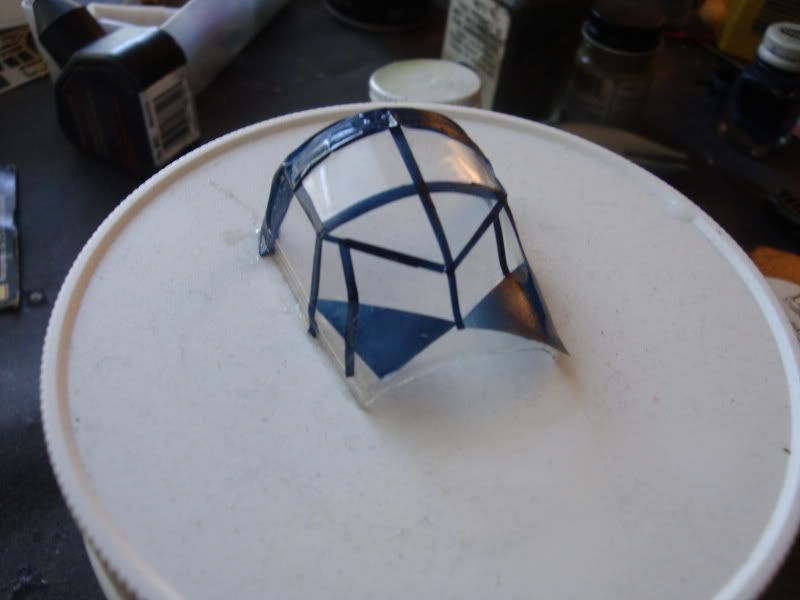
It worked so well I took my time and used a little more finess and patience and got this!
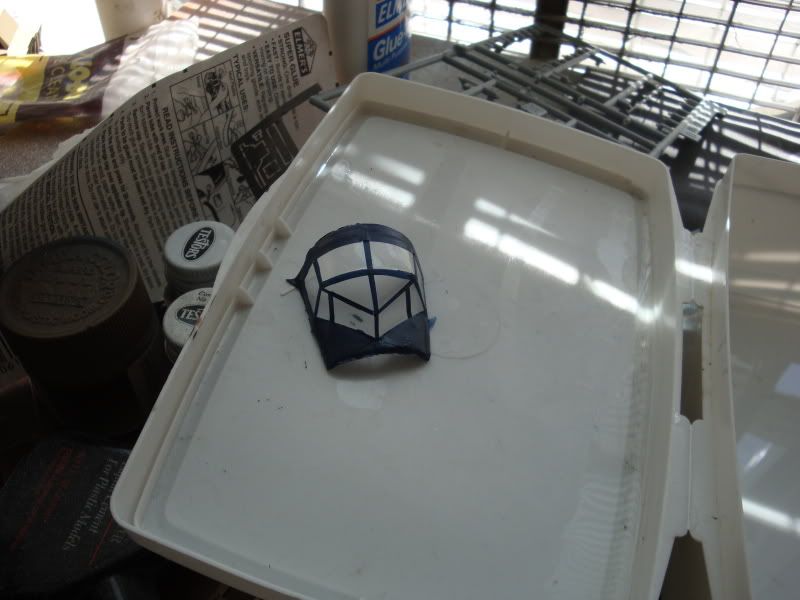
Left the edges rough.As I have to join them to the aircraft so why smooth them twice and do double work?

The paint on the windshield is actually on the box lid so you can see the future did it's job clearing things up! Thumbs Up [tup]

The kits white metal guns look ok? But are too fragile for me. They bend in a good breeze. So I started experimenting again.
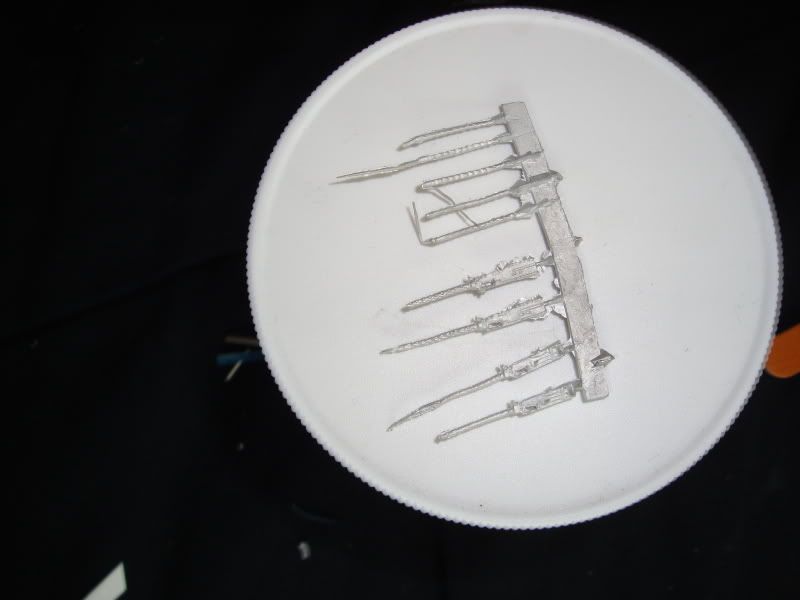
Started scratch building guns and did a turret as the resin piece was only an external part. Nothing inside to see right by the open door! Banged Head [banghead]

The resin part didnt fit anyways and made the whole thing sit way way to high up! Looked aweful!  So I only used the resin gunsite which I cut off it.

I had some spare guns from the B-17 kits as I decided the scratched ones looked good but were really more of a 1/32 scale. Needed Dave to help me think smaller!
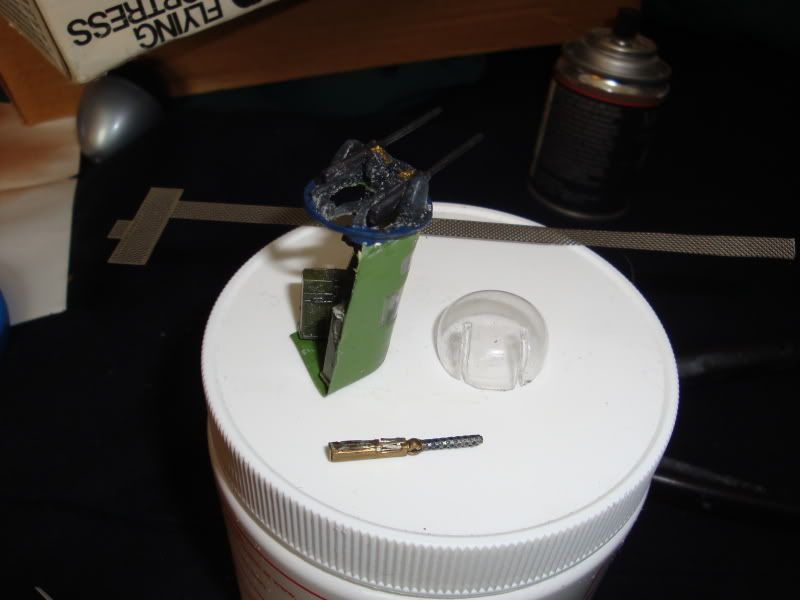
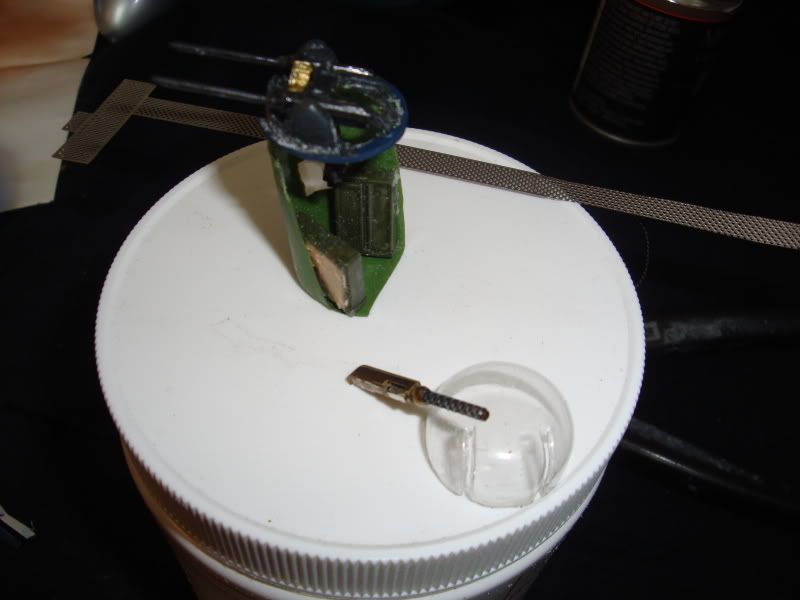
Yep the only original parts are the vacuform cover and the gunsite. I used the remote controll grip from a defunked B-25 and scratched some ammo boxes and feed chutes and called it good enough and much better to see thru the open door! Thumbs Up [tup]Thumbs Up [tup]

Can't tell you how much test fitting and alterations I did. A lot but the slight cant to the lower turret allows it to turn freely with out hitting any of the inside details.

Starting to look like an airplane! Gotta smooth it all out where I attached the vacuform parts and repaint those areas. Then it's onto weathering using advice from the good ol XO! And you all if you wanna give some!
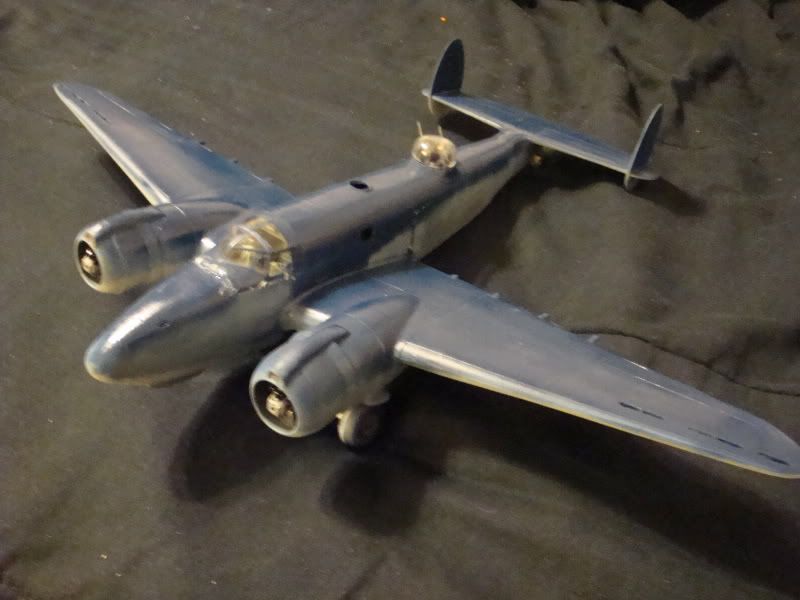
Whatcha think? Come on don't be shy am I gonna make it?Shock [:O]Cool [8D]

  • Member since
    September 2003
  • From: South Central Wisconsin
Posted by Daywalker on Sunday, April 19, 2009 11:02 PM

Thanks everyone, glad you like my progress thus far. Thumbs Up [tup]  Just have to touch up a couple of spots tonight then let her sit a few days to cure before the clearcoat.

Aaron- What can I say?  You make it look easy!  I agree- that scratched gun looks a bit big for 1/48.  Save that for the 1/32 B-17. Shock [:O]

Frank 


  • Member since
    March 2007
  • From: Carmel, CA
Posted by bondoman on Sunday, April 19, 2009 11:35 PM

This is great build, no need for me to say so, but really impresses is that you're taking on about 5 issues in modeling, never mind the personal stuff. Bad kit, scratchbuild, not much info, big scale, deadlines, all I can say is

Bow [bow]

Bow [bow]

Bow [bow]

Bow [bow]

  • Member since
    March 2006
Posted by simpilot34 on Monday, April 20, 2009 3:14 AM
 bondoman wrote:

This is great build, no need for me to say so, but really impresses is that you're taking on about 5 issues in modeling, never mind the personal stuff. Bad kit, scratchbuild, not much info, big scale, deadlines, all I can say is

Bow [bow]

Bow [bow]

Bow [bow]

Bow [bow]

Sign - Ditto [#ditto] Theyare both looking great guys, WELL DONE!!!!!

Cheers, Lt. Cmdr. Richie "To be prepared for war, is one of the most effectual means of preserving the peace."-George Washington
  • Member since
    December 2002
  • From: A secret workshop somewhere in England
Posted by TANGO 1 on Monday, April 20, 2009 5:37 AM

Frank, Aaron,

outstanding work gentlemen! Bow [bow]Bow [bow]Bow [bow]


I am up to my eyes in work at the moment-hope all is well with everyone here.Approve [^]

Take care.Wink [;)]


Regards, Darren. C.A.G. FAA/USNFAW GB
  • Member since
    September 2004
  • From: Vernon, BC, Canada
Posted by razordws on Monday, April 20, 2009 12:22 PM

Frank, spectacular looking paint job Bow [bow]Bow [bow]  I didn't know they had Corsair nightfighters aboard the Enterprise.  Thought they only had Hellcats.

Aaron, excellent call on the canopy frame decals.  Looks superb and I'll have to file that little trick away for later use on some old airfix kits in the stash.  Thumbs Up [tup]

Thanks everyone for your input on the landing gear mishap.  I appreciate your comments but I just couldn't bring myself to scratch a matching support and the fix on the kit part was pretty straight forward once I stripped the paint goo off.  The legs and gear doors are on.  Wheels and bomb are next and then on to weathering.

Dave

  • Member since
    December 2008
  • From: Goffstown, NH
Posted by New Hampshire on Monday, April 20, 2009 6:59 PM

You'll make it Aaron!  We have faith in your superior skills!!!! Big Smile [:D]

Brian

  • Member since
    October 2004
  • From: League City, Texas
Posted by sfcmac on Monday, April 20, 2009 9:33 PM

Thanks fellows! Been pecking away at it for a long while.  The Kind words mean a lot! I got Dee dressed and out the house and we did a few errands today. She seems to be doing much better today.  Anytime she is outta bed I am happy.  Used to be the other way around? Am I getting old or what?

 Anyways Got a little farther on the PV-1. A little each day!  I used a lawn mower blade shapening tool to grind the Gap filling Super Glue( CA) that I used with acclerator.  Don't laugh that stuff is hard!  Really was hard on the grinding stone. I use it at pretty high RPMS as well to get a smooth surface. Takes  a lot of caution but I am gettung so good with a dremel after these FM kits I think I could carve an ice sculpter of Nam and Bondo dancing a jig on the rum barrel! Blush [:I]

Then a touch up with the belt sander! Just kidding a sanding stick works well. When I see platic I know I have gone far enough!  Then I start building up the Mr Surfacer!  Really smooth things out!

I build it up in coats really heavy. It Drys fast and doesn't take long especially with the fans blowing full blast out the windows so I don't have to smell the stuff!  It's pretty potent! Dead [xx(]

 I let the whole thing dry overnight!  Make sure the Mr Sufacer is set up well or it will sand off in gobs!  Then I wet sand it with water and a fine sanding stick to really level it out and get rid of as much distortion as possible.

Never had much luck thinning the stuff to smooth it without making a real mess and getting on parts I don't want it on.

 With that done  it was back to painting!  Really did Frank's weathering technique to the extreme!  Best part is if it is too heavy the future under it will let me take it off and redo.  I Wanted to make it really heavy to start with then blend the coats in gradually with a sucessive dusting of the base colors thinned much the same way as the post shading wash. I think it will give a good tired look to it if I may quote the XO. Bow [bow]

 Going back to work tonight so Gonna let it be and see what the light of day brings tommorrow!  Thanks again fellows!

 Frank! Stay away from the Old Milwalkee! Yuck [yuck]


  • Member since
    September 2003
  • From: South Central Wisconsin
Posted by Daywalker on Monday, April 20, 2009 10:51 PM

Thanks guys! Big Smile [:D]

Dave- Yep, Enterprise had four of these night fighting Corsairs aboard.  Numbers 9, 10, 11, and 12.  Here's three of them on deck...

Aaron- Is that the MPM 1/48 He-177?  What a cool kit, didn't know you had one of those. Cool [8D]

Frank 


  • Member since
    March 2006
Posted by simpilot34 on Tuesday, April 21, 2009 2:56 AM
Aaron you are really beating it into submission now!!!! Great Work!!!Thumbs Up [tup]Bow [bow]
Cheers, Lt. Cmdr. Richie "To be prepared for war, is one of the most effectual means of preserving the peace."-George Washington
  • Member since
    October 2007
  • From: Inland Northwest
Posted by Summit on Tuesday, April 21, 2009 9:06 AM

Frank - I cant believe my eyes - Paint on the Corsair Party [party]  Too bad them Navy guys couldnt of painted a "Sharks mouth" on that Radome ! It wont be long now and you will have her all decorated up making all of us jealus with envy. Thumbs Up [tup]

I like the scheme you picked, nice to see something different. 

Sean "I've reached nearly fifty years of age with my system." Weekend GB 2008
  • Member since
    September 2004
  • From: Vernon, BC, Canada
Posted by razordws on Tuesday, April 21, 2009 11:53 AM
 Daywalker wrote:

Aaron- Is that the MPM 1/48 He-177?  What a cool kit, didn't know you had one of those. Cool [8D]

Ya, and a 1/32 Hasegawa Ju 87 in the background too!!! Tongue [:P]

Dave

  • Member since
    October 2004
  • From: League City, Texas
Posted by sfcmac on Tuesday, April 21, 2009 5:23 PM

 Thanks again fellows Gonna hit it again. I went over the post shading with a damp rag and it toned it down to where it looks right and I am much happier. I hadn't taken into the account of the different colors and how it made a different look.  Oh well It's fixed!  I appreciate the swell comments and support!

 As far as the German Aircraft kits? I think you all are hallucinating and have too much luftwaffe on the brains ! LOL

Cool [8D]Pirate [oX)]

JOIN OUR COMMUNITY!

Our community is FREE to join. To participate you must either login or register for an account.

SEARCH FORUMS
FREE NEWSLETTER
By signing up you may also receive reader surveys and occasional special offers. We do not sell, rent or trade our email lists. View our Privacy Policy.