SEARCH FINESCALE.COM

Enter keywords or a search phrase below:

P-47 "Jug" Group Build

75289 views
462 replies
1 rating 2 rating 3 rating 4 rating 5 rating
  • Member since
    December 2003
  • From: Indiana
Posted by hkshooter on Thursday, October 11, 2007 7:41 PM

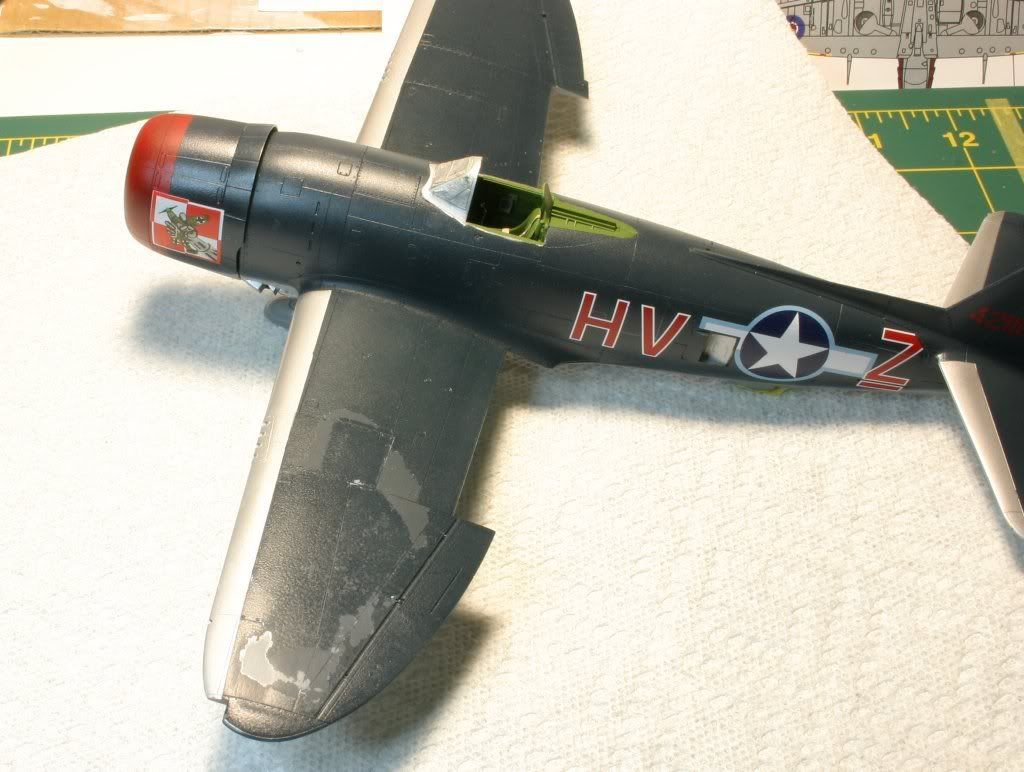
Ok, got two more colors on. I don't know how much more I'm going to do. I'll look it over as I go along and decide if it needs anything else as far as paint goes. Hopefully the color contrast shows in the pics.

  • Member since
    December 2003
  • From: Indiana
Posted by hkshooter on Thursday, October 11, 2007 6:32 PM

All right. Got the first paint on tonight. To follow should be three more colors. This one is Duraluminum. Upcomming should be white alum, dark alum and aluminum. I'm thinking of trying some chrome!


  • Member since
    August 2005
  • From: Long Island, New York, USA
Started trumpy's 1:32 P-47D Razorback...
Posted by fjs3 on Thursday, October 11, 2007 4:38 PM

Don't have aby pictures yet, only did a little cleaning up and test fitting.  Seems to me, it's a big version of Tamiya's beauty, with a little more detail.  Man there are a LOT of parts in this thing!  Going to have to work slow and take time with this baby.  Anyway, I should have some pictures in a day or two. 

Regards,

Freddie from LI

"I'm gonna build all these models one kit at a time!

  • Member since
    January 2007
Posted by Gigatron on Thursday, October 11, 2007 12:03 PM

 hkshooter wrote:
Made some more progress on the Jug tonight. All seam and panel line work. I'll post first pics when something exciting happens. Like paint maybe.

Post some WIP photos, those are always more interesting.

I don't know if I can speak for others, but i like watching a kit go together from sprues to finished model.

-Fred


  • Member since
    December 2003
  • From: Indiana
Posted by hkshooter on Tuesday, October 9, 2007 7:02 PM
Made some more progress on the Jug tonight. All seam and panel line work. I'll post first pics when something exciting happens. Like paint maybe.
gzt
  • Member since
    May 2007
  • From: Massachusetts
Posted by gzt on Tuesday, October 9, 2007 3:28 PM

Mike: I was curious what take you so long ... Big Smile [:D] Sign - Welcome [#welcome]

Marc: it is a very good idea - I wish I know it while sufffering with tamiya spit seat - it is really bad. Your process would be a great improvement. Bow [bow]

Flying is a thrill #2 known to mankind. Landing is #1.

http://www.rwd-6.org

  • Member since
    April 2005
  • From: Piscataway, NJ!
Posted by wing_nut on Tuesday, October 9, 2007 3:11 PM
Dunno about acrylics but I brush painted it with enamel paint and it adhered just fine.

Marc  

  • Member since
    February 2006
  • From: Smithers, BC, Canada
Posted by ruddratt on Tuesday, October 9, 2007 2:58 PM
Wow! A fine group assembled here, a great topic, and some very inspiring work on display so far. That's enough to twist my arm, Greg! Count me in with a Tamiya 1/72 Razorback. Not sure about the markings yet though.

Mike

 "We have our own ammunition. It's filled with paint. When we fire it, it makes pretty pictures....scares the hell outta people."


  • Member since
    November 2006
  • From: Coastal Maine
Posted by dupes on Tuesday, October 9, 2007 6:48 AM

 wing_nut wrote:
I made a new one from a piece of soda can using a P-40 seat as a guide.

A piece of soda can? For real? I can't believe I never thought of that. So much for all those PE sets (well, maybe not Big Smile [:D])!

Do you have to prime soda can or can you fire acrylics right onto it?

gzt
  • Member since
    May 2007
  • From: Massachusetts
Posted by gzt on Monday, October 8, 2007 9:44 PM

Welcome htshooter !

You are in ! 

Flying is a thrill #2 known to mankind. Landing is #1.

http://www.rwd-6.org

  • Member since
    December 2003
  • From: Indiana
Posted by hkshooter on Monday, October 8, 2007 8:56 PM

Beautiful seat, Mark! Infact, there is a lot of nice work going on here!

Mind if I get in? I started a Hase 1/48 bubble top lastnight.

  • Member since
    April 2005
  • From: Piscataway, NJ!
Posted by wing_nut on Monday, October 8, 2007 10:13 AM
Thanks Greg.  The gunsight is from Quickboost.  The bracket is the kit prt with the clear plastic gunsight lopped off.

Marc  

gzt
  • Member since
    May 2007
  • From: Massachusetts
Posted by gzt on Monday, October 8, 2007 9:35 AM

Marc: Great cockpit job !!!

The seat is exceptional - much better than original plastic piece :)

Sorry about your tumb tip, however you describe it in such funny way Smile [:)]

What resin set did you use for the gunsight ???? 

Flying is a thrill #2 known to mankind. Landing is #1.

http://www.rwd-6.org

  • Member since
    April 2005
  • From: Piscataway, NJ!
Posted by wing_nut on Monday, October 8, 2007 8:46 AM

Greg, any chance the original aircraft happen to have a big paint chip in that spot?  That looks kind of goodWink [;)]

Progress has been slow.  If you are right handed (south paws just flip this aroundWink [;)]), be careful not slice open the tip of your left thumb.  It is amazing the multitude of things that require that little body part.  Tough to hold the tiny parts for clean up etc.

I glued the seat to the bracket and for the life of me can’t find it anywhere.  I can understand the little noseeum parts… but a seat and bracket?  I made a new one from a piece of soda can using a P-40 seat as a guide.  Fortunately for some reason there are 2 seat brackets in the kit.  I realized after the fact the Jug seat did not have the ribs.  Oh well. Except for the PE IP and a resin gunsight, the rest of the pit is OOB.  I am beginning to see why everyone says what a great kit the Tamiya 47 is.


Marc  

gzt
  • Member since
    May 2007
  • From: Massachusetts
Posted by gzt on Sunday, October 7, 2007 2:30 PM

Frank,

thanks for help. Yes, I removed it (along with some paint Big Smile [:D] ) but it is not a big deal - I can fairly easy fix it. The only problem is - I have to order a set of Lanowski P-47M decals - those were a but diferent than regular US insignia (I think) the border was blue instead of dark blue. Besides that I also lost a horse shoe - so I have to get a decal anyway (or make a horse shoe myself ... not a bad idea Big Smile [:D]

At this moment I place the kit on side - just waiting for Monday to get new decals  

Flying is a thrill #2 known to mankind. Landing is #1.

http://www.rwd-6.org

  • Member since
    September 2003
  • From: South Central Wisconsin
Posted by Daywalker on Sunday, October 7, 2007 12:09 PM

Greg-

Glad you were able to catch it before the clearcoat so you have a chance to fix it without ruining the whole airplane.  How is it going?  Did you remove the old decal yet?  Did it work out OK?

Frank 


gzt
  • Member since
    May 2007
  • From: Massachusetts
Posted by gzt on Saturday, October 6, 2007 9:53 AM

thanks, I am going to do it.  Angry [:(!] I did not finish decals yet, so those are not sealed yet.

Have to wait for new decals  ... to finish it but still have about two weeks of work with UC  and other details.

Thanks guys for pointing it so quickly. 

 last minute news: I was able to remove the decal but during the process some paint was pilled of as well Angry [:(!], now I have to repaint part of it, ohh well .. I will than put some shades on that wing anyway while waiting for the decals

Thanks again !! I think it is a very good idea to show a progress on a first plane so just you will point what is wrong soon enough to fix it Big Smile [:D]


Flying is a thrill #2 known to mankind. Landing is #1.

http://www.rwd-6.org

  • Member since
    September 2003
  • From: South Central Wisconsin
Posted by Daywalker on Saturday, October 6, 2007 9:47 AM

Greg-

Bummer about the decal!  I have made similar errors when tired and trying to do "one last thing". 

Did you already put a clear over the decal?  If not, you could put tape over it and "rip" it off.  The decal would be history, but maybe you can get your hands on a replacement.

Frank 


gzt
  • Member since
    May 2007
  • From: Massachusetts
Posted by gzt on Saturday, October 6, 2007 9:39 AM

Angry [:(!]

Guys, you are right, I ..... up a big time Angry [:(!]

Decal is wrong. It was late and I must be tired while doing it. Funny part is: I set it right and than turned 180 due to a opening in a decal (matching the wing).

So, anyone has an idea how to fix it ? or the only way is to get a new set of decals ?

Marc: it is a great idea and just fantastic engine finish. I am going to use this idea on my Razorback and bubbletop soon. The ring around the crankcase is just a wire ?? I can not believe how well this came up . Absolutely fantastic job - both of you glentlemen ! Bow [bow]

Flying is a thrill #2 known to mankind. Landing is #1.

http://www.rwd-6.org

  • Member since
    January 2007
Posted by Gigatron on Saturday, October 6, 2007 7:53 AM

Marc, that's insane and ingenious all at the same time Laugh [(-D]  It's amazing what you can come up when necessary.

-Fred


  • Member since
    April 2005
  • From: Piscataway, NJ!
Posted by wing_nut on Saturday, October 6, 2007 6:35 AM

Thanks guys. 

Nice work on that engine Fred. Looks good Greg  but I agree, check the wing decal.


Greg, I made 18 of these...

by drilling out the end of a plastic rod, gluing in 2 pieces of .009 solder and cutting the piece off.  The ring around the crankcase is a piece of wire and all the wires are CA'd to that. 

Marc  

  • Member since
    January 2007
Posted by Gigatron on Saturday, October 6, 2007 12:30 AM

That's a sweet looking build you've got going on there, Greg!

But I have a quick question and/or observation (and I may be completely wrong).  I am about as far from an expert on Lanowski's aircraft as any person could ever hope to be, but is the wing star upside down?  I always thought that the single point faced foward on the plane.  But like I said, I'm no Lanowski expert, so maybe his craft had the star that way.

-Fred


gzt
  • Member since
    May 2007
  • From: Massachusetts
Posted by gzt on Friday, October 5, 2007 9:57 PM

OK Guys: YOU ARE UNBELIEVABLE!

Those engines look great !!!

It looks I need to do some shopping .....  

here is my Lanowski's aircraft, just started to put decals ...


Flying is a thrill #2 known to mankind. Landing is #1.

http://www.rwd-6.org

  • Member since
    January 2007
Posted by Gigatron on Friday, October 5, 2007 8:29 PM

Here's a closeup of my power plant

It's a mix of verlinden AM and OOB parts, all cobbled together.

-Fred


gzt
  • Member since
    May 2007
  • From: Massachusetts
Posted by gzt on Friday, October 5, 2007 5:33 PM
 wing_nut wrote:

Dupes... don't know what you mean bythe basics buts if if you Google P-47 You will be able to find and enormous amount of info, then click the Images tab and there will about a zillion pics.


Some prgress here... engine is done. And the groove from in my forehead the Opti-Visor is finally going awaySmile [:)] Quickbbost resin engine with scratched igniton harness.  69 Parts.Dead [xx(]

The wash is not as dark in real life as in the pics.


Marc: how did you do it ? What parts did you use ??

It is an exceptional job you did !!! (..again Big Smile [:D]) Bow [bow] 

a higher res pict would be nice Wink [;)]


Flying is a thrill #2 known to mankind. Landing is #1.

http://www.rwd-6.org

  • Member since
    January 2007
Posted by Gigatron on Friday, October 5, 2007 2:47 PM

Nice work on that double wasp, Marc!  I've got 3 more of those to build for other projects.  I think I'll send them your way for wiring Laugh [(-D].

I'll see if I can get better pics of my engine tonight.

But now I understand why people build planes that used Allison engines Smile,Wink, & Grin [swg]

-Fred


  • Member since
    September 2004
  • From: Vernon, BC, Canada
Posted by razordws on Friday, October 5, 2007 11:19 AM
Nice work on the engine Mark! Thumbs Up [tup]  Lots of wires Shock [:O]

Dave

  • Member since
    December 2002
  • From: Northern California
Posted by jeaton01 on Friday, October 5, 2007 11:18 AM
Nice work, Fred and Greg.  Looks like we are all working under microscopes, I'm doing the same on the WW I group build. I'll be starting on my P-47 soon.

John

To see build logs for my models:  http://goldeneramodel.com/mymodels/mymodels.html


  • Member since
    December 2002
  • From: Northern California
Posted by jeaton01 on Friday, October 5, 2007 11:15 AM
Dupes, a good reference is the Detail and Scale book on the P-47, it is volume 54, ISBN 1-888974-07-9.  You should be able to find a copy for less than $20.00.

John

To see build logs for my models:  http://goldeneramodel.com/mymodels/mymodels.html


  • Member since
    November 2006
  • From: Coastal Maine
Posted by dupes on Friday, October 5, 2007 10:18 AM

I'm really just looking for something I can put my hands on, to peruse at my leisure. Sadly, I'm still saddled with dialup internet access out here in the williwags of Maine - maybe one of these years! - and most of the time it's still preferable to do my research with books (*sniff, sniff*) Sigh [sigh].

That engine is pretty freakin' amazing. Yikes. 

JOIN OUR COMMUNITY!

Our community is FREE to join. To participate you must either login or register for an account.

SEARCH FORUMS
FREE NEWSLETTER
By signing up you may also receive reader surveys and occasional special offers. We do not sell, rent or trade our email lists. View our Privacy Policy.