SEARCH FINESCALE.COM

Enter keywords or a search phrase below:

Hawker Hurricane GB

43631 views
435 replies
1 rating 2 rating 3 rating 4 rating 5 rating
  • Member since
    April 2005
  • From: Piscataway, NJ!
Posted by wing_nut on Sunday, March 16, 2008 8:25 AM

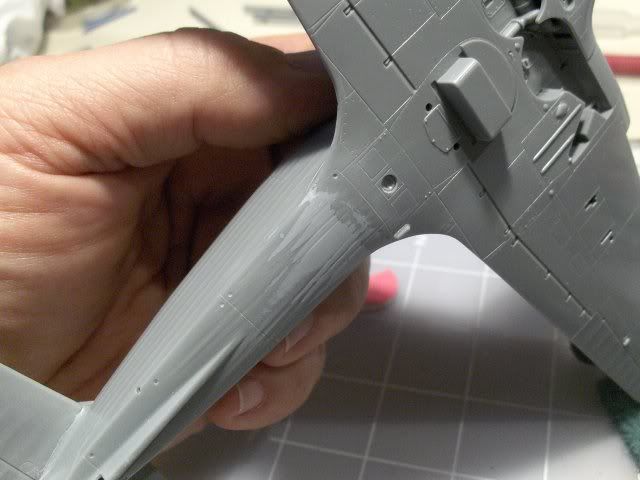
So, I finally got off my fat keester and got my camera. Here is one of the wing joints. The sand & test fit cycle seemed like it would never end.

The other pic is in the "come on Hasegawa, use a lilttle bit of all that brain power at your disposal and not put a seam in such a stupid place" category.


Marc  

  • Member since
    September 2003
  • From: South Central Wisconsin
Posted by Daywalker on Sunday, March 16, 2008 8:38 AM
Greg and Marc- Great progress fellas!  You know, I was looking at that seam on the bottom of the Hasegawa fuselage last night and thought "why the heck would they put a major seam right there?" Confused [%-)]

Frank 


gzt
  • Member since
    May 2007
  • From: Massachusetts
Posted by gzt on Sunday, March 16, 2008 8:43 AM
 wing_nut wrote:

So, I finally got off my fat keester and got my camera. Here is one of the wing joints. The sand & test fit cycle seemed like it would never end.

The other pic is in the "come on Hasegawa, use a lilttle bit of all that brain power at your disposal and not put a seam in such a stupid place" category.


Yup, I could not believe they did it ! To make it right will take a lot of fine sanding ... OUCH , I am glad I did not start with this kit. Let us know how you are going to do it.

Flying is a thrill #2 known to mankind. Landing is #1.

http://www.rwd-6.org

  • Member since
    December 2002
  • From: A secret workshop somewhere in England
Posted by TANGO 1 on Sunday, March 16, 2008 2:58 PM

Mark, Greg,

Looks like you lads are doing some good work there.Thumbs Up [tup]

If its any consolation, I have had problems too............I don't think that I have done a great job sorting out the Hasegawa fabric seam, but its good enough for me.Shy [8)]

Regards, Darren. C.A.G. FAA/USNFAW GB
  • Member since
    July 2006
  • From: San Francisco, CA
Posted by telsono on Sunday, March 16, 2008 10:37 PM

Ok guys,

I did get some work done on my Hasegawa 1/48 Hurricane I. Here are some photos of my bird. The cockpit is partially Ultracast (seat and armor back) and Aires (balance of cockpit). I'll be adding the control surfaces prior to adding the green portion of the camoflage. Its not been too bad of a build so far. I added the knockout panel and tried to match it to the body as best that I could, It may need a little touch up work.

Mike T.

Beware the hobby that eats.  - Ben Franklin

Do not fear mistakes. You will know failure. Continue to reach out. - Ben Franklin

The U.S. Constitution  doesn't guarantee happiness, only the pursuit of it. You have to catch up with it yourself. - Ben Franklin

gzt
  • Member since
    May 2007
  • From: Massachusetts
Posted by gzt on Sunday, March 16, 2008 11:03 PM
Nice work Mike ! Looking forward to see next step. All here are struggling with the seam fuse/wing. How did you make it ?

Flying is a thrill #2 known to mankind. Landing is #1.

http://www.rwd-6.org

  • Member since
    November 2006
  • From: Coastal Maine
Posted by dupes on Monday, March 17, 2008 7:57 AM

As I have one of these Has-icanes in my stash, question for you guys - is there SUPPOSED to be a panel line in the wing/fuselage joint, just not a major gap? Dunce [D)]

Surprised the fit is so terrible...although that seam location in the middle of the fabric on the underside is pretty bone-headed! Yuck [yuck]

  • Member since
    July 2006
  • From: San Francisco, CA
Posted by telsono on Monday, March 17, 2008 10:08 AM

Greg;

 I must have been lucky, that gap between the wings and the fuselage was very minor and a little Tamiya putty, and Gunze Liquid Putty did the trick with of course some sanding. my only trouble was that the fit was very tight and the edgfes didn't want to poop up to match at first. 

Before I attach the flying surfaces I have to bevel the joining area to get a proper fit. The Ultracast flying surfaces match up perfectly, especially the length.

Mike T.

Beware the hobby that eats.  - Ben Franklin

Do not fear mistakes. You will know failure. Continue to reach out. - Ben Franklin

The U.S. Constitution  doesn't guarantee happiness, only the pursuit of it. You have to catch up with it yourself. - Ben Franklin

  • Member since
    April 2005
  • From: Piscataway, NJ!
Posted by wing_nut on Monday, March 17, 2008 10:12 AM

Hey dupes...Since you are always answering my armor questions... I can finally repay a bit.

The short answer is yes.  The curved section between the fuselage side and the upper wing surface is a fairing.  This can be removed, usually to get to cable or hydraulic access.  Without the fairing in place, the wing/fuselage joint would be 90 degrees, more or less. 


Here is shot of a P-39 with the fairing removed...

http://data3.primeportal.net/hangar/scott_dimmick/p-39q/images/p-39q_17_of_17.jpg 

Marc  

  • Member since
    September 2003
  • From: South Central Wisconsin
Posted by Daywalker on Monday, March 17, 2008 10:34 AM

OK, Hasegawa 1/48 Hurricane builders:

Can anyone supply a photo of how the downward sloping supports off of the front of the I.P. fit into the assembly?  Mine were broken off of the I.P. from some rough handling (not me!) and the instructions don't really show where they attach to.  If anyone could supply a photo of how it fits in there, I would sure appreciate it! Big Smile [:D]

Frank 


  • Member since
    April 2005
  • From: Piscataway, NJ!
Posted by wing_nut on Monday, March 17, 2008 10:50 AM

Frank, I don’t have a pic but after the bottom and side where together,  I glued the IP to the brace and while the joint was still a tiny bit soft, glued the whole thing in place and pushed the braces down ‘til the touched the bottom and the IP was still more or less straight up.  Then I put into one side of the fuselage just to make sure everything was lined up right.  If the angled supports don’t quite touch the floor it no biggie.  They disappear under the seat anyway.


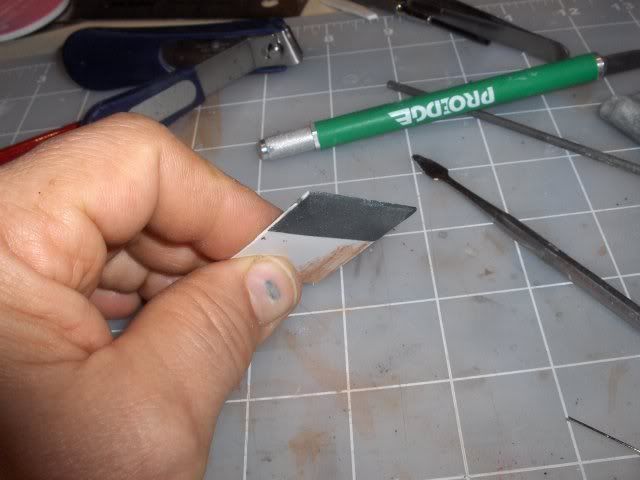
Here is what I did with the “stupid joint”  Filled it and sanded it flat.  Then round the edge of some thick plastic card and glued some 400 wet/dry to it.  Roll it first so when you fold it over it doesn’t crack.  Using some Dymo tape as a guide I sanded the grooves.  These were softened with a small tube of rolled 400 grit following the groove The pic with the grooves is before they were softened a little.  


Marc  

  • Member since
    April 2005
  • From: Piscataway, NJ!
Posted by wing_nut on Monday, March 17, 2008 10:53 AM
A question of seat color in a hurricane.  Interior green or bakelite?

Marc  

  • Member since
    July 2006
  • From: San Francisco, CA
Posted by telsono on Monday, March 17, 2008 11:03 AM

wing-nut

Interior Green, but i have heard of some in aluminum as well. Just found this site. some good interior shots!

http://www.warmkessel.com/jr/flying/td/jd/73.jsp


Mike T.

Beware the hobby that eats.  - Ben Franklin

Do not fear mistakes. You will know failure. Continue to reach out. - Ben Franklin

The U.S. Constitution  doesn't guarantee happiness, only the pursuit of it. You have to catch up with it yourself. - Ben Franklin

  • Member since
    April 2005
  • From: Piscataway, NJ!
Posted by wing_nut on Monday, March 17, 2008 11:27 AM
Thanks Mike.  Some great detail shots there.  Bookmarked for later ref.

Marc  

gzt
  • Member since
    May 2007
  • From: Massachusetts
Posted by gzt on Monday, March 17, 2008 11:31 AM

Marc: it is a very good tip to deal with Hase "stupid" joint Smile [:)]

Mike: great site, I wish I have it for my Mk I Sad [:(] , next one Smile [:)] coming 

Flying is a thrill #2 known to mankind. Landing is #1.

http://www.rwd-6.org

  • Member since
    July 2006
  • From: San Francisco, CA
Posted by telsono on Monday, March 17, 2008 11:31 AM

wing_nut

Good luck with your build!. i haven't been in Piscataway in many rears since my college days at Rutgers, I used to live in Edison during my grad student times.

Mike T.

Beware the hobby that eats.  - Ben Franklin

Do not fear mistakes. You will know failure. Continue to reach out. - Ben Franklin

The U.S. Constitution  doesn't guarantee happiness, only the pursuit of it. You have to catch up with it yourself. - Ben Franklin

  • Member since
    September 2003
  • From: South Central Wisconsin
Posted by Daywalker on Monday, March 17, 2008 12:58 PM

Thanks Marc!  So they just pass under the seat to the floor?  Couldn't tell if they went outboard of the seat along with the outer frame parts, or passed under.  Thanks again! Thumbs Up [tup]

Also, great tip on the wing joint fix.  Do you have a photo of the top join?  Just want to see how nice it looks, and to inspire me to get it to fit properly! Big Smile [:D]

Frank 


  • Member since
    April 2005
  • From: Piscataway, NJ!
Posted by wing_nut on Monday, March 17, 2008 7:30 PM

Frank there is a shot of the wing root back on pg 14 in about the middle.


YeahMike, the Scarlet Knights are the talk of the town these days. 

Marc  

  • Member since
    September 2003
  • From: South Central Wisconsin
Posted by Daywalker on Monday, March 17, 2008 7:35 PM
 wing_nut wrote:

Frank there is a shot of the wing root back on pg 14 in about the middle.

Blush [:I] So there is!  You musta snuck that one in there when I wasn't looking. Whistling [:-^]

Frank 


  • Member since
    April 2005
  • From: Piscataway, NJ!
Posted by wing_nut on Monday, March 17, 2008 8:08 PM

Yup... learning how to be stealthy now that I am making sorties tot he armor forum.


Here's a shot of the pit with the left brace visible.


Marc  

  • Member since
    February 2007
  • From: Bournemouth UK
Posted by Luftwoller on Tuesday, March 18, 2008 10:29 AM

Nice work here fellas. So much quality in so little space. Keep it up, and faster you dogs Wink [;)]

...Guy

..'Your an embarrassment to the human genus, makes me ashamed to call myself Homo'.
  • Member since
    April 2005
  • From: Piscataway, NJ!
Posted by wing_nut on Tuesday, March 18, 2008 10:54 AM
Yeah...gotta get this done so I can start on my TigerWhistling [:-^]

Marc  

  • Member since
    September 2003
  • From: South Central Wisconsin
Posted by Daywalker on Tuesday, March 18, 2008 11:41 AM

 wing_nut wrote:
Yeah...gotta get this done so I can start on my TigerWhistling [:-^]

Yeah, a target to shoot with your newly built cannon armed Hurri! Big Smile [:D]

Frank 


  • Member since
    February 2003
  • From: Niagara Falls NY
Posted by Butz on Tuesday, March 18, 2008 12:15 PM

Hey Marc,

 I love how your pit turned out..!!! Yea I know, I too have to start mine.. Looking forward to the bird thats fer sure!!

Flaps up,

Mike

Rangers Lead The Way 

  If you would listen to everybody about the inaccuracies, most of the kits on your shelf would not have been built Too Close For Guns, Switching To Finger

  • Member since
    October 2007
  • From: South Florida (for now...)
Posted by iflyprops on Wednesday, March 19, 2008 5:37 PM

Looking great everyone!

Here's a quick update on my CA Mk I build.

I finished the cockpit up, glued the wing and fuselage halves together and began sanding... It's going to be along process.

I initially tried to glue the cockpit in prior to joining the fuselage halves (against someones advice on here...) and it popped out while I was joining the fuselage halves. So I guess its going in through the bottom after I'm done sanding. Oh, and just so someone doesn't think I am forgetting the shoulder harness...I am going to put that in after paint and weathering as I plan to drape it outside of the cockpit as they did when on alert.

Keep up the good work,

Adam

On the Bench: Eduard 1/48 Yak-3 Profipack OTB 99.999% complete Classic Airframes Hurricane Mk I
  • Member since
    September 2003
  • From: South Central Wisconsin
Posted by Daywalker on Wednesday, March 19, 2008 7:03 PM

Looking good Adam!  Great to see another ragwing Hurri here. Thumbs Up [tup]

I started my HAsegawa kit the other night, and cleaned up the resin parts and interior bits.  I found a photo in a reference book on the Hurri that showed exactly where the tubes from the IP go.  Thanks Marc for your help!  Today, I worked on cleaning up the exhausts.  Lots of cleaning up to do on those, and unfortunately Hasegawa located them on the sprue facing the same direction.  This means that one of them will have the side with the ejector marks facing up.  If they could have just reversed one, then you could position them with the indentations from the pins facing down out of sight on both.  Come on Hasegawa!  Tamiya can do it, why can't you?  Sorry. Grumpy [|(]


Frank 


  • Member since
    September 2003
  • From: South Central Wisconsin
Posted by Daywalker on Wednesday, March 19, 2008 11:22 PM

OK, here's my first WIP pic here, sorry it's not much.  I spent quite a while cleaning up the VERY prominent seams on the exhausts, then cleaning them up while saving the weld beads.  I looked through my references to see if these manifolds had seams down them where the plastic mold seperation line was, but didn't see any in my pics.  Finally, I hollowed out the ends.  The round ones on the ends were fairly easy, but the hemispherical ones on the front two were a real bugger.  I ended up using a .25mm round dental bur spinning in my motortool at about 100 rpm-VERY slowly.  Had to be very careful not to let the bur walk itself around and tear up the outside surfaces.  I must say I am very happy with them! Big Smile [:D]

Frank 


  • Member since
    October 2007
  • From: South Florida (for now...)
Posted by iflyprops on Thursday, March 20, 2008 11:35 AM
Looks good Frank!
On the Bench: Eduard 1/48 Yak-3 Profipack OTB 99.999% complete Classic Airframes Hurricane Mk I
gzt
  • Member since
    May 2007
  • From: Massachusetts
Posted by gzt on Thursday, March 20, 2008 11:40 AM
indeed, nice ! I thought you will do a metal exhaust Smile [:)]

Flying is a thrill #2 known to mankind. Landing is #1.

http://www.rwd-6.org

  • Member since
    April 2005
  • From: Piscataway, NJ!
Posted by wing_nut on Thursday, March 20, 2008 3:39 PM
And you should be Frank.  They look nice.  As a matter of fact.... I am going to mail mine to you so keep the Dremel warmWink [;)]

Marc  

JOIN OUR COMMUNITY!

Our community is FREE to join. To participate you must either login or register for an account.

SEARCH FORUMS
FREE NEWSLETTER
By signing up you may also receive reader surveys and occasional special offers. We do not sell, rent or trade our email lists. View our Privacy Policy.