SEARCH FINESCALE.COM

Enter keywords or a search phrase below:

The In My Stash GB : Redux

89050 views
1682 replies
1 rating 2 rating 3 rating 4 rating 5 rating
  • Member since
    May 2003
  • From: Staten Island, New York
Posted by kenny_conklin on Friday, January 25, 2008 10:38 AM
ah tony is always having some sort of problem Laugh [(-D]
"Rakkasans Lead the Way!"
  • Member since
    June 2006
  • From: Highland IN
Posted by TGregory on Friday, January 25, 2008 6:37 PM

Well, at least I'm still good looking.

No proof, no camera, take my word for it, would I lie Angel [angel] to you?

Tony

Tony Gregory
  • Member since
    May 2003
  • From: Staten Island, New York
Posted by kenny_conklin on Friday, January 25, 2008 6:49 PM
 TGregory wrote:

Well, at least I'm still good looking.

No proof, no camera, take my word for it, would I lie Angel [angel] to you?

Tony


no never tony Evil [}:)]

"Rakkasans Lead the Way!"
  • Member since
    September 2006
  • From: From Vernal UT OH YEA!!
Posted by raptordriver on Friday, January 25, 2008 10:52 PM

I guess I'll get the model done first and then when I go to SLC again I'll have to pick some up.

That'll be a funny biplane lol without rigging.

Andrew


  • Member since
    February 2004
  • From: Second City
Posted by arki30 on Friday, January 25, 2008 11:00 PM

If you didn't want to build it, you shouldn't have put it on the list. Evil [}:)]Big Smile [:D]

Keep in mind, you don't have to build the others in your list.  It's cool if you do, but no one will twist your arm.

Building Now:

1/48 Academy Bf-109G6 - 100%

1/48 Tamiya F4U-1A - 5%

Upcoming:

1/48 Revell F-14D

  • Member since
    May 2003
  • From: Staten Island, New York
Posted by kenny_conklin on Saturday, January 26, 2008 8:49 AM
arki is right the number one kit is the only mandatory one , but we do like to see others
"Rakkasans Lead the Way!"
  • Member since
    October 2004
  • From: Nelson, BC, Canada
Posted by paul_toz on Saturday, January 26, 2008 10:59 AM

Thanks Kenny and TG I don't think I will be able to build my next build because its a biplane And I cant find any rigging wire. I had some cable but it mysteriosly vanishedGrumpy [|(] so if anyone had knows what to use for that thanks in advance.

Try invisible thread from the sewing department...obviously take SWMBO along so people thinnk it's for her, not you. To colour it, trap the thread between a table and the point of a suitably coloured Sharpie or other felt pen and pull it through. Hey presto, black thread, or brown or whatever colour you want. Then superglue into place, using accelerator is best as you can maintain the tension. I have just tried it out on an E13A1 floatplane - 8 wires on the floats. It went ok, drilled holes into the floats and lower wings and pulled them tight before the wing tops were put on. They seem to have slackened a bit during thr rest of the construction process, but I read that putting a heat source close to the thread will tighten it up again. Got to try that on a seperate piece of thred first though.

Paul 

  • Member since
    September 2004
  • From: Vernon, BC, Canada
Posted by razordws on Saturday, January 26, 2008 4:03 PM
 paul_toz wrote:

...I read that putting a heat source close to the thread will tighten it up again. Got to try that on a seperate piece of thred first though.

Paul 

Guys, I use the invisible thread all the time for my aerials and yes a heat source will help tighten it up.  My favorite heat source is a small soldiering iron which works wonderfully.  Provides the right amount of heat with a small tip for getting into tight spaces.  Just move the tip a little closer at a time until you see the thread tighten up and work it up and down the thread a bit.

Dave

  • Member since
    October 2004
  • From: Nelson, BC, Canada
Posted by paul_toz on Saturday, January 26, 2008 6:19 PM

Thanks for that Dave - I'll go straight ahead and try that now rather than experimenting. Smile [:)]

Paul 

  • Member since
    September 2006
  • From: From Vernal UT OH YEA!!
Posted by raptordriver on Saturday, January 26, 2008 9:15 PM
So I can just use fishing string? and if it gets saggy put some heat by it then it'll tighten?

Andrew


  • Member since
    September 2004
  • From: Vernon, BC, Canada
Posted by razordws on Saturday, January 26, 2008 9:24 PM

Raptor, I've not tried it with fishing line so I would experiment if I were you beofre trying it on the real thing. 

Paul, hope it turns out!

Dave

  • Member since
    June 2006
  • From: Highland IN
Posted by TGregory on Monday, January 28, 2008 1:17 PM

I'm still trying to get the computer to recognize the camera. Got the prop and spinner painted, engine is comming along, cut out the molded air hose from the cockpit and repaced it with guitar string (low E). Will post progess when I can.

Tony Gregory
  • Member since
    July 2013
Posted by IL2windhawk on Tuesday, January 29, 2008 12:26 AM

Well, I closed up the fuselage and then pulled out the 80-grit stick
and proceeded to beat the hell out of this kit.  LOL, it was like
sanding a chunk of wood.   The panel lines are gone, the seams are
smooth the touch.  Most of the sanding effort was trying to address
some of the profile problems (particularly on the nose).  I probably
sanded off 0.020" of material in some places to get the right contour. 

Anyway, that was a blast.  This plastic sands very nicely.
I still have a little work to do before I move to the wings.

Canopy isn't bonded yet.  Still trying to pull that perfect shape for
the top piece. 

  1/32 Revell Duo Discus
  1/32 Revell ASK-21
  1/48 Ardpol SZD-51 Junior
  1/48 Czech Models Grumman Goose
  1/144 FineMolds Millennium Falcon

  • Member since
    November 2006
  • From: Coastal Maine
Posted by dupes on Tuesday, January 29, 2008 7:11 AM

In an effort to clean at least one of the builds off of my bench (before I jump into MORE GB's) I've been making a serious push on the MiG. The majority of the body work is done, mostly happy with all of the seam work, not confident enough to re-scribe panel lines, so I can't go really nuts with a belt sander like I want to. Wink [;)] Excuse the "up on blocks" appearance, haven't attached the landing gear yet.

Just need to mask off the nose cone and canopy, then it's time to start spraying some paint...might be able to get at the underside tonight.

The finished cockpit:

Will try to get some more pics in there with better lighting when I get a chance. 

  • Member since
    May 2003
  • From: Staten Island, New York
Posted by kenny_conklin on Tuesday, January 29, 2008 7:28 AM
looking excellent guys great work
"Rakkasans Lead the Way!"
  • Member since
    September 2006
  • From: From Vernal UT OH YEA!!
Posted by raptordriver on Tuesday, January 29, 2008 8:11 AM
Wow dupes That cockpit is incredibleBig Smile [:D]. Don't do the same I did didnt mask enough and paint got all over the cockpit,

Andrew


  • Member since
    February 2004
  • From: Second City
Posted by arki30 on Tuesday, January 29, 2008 1:10 PM

IL, oh boy, this isn't the Mig-31 again is it? You were never the same after that....Big Smile [:D]

Dupes, the Mig looks really good.  And the cockpit PE looks appropriately busy, although typical to PE a little flat.  That's the medium, though.

Building Now:

1/48 Academy Bf-109G6 - 100%

1/48 Tamiya F4U-1A - 5%

Upcoming:

1/48 Revell F-14D

  • Member since
    September 2004
  • From: Vernon, BC, Canada
Posted by razordws on Tuesday, January 29, 2008 1:20 PM
Nice work Dupes! Thumbs Up [tup]Thumbs Up [tup]

Dave

  • Member since
    July 2007
  • From: Sweden
Posted by Azgaron on Tuesday, January 29, 2008 2:07 PM

Looking good, Dupes! Very nice looking cockpit!

Cheers,

Azgaron


  • Member since
    November 2006
  • From: Coastal Maine
Posted by dupes on Tuesday, January 29, 2008 3:21 PM

Hey fellas, thanks a lot! Big Smile [:D] My first PE cockpit, it certainly is pretty sweet. Glad this is an aircraft that you'll actually be able to see into.

Arki- I know what you mean about it being too "flat". There are some 3-D type knobs and levers, but they're so damn small that I can't really get them to come out in the pics. I need a smaller lens I can just shove right in there, because you can't see all the detail in the ones I have here. I'll see what I can do. Wink [;)]

Time for paint! 

  • Member since
    July 2003
  • From: waynesboro va, via Ireland
Posted by sidure on Tuesday, January 29, 2008 11:03 PM

really great work there dupes, it turned out like a stunner. I gotta get me some of that pe stuff

Steve

  • Member since
    July 2013
Posted by IL2windhawk on Tuesday, January 29, 2008 11:32 PM

Yeah - wow.
That does look great.


Good work Dupes.

  1/32 Revell Duo Discus
  1/32 Revell ASK-21
  1/48 Ardpol SZD-51 Junior
  1/48 Czech Models Grumman Goose
  1/144 FineMolds Millennium Falcon

  • Member since
    November 2006
  • From: Coastal Maine
Posted by dupes on Wednesday, January 30, 2008 6:58 AM

Hey, thanks again guys! Glad it turned out so well. Big Smile [:D]

Sprayed the underside last night, then was able to mask off the wheel wells and spray those as well. Need to throw a bunch of tape all over the kit and then it's time to start in on the topside camo! This is where it gets fun. Wink [;)]

  • Member since
    September 2006
  • From: From Vernal UT OH YEA!!
Posted by raptordriver on Wednesday, January 30, 2008 9:33 PM
I'll say painting is always the fun partLaugh [(-D]

Andrew


  • Member since
    November 2006
  • From: Coastal Maine
Posted by dupes on Thursday, January 31, 2008 8:34 AM

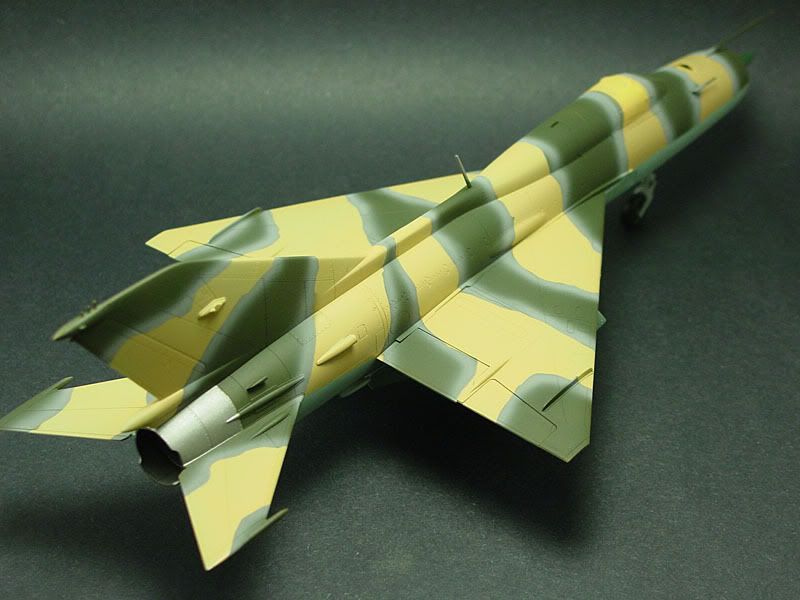
Sure is! Got the upper half basecoat on last night, then this morning threw on the silly putty mask for the green portion of the topside camo. Tonight will be the gray borders on the green (pretty neat camo scheme) which I think I'll have to freehand, unless I can find some more silly putty after work today...nahhh, I love a challenge. Free hand it is! Big Smile [:D]


  • Member since
    July 2003
  • From: waynesboro va, via Ireland
Posted by sidure on Thursday, January 31, 2008 1:13 PM

Hey dupes, it's really looking good. I have to try the silly putty some day. I bought some but not used yet. Best of luck on the free hand colour. It's not as bad as you think.

Steve

  • Member since
    July 2007
  • From: Sweden
Posted by Azgaron on Thursday, January 31, 2008 3:33 PM

Looking good, Dupes!

I really like to try silly putty someday, if I can get hold of some.

Cheers,

Azgaron


  • Member since
    May 2003
  • From: Staten Island, New York
Posted by kenny_conklin on Thursday, January 31, 2008 4:51 PM
dupes looking really great
"Rakkasans Lead the Way!"
  • Member since
    November 2006
  • From: Coastal Maine
Posted by dupes on Thursday, January 31, 2008 7:36 PM

Thanks fellas! If you guys haven't tried the silly putty method, you really should - it makes complex camo schemes very simple. One good thing I learned from building all that armor. Wink [;)]

Got a little bit more work done (heh) this evening - was so fired up with how it turned out, think I ripped the masks off about 5 minutes after I was done spraying - i.e., about the time it took to clean the final color of paint out of the airbrush. Here she is as of now:
Was really hoping to finish this guy up and claim my badge, but I have another build starting tomorrow, promised I'd get right on that one...so the MiG is going to have to sit on the shelf until Monday or Tuesday unless I can sneak a little work in between this and the other one. Mischief [:-,]

  • Member since
    February 2004
  • From: Second City
Posted by arki30 on Thursday, January 31, 2008 8:54 PM
Dupes, I love it!  Gorgeous scheme, and I'm quite jealous of your painting skills.  Bow [bow] 

Building Now:

1/48 Academy Bf-109G6 - 100%

1/48 Tamiya F4U-1A - 5%

Upcoming:

1/48 Revell F-14D

JOIN OUR COMMUNITY!

Our community is FREE to join. To participate you must either login or register for an account.

SEARCH FORUMS
FREE NEWSLETTER
By signing up you may also receive reader surveys and occasional special offers. We do not sell, rent or trade our email lists. View our Privacy Policy.