SEARCH FINESCALE.COM

Enter keywords or a search phrase below:

Urban Armor GB, May 1-Dec 31, 2008

29417 views
262 replies
1 rating 2 rating 3 rating 4 rating 5 rating
  • Member since
    April 2007
  • From: Schroon Lake, NY
Posted by SMJmodeler on Monday, June 2, 2008 7:57 AM
mg42gunner: Please use the Panther.  I need to stick with the rules...besides, then you can show us the build portion tooThumbs Up [tup]

  • Member since
    November 2006
  • From: Coastal Maine
Posted by dupes on Monday, June 2, 2008 5:40 PM
Hey man - lovin' the badge...I think it needs to be a bit smaller, though? I know the profiles will only accept badges of a certain size until it shrinks them down on it's own, not always in the proper ratios - i.e., it gets squished unequally in each direction. If you or Hermes can't do it, I'll whip out some photoshop and resize it. Wink [;)]
  • Member since
    April 2006
  • From: LaValle, Wisconsin
Posted by Hermesminiatures on Monday, June 2, 2008 5:52 PM

Jonathan

For every modeling technique that works, I have three that don't.

  • Member since
    November 2006
  • From: Coastal Maine
Posted by dupes on Monday, June 2, 2008 6:06 PM
See? Hermes is on it. Big Smile [:D]
  • Member since
    July 2006
  • From: Rochester NY
Posted by mg42gunner on Monday, June 2, 2008 9:47 PM
Alright then put me down for one panther G late. This is actually good because I can use the JSU as a test bed for weathering since its also going to be in berlin, then I can apply what I learned about weathering to the panther. I also want to take pictures every step of the way on this one, as ive never done that before. Anybody built the dragon panther G late smart kit yet? It looks like a very high quality kit, not sure if ill use the kit markings or go for a late berlin, dark yellow last ditch effort look. Actually that sounds kinda cool...
  • Member since
    April 2007
  • From: Schroon Lake, NY
Posted by SMJmodeler on Tuesday, June 3, 2008 8:05 AM

dupes:  Thanks for the heads up on the badge, it's handled...and thanks for the help Hermesminiatures. 

mg42gunner:  I put you down for the Panther G Late, but to adhere to the rules (please re-read), I'll need some photo proof of your urban setting.  There are a lot of pics' available...see what you can find.  Glad you could join in, I look forward to seeing how you weather that beastThumbs Up [tup]!

...By the way, I'll be doing the Panther A for this GB.  I used my current Big Cats GB entry, the Panther G Late (Tamiya kit) as my "guinea pig" for this GB.  I was REAL happy with the dark yellow paint job...here is how it came out, and what I hope to duplicate for this GB:

How'd you do on those AP tests?!

  • Member since
    July 2006
  • From: Rochester NY
Posted by mg42gunner on Tuesday, June 3, 2008 9:57 PM
Hey SMJ, I have a quick question about the photo. Does it have to have the same paint we plan to use on our tank? Because I was kind of hoping to improvise a bit with the late war idea, and im not sure if ill be able to find a pic of a panther with what I was thinking of painting. And that dark yellow panther looked great, Im hoping I can produce something simmilar looking too!

*AP tests went well for me, all that studying payed off! Under 10 days of school left....cant wait!
  • Member since
    April 2007
  • From: Schroon Lake, NY
Posted by SMJmodeler on Wednesday, June 4, 2008 4:26 PM

mg42gunner:  No, the paint job on your build doesn't have to be the same.  The photo is for proof of your urban setting/ inspiration only.

By the way, the paint job on my Panther was actually pretty easy...time consuming, but easy.  Let me know if you need any info on how I got the look, OK?

  • Member since
    December 2002
  • From: Reno, NV
Posted by espins1 on Thursday, June 5, 2008 12:42 PM
 SMJmodeler wrote:

By the way, the paint job on my Panther was actually pretty easy...time consuming, but easy.  Let me know if you need any info on how I got the look, OK?

Very nice job with your pre and post shading!  Cool [8D]

Scott Espin - IPMS Reno High Rollers  Geeked My Reviews 

  • Member since
    April 2007
  • From: Schroon Lake, NY
Posted by SMJmodeler on Thursday, June 5, 2008 4:23 PM

Thanks Scott!...by the way, what the heck is the difference between pre-and post-shadingConfused [%-)]

Here's what I did:

First I sprayed the whole model Dark Yellow, XF-60 (no primer).  Then I lightened it and sprayed the center of each surface/ detail.  Then, I lightened it even more and sprayed/ accented only the horizontal surfaces where the sun would bleach it the most. Finally I came back with the first lightened color and re-"shaded" where I oversprayed the lightest shade.

Is that the same shading technique you mentioned?  It's neither here nor there,  I'm just trying to get my teminology correct.

  • Member since
    December 2002
  • From: Reno, NV
Posted by espins1 on Thursday, June 5, 2008 4:49 PM
 SMJmodeler wrote:

Thanks Scott!...by the way, what the heck is the difference between pre-and post-shadingConfused [%-)]

Here's what I did:

First I sprayed the whole model Dark Yellow, XF-60 (no primer).  Then I lightened it and sprayed the center of each surface/ detail.  Then, I lightened it even more and sprayed/ accented only the horizontal surfaces where the sun would bleach it the most. Finally I came back with the first lightened color and re-"shaded" where I oversprayed the lightest shade.

Is that the same shading technique you mentioned?  It's neither here nor there,  I'm just trying to get my teminology correct.

Ah, that's all post shading. 

A pre-shade would have included spraying a dark color (flat black, dark brown) along all the panel edges and wherever there would have been more shadows to darken the basecoat in those areas after you spray the base coat.

Post shading is spraying the base coat, then adding increasingly lighter coats in the panels just like you mentioned above. 

Scott Espin - IPMS Reno High Rollers  Geeked My Reviews 

  • Member since
    April 2007
  • From: Schroon Lake, NY
Posted by SMJmodeler on Thursday, June 5, 2008 4:54 PM
POST SHADING, huh?...got itThumbs Up [tup]...thanks Scott!

  • Member since
    July 2006
  • From: Rochester NY
Posted by mg42gunner on Sunday, June 8, 2008 10:34 AM
Hey SMJ, I have a question. I know Ive already changed builds late in the game once, but I wanted to know if I could change my entry for this GB to an M18 hellcat (academy)? I think I might use the panther for the Berlin GB, but I still want to be a part of this one. Ive got the pictures for the hellcat:


I think I might use this photo as inspiration because I like the idea of the logs on the front, Im going to do something similar with the hellcat:


Sorry for the late switch SMJ, ill be buying the hellcat in my next round of models (should come in late june/early july) So I know ill be able to finish in time.


  • Member since
    April 2007
  • From: Schroon Lake, NY
Posted by SMJmodeler on Sunday, June 8, 2008 10:43 AM
mg42gunner:  No sweat, I'll make the change!...nice Pic's!

  • Member since
    November 2006
  • From: Coastal Maine
Posted by dupes on Sunday, June 8, 2008 1:05 PM

That 1st one is particularly sweet. Thumbs Up [tup]

Going to do the dio version of that one? Huh? Huh? Big Smile [:D]

  • Member since
    July 2006
  • From: Rochester NY
Posted by mg42gunner on Sunday, June 8, 2008 3:46 PM
Id really like to do a dio, but im not really sure where to start. I dont think that anything I make will be a very convincing building, and the pre-made dio buildings seem a bit daunting...Im not really scared of the figures though, Id like to give them a try. Mayby I can get away with doing just a low wall on one side of the dio, with the hellcats gun pointing down an alley made of just the two fronts of the buildings.
  • Member since
    December 2007
  • From: Bridgeview, Illinois
Posted by mg.mikael on Tuesday, June 10, 2008 7:35 PM

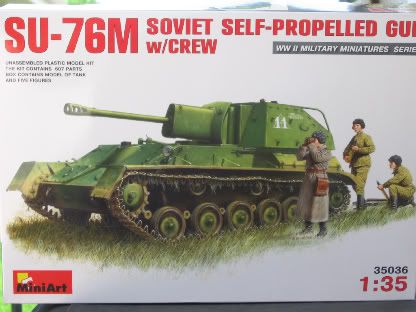
Man, I really have to get started on my SU-76 for this GB.

Didn't realize how far behind I fell, by not checking into this site and posting for the past few months. Anways I hope to get started on my SU-76, today.

"A good plan executed now is better than a perfect plan next week." - George S. Patton

  Photobucket 

  • Member since
    December 2002
  • From: Reno, NV
Urban Armor GB, May 1-Dec 31, 2008
Posted by espins1 on Wednesday, June 11, 2008 11:59 AM

Ok, it's official.  For this GB, I'm going to build my Dragon 1/35 King Tiger w/zimmerit as one that served with the 503 Schwere PanzerAbteilung attached to the Feldherrnhalle division in the defense of Budapest Hungary.  Here are a few inspiration photos.  I'll have to dig through my Tigers in Combat books to see if there are any other good, relevant photos.  

Scott Espin - IPMS Reno High Rollers  Geeked My Reviews 

  • Member since
    November 2006
  • From: Coastal Maine
Posted by dupes on Wednesday, June 11, 2008 12:06 PM

Scott - if you're interested, I'm going to ask my Grandmother what she remembers about the fighting in Budapest in '44-'45 - she was 15 at the time. She and my Grandfather (now deceased) both lived there at the time before moving to the US in 1949. I'm willing to bet she has some interesting stories if I can get her to talk about it. Smile [:)]

Great batch of pics, btw. Cool [8D]

  • Member since
    April 2007
  • From: Schroon Lake, NY
Posted by SMJmodeler on Wednesday, June 11, 2008 12:10 PM
espins1:  Nice photos!...I'll go ahead and change your build info...hey, how about adding a figure on the end of the barrel like that one pic'Thumbs Up [tup]

  • Member since
    December 2002
  • From: Reno, NV
Posted by espins1 on Wednesday, June 11, 2008 12:10 PM
 dupes wrote:

Scott - if you're interested, I'm going to ask my Grandmother what she remembers about the fighting in Budapest in '44-'45 - she was 15 at the time. She and my Grandfather (now deceased) both lived there at the time before moving to the US in 1949. I'm willing to bet she has some interesting stories if I can get her to talk about it. Smile [:)]

Great batch of pics, btw. Cool [8D]

If you can get her to talk about her experiences then you've got to post them!  Smile [:)]

Scott Espin - IPMS Reno High Rollers  Geeked My Reviews 

  • Member since
    December 2002
  • From: Reno, NV
Posted by espins1 on Wednesday, June 11, 2008 12:11 PM

 SMJmodeler wrote:
espins1:  Nice photos!...I'll go ahead and change your build info...hey, how about adding a figure on the end of the barrel like that one pic'Thumbs Up [tup]

Thanks guys.  I'm leaning more towards the pic 2nd from the bottom, #233

Scott Espin - IPMS Reno High Rollers  Geeked My Reviews 

  • Member since
    December 2007
  • From: Bridgeview, Illinois
Posted by mg.mikael on Friday, June 13, 2008 9:13 PM

Rookie question, hope someone can answer it for me.

I plan on doing my first wash for my armor for this GB after I finished the painting. But I know you have to prepare for it. So are these basically the steps you have to take:

1) put a layer of Future on the armor      2) put on decals     3) put on a layer flat-clear gloss   4) do the wash/weathering

For step 2, I was wondering is their anything special you have to do to decals for them to stick to the Future, or do apply decals just by putting it on the Future.

Oh and for step 3 do you have to thin the gloss for use in a airbrush or is it fine straight from a bottle.

"A good plan executed now is better than a perfect plan next week." - George S. Patton

  Photobucket 

  • Member since
    November 2006
  • From: Coastal Maine
Posted by dupes on Sunday, June 15, 2008 6:48 AM

So long as you give it enough dry-time (24 hours is sufficient), your decals can be laid down right over the future. For step 3, I think you mean a gloss coat, not a flat coat? After your decals are dry, you can use another coat of future to seal them in pre-weathering. Some people dislike the added gloss layer and head straight to the flat coat to seal them in, although certain washes behave differently when applied over a flat vs a gloss.

Did that help?  Confused [%-)]

  • Member since
    December 2007
  • From: Bridgeview, Illinois
Posted by mg.mikael on Sunday, June 15, 2008 10:52 AM
 dupes wrote:

So long as you give it enough dry-time (24 hours is sufficient), your decals can be laid down right over the future. For step 3, I think you mean a gloss coat, not a flat coat? After your decals are dry, you can use another coat of future to seal them in pre-weathering. Some people dislike the added gloss layer and head straight to the flat coat to seal them in, although certain washes behave differently when applied over a flat vs a gloss.

Did that help?  Confused [%-)]

Helped out a tonThumbs Up [tup], but do you have to thin the gloss or flat coat? Oh yeah one more thing can you do a wash right on top of the paint without a coat of Future or a flat coat first?Question [?]

"A good plan executed now is better than a perfect plan next week." - George S. Patton

  Photobucket 

  • Member since
    November 2006
  • From: Coastal Maine
Posted by dupes on Sunday, June 15, 2008 8:12 PM

Well, it depends on what gloss or flat coat you're using (great answer, huh? Big Smile [:D]). If you're talking about future, you can shoot it straight out of the squeeze bottle. Personally, when I use the Model Master Dullcoat (or whatever they call it) I put a few drops of thinner in there, but I'm not 100% sure it's necessary - just seems to help it mix a bit and lay down a bit smoother.

As for the wash right on top of the paint, you shouldn't have an issue putting an OIL wash down right over acrylics (or an acrylic wash over oils). If you're trying to do oils over enamels you MUST seal them in first with an acrylic (or I think a lacquer) coat first or you run the risk of your thinner in the wash eating into your paint. Shock [:O]

  • Member since
    December 2007
  • From: Bridgeview, Illinois
Posted by mg.mikael on Sunday, June 15, 2008 8:28 PM
Thanks dupes, that info helped me out a ton. Cool [8D]

"A good plan executed now is better than a perfect plan next week." - George S. Patton

  Photobucket 

  • Member since
    November 2006
  • From: Coastal Maine
Posted by dupes on Sunday, June 15, 2008 8:50 PM
No problemo. Big Smile [:D]
  • Member since
    December 2007
  • From: Bridgeview, Illinois
Posted by mg.mikael on Wednesday, June 18, 2008 5:42 PM

Here's pics of some work I've done on my SU-76M:
Front Hull pieces went together nicely but some sanding was needed.
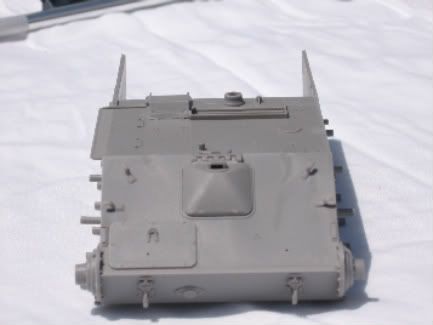
The suspension arms had MAJOR problems with fitting into the hull. So the hole for the suspension arms had to be enlarged.
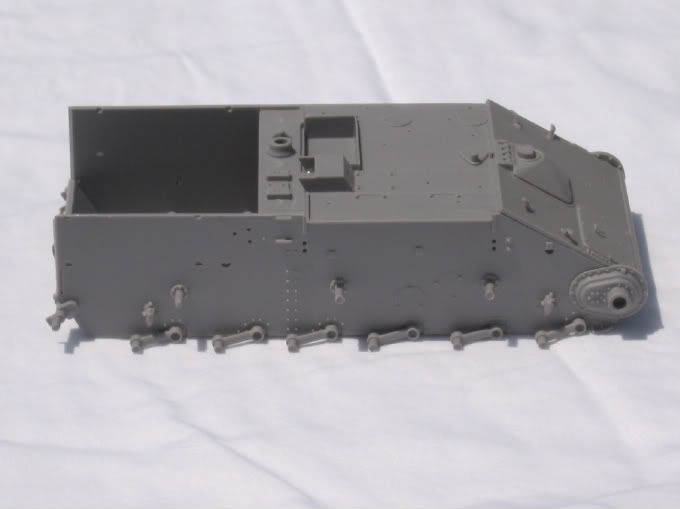
Upper hull panels were snug, but that wasn't something a little trimming & sanding couldn't fix. 

The gun still under construction, you probably could tell I did some drastic trimming and sanding to the top of it, because it dosen't fit into the outside armor covering. One of my many useful tools, along with a roadwheel I was testing some color on.

An example of some of the flash I have to deal with.

The level I was using to make sure the suspension was perfectly articulated.

The grill on the SU-76 and it's replacement the black mesh/screen. Or in other words what I'll be covering up the original grill with.

For those wondering the black screen/mesh is simply the stuff you use in screen doors to keep bugs out.

Finally the tracks, it took quite a while to cut each one out. And some were faulty, they were molded badly and they simply cracked, so those had to be glued back together.

All comments, suggestions, and questions welcome!Smile [:)]


"A good plan executed now is better than a perfect plan next week." - George S. Patton

  Photobucket 

  • Member since
    December 2007
  • From: Bridgeview, Illinois
Posted by mg.mikael on Friday, June 20, 2008 6:19 PM

My work is still continuing on this model. The fenders are finished and some details are done. Smile [:)]

Sigh [sigh]Some problems arose because I was missing a muffler/exhaust piece. I don't think I lost it to the carpet monster, but I couldn't find it after an exhaustive search. So I decided to make one out of wax. Made a mold of the piece needed in the Silly Putty, poured in the wax, let in sit for a few hours, then cut off all the extra wax. Took a few molds to finally get one almost perfect.Big Smile [:D]

"A good plan executed now is better than a perfect plan next week." - George S. Patton

  Photobucket 

JOIN OUR COMMUNITY!

Our community is FREE to join. To participate you must either login or register for an account.

SEARCH FORUMS
FREE NEWSLETTER
By signing up you may also receive reader surveys and occasional special offers. We do not sell, rent or trade our email lists. View our Privacy Policy.