SEARCH FINESCALE.COM

Enter keywords or a search phrase below:

The Forgotten War GB (6/25/08 - 2/28/09) - Deadline Extended Yet Again!

55800 views
681 replies
1 rating 2 rating 3 rating 4 rating 5 rating
  • Member since
    November 2006
  • From: Coastal Maine
Posted by dupes on Tuesday, February 10, 2009 8:47 AM
Bob - I just snagged that same kit off of evilbay over the weekend (dirt cheap!) along with some other stuff...glad to hear it's worth building! Looking forward to your progress!
  • Member since
    July 2004
  • From: Northern KY
Posted by mucker on Thursday, February 12, 2009 11:44 AM

Sounds like a nice score, Bob!

Jerry, I'm looking forward to your pics. I've been scared to apply a wash over Alclad. Did you seal it before the wash? I'd be curious to hear your technique.

  • Member since
    November 2003
  • From: Nashville, TN area
Posted by bobbaily on Thursday, February 12, 2009 1:13 PM
Thanks Mucker.  I'm happy with it-low cost and good detail.  There is a lot of flash to deal with, along with thick attachment points.  I've primed and air brushed the interior bits.  I also managed to break off part of the frame for the pilots seat while trying to cleanup some flash-time for some scratch building!  Normally I paint the interior bits on the spruce so this evening I hope to remove them from said spruce and do a lot of cleanup.  Will have to shoot some more interior green but that's that price you pay for an inexpensive kit.

Bob


  • Member since
    September 2003
  • From: N.E. Ohio
Posted by dragonfly on Friday, February 13, 2009 11:20 AM
 mucker wrote:

Sounds like a nice score, Bob!

Jerry, I'm looking forward to your pics. I've been scared to apply a wash over Alclad. Did you seal it before the wash? I'd be curious to hear your technique.

I know what you mean. Applying a wash over the polished Alclad shades wants to leave a slight stain but the regular shades come out clean. A clear seal coat diminishes the shine so I go right over the Alclad with a water based wash. An oil wash would destroy the Alclad and that would not be good.

Should finish the Sabre tonight.

Jerry

  • Member since
    September 2003
  • From: N.E. Ohio
Posted by dragonfly on Saturday, February 14, 2009 8:39 PM

After a rather bizzare experience with the decals I was able to finish the model without any more problems. This is the first Sabre I've built and would like to do another. Maybe something a little more colorfull in 32nd scale perhaps. Lotsa choices!!!

I chose the markings for "Boomer", a Mig killer flown by Captain Clyde A. Curtain of the 335th FIS Kimpo AB 1953.

Cheers.....thanks for the extension Charles

Jerry

  • Member since
    November 2003
  • From: Nashville, TN area
Posted by bobbaily on Sunday, February 15, 2009 6:30 AM
Jerry- Very nice build.  Great detail....great finish.  Very impressive. Bow [bow]

Bob


  • Member since
    July 2004
  • From: Northern KY
Posted by mucker on Tuesday, February 17, 2009 6:30 AM
Wow, Jerry...whatever decal issue you had, consider them solved. Very nice Sabre (one of my favorite birds). Have you shown this to Larry?

  • Member since
    September 2003
  • From: N.E. Ohio
Posted by dragonfly on Tuesday, February 17, 2009 9:10 AM

Yep, Larry gave me the "Stamp of Approval" last night at out monthly meeting. He had some interesting comments about the pilot of this jet.

The decals were extremely frustrating. Finally, with the aid of Mr.Mark Softer, Mr. Decal Squeegee, Mr. Wet Paper Towel, and Mr. Jack Daniels.....I was able to work it out.

Cheers....Jerry

  • Member since
    November 2006
  • From: Coastal Maine
Posted by dupes on Tuesday, February 17, 2009 10:04 AM

Wow. That is a hot build, Dragonfly! Evil [}:)]

Really sharp all around...who's decals did you end up going with?

Thumbs Up [tup]Thumbs Up [tup]

  • Member since
    September 2003
  • From: N.E. Ohio
Posted by dragonfly on Tuesday, February 17, 2009 10:11 AM

Thanks Dupes...I used an AeroMaster sheet printed by Microscale.

Jerry

  • Member since
    September 2007
  • From: galt, ca.
Posted by dirtball on Tuesday, February 17, 2009 1:27 PM
   Jerry, that is one of the finest looking Sabers I`ve ever seen! Thanks for sharing with us all. I hope to get back to mine soon. Had a bad back last week, so could do nothing. But yours is truely an insperation to me!.............Harv
"I once shot an elephant in my pajamas. How he got in my pajamas, I`ll never know!"
  • Member since
    November 2003
  • From: Nashville, TN area
Posted by bobbaily on Tuesday, February 17, 2009 7:16 PM

Hey all.  I'm making some progress on the Texan.....err...Mosquito.  Yep....the Texan's used as FAC's in Korea were called Mosquitos.  The Monogram/Revell kit is a fair value-good interior detail, fair fit.  There are some 'interesting' extra parts and extra holes that the instructions don't describe.  This would be a good kit for someone with time & skill...and I'm short on both at the moment.

Anyway, here's the progress pics

I'm a little ahead of my self imposed build schedule.  I hope to have the seams filled (really not bad for a $12.00 kit), primed & painted by the end of the weekend.  I am dreading masking the canopy though.....

Cheers

Bob


  • Member since
    September 2003
  • From: N.E. Ohio
Posted by dragonfly on Tuesday, February 17, 2009 8:16 PM

Wow, that really looks good Bob. I didn't realize the cockpit was so nicely detailed. Can't wait for more.

Jerry

  • Member since
    September 2007
  • From: galt, ca.
Posted by dirtball on Wednesday, February 18, 2009 1:56 AM
  Bob, comming along very nicely I agree about the pit! I HOPE to get back to my Saber sometime this week Lets see if life can stay out of the way alittle!..........Harv
"I once shot an elephant in my pajamas. How he got in my pajamas, I`ll never know!"
  • Member since
    November 2003
  • From: Nashville, TN area
Posted by bobbaily on Wednesday, February 18, 2009 7:10 AM

Thanks guys.  Again, this is a fun little kit-it should look like a Texan when I'm finished.  With a little research & spare parts, you could arm it with a machine gun pod & rockets for it's role in the Korean War.

Hav.....good luck on keeping life out of the way..tha's one battle I usually lose.

Bob


  • Member since
    November 2006
  • From: Coastal Maine
Posted by dupes on Wednesday, February 18, 2009 12:45 PM
Dang. That's really all kit parts? I'm more than pleasantly surprised! Can't wait for mine to show up...hopefully in the mail today! Approve [^]
  • Member since
    November 2003
  • From: Nashville, TN area
Posted by bobbaily on Wednesday, February 18, 2009 8:00 PM
Dupes-the only 'add-on' are the PE belts.  And surprisingly, the fit of the fuselage & wings are pretty good.

Bob


  • Member since
    July 2004
  • From: Northern KY
Posted by mucker on Friday, February 20, 2009 1:04 PM

Looking really good, Bob! I know the feeling of having a nice fitting cheap kit. It really adds to the fun.


  • Member since
    November 2003
  • From: Nashville, TN area
Posted by bobbaily on Friday, February 20, 2009 1:52 PM

Thanks Charles.  As far as progress, I missed last night & will probably not get much time tonight.  My goal is to fill some seams, sand & prime by the end of the weekend.  If I can get the canopy masked, then I'll really be happy. 

In anticipation of The Forgotten War, Pt.II, I picked up a 1/48th Tamiya F-84G off of Ebay for a fair price so I'll be ready......

Bob


  • Member since
    November 2006
  • From: Coastal Maine
Posted by dupes on Friday, February 20, 2009 3:41 PM
I did indeed get a hold of my Texan - it's nice! Need to find an excuse (and more TIME) to build it up. Wink [;)]
  • Member since
    July 2004
  • From: Northern KY
Posted by mucker on Friday, February 20, 2009 8:42 PM
the F-84G is a GREAT kit, Bob. It practically builds itself, which means you can spend more time on the painting and detaling.

  • Member since
    April 2005
Posted by Thunderbolt379 on Friday, February 20, 2009 11:43 PM

Hi guys,

With a week to go I can show you some paint!

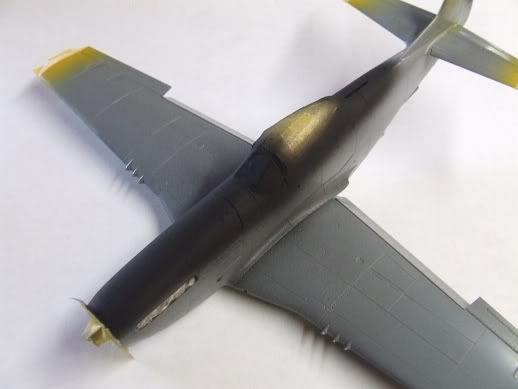
Here's the Mustang with the AG areas sprayed into Tamiya XF-1:

Photobucket" border="0" />

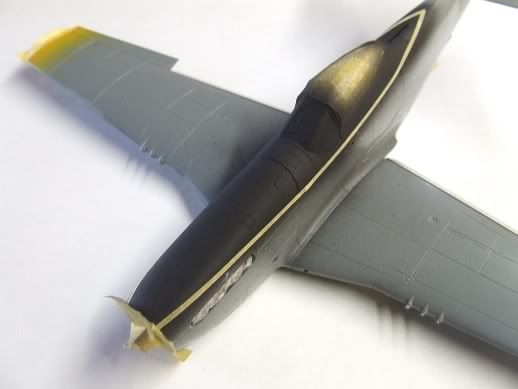
And with the areas outlined in thin strips of low-tack tape:

Photobucket" border="0" />

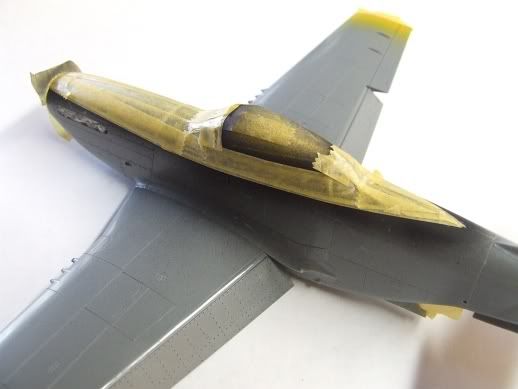
And finally with the black areas fully masked:

Photobucket" border="0" />

I went on and finished masking the wheelwells (always so fiddly!) and made sure every hole and such had its blob of Maskol. The rudder trim tab was also blown into black and masked, and the lights under the starboard wingtip were masked with the items from the Eduard set.

I opted for an emamel spray job, and agonised for a long time over the mix. I looked at my references over and over and it definitely seems the Mustangs were weather-worn. Dozens were in Japan awaiting scrapping when the war broke out, and were hurreidly returened to duty. 150 were recovered from ANG units, mothballed and shipped out to Korea aboard USS Boxer, and all had seen heavy duty since they were built, not more than six years earlier.

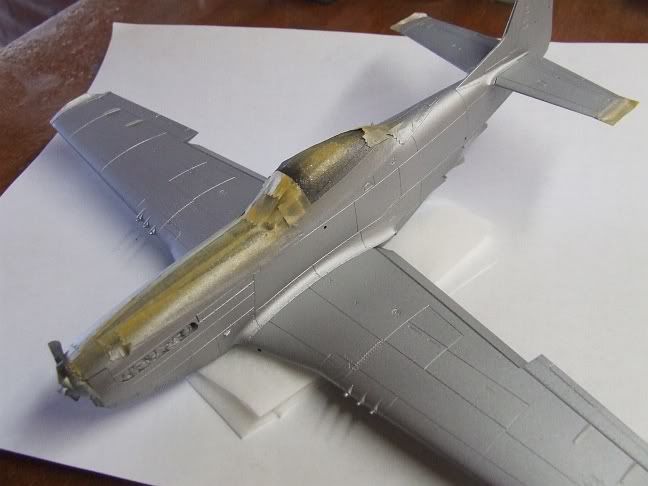
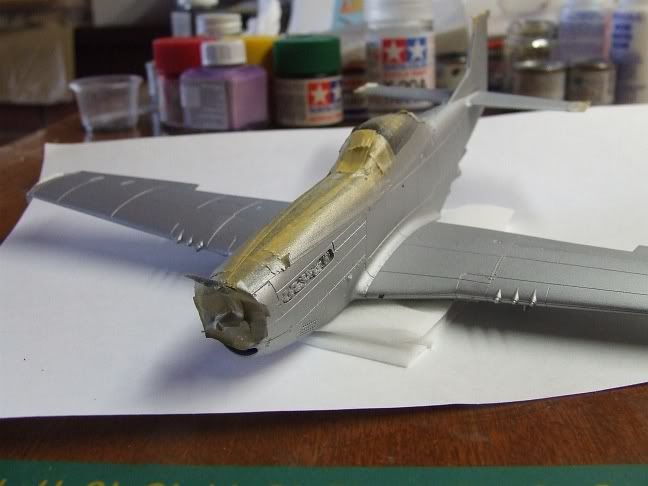
Maybe it's the filmstocks of the time, or the generally appalling weather conditions, or the lighting on the day, but those planes looked drab compared to their appearance in WWII. Even new F-80s were taking a beating at the hands of the weather. I knew I didn't want a bright, shiny finish, so I mixed Humbrol Silver Fox 11 with Humbrol Flat Aluminum 56 at a ratio of 7:3, then thinned by 50%. The paint went on readily enough, here's the result:

Photobucket" border="0" />

And:

Photobucket" border="0" />

Okay, she's only a ghost compared to Dragonfly's incredible Sabre (I'm green with envy for that result, man!!!), but what do you all think? Is she too weather-beaten? Is the finish too dull?

My plans are to apply the decals, then Promodeller panel wash, and finish with graphite for panel variation. The use of the Flat Aluminum both pulled back the shine and toughened the surface to I'm expecting it to withstand Post-a-note masking for the graphite treatment. I found to my disgust that even Tamiya tape will lift Humbrol or Testor Chrome Silver in its pure state, or at least de-surface it.

Comments and impressions most welcome,

Cheers, Mike/TB379

http://worldinminiature.blogspot.com/

  • Member since
    November 2006
  • From: Coastal Maine
Posted by dupes on Saturday, February 21, 2009 11:27 AM
Nice masking job there for sure!
  • Member since
    November 2003
  • From: Nashville, TN area
Posted by bobbaily on Saturday, February 21, 2009 11:56 AM
Looks good Mike.  I don't think you can go wrong either way-weathered or the fresh off the showroom floor look.

Bob


  • Member since
    September 2015
  • From: The Redwood Empire
Posted by Aaronw on Sunday, February 22, 2009 11:27 AM
 bobbaily wrote:

Mike-Your Mustang is looking good.  Can't wait to see it painted & decaled.

Mucker-I'm back in.  I picked up the 1/48 Revell AT-6/SNJ Texan kit today @ my LHS.  I can't believe the detail for $12.99.  I may have to add another one to the stash.  Looks like a quick build.....I hope.  Also I ordered the 'Texans over Korea Pt.1 ' decal sheet from Squadron, so hopefully they will be here in time.  After spending some time researching the Texan in Korea, it seems that the T-6 was called the 'Mosquito' and used as a Forward Air Command plane. 

Neat, I had no idea Texans were used in Korea, and really never thought about what they used for FAC, I just kind of assumed that technique was still in its infancy during Korea. Vietnam is the first war I knew of that seemed to make real use of FAC aircraft.


Dragonfly, great Sabre, it really was a good looking fighter, particularly when compared to how clunky many of its counterparts of the era were.

I'll be getting back to the H-19, I was out of town for a week and brought home one of the nastiest flus I've had in years. 3 days of sick leave used, 2 days off lost to bed and not enough energy to even look at a model, what a waste of time off. Dead [xx(] Propeller [8-]

  • Member since
    July 2004
  • From: Northern KY
Posted by mucker on Sunday, February 22, 2009 11:51 AM
Looking good so far, Mike. I think the key to the finsh is she comes out how you intend. It sounds like you've done your research and you want a dull finish to the NMF.  I can't argue with that (not that I'd want to anyways)! The conditions, especially in the harsh winters definately support the dull finish. Keep those pics coming.

  • Member since
    November 2003
  • From: Nashville, TN area
Posted by bobbaily on Monday, February 23, 2009 6:14 AM

I had a good weekend with the family, a bad time with my tax guy Sad [:(], and no time with the Texan.

Charles-do you mind if we continue to post progress after the 2/28 deadline?  I will get this one finished....at some point Big Smile [:D]

Bob


  • Member since
    July 2004
  • From: Northern KY
Posted by mucker on Monday, February 23, 2009 8:50 AM
 bobbaily wrote:

I had a good weekend with the family, a bad time with my tax guy Sad [:(], and no time with the Texan.

Charles-do you mind if we continue to post progress after the 2/28 deadline?  I will get this one finished....at some point Big Smile [:D]

Absolutely, Bob. I am looking forward to seeing this!


  • Member since
    April 2005
Posted by Thunderbolt379 on Tuesday, February 24, 2009 6:13 AM

Hi Mucker and all,

With your positive feedback on the paintjob I decided to forge ahead. I sprayed a contrasting metallic shade for the stainless steel (?) panel around the exhausts (acryclic, XF-16 darkedn with XF-1), it doesn't show up too well even though I darkened the shade three times, but you can see it in different lighting conditions. This looked so effective that I was tempted to do a contrasting panel job all over the plane, but there's no time for that kind of ambitious stuff at the moment. I'll go with graphite and take it real easy.

The masking is mostly away and the decals are going down nicely, there are seven major decals to go plus twenty-four more stencil items, then I'm onto touch-ups and panel wash. Here she is:

Photobucket" border="0" />

Photobucket" border="0" />

The only difficult decal so far has been the top wing insignia, it's taken lots of MicroSol to get it to conform over the aileron jack, and it'll need to be touched up also. I'll see how the tail band goes on, I'm guessing that'll be a fun experience too...

Cheers,

Mike/TB379

http://worldinminiature.blogspot.com/

  • Member since
    November 2003
  • From: Nashville, TN area
Posted by bobbaily on Tuesday, February 24, 2009 7:54 AM
Looks great Mike.  Nice job on the paint & decals.  Regarding the tailband, mine was a bit short....or maybe I misplaced it...Banged Head [banghead]..so yes, caution is in order.

Bob


JOIN OUR COMMUNITY!

Our community is FREE to join. To participate you must either login or register for an account.

SEARCH FORUMS
FREE NEWSLETTER
By signing up you may also receive reader surveys and occasional special offers. We do not sell, rent or trade our email lists. View our Privacy Policy.