SEARCH FINESCALE.COM

Enter keywords or a search phrase below:

#100 Tristar Pz 38(t) B COMPLETE PICS P.10 10-24-09

59016 views
221 replies
1 rating 2 rating 3 rating 4 rating 5 rating
  • Member since
    April 2005
  • From: Piscataway, NJ!
Posted by wing_nut on Sunday, October 11, 2009 6:20 AM
WOW Bill, that really is something special.  This will still be a shining star when you get to 200.

Marc  

  • Member since
    November 2005
Posted by Anonymous on Sunday, October 11, 2009 9:04 AM
Sweet...cutting up a tank to show the interior effectively yet maintaining the original integrity of the model is more of an exercise than is realized (especially a small tank), but you nailed it...very nice colors in the interior...nice touch in adding the red to the face of the cuts...this one is exceeding expectations in my book. Thumbs Up [tup]Thumbs Up [tup] 
  • Member since
    July 2004
  • From: Texas
Posted by wbill76 on Sunday, October 11, 2009 11:21 AM

Nate, Marc, thanks for the comments, much appreciated!

 Mansteins revenge wrote:
Sweet...cutting up a tank to show the interior effectively yet maintaining the original integrity of the model is more of an exercise than is realized (especially a small tank), but you nailed it...very nice colors in the interior...nice touch in adding the red to the face of the cuts...this one is exceeding expectations in my book. Thumbs Up [tup]Thumbs Up [tup] 

Manny, I literally spent hours and hours agonizing over how best to do this. What made it possible was the design that Tristar chose for the roof plate with the turret ring. It was molded thick enough to tolerate the stress of the cutting/removal and also had enough strength left over when those parts were removed to retain it's shape and keep the overall hull integrity intact. The turret cut-outs were actually the more difficult to manage since the plates were curved and thin, had to be very careful not to snap them in two when working with the razor saw. I also had to think through the use of the red but Edmund's suggestion and flipping through different reference books that use that same convention on color plate cut-aways clinched it for me. Thanks for the comments and glad to hear it's exceeding expectations! Wink [;)]

  • Member since
    July 2004
  • From: Texas
Posted by wbill76 on Sunday, October 11, 2009 3:26 PM

The weekend was good for spending time at the bench and I spent a lot of time on the detail side of things to wrap up some loose ends. The first order of business involved detailing and installing the crew hatches for both the hull and turret. The leather pads were base coated with Italian Dark Brown then dry brushed with a tan/yellow mix of "wood" color that I also use for tool handles. I also dry brushed some enamel Gunmetal and then dry brushed some of the Italian Dark Brown to tone down and blend in the previous efforts into a unified look. Before the front hatch could be installed, I needed to install the rubber base of the antenna mount. This was drilled out with a #72 finger drill to accept a brass antenna later on and then painted with Gunmetal and glued into position. The two hatch halves were then glued together and carefully positioned so that they were slightly bent/angled with one edge resting on the antenna base and then glued into position on their hinge points.

I also added the long pry bar for the left fender and detailed the leather straps with Italian Dark Brown and Non-buffing Metalizer for their buckles. The straps were then carefully bent to shape and the pry bar glued into position in the clamps to avoid it shifting position. I also dry brushed Steel along the rims of the road wheels to simulate their bare metal wear from contact with the track guide horns and then installed the rubber rims to the road wheels and return rollers on both sides.

Next up were the right side fender details. I detailed the jack straps the same as for the pry bar on the other side. The metal portions of the tools were base coated with Non-buffing Metalizer Gunmetal and lightly dry brushed with Steel to create their metallic finish. The wood handle on the axe and the jack block were base coated with my personal mix of "wood" color and then given a light wash of Leather. Once the wash dried, I lightly dry brushed more of the "wood" color to introduce some variation and then also applied some Burnt Umber artist pastel to wear/darken the overall appearance just a bit. The Bakelite handles on the wire cutters were painted with Italian Dark Brown and the rubber end caps with Gunmetal. The two spare track links were supplied courtesy of the MK workable track set since they already had the open holes for the missing pins front and back. The links were base coated with Non-Buffing Metalizer Gunmetal, dry brushed with a touch of Steel, then dry brushed with Rust and Burnt Umber to complete their look. The two small PE retaining straps were painted separately and carefully installed with regular glue to insure they were positioned correctly.

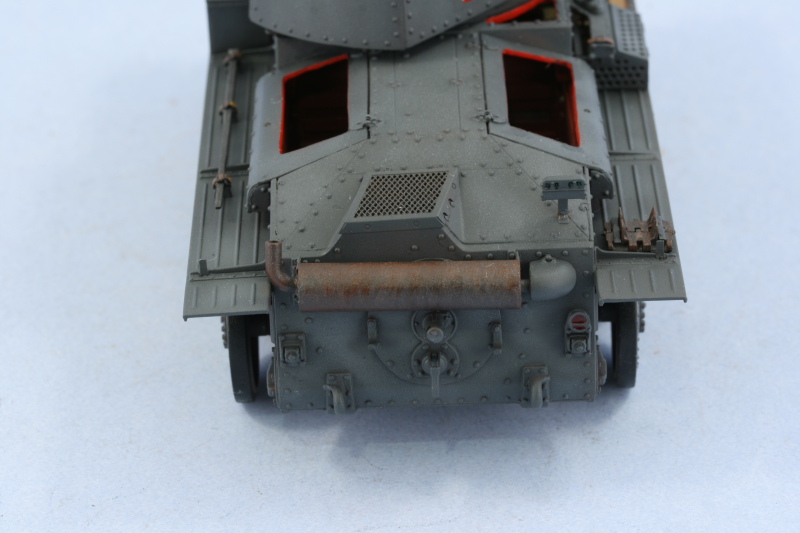
The rear hull also received some attention, I detailed the lenses in the Notek light with Tamiya Clear Green and those in the brake/tail light with Tamiya Clear Red.
I test fit the MK tracks along with the sprockets and idlers and needed to add another link in order to get the desired sag vs. the idler position. This brought the total # of links per track run to 93. In preparation for mounting the sprockets and idlers, both were given some bare metal wear on their teeth/rims/contact points by dry brushing Steel followed by an application of black artist pastels to tone down and blend them in with the painted surfaces.

The tracks themselves were painted next. I applied a primer coat of Flat Black by airbrush to protect the pins and joints from direct exposure to the lacquer-based Non-Buffing Metalizer Gunmetal base coat. This was also applied by air brush and dries very quickly. The tracks were then dry brushed with Steel followed by an overall wash of Burnt Umber.

The idlers were glued into the desired position and then the tracks and sprockets added. The tracks aren't yet glued down to the road wheels, that will come after the pigment weathering is applied to allow for a little flexibility.

That was the last remaining construction step so the entire vehicle received a sealing coat of Future applied by airbrush. This was allowed to dry overnight and the decals applied using Walther's Solvaset to insure they snugged down tight to the surfaces. A 2nd coat of Future was applied to seal in the decals to round things out. Because of the cutouts on the turret, only the rear received a vehicle number but I was still able to apply the 7th Pz Div markings and panzer forces rhomboid markings to the turret sides with some minor adjustments.

I head out on Tuesday for some vacation so won't get back to this one to complete the next steps for a little while but it's on track to be done before the end of the month, never fear! Wink [;)]

  • Member since
    August 2008
  • From: S.W. Missouri
Posted by Pvt Mutt on Sunday, October 11, 2009 5:19 PM

Vacation???? There you go just thinking about yourself, that alright, forget about us and be that way. You know you won't relax for thinking about how you're going to finish up.

Relax and have fun the best you can and we'll be expecting great things when you get back.Big Smile [:D]

I'm terrible huh                                                                                                                        Tony the Mutt

Shoot Low Boys They're Ridin Ponys

  • Member since
    July 2004
  • From: Texas
Posted by wbill76 on Sunday, October 11, 2009 6:20 PM
Thanks Tony! Yes I know, terribly selfish to think I could take a vacation and leave the forum behind but it won't be for too long I promise! Laugh [(-D]
  • Member since
    February 2009
  • From: mass,USA
Posted by scratchmod on Sunday, October 11, 2009 6:31 PM

I think this should get finished and then a well deserved vacation Wink [;)], you can't leave us hanging like that Bill. Just kidding my friend,this build is worth waiting for, we all need a break some times. Unfortunately I have tooo little time for the hobby.

Bill this T38 is looking better each time you post updates. a definate candidate for a display case, or maybe a Museum.

I be watching for the next post.


Rob

  • Member since
    January 2007
Posted by the doog on Sunday, October 11, 2009 7:08 PM

Again, WOW, Bill!

Just one question--what magazine cover will this one be on? Wink [;)]

  • Member since
    August 2006
  • From: Cygnus X-1
Posted by ogrejohn on Sunday, October 11, 2009 7:21 PM
Absolutely beautiful work Bill!
  • Member since
    October 2007
  • From: N.H.
Posted by panzerguy on Sunday, October 11, 2009 9:30 PM
 

    Well Bill  #100 has certainly surpassed all expectations. Beautiful work!

    Enjoy your vacation.

"Happiness is a belt fed weapon"

  • Member since
    July 2004
  • From: Texas
Posted by wbill76 on Sunday, October 11, 2009 9:56 PM

Thanks Steve and John!

 scratchmod wrote:
I think this should get finished and then a well deserved vacation Wink [;)], you can't leave us hanging like that Bill. Just kidding my friend,this build is worth waiting for, we all need a break some times. Unfortunately I have tooo little time for the hobby.

Bill this T38 is looking better each time you post updates. a definate candidate for a display case, or maybe a Museum. I be watching for the next post.

Thanks Rob! I haven't been able to get away from work and take a real vacation for over two years now, so I'm definitely looking forward to this one! In honor of the 100th build, I'm going to DisneyWorld! (Of course it would be a little more fitting if I'd actually completed it first but it's close enough, right? Big Smile [:D])

 the doog wrote:
Again, WOW, Bill!

Just one question--what magazine cover will this one be on? Wink [;)]

Karl, thanks for the kind words as always and I'm humbled by the thought that this one would be cover-worthy. High praise indeed and it's not even finished yet...so no pressure, right? Laugh [(-D]

  • Member since
    July 2006
  • From: New Jersey
Posted by redleg12 on Sunday, October 11, 2009 11:26 PM

VACATION......Oh..alright

Nice work as usual...We will stay tuned until you return!!

Rounds Complete!!

"The Moral High Ground....A Great Place to Emplace Artillery."

  • Member since
    November 2006
  • From: Coastal Maine
Posted by dupes on Monday, October 12, 2009 10:55 AM
 wbill76 wrote:

Wow...bummed about the wait! Can't wait to see another super build "in the bank". Approve [^]

  • Member since
    July 2004
  • From: Texas
Posted by wbill76 on Monday, October 12, 2009 11:24 AM
Thanks Mike and Marc, appreciate the comments. Just be sure to keep the lights on for me when I get back. Wink [;)]
  • Member since
    April 2009
  • From: Carmel, IN
Posted by deafpanzer on Monday, October 12, 2009 12:28 PM
Bill, are you supposed to be on vacation by now?  Go go go... don't dare to think of us... have a great vacation!  We will be here waiting for your return. 

Andy

  • Member since
    July 2004
  • From: Texas
Posted by wbill76 on Monday, October 12, 2009 1:47 PM

 deafpanzer wrote:
Bill, are you supposed to be on vacation by now?  Go go go... don't dare to think of us... have a great vacation!  We will be here waiting for your return. 

Andy,

Today is the "run around and pack and last minute shopping" day before we leave tomorrow. Big Smile [:D] That means I still have a chance to poke my head in before abandoning all cyber-connectivity at least for a while!

  • Member since
    December 2005
  • From: Goteborg / Sverige
Posted by Svenne Duva on Tuesday, October 13, 2009 1:30 PM

Enjoy your vacation Bill, I have spent the last 3 hours looking at this #100 build and can only say, as ususal:
Thank you for sharing!
Every step in your log is educationel and inspirational, thanks.

Get payed ;)

Svenne

sic transit gloria mundi

  • Member since
    October 2007
  • From: N.H.
Posted by panzerguy on Tuesday, October 13, 2009 9:22 PM
 

   I just can't get over how great this looks Bill. This falls under the shock and awe factor. Shocked that you were going to cut it up and awed at the results!

   By the way how long is a while?Wink [;)]

"Happiness is a belt fed weapon"

  • Member since
    February 2007
  • From: Calgary, Alberta, Canada
Posted by T-rex on Tuesday, October 13, 2009 11:26 PM
Another great build bill, keep up the good work.

Working on: Trumpeter SU-152 (1/35) Trumpeter E-10 (1/35) Heller Somua (1/35)

"The world is your enemy, prince of a thousand enemy. And when they'll find you, they will kill you... but they will have to catch you first ''

  • Member since
    December 2005
  • From: Syracuse, NY
Posted by lexesbenz on Wednesday, October 14, 2009 1:31 AM
Looks great Bill, another spectacular kit! love the cut aways. Bill do you happen to have a set of tiger 1 early tracks by modelkasten? I was just wondering if there were any ejector marks on them?
The flying hamster of doom rains coconuts on your pitiful city!!!!
  • Member since
    July 2003
  • From: On my kitchen counter top somewhere in central North Carolina.
Posted by disastermaster on Wednesday, October 14, 2009 8:17 PM

VERY SHARP!

http://www.innovationbyinstinct.com/services/hosting/clients/accountyp/status/DisasterMaster/%23t1-4.jpg

 https://i.imgur.com/LjRRaV1.png


  • Member since
    March 2003
  • From: Rain USA, Vancouver WA
Posted by tigerman on Wednesday, October 14, 2009 10:13 PM
This is fantastic idea for your 100th Bill. Very sharp so far.

   http://i7.photobucket.com/albums/y269/wing_nut_5o/PANZERJAGERGB.jpg

 Eric 

  • Member since
    April 2003
  • From: 41 Degrees 52.4 minutes North; 72 Degrees 7.3 minutes West
Posted by bbrowniii on Thursday, October 15, 2009 6:33 PM

Oh man, oh man, oh man, oh man, oh man, oh man, oh man....

This thing is CRAZY good!

'All that is necessary for the triumph of evil is for good men to do nothing' - Edmund Burke (1770 ??)


  • Member since
    November 2006
  • From: Coastal Maine
Posted by dupes on Saturday, October 17, 2009 10:49 AM

Bill - this vacation thing is pretty lame. I'm submitting a formal request to put the kaibosh on those from now on anytime you're in the middle of a build.

Thanks for your support on this. Laugh [(-D]

  • Member since
    August 2007
  • From: The Plains of Kansas
Posted by doc-hm3 on Sunday, October 18, 2009 12:32 PM
 Bill, she is looking like she should be on display in an armor museum. Your build is coming along great!

All gave some and some gave all.

  • Member since
    April 2003
  • From: 41 Degrees 52.4 minutes North; 72 Degrees 7.3 minutes West
Posted by bbrowniii on Monday, October 19, 2009 12:27 PM
 dupes wrote:

Bill - this vacation thing is pretty lame. I'm submitting a formal request to put the kaibosh on those from now on anytime you're in the middle of a build.

Thanks for your support on this. Laugh [(-D]

Sign - Ditto [#ditto]

Blush [:I]

'All that is necessary for the triumph of evil is for good men to do nothing' - Edmund Burke (1770 ??)


  • Member since
    July 2004
  • From: Texas
Posted by wbill76 on Wednesday, October 21, 2009 10:05 AM

Thanks guys for all the support and interest in this one, hope I didn't leave you hanging too long! I'll be back home this afternoon and after I get unpacked I expect to get back to work on this one since I have the rest of the week off...who knows, it may even cross the finish line. Wink [;)]

 lexesbenz wrote:
Looks great Bill, another spectacular kit! love the cut aways. Bill do you happen to have a set of tiger 1 early tracks by modelkasten? I was just wondering if there were any ejector marks on them?

LB,

I don't think I have a set of Early tracks if by "Early" you mean the type that are handed? I do have a set of Tiger tracks, MK-2 I believe, and can take a look at them when I get home and let you know. MK tracks are usually pretty good about not having ejector marks, are you comparing them to say DML Magic tracks or did you get a set of MKs and they had ejector marks present?

  • Member since
    April 2009
  • From: Carmel, IN
Posted by deafpanzer on Wednesday, October 21, 2009 3:44 PM

Bill, good to have you back!  Just in time to stop me from jumping off the building... a week of waiting was too much for me to handle! Kidding... hope you had a GREAT vacation!

Andy

  • Member since
    July 2004
  • From: Texas
Posted by wbill76 on Thursday, October 22, 2009 5:16 PM

Now that I've made it safely back from vacation and had a chance to rest some yesterday, I got back to the workbench today and invested some time in the weathering process.

First order of business was the application of an overall wash of enamel Raw Sienna. I used a round sable brush to apply this liberally to all the different surfaces and let it dry.

Working on that foundation, I applied some dot filters using Flat Sea Blue, Flat White, and Panzer Dunkelgelb to further vary the overall finish. A small square tip brush lightly dampened with thinner was used to blend the dots together and create the desired effect.

I'm going to let this sit overnight and then continue work in the morning. At a minimum the Raw Sienna is going to be reapplied as a pin wash to all the rivets and raised detail and I may make some other adjustments as well depending. It felt good to be back at the bench after the break for sure.

  • Member since
    December 2008
  • From: Northern Va
Posted by psstoff995's lbro on Thursday, October 22, 2009 5:26 PM

Looking great Bill! Shapping up very well, love that dot weathering. Thumbs Up [tup]

Andy: Is that your scale in the previous pic? LOL Laugh [(-D]

-Will young modeler Test fit master
JOIN OUR COMMUNITY!

Our community is FREE to join. To participate you must either login or register for an account.

SEARCH FORUMS
FREE NEWSLETTER
By signing up you may also receive reader surveys and occasional special offers. We do not sell, rent or trade our email lists. View our Privacy Policy.