SEARCH FINESCALE.COM

Enter keywords or a search phrase below:

12.8 cm Waffentrager--FINISHED PICS

30811 views
134 replies
1 rating 2 rating 3 rating 4 rating 5 rating
  • Member since
    July 2004
  • From: Texas
Posted by wbill76 on Monday, January 23, 2012 7:13 PM

Off to a good start Karl...but I'm confused by what you are referring to as the "sheer number of shells" that are provided. Are you referring to the dark brown sprues that are provided separate from the track links? If so, those aren' t shells...they are the track pins needed to create workable tracks for your Waffentrager, two per indy link in the bag at the top. The pins are on the end of handles (what look like shells) and are designed that way on purpose to make it easier to assemble the tracks. It's the same way that Model Kasten does theirs.

  • Member since
    August 2008
  • From: S.W. Missouri
Posted by Pvt Mutt on Monday, January 23, 2012 7:58 PM

Bill we send them to school and buy their books and what do they do???

Eat the covers off the books.          KIDSWink

Tony lee

Shoot Low Boys They're Ridin Ponys

  • Member since
    January 2007
Posted by the doog on Monday, January 23, 2012 8:57 PM

wbill76

Off to a good start Karl...but I'm confused by what you are referring to as the "sheer number of shells" that are provided. Are you referring to the dark brown sprues that are provided separate from the track links? If so, those aren' t shells...they are the track pins needed to create workable tracks for your Waffentrager, two per indy link in the bag at the top. The pins are on the end of handles (what look like shells) and are designed that way on purpose to make it easier to assemble the tracks. It's the same way that Model Kasten does theirs.

Ha ha ha ha!! Big laugh, Bill--boy do I feel stupid! Clown

Just goes to show how much experience I've had with Model Kasten tracks! I remember using them on that Patton, but I swear, I though they were like, 10mm shells or something!

OK....deep breath, reload. ha ha. Thanks for pointing that out! EmbarrassedYes

  • Member since
    January 2007
Posted by the doog on Monday, January 23, 2012 8:58 PM

Pvt Mutt

Bill we send them to school and buy their books and what do they do???

Eat the covers off the books.          KIDSWink

Tony lee

Embarrassed..........Big Smile

  • Member since
    March 2003
  • From: Rain USA, Vancouver WA
Posted by tigerman on Monday, January 23, 2012 9:01 PM

Gotta say i got a chuckle out of that Fubar Karl.

   http://i7.photobucket.com/albums/y269/wing_nut_5o/PANZERJAGERGB.jpg

 Eric 

  • Member since
    November 2005
Posted by Anonymous on Tuesday, January 24, 2012 3:40 PM

DOH!  Shells?---are you kidding me?  Tell me that you were just yankin' our chains, Karl...

Anyhow--this mutha is gonna be cool...I will be following this thread like a Russian sniper follows a Field Marshal's head in his crosshairs...

  • Member since
    January 2007
Posted by the doog on Tuesday, January 24, 2012 3:53 PM

Manstein's revenge

DOH!  Shells?---are you kidding me?  Tell me that you were just yankin' our chains, Karl...

Anyhow--this mutha is gonna be cool...I will be following this thread like a Russian sniper follows a Field Marshal's head in his crosshairs...

lol...spoken like a true MO-JO.....Wink

  • Member since
    July 2004
  • From: Texas
Posted by wbill76 on Tuesday, January 24, 2012 5:44 PM

No worries Karl...I can see how such a mistake could happen. Trumpeter has started to provide workable tracks as a regular feature in their latest releases so it's a fairly recent phenomenon. Wink

  • Member since
    July 2003
  • From: On my kitchen counter top somewhere in North Carolina.
Posted by disastermaster on Tuesday, January 24, 2012 6:06 PM

the doog


Ha ha ha ha!! Big laugh, Bill--boy do I feel stupid! Clown


Just goes to show how much experience I've had with Model Kasten tracks! I remember using them on that Patton, but I swear, I though they were like, 10mm shells or something!

OK....deep breath, reload. ha ha. Thanks for pointing that out! EmbarrassedYes

                        http://t2.gstatic.com/images?q=tbn:ANd9GcQd_UdDGauiqZBI-3ZNHsKGlQHjFTkUR9cLC_jaGpap_9YrHPB54w


                                   http://www.smileyvault.com/albums/forum/smileyvault-giggle.gif


Sherman-Jumbo-1945

"I was so much older then, I'm younger than that now"


  • Member since
    January 2007
Posted by the doog on Thursday, January 26, 2012 8:57 PM

Update time! A couple of warnings and call-outs here to be posted;

The first thing NOT to do is to confuse the parts called out in Part 8. These copper ducts are called out as "0.5" and "05.5".

Now, I don't have any background in engineering, so I mistook that as meaning something about their length...

Well of course, THAT was stupid--it's all about their DIAMETER! So after ruining parts B14 and  B15 by getting 'em stuck fast in the wrong sized tubes, I had to wind up scratchbuilding two parts. Luckily there was enough of each left to copy them fairly exactly.

Here's the finished piece--the two copper tubes fit inside each other. I have already primed them with some Tamiya gray primer. The piece I had to scratchbuild is on the near end.

PE parts A6 and A7 are glued back-to-back in the slot in piece B28 in part 9. You can see some knockout marks to be filled in the gun truncheon side.

Speaking of the PE parts, check this out--this is cool. Trumpeter encloses the PE frames in an adhesive sleeve! So you can cut the piece out and not have it spring out into space. VERY cool idea!

So here's the hull so far, finished. I decided to cover up the seats--darn, on second thought, I should've taken them out to use as spares before sealing up the hull! You just couldn't really see them and there wasn't much detail in the driver's compartment to be seen.


Well, here's my pathetic attempt to form the gun muzzle -- it's a really thick piece of PE, and I even tried annealing it in flame for a minute and then tried forming it around a wooden dowel, but the problem is that the numerous holes in the piece make that section of the piece much more flexible than the non-holed pieces that lays at 6:00 on the part. ( It looks just as uneven on the opposite side...Black Eye) So it was impossible (for me) to bend it evenly, though I gave it hell....I'll just have to use the plastic part and drill out each hole...

Anyone have any ideas on how I could have accomplished this in some presentable fashion?

That's it for now, boys! I'll be working on the gun through the weekend, and should have it ready for paint by...Sunday? Have a great Friday night, guys, and I"ll catch you soon!


  • Member since
    July 2003
  • From: On my kitchen counter top somewhere in North Carolina.
Posted by disastermaster on Thursday, January 26, 2012 10:00 PM

I ain't worried.

I know you'll work that muzzle out to look just great......http://t0.gstatic.com/images?q=tbn:ANd9GcRylZuOoyaOHU52-G_8W6Zw4Kp3-OFZQXWTBig0OTbODAgJmF3SktJizA

                        http://i20.photobucket.com/albums/b232/gluetank/Animated/th_1-Animated-Disastermaster.gif?t=1296616998

Sherman-Jumbo-1945

"I was so much older then, I'm younger than that now"


  • Member since
    November 2005
Posted by Anonymous on Friday, January 27, 2012 7:20 AM

Looking good...but that really bums me about the muzzle brake--especially since in my eye it is a major focal point.   Wonder if Aber offers a brass replacement option???

  • Member since
    January 2007
Posted by the doog on Friday, January 27, 2012 7:45 AM

Manstein's revenge

Looking good...but that really bums me about the muzzle brake--especially since in my eye it is a major focal point.   Wonder if Aber offers a brass replacement option???

Manny, no worries here--you just know that I"ll make that beautiful styrene piece look like it weighs 500lbs!

Have faith, M0J0-L0RD; the Master of Disaster believeth! Bow Down And that's enough for me!

  • Member since
    April 2008
  • From: Kristiansund, Norway
Posted by Huxy on Friday, January 27, 2012 2:21 PM

I guess this will look awesome..


As long as you make them tracks awesome. Which you do. Always.


Ø5.5, eh? That's not 05.5! Smile Burger


-Huxy

"Every War Starts And Ends With An Invasion".

  • Member since
    November 2005
Posted by Anonymous on Friday, January 27, 2012 2:33 PM

the doog

 Manstein's revenge:

Looking good...but that really bums me about the muzzle brake--especially since in my eye it is a major focal point.   Wonder if Aber offers a brass replacement option???


Manny, no worries here--you just know that I"ll make that beautiful styrene piece look like it weighs 500lbs!

Have faith, ***-L0RD; the Master of Disaster believeth! Bow Down And that's enough for me!

I have faith...I just don't want that muzzle to put a brake on things...


  • Member since
    July 2004
  • From: Texas
Posted by wbill76 on Friday, January 27, 2012 5:33 PM

Karl,

Check out www.jbmodels.eu I believe they offer the 12.8cm barrel complete with brass brake that will do this baby justice for a decent price. He ships fast and cheap even being based out of Austria and takes Paypal. Wink

Yep...the RB version: http://www.jbmodel.eu/product_info.php/cPath/22/products_id/2657 at 8 euros, that's a great deal IMHO.

  • Member since
    January 2007
Posted by the doog on Friday, January 27, 2012 5:59 PM

wbill76

Karl,

Check out www.jbmodels.eu I believe they offer the 12.8cm barrel complete with brass brake that will do this baby justice for a decent price. He ships fast and cheap even being based out of Austria and takes Paypal. Wink

Yep...the RB version: http://www.jbmodel.eu/product_info.php/cPath/22/products_id/2657 at 8 euros, that's a great deal IMHO.

Bill,

Thanks so much for the line on that barrel, but I have managed to "rise above"!  I"m proud to say that I've managed to improve upon my own deficient skills and learned something new!

See the following post!


  • Member since
    January 2007
Posted by the doog on Friday, January 27, 2012 6:15 PM

Hallelujah!

Well, I have actually managed to learn something new, and saved my PE muzzle brake!

So, in the last post, I had had a hell of a time bending that cylindrical muzzle brake, and had rather deformed it. I thought I would have been able to drill out the plastic substitute, but to my disappointment, the dimples which populated the surface in place of the actual hole were too shallow to allow my microdrill to track them accurately, and after drilling a few dozen of them I was less-than-satisfied with the results. Hmmm. NOW what to do? Both the PE and the plastic parts looked like crap, I"m here to testify!

Well, I put on my Big-boy pants and took another look at that PE piece. Hmmm, it wasn't TOO badly out-of-round?  The problem had been that the perforated surface in 80% of the piece had a lower tensile strength that the un-perforated ribs that sat opposite each other, and these "ribs" were hard to bend to the same degree as the perforations, leading to an out-of-round abomination. Well, I got back at it, and got the idea to use the plastic insert piece to help form to cylinder.

I used a flat pliers that I picked up at AC Moore's to help me. I finally got it round, and then had to face up to how to join the ends? Hmm...it didn't look like super-glue would hold it? So I trudged down to the hardware store and picked up some soldering tools, and took a crack at it. Holy styrene! I actually got it to take! I even managed to solder the end cap on! WAHOOOO!! I was thrilled!

I then used the pliers again to refine the shape and used a file to further correct and perfect the piece...

After some Tamiya Gray Primer, I think it looks killer!

That's it for tonight--I"l have more updates by Sunday! Big Smile


  • Member since
    November 2005
Posted by Anonymous on Friday, January 27, 2012 6:29 PM

WOW...what a save, bro!!!  The truth is in the primed piece...oustanding bit 'o fine-scale modeling here...

  • Member since
    August 2008
  • From: S.W. Missouri
Posted by Pvt Mutt on Friday, January 27, 2012 7:17 PM

Hey Bill the Doog found a book with the cover still on it.Wink

Good job Karl

Tony lee

Shoot Low Boys They're Ridin Ponys

  • Member since
    July 2003
  • From: On my kitchen counter top somewhere in North Carolina.
Posted by disastermaster on Friday, January 27, 2012 9:08 PM

disastermaster

I ain't worried.

I know you'll work that muzzle out to look just great......http://t0.gstatic.com/images?q=tbn:ANd9GcRylZuOoyaOHU52-G_8W6Zw4Kp3-OFZQXWTBig0OTbODAgJmF3SktJizA

                        http://i20.photobucket.com/albums/b232/gluetank/Animated/th_1-Animated-Disastermaster.gif?t=1296616998

http://i752.photobucket.com/albums/xx170/mqnina/emoticons/11.gifWas there ever any doubt?


Sherman-Jumbo-1945

"I was so much older then, I'm younger than that now"


  • Member since
    July 2004
  • From: Texas
Posted by wbill76 on Saturday, January 28, 2012 11:08 AM

Very nice on the save Karl. Soldering does wonders for things like this and using the styrene piece as a form makes sense. Glad you were able to work it out...the primed piece looks a beaut! Wink

  • Member since
    March 2003
  • From: Rain USA, Vancouver WA
Posted by tigerman on Saturday, January 28, 2012 2:05 PM

Nice save. Yes

   http://i7.photobucket.com/albums/y269/wing_nut_5o/PANZERJAGERGB.jpg

 Eric 

  • Member since
    April 2003
  • From: 41 Degrees 52.4 minutes North; 72 Degrees 7.3 minutes West
Posted by bbrowniii on Saturday, January 28, 2012 5:06 PM

NIce save, Karl.

I'll enjoy watching this one come together.

By the way, is it me or is something wrong with your second update - all the images are gone (or at least I can't see them. I get the "This image has been deleted or moved" message from Photobucket).

'All that is necessary for the triumph of evil is for good men to do nothing' - Edmund Burke (1770 ??)


  • Member since
    January 2007
Posted by the doog on Saturday, January 28, 2012 5:47 PM

Thanks, guys--I have to admit a feeling of being "well chuffed" at this lucky rescue! Thanks to all for the words of support! Big Smile

Boyd--thanks for that callout about my second post--I just remember that I DID move the photos in my Photobucket account. I loaded them into the wrong album. I'll have to go and repair that now. Sad Thanks again!


  • Member since
    September 2009
  • From: Rugby, England
Posted by Hinksy on Saturday, January 28, 2012 6:55 PM

the doog

Thanks, guys--I have to admit a feeling of being "well chuffed" at this lucky rescue! Thanks to all for the words of support! Big Smile 

You should be well-chuffed too Karl. I learnt soldering on electronic PCB's at college whilst getting my engineering qualifications and I still struggle with it sometimes - now it's primed that looks SUPERB Yes

I'll be really interested to see how this build turns out.

Nice save - keep it up!

Ben Yes

On the Bench - Dragon Pz. IV Ausf. G (L.A.H.) Yes

Your image is loading...


  • Member since
    March 2003
  • From: El Dorado Hills, CA
Posted by IBuild148 on Saturday, January 28, 2012 9:45 PM

Nice 

IBuildOne48

Teach modeling to youth!

Scalefinishes.com

http://i712.photobucket.com/albums/ww122/randysmodels/NMF%20Group%20build%20II/Group%20Badge/NMFIIGBbadgesmall.jpg


  • Member since
    May 2005
  • From: Dublin Rep Of Ireland
Posted by terry35 on Sunday, January 29, 2012 4:41 PM

Hi, Karl great to see you back home in armour. I love the subject, I bought two of the 105mm when it came out. I did not go for this one as I have the gun as a separate kit. 

Great save on the pepper pot muzzle brake, I only examined the gun parts in the kit box and did not realise that the plastic pepper pot was so badly done. 

Great work so far, I will be following this one closely. I know it's not a subject for everybody but it's so weird that I cannot turn away for an instant.

Just a heads up, I have heard that it might be worth your time adding some weight to the insides of the hull, the way that aircraft modellers add weight to the nose of tricycle landing gear aircraft, apparently the metal gun barrel can cause the vehicle to tip over.

Well good luck with the build and I look forward to seeing you progress.

Terry.

  • Member since
    July 2006
  • From: San Francisco Bay Area
Posted by bufflehead on Sunday, January 29, 2012 7:35 PM

Nice to see you back Karl!  Your builds always educate, amaze and inspire!  Great work and save on the perforated muzzle brake; with primer on it looks fantastic!  This is a very interesting vehicle and I know you'll hit a home run with it!

Ernest

Last Armor Build - 1/35 Dragon M-26A1, 1/35 Emhar Mk.IV Female


Last Aircraft Builds - Hobby Boss 1/72 F4F Wildcat & FW-190A8


  • Member since
    July 2006
  • From: New Jersey
Posted by redleg12 on Monday, January 30, 2012 7:19 PM

Well.....I thought Bill was sneaking by, then I see your post so it is official....I am getting careless and need a flogging  Indifferent. Nice work as always....

Looking at your muzzle.....what is the outside diameter??? Is it close to a standard size so you could use a tube and work it front that point. Is there a PE replacement....somewhere....internet search. Otherwise a good center measurements and drilling....carefully

I will keep thinking Confused

Rounds Complete!!

"The Moral High Ground....A Great Place to Emplace Artillery."

  • Member since
    November 2005
Posted by Anonymous on Wednesday, February 1, 2012 9:55 AM

redleg12

Well.....I thought Bill was sneaking by, then I see your post so it is official....I am getting careless and need a flogging  Indifferent. Nice work as always....

Looking at your muzzle.....what is the outside diameter??? Is it close to a standard size so you could use a tube and work it front that point. Is there a PE replacement....somewhere....internet search. Otherwise a good center measurements and drilling....carefully

I will keep thinking Confused

Rounds Complete!!

You do need a flogging----if you go back in the thread you'll see that the problem was already corrected ala Von Hammer methods...

  • Member since
    January 2007
Posted by the doog on Wednesday, February 1, 2012 10:13 AM

Thanks again, guys--just wanted to say that I"m working away here, re-engineering some stuff on the rear hull that needed attention. The nice thing about these "paper panzers" is that they're not at all set in stone as far as their configuration--and sometimes the research on them doesn't take some realities or possibilities in mind.

I'm adding some cool things to the vehicle that I think would have been added, and Hans is going to be so proud of me Wink. No aftermarket stuff; well, hardly anything, really.

Terry, thanks man--and a good suggestion about the weights being added to counterbalance the weight of the gun; I don't usually go for the metal gun barrel, but this one was sooooooooo long, it seemed to make sense. However, the gun rests pretty squarely on the chassis, and it has a travel lock to rest upon, so I"m confident that it will sit well. Thanks for the suggestion though! Smile

Mike--you know, I actually thought about that--using a piece of tubing to replace the piece, but luckily I pulled it out at the last minute. Don't worry about not catching it in the text--I've got to be the WORST person here about missing details in someone's post and then asking a redundant question, lol!

I'll have an update soon, guys! Thanks to all again!!! Big Smile

  • Member since
    August 2006
  • From: Arkansas
Posted by K-dawg on Wednesday, February 1, 2012 10:48 AM

Good stuff! I wonder how the new Dragon 8.8cm Waffentrager will compare to the Trumpeter one? Hmmmm

Kenneth Childres, Central Arkansas Scale Modelers

  • Member since
    January 2007
Posted by the doog on Friday, February 3, 2012 9:55 PM
 

Hey thanks, K-Dawg! I appreciate the look-in!

Well, I figured I better get an update out here before you think I forgot about this one..I'm dedicating this post to Hans Von Hammer, our resident "don't need no stinkin' AM parts!" guy who I hope will find favor with my attempts to scratchbuild 95% of the details here--this one's for you, Hans!

First of all, here's the nifty little sight mechanism--some nice detailing here, and the PE parts are kit parts.

And added to the gun, with seat and pedals added....

Here's the build-up before I started appraising and tinkering with things....SEE THAT GUN CRADLE, TERRY?! Big Smile

OK, so...........Whistling...........I took a look at this concept of a model and thought that there were a number of things that could have used improvement and additions...first of all, tools and some fittings. I added some tools---a shovel, axe. crow bar, on the top hull and fender; they have scrap brass holder locking handles but you can't see them in the photo too well--and added a spare track holder on the front made from brass, wire and strip. (still adding details)

I added an expedient "field mod"--a stowage bin from an old zimmeritted vehicle. I figured they would maybe keep barrel cleaning heads/rags in here? In any case, it presents interesting painting possibilities?

Next, one thing that really bothered me was that these rear spades had no way to raise or keep them up when traveling. The way the kit had them engineered, they would literally drag on the ground. I also didn't like the lack of towing pintles--these parts in circles are solid. So I figured to build hydraulic lifters and replace the towing pintles.

I shaved off those "lights" or whatever they were--remember, everything is "conceptual" here, so you can pretty much take "artistic license" to a degree--and made new pintles, Then, I spent a good two days engineering and making through much trial-&-error some functioning hydraulic lifters. I drilled out some sprue with a micro-drill, and fashioned the rest from styrene rod and strip.

Here's what I have so far...I also added a back to the seat from scrap brass and styrene. You might notice that I cut away the fender insides as well to provide access to the pintles from a cable or hook:

I also plan to add retaining hooks to the spade arms' fronts, to hold them in place during travel. I'm prbably going to portray this vehicle in travel mode, in order to use the gun travel lock to hold up the heavy metal barrel.

I also scratchbuilt some gun cleaning rods and mounted them to a frame on the front gun shield with a little PE butterfly clasp.

That's it so far, guys! Hope you like it--I like these projects because there's so much room for improvisation! I hope you're equally inspired to create your own mods--I've got some more coming on this one; just a few small ones, but you'll have to wait for the next update!

Comments and critiques always welcomed!

the doog


  • Member since
    July 2003
  • From: On my kitchen counter top somewhere in North Carolina.
Posted by disastermaster on Friday, February 3, 2012 10:24 PM

 http://www.sherv.net/cm/emoticons/toilet/reading-on-toilet.gifOOOOH......  Something fresh!

A very nice Friday night delight.

 Good call on the accessories too.

Sherman-Jumbo-1945

"I was so much older then, I'm younger than that now"


  • Member since
    July 2006
  • From: New Jersey
Posted by redleg12 on Saturday, February 4, 2012 7:21 AM

Karl - The panoramic telescope (sight) is nicely detailed. Interesting scratch build with the with the hydraulic lifters for the spades. Nice job with the ramming staffs. You could have aiming posts somewhere (candy cane poles).....just another item to think about.

OK....now both Bill and Karl doing weekday updates.....what is this world coming to.

Rounds Complete!!

"The Moral High Ground....A Great Place to Emplace Artillery."

  • Member since
    July 2004
  • From: Texas
Posted by wbill76 on Saturday, February 4, 2012 4:20 PM

Nice work on the mods and additions Karl! This baby definitely shows the German obsession with big guns...Big Smile

  • Member since
    July 2006
  • From: San Francisco Bay Area
Posted by bufflehead on Saturday, February 4, 2012 4:32 PM

Excellent scratchbuilding Karl!  I love all the additions you've incorporated....not only are they logical (especially the hydraulic lifters) ,but they will add immensely to the overall buld.  Its coming together very nicely! 

Ernest

Last Armor Build - 1/35 Dragon M-26A1, 1/35 Emhar Mk.IV Female


Last Aircraft Builds - Hobby Boss 1/72 F4F Wildcat & FW-190A8


  • Member since
    May 2005
  • From: Dublin Rep Of Ireland
Posted by terry35 on Saturday, February 4, 2012 5:47 PM

Wow that is some size Karl. Gotcha on the gun cradle, just a question, if you pointed the gun over to 90 degrees would it alter the balance, I now know the question is redundant because of the way you intend to display the vehicle, but curiosity and all that. Te cradle will more than likely support the kit over time. I love the struts you have added to the legs, cool.

I look forward to seeing you progress.

Regards,

Terry.

  • Member since
    April 2009
  • From: Carmel, IN
Posted by deafpanzer on Saturday, February 4, 2012 9:59 PM

Oh my!  That gun is BIG!  I count only 6 cleaning rods... I think you need to make another 6. LOL  Looking real good!

Andy

  • Member since
    January 2007
Posted by the doog on Sunday, February 5, 2012 12:26 PM

Guys, thank for all the Yes's and comments!

Gotta love your million-and-one Smileys for every occasion, Steve!

Mike, I thought really hard about the "candy canes", but my gut tells me that this vehicle would have been utilized primarily in a panzerjager role. When you think about the time frame and the state of the war then, I think that it would have been put to use in a defensive role, and I'm not convinced the crew would've had the luxury of having the time to lay down coordinates and distances. Great minds wonder alike though, I guess? Wink

Thanks too, Bill, Ernest, and Terry! Terry, yes, the vehicle would definitely "fall over" if you turned the barrel 90 degrees. I'll be capturing that big barrel in the travel lock, however, so it'll be pretty stable. Smile

Thanks, too, Andy--I made sure to "scale" out the cleaning rods--put together, they'd span the length of the gun tube. Smile

Working away here; should have the thing ready for paint by tomorrow with the next and last update on construction....stay tuned! Big Smile

  • Member since
    April 2003
  • From: 41 Degrees 52.4 minutes North; 72 Degrees 7.3 minutes West
Posted by bbrowniii on Sunday, February 5, 2012 12:42 PM

Karl

Really impressive scratch building there. This thing is truly a conceptual behemoth!

I'd agree with you on the candy canes - to me, this has the look of something used in a direct fire, primarily anti-tank role as opposed to indirect.

Having said that, since it is all 'made up', the candy canes might make for an interesting splash of color and suggest a dual purpose mission for this big monster.

'All that is necessary for the triumph of evil is for good men to do nothing' - Edmund Burke (1770 ??)


  • Member since
    July 2004
  • From: Texas
Posted by wbill76 on Sunday, February 5, 2012 3:22 PM

If Karl wanted to satisfy both crowds, he could take advantage of the fact that the Germans often had the ranging poles do double duty as cleaning rods...so some of the rods he's already built would be candy-striped (4 of the 6) and the others not. Wink Even the Jagdtiger had ranging poles and it mounted the same gun.

  • Member since
    January 2007
Posted by the doog on Sunday, February 5, 2012 4:45 PM

wbill76

If Karl wanted to satisfy both crowds, he could take advantage of the fact that the Germans often had the ranging poles do double duty as cleaning rods...so some of the rods he's already built would be candy-striped (4 of the 6) and the others not.

Uhhhhhhhhhhhhh............. Indifferent

Good Grief, Bill! Don't get me confused now! lol! Big Smile

Actually, it's an excellent suggestion--I just don't know if I'd be able to pull off the painting requirements of masking, etc, with them glued on already like that.

Oh hell, who am I kidding? Of course I would--I just don't know if I'm too lazy too at this point?! Whistling..Wink

Boyd -- thanks for looking in as well, and for the comments and suggestions! Big Smile

  • Member since
    July 2006
  • From: New Jersey
Posted by redleg12 on Sunday, February 5, 2012 4:55 PM

the doog

 wbill76:

If Karl wanted to satisfy both crowds, he could take advantage of the fact that the Germans often had the ranging poles do double duty as cleaning rods...so some of the rods he's already built would be candy-striped (4 of the 6) and the others not.


http://i170.photobucket.com/albums/u244/heydoog/misc%20unrelaed%20photos/deer-in-the-headlights.jpg

Uhhhhhhhhhhhhh............. Indifferent

Good Grief, Bill! Don't get me confused now! lol! Big Smile

Actually, it's an excellent suggestion--I just don't know if I'd be able to pull off the painting requirements of masking, etc, with them glued on already like that.

Oh hell, who am I kidding? Of course I would--I just don't know if I'm too lazy too at this point?! Whistling..Wink

Boyd -- thanks for looking in as well, and for the comments and suggestions! Big Smile

Sorry for stirring up a hornets nest mentioning the aiming posts Surprise .... The aiming posts would add a splash of color, just the artilleryman in me!! Now as far as easy.....we would not be the modelers we are if we did easy Wink Good luck

Back to my PE pnematic hoses and fittings on my 8 inch howitzerSurprise Details....you have to love them!

Rounds Complete!!


"The Moral High Ground....A Great Place to Emplace Artillery."

  • Member since
    November 2005
Posted by Anonymous on Monday, February 6, 2012 8:20 AM

He's gone "Von Hammer" on us...very cool.  Maybe those spades that late in the war were manually put into place and then manually removed and stowed when on the move???  Anyways---your taking the basic model and adding your own what-ifs makes it more your creation and has the bonus of noone telling you its wrong!!!  Too cool for school, my friend...

...can't wait to see how you color her up...keep in mind that barrels were in a greyish primer...I could see this thing in part red-oxide primer, part dark yellow and maybe part in grey barrel primer...!!!  maybe some camo to boot...what a canvas to work with...

I hereby crown Karl the Paper-Panzer King.

  • Member since
    December 2008
  • From: Currently Moscow, Russia
Posted by Coldsteel6d on Monday, February 6, 2012 1:08 PM

Love this write up. Gotta say my favorite part is the no BS honesty. I like to see how someone as accomplished as we all know you are has a run in or two and still puts it out there for all to see. I get the feeling a lot of the WIP write ups are touched up slide shows that just show off the successful steps on route to a finished project.

Its great to see the obstacles you run into and better yet how you conquered them. Lost to be learned here for sure. No doubt this one will be as great as your other masterpieces.


  • Member since
    January 2007
Posted by the doog on Monday, February 6, 2012 5:45 PM

Manstein's revenge

He's gone "Von Hammer" on us...very cool.  Maybe those spades that late in the war were manually put into place and then manually removed and stowed when on the move???  Anyways---your taking the basic model and adding your own what-ifs makes it more your creation and has the bonus of noone telling you its wrong!!!  Too cool for school, my friend...

...can't wait to see how you color her up...keep in mind that barrels were in a greyish primer...I could see this thing in part red-oxide primer, part dark yellow and maybe part in grey barrel primer...!!!  maybe some camo to boot...what a canvas to work with...

I hereby crown Karl the Paper-Panzer King.

Ha ha, Thanks, Manny! Big Smile

Man, I would think that those spades would have been HEAVVVV--VEE! I dunno if you could actually pick 'em up without breaking your back? But hey, who knows? Like you said, that's one of the joys of "Paper Panzers"---the possibilities! Stick out tongue

You're tuned right into my way of thinking with the painting! I was thinking of a primer red vehicle with a gray primed barrel, and "inside white" paint on the breech/gun mount, as if it would have extracted from an existing vehicle? I was also throwing around the idea of some hard-edged DY camo over the shields? Maybe some DY wheels...honestly, it's scary how close to my thinking you were on this! Great minds...lol? Whistling........Toast

  • Member since
    January 2007
Posted by the doog on Monday, February 6, 2012 5:48 PM

ColdSteel, hey thank you, that's a nice comment, and something I've never heard before. I like to think that anyone can make a model look unique, and some of the best "tricks" and ideas I've had have truly come from "accidents". I try to document them so that others can be inspired to never give up and to soldier on even after something that you might ordinarily think of as "disastrous" happens.

Thanks for the sincere compliment, and I'm happy to know you're tuned in!

  • Member since
    November 2005
Posted by Anonymous on Monday, February 6, 2012 5:53 PM

the doog

 Manstein's revenge:

He's gone "Von Hammer" on us...very cool.  Maybe those spades that late in the war were manually put into place and then manually removed and stowed when on the move???  Anyways---your taking the basic model and adding your own what-ifs makes it more your creation and has the bonus of noone telling you its wrong!!!  Too cool for school, my friend...

...can't wait to see how you color her up...keep in mind that barrels were in a greyish primer...I could see this thing in part red-oxide primer, part dark yellow and maybe part in grey barrel primer...!!!  maybe some camo to boot...what a canvas to work with...

I hereby crown Karl the Paper-Panzer King.


Ha ha, Thanks, Manny! Big Smile

Man, I would think that those spades would have been HEAVVVV--VEE! I dunno if you could actually pick 'em up without breaking your back? But hey, who knows? Like you said, that's one of the joys of "Paper Panzers"---the possibilities! Stick out tongue

You're tuned right into my way of thinking with the painting! I was thinking of a primer red vehicle with a gray primed barrel, and "inside white" paint on the breech/gun mount, as if it would have extracted from an existing vehicle? I was also throwing around the idea of some hard-edged DY camo over the shields? Maybe some DY wheels...honestly, it's scary how close to my thinking you were on this! Great minds...lol? Whistling........Toast

Hey, I think it could be the "great minds" thing.  I'm with you on all but the white breech and mount---I mean what other vehicle carried this mutha?  The only thing I know would have been the Jagtiger, but I dunno if it had the exact gun or mount (but both are 12.8 cm)...???

  • Member since
    January 2007
Posted by the doog on Monday, February 6, 2012 5:57 PM

OK, well the beast is ready for painting--this is the last construction update.

I've added some more small details--here's a look at the rear of the vehicle. I've added a central towing pintle, some handles to help raise the big spades, and some hooks to secure them, and some small details to the shields.

I also added some inside detail--a gas canister container her inside. I also put that cleaning head on one of the rods for added visual interest, and added some small detailed simulated-threaded ends to the rods.

Here's the clips on the tool holders too...

I haven't even started the tracks yet--ugh, I tool a look at wbill76's website to see what I was in for with these MK tracks, and it looks like it's going to be a task to get them all cleaned up and assembled. Got some work there....but for now, I've lightly primed the model with Tamiya Gray and will be putting a base coat of Red Primer on it soon.

That's all for now! Should have an update in a day or two when I get some proper paint down!

Stay tuned!! Big Smile

  • Member since
    January 2007
Posted by the doog on Monday, February 6, 2012 6:02 PM

Manny, you're correct--the Jagdtiger would have had this gun too. I think it's add some visual interest, and a bit of "story" to it. The muzzle brake, of course, will not have been used on it in the JT, but that will be cool as well; it can be painted either DY or red, as an add-on piece!

I'll do some research to be sure; that may change in time....

  • Member since
    August 2008
  • From: S.W. Missouri
Posted by Pvt Mutt on Monday, February 6, 2012 6:32 PM

My My Karl that rig is going to be BOSSToast

Katy Bar the Door here comes the judge,here comes the judge.Cool

Tony leeSmile

Shoot Low Boys They're Ridin Ponys

  • Member since
    November 2005
Posted by Anonymous on Tuesday, February 7, 2012 6:35 AM

I love this model and want to marry it...

That travel lock sure looks flimsy for that mutha of a canon!!!

  • Member since
    July 2004
  • From: Texas
Posted by wbill76 on Tuesday, February 7, 2012 2:02 PM

Very nice work on the additional details Karl, really dressing this one up in style! Beer

The best advice I can give you on the tracks is to work on them in stages while watching TV or other similar activity...it helps break up the monotony! Depending on the track type I usually create an "assembly line" type of process that helps move things along and work with sections of 10 or so links at a time...that way you feel like you're making progress and it's not so much of a slog. Wink

  • Member since
    January 2007
Posted by the doog on Tuesday, February 7, 2012 5:50 PM

Thanks, Tony! Hey, don't go singing "Here comes da judge", or you're going to have me thinking about going back to the garage for a GTO fix! lol!

Thanks for the Yes!

Manny, ha ha; consider yourself "betrothed"! Kiss Hey, I DID research that idea I had about the white gun mount, et al, and you were right--the mounting for this gun in its "field gun" role was not the same as a JT. So I went back to the idea of a field gun mounted on a primer-red  testbed vehicle. Good call!

Bill, thanks for the advice! I looked at your blog and got that impression; that "Patience" counts! (I think you'd said as much in one post!) I"l get to those tracks one of these nights after I get some paint on it. I"m about halfway through the shading coats now...thanks for "following" my build here!

Big Smile

  • Member since
    March 2003
  • From: Rain USA, Vancouver WA
Posted by tigerman on Tuesday, February 7, 2012 6:51 PM

Manstein's revenge

I love this model and want to marry it...

That travel lock sure looks flimsy for that mutha of a canon!!!

Is Polygamy allowed in the Fatherland? Der Fuhrer is making phone calls......

   http://i7.photobucket.com/albums/y269/wing_nut_5o/PANZERJAGERGB.jpg

 Eric 

  • Member since
    July 2006
  • From: New Jersey
Posted by redleg12 on Tuesday, February 7, 2012 8:42 PM

Karl, I see you made it to Prime Time!!! Just as a note, in the future as an /acrylic lover, you may want to try the Vallejo primers. I tried the OD primer and I am hooked. Right from the bottle to AB, lays down and covers well and not too thick to cover details. Price is also good

Rounds.Complete!!

"The Moral High Ground....A Great Place to Emplace Artillery."

  • Member since
    January 2007
Posted by the doog on Tuesday, February 7, 2012 10:11 PM

redleg12

Karl, I see you made it to Prime Time!!! Just as a note, in the future as an /acrylic lover, you may want to try the Vallejo primers. I tried the OD primer and I am hooked. Right from the bottle to AB, lays down and covers well and not too thick to cover details. Price is also good

Rounds.Complete!!

Thanks for the recommendation, Mike! I've picked up some Vallejo paints, but you know what I absolutely HATE about them? Those crappy little bottles! I just can't work with them. What do you do with the paint if you put too much out of the bottle? You've wasted it? Drives me crazy. Alas, with the limited availability of my favorite Tamiyas, I may have to start looking at them for future use!

----------------------------------------------------------------------------------------------------------------------------------------------------


OK--paint update! Stick out tongue

I started out with a dark red primer--this is Tamiya's Hull Red with a smidge of Red and some Black added. I painted the hull and wheels in this color. The travel lock is masked-it's going to be DY.


Next, I sprayed some straight Hull Red. It's hard to see, but it grades the finish a little lighter...


A rare action shot from the dooghouse! I'm using mask templates to block off sections that I don't want covered, and I'm now spraying a lighter Primer color that I have added some Buff to...

Here's the shading result.

In the flash, it really looks glaring, but those of you who know my usual methods know that this is what I like to do, the better to tone it down and use the harsh gradient to my advantage when weathering and finishing. Note that the "tub" is a lot darker, because it would be more in the shadows.

I was going to paint the gun white as if it were used in a previous vehicle, but thank to Manny, I re-checked my references and realized that that would be unrealistic, so I started the DY coat with a dark DY to which I had added some dark Grey. I had already painted a base coat of DY before I realized that I'd forgot to do a dark coat.....hey, it's late....Sleep


Next, I graded the lightness with a standard coat of DY.

And then added some white and added a highlighting coat.

And a teaser---the gun has been painted the dark grey primer that was used on barrels--it looks nearly black here, but I will mitigate that with filters when the time comes.

And that's the end of "phase one"--there's still more masking and careful painting tomorrow before I start the weathering....tune in tomorrow night for more!

Thanks for looking in, guys!

Karl the doog.....

  • Member since
    July 2003
  • From: On my kitchen counter top somewhere in North Carolina.
Posted by disastermaster on Tuesday, February 7, 2012 10:36 PM

 A question.

http://board.marlincrawler.com/Smileys/marlin/pokinit.gif How much is a smidge, really?


A revelation.

http://www.freesmileys.org/smileys/smiley-fc/bottle.gifI hate those stoopid lil' bottles too.


A statement I overheard.

http://southrnfresh.com/images/smilies/naziskie.gif I vil not allow Manstein to marry my sister!

Nein, Nein, Nein, NEIN !!!


And an observation.

As always,the paint brings on the anticipation. I think you're spot on with this.


Sherman-Jumbo-1945

"I was so much older then, I'm younger than that now"


  • Member since
    November 2005
Posted by Anonymous on Wednesday, February 8, 2012 10:35 AM

the doog


Here's the shading result.


http://i170.photobucket.com/albums/u244/heydoog/Waffentrager/100_2939.jpg

I'm digging this look...

  • Member since
    April 2003
  • From: 41 Degrees 52.4 minutes North; 72 Degrees 7.3 minutes West
Posted by bbrowniii on Wednesday, February 8, 2012 2:34 PM

Yeah, that's hot...Toast

'All that is necessary for the triumph of evil is for good men to do nothing' - Edmund Burke (1770 ??)


  • Member since
    November 2005
Posted by Anonymous on Wednesday, February 8, 2012 2:47 PM

Wouldn't it be cool to partially paint on some camo green on a portion of one side, as if the crew had begun to paint over the primer and just ran outta time???

  • Member since
    July 2004
  • From: Texas
Posted by wbill76 on Wednesday, February 8, 2012 3:50 PM

Definitely a lot going on visually with this one Karl, look forward to the next round! Beer

  • Member since
    January 2007
Posted by the doog on Wednesday, February 8, 2012 6:09 PM

Hey, thanks, Steve, Manny, Boyd, and Bill! Once again, I appreciate you guys following along and offering suggestions!

Manny, I actually thought about that aspect of it, but actually decided against it because of the nature of the poses that I have in the crew figures that I'm going to pose with it--kinda laid back, hanging out. Also, as you'll see, the paint scheme I chose kinda tells its own narrative?

And now, without further ado...

The paint and camo is finished. You can see that I used some masks to paint the travel lock and stowage box; I made these out of index cards and masking tape.

And now the finished paint. My concept for this vehicle is a new hull which has been left in Primer Red; the gun was taken from an existing carriage and mounted to this hull. A new barrel was fitted for the new weapon, and the old muzzle brake used. The stowage bin is from a damaged tank of some sort and was thus painted with a brush for visual interest and contrast; the travel lock also a "spare" part painted in DY. The wheels are simply DY--in most of the photos of Waffentragers and indeed a lot of late-war vehicles that I've seen, they seems to have plain DY wheels. All paint is Tamiya.

No, I still haven't got to the tracks...Sad I MAY paint the front spare tracks rack in rusty, bare metal, as if it was a field expedient? Might be cool?

Next up: decals (minimal, of course) and then start in weathering....Stick out tongue

All comments welcomed! Big Smile.


  • Member since
    September 2007
  • From: Truro Nova Scotia, Canada
Posted by SuppressionFire on Wednesday, February 8, 2012 6:39 PM

A stretched 38(t) on steroids?

Leave it to the desperate last days to design such a weapon!

The story line paint scheme is spot on. looking forward to how its weathered to nail down the concept.Hmm

I would fire the first round via long rope from behind a building, that chassis looks barely capable of moving the cannon let alone firing a shell!

Kind of dropped in, is this a 'paper Panzer' or a fielded design?

http://i6.photobucket.com/albums/y211/razordws/GB%20Badges/WMIIIGBsmall.jpg


  • Member since
    August 2008
  • From: S.W. Missouri
Posted by Pvt Mutt on Wednesday, February 8, 2012 6:40 PM

Karl there's more interest there than 40 people can handle. The other 60 will fall in line with the detailing and weathering for sure.YesCool

Cat Nip will do that to youWink

Tony lee

Shoot Low Boys They're Ridin Ponys

  • Member since
    July 2006
  • From: New Jersey
Posted by redleg12 on Wednesday, February 8, 2012 6:59 PM

Karl - LOOKING GOOD!!!

BTW....the Vallejo primers don't come in the little crappy bottles.....check out this link

http://www.acrylicosvallejo.com/gb/primers-gb.html

They are a 60 ml bottle....and yes the top screws off to pour excess back in from the AB. You could use the Hull Red primer and eliminate a coat of paint......just a thought and wanted to make sure you were looking at the right thing!! You know me, I like to try something new....At $5 for 60ml and great coverage, I adopted it.....trying to share the love!!

No it is time for the King of Finish to begin his work.....always fun to watch

Rounds Complete!!

"The Moral High Ground....A Great Place to Emplace Artillery."

  • Member since
    October 2008
  • From: New Jersey
Posted by oddmanrush on Wednesday, February 8, 2012 7:04 PM

Awesome work Karl, can't wait to see the weathering! I have a question about the road wheels. I don't know much about armor painting practices, especially late in the war. Why would the wheels have color but the hull left in primer red? 

Either way, I really like it. Visually interesting indeed!

Jon

My Blog: The Combat Workshop 

  • Member since
    January 2007
Posted by the doog on Wednesday, February 8, 2012 7:34 PM

Hey, thanks guys, for the comments!

SuppressionFire, this was a concept for a Waffentrager ("Weapon Carrier) that never actually made it to prototype stage. It was apparently only a design.

Ha ha, thanks Tony!

Mike, thanks for the info on the Vallejo primers! That's cool that they actually come in bottles! I have to see if I can find the bottled ones--I"d like to maybe think about using these paints, but only when they come out in bottles where I'm not feeling like I"m wasting paint. For the life of me, I can't believe that they haven't corrected the flaw of that "medicine dropper" bottle. Unfortunately, I've only ever seen the dropper-bottles on the stores' racks? Thanks for the comments and vote of confidence!

Jon, the way I'm reasoning it is that the wheels were produced for the 38t series--Hetzers, Marders, etc--so they would have been produced "in bulk", and probably painted. You can see a well-known shot of one of these related waffentragers where the wheels are plainly painted in DY. Of course, the hull is too, but I reason that the hull here is "so new" that it was just left in primer to get the gun mounted and out to the front as soon as possible?

Big Smile

  • Member since
    April 2009
  • From: Carmel, IN
Posted by deafpanzer on Wednesday, February 8, 2012 8:01 PM

WOW!  I have to say it is one of most weird looking armor I have seen... so pumped up on steroids?  I am really enjoying your WIP.  It is really good having you back! 


Andy

  • Member since
    May 2006
  • From: Queensbury,NY
Posted by panzer88 on Wednesday, February 8, 2012 8:14 PM

Looking great Doog!!!! That muzzle break looks sweeeeet, incedible save there.This beasty is shaping very nicely. And I know it is only going to get better.


  • Member since
    August 2008
  • From: S.W. Missouri
Posted by Pvt Mutt on Wednesday, February 8, 2012 8:18 PM

Hey guys the eye dropper part of a Vallejo bottle just pulls out,I do it all the time.Yes

Tony lee

Shoot Low Boys They're Ridin Ponys

  • Member since
    November 2005
Posted by Anonymous on Wednesday, February 8, 2012 8:31 PM

Looks great...doog, IMO I would think there would be NO markings on this mutha...not even a national cross...I love the camo on the shield but I feel that the camo on the muzzle brake is a bit overdone (typically even if an AFV was heavily camoed it rarely extended on the barrel, and if it did very rarely to the muzzle brake)---I woulda left it in dark yellow.  I still can't get over how well that brake turned out!

  • Member since
    July 2006
  • From: San Francisco Bay Area
Posted by bufflehead on Wednesday, February 8, 2012 9:38 PM

Whoa!  I blink my eyes and the doog had almost got this one done!!  Amazing work Karl!!  I love the Frankenstein looking effect you've accomplished with paint job you did!  I'm very curious to see what you're going to do with the dark gray barrel.  Hmm

Ernest

Last Armor Build - 1/35 Dragon M-26A1, 1/35 Emhar Mk.IV Female


Last Aircraft Builds - Hobby Boss 1/72 F4F Wildcat & FW-190A8


  • Member since
    March 2003
  • From: El Dorado Hills, CA
Posted by IBuild148 on Wednesday, February 8, 2012 10:43 PM

Your moving this thing right along. Dig the paint scheme. The Germans were a creative bunch. I'll be watching the weathering.

IBuildOne48

Teach modeling to youth!

Scalefinishes.com

http://i712.photobucket.com/albums/ww122/randysmodels/NMF%20Group%20build%20II/Group%20Badge/NMFIIGBbadgesmall.jpg


  • Member since
    April 2008
  • From: Kristiansund, Norway
Posted by Huxy on Thursday, February 9, 2012 6:41 AM

That's an interesting scheme! Well done.

"Every War Starts And Ends With An Invasion".

  • Member since
    October 2008
  • From: New Jersey
Posted by oddmanrush on Thursday, February 9, 2012 9:08 AM

Thanks for answering my question Karl. I wouldn't have thought that wheels were produced in bulk and painted separate from the tank. There is always good stuff to learn here. That's a pretty neat shot of the Waffentrager as well. Keep up the good work!

Jon

My Blog: The Combat Workshop 

  • Member since
    April 2003
  • From: 41 Degrees 52.4 minutes North; 72 Degrees 7.3 minutes West
Posted by bbrowniii on Thursday, February 9, 2012 10:08 AM

Karl

As always, your work is both excellent and distinct. I like the way you illustrate your thought process for all to see.

I can't wait to see the weathering stages you will put into this.

'All that is necessary for the triumph of evil is for good men to do nothing' - Edmund Burke (1770 ??)


  • Member since
    July 2004
  • From: Texas
Posted by wbill76 on Thursday, February 9, 2012 1:35 PM

Karl,

I agree with Manny about the muzzle brake...those usually got replaced right along with the barrel as opposed to being re-used. I can't recall any photos off the top of my head where there was a replacement barrel with a painted muzzle brake...doesn't mean it didn't ever happen but for visual continuity I would suggest repainting the brake in the lacquer primer. I'm also curious as to why you decided to paint only the travel lock in DY (you might have said it in an earlier post but am too lazy to check Wink )? It's an integral part of the hull and wouldn't have been assembled/provided separately as a rule. I do like the wheels in DY as a visual contrast though. Also agree with Manny about the markings...leaving the hull in primer would equate to no markings IMHO. Looking forward to the next round! Yes


  • Member since
    January 2007
Posted by the doog on Thursday, February 9, 2012 6:22 PM

Andy -- thanks, man! It's good to be back!

panzer88 -- Eric, is it? Thanks; I"m relieved that I saved that muzzle brake! I think it looks better than the plastic one could ever have looked!

Tony -- wow, I didn't know about the dropper tops pulling out of the Vallejo bottle! I thought it was sealed in there somehow--wow, that's great to know! Thanks!

Manny -- You're right about the markings--I've taken your advice and nixed the idea. Wink I have researched the muzzle brake, and it probably was Black or at least the same color as the barrel--that will be easy enough to fix, though it pains me to blacken it. I liked the color variation. Embarrassed

Ernest -- thanks for looking in, too! I"m trying to get this barrel thing straightened out here. But I"m glad you like the color scheme!

Marc -- thanks too, for taking the time to comment!

You too, Huxy!

Jon-- believe me, this is the place to learn things that you need to know about armor! I learn new things every day here--or should I say "every WIP!" Thanks for the comments!

Boyd -- thanks too for dropping in! It's great to be back and sharing the fun I have here. (It's easier to do without the O&E being such a temptation to cruise....Embarrassed lol)

Bill -- once again, thanks for straightening me out. If there's a guy here who knows his stuff inside and out, it's gotta be you--and I'll take your advice on the travel lock and--along with Manny's views--the muzzle brake. I got on a thread on Armorama where a guy said that gun barrels came separately from the muzzle brakes, but I don't know for sure, so I'll err on the side of caution if that's possible. Dark Grey it is! That'll be easy to correct. BTW, the travel lock color was just an idea thinking that it would have already been manufactured in the diameter for the large barrel? Maybe it was a stretch..Whistling

Thanks again, guys, for all the kind comments and the useful, informative suggestions!!! Big Smile Update coming real soon!

  • Member since
    November 2005
Posted by Anonymous on Thursday, February 9, 2012 6:41 PM

the doog

Manny -- You're right about the markings--I've taken your advice and nixed the idea. Wink I have researched the muzzle brake, and it probably was Black or at least the same color as the barrel--that will be easy enough to fix, though it pains me to blacken it. I liked the color variation. Embarrassed

Bill -- once again, thanks for straightening me out. If there's a guy here who knows his stuff inside and out, it's gotta be you--and I'll take your advice on the travel lock and--along with Manny's views--the muzzle brake. I got on a thread on Armorama where a guy said that gun barrels came separately from the muzzle brakes, but I don't know for sure, so I'll err on the side of caution if that's possible. Dark Grey it is! That'll be easy to correct.

doog, I think you'd be good with leaving it in dark yellow...my concern was the camo on top of the dark yellow...I'd go dark yellow sans camo on it---as you mentioned, the brake is separate from the barrel...my concern was that I've never seen camo extend up on the brake like that.  Bill?

  • Member since
    January 2007
Posted by the doog on Thursday, February 9, 2012 9:25 PM

Manny--thanks for the suggestions. I've already painted the muzzle brake to match the gun tube; maybe I"ll go back to DY; I haven't made up my mind yet, but I think that the idea Bill proposed is sound. If you have any definite evidence, let's have it; it would help!

Anyhoo......I've got a painting/filtering update.

I started out by applying an overall filter of "Gray for Dark Yellow", just to fade the red a bit. Then I started in here with "Faded Dark Yellow" which is actually a funny orangey color, and also Primer Red, with some Buff, which is a nice, neutral tan. I added them in small diluted dots, adding them from the wet brush, NOT with a toothpick! NOTE--they are not "full strength"< but diluted with "Thinner for Washes" somewhat.

With a large, soft brush, I start to work them in to the paint...

Next, I take some Buff and add it to the model with a small brush.

Then with a DIFFERENT, flat brush, I pull the color out, blending it into the fender to simulate dust build-up.

This technique was then used with various color oils in dark browns, lighter browns, and all kinds of shades and variations/mixes in between, on the fenders and hull tops and sides. Streaks were added by pulling down the colors with a DRY brush after putting the colors on and massaging them into the base with a slightly WET brush.

Here I'm going back to the primer red color in order to bring some of the reddishness back into the paint coat. You can see the results of the oils and filters on the rest of the model. The method that I use in the next series of photos is the same that I used for all the colors, so pay attention!

First, select the diluted, thinned color; in this case, primer red:

add it to the model:

Now I use a DIFFERENT, DRY brush to massage the color into the paint. Flat, dry brushes work well for blending.

Here's the results SO FAR. More will be done once this dries well. The spare tracks rack was a field mod and will be rusty, as it was bare metal--still to be painted as such.

Note the subtle color gradients: the storage box is only starting to get worked on.

The first layer of weathering in the rear, Note the fenders, where the crew would stand, transferring a lot of dirt. Remember; I still have pigments to apply! Stick out tongue

With flash: the cleaner upper hull and clearer "red" color is evident here:

Now I'm going to show you a cool trick to use on wheels:

The wheels were weathered by simply adding filters of various colors--grey, Buff, etc, and a bit of raw umber. Then I wanted to add some random spots and discoloration. I did this by thinning some color. in this case "Shadow Brown"...I load up a brush with it. Practice this technique against some cardboard before you try it on the model...

Next, get a large brush handle, or a similar implement to use, and smack the loaded brush against it like you're a drummer counting a song off--the oil color on the smaller brush will spatter onto the wheels (or model) leaving random spots.

You can then use another brush to mediate the color--draw it outward for streaks, or move the brush around the inside circumference of the wheel to "clean it up" a bit. You can see that I"m doing this with different colors as well, for variety. And I will still be adding some pigments after this, most likely....note that the rubber parts have not been painted yet.


The wheels so far: I'll be adding to these with some grease runs and whatnot.

I do have figures too...the one in the middle will be put on my Tiger Coelian; the outside ones will crew this beast...

Well that's it for now! I hope you get some ideas out of this little toot! Comments, questions, and suggestions always welcomed! Smile


  • Member since
    September 2009
  • From: Rugby, England
Posted by Hinksy on Friday, February 10, 2012 8:21 AM

Hey Karl,

This beast is looking superb!

Great tutorial btw, I like the bit on the wheels as I'm always trying to add some life to them and as I'll be doing my Tiger I wheels soon this will help me a lot Yes

I see your buff weathering to give a dusty appearance. On some of my builds I like to put a drop of Tamiya Buff into my ab cup and heavily dilute with water then spray along edges and fenders etc. When the water dries it leaves a great dusty effect.

I know it's different with your Enamels but she's looking great - this build is going to be KILLER Cool 

Keep the photos coming - I'm loving this one!

Ben Toast

On the Bench - Dragon Pz. IV Ausf. G (L.A.H.) Yes

Your image is loading...


  • Member since
    March 2003
  • From: Rain USA, Vancouver WA
Posted by tigerman on Friday, February 10, 2012 9:10 AM

A subject that gets more interesting by the day. I like the painting toots, which make things more simplistic to slow people like myself. Embarrassed

   http://i7.photobucket.com/albums/y269/wing_nut_5o/PANZERJAGERGB.jpg

 Eric 

  • Member since
    October 2008
  • From: New Jersey
Posted by oddmanrush on Friday, February 10, 2012 9:15 AM

Lookin' pretty sweet there Karl! I still haven't gotten the hang of that filtering process. Every time I try it, I wind up ruining the base coat. Sad You seem to have it down pat! 

Jon

My Blog: The Combat Workshop 

  • Member since
    April 2003
  • From: 41 Degrees 52.4 minutes North; 72 Degrees 7.3 minutes West
Posted by bbrowniii on Friday, February 10, 2012 9:27 AM

Karl

A question about your technique:

In the beginning of the toot, you descibe laying on your filters and you describe quite nicely how you do it. Then you state:

"This technique was then used with various color oils in dark browns, lighter browns, and all kinds of shades and variations/mixes in between, on the fenders and hull tops and sides. Streaks were added by pulling down the colors with a DRY brush after putting the colors on and massaging them into the base with a slightly WET brush."

I am curious if you gave any time to dry between the layers or did you lay them on in pretty rapid succession?

'All that is necessary for the triumph of evil is for good men to do nothing' - Edmund Burke (1770 ??)


  • Member since
    July 2004
  • From: Texas
Posted by wbill76 on Friday, February 10, 2012 11:43 AM

Looking good Karl and a nice little toot to go with some of the techniques being applied!

I don't want to cloud the issue here of the muzzle brake so will do my best to keep this short. The brakes were indeed separate from the barrel (all brakes were screwed on and secured to the barrel) as a separate part. The barrels were treated with a special lacquer heat-resistant primer (the dark gray you have used) because of the temps subjected to when firing...the same holds true for the muzzle brakes, they too needed the same heat resistance and followed the same painting procedure. 

Here's where I apply logic to my thought process. As Manny points out, camo was rarely extended up to the muzzle brake on artillery pieces but was common on tanks and SPGs depending on the time period and inclination of the crew for field-applied patterns...so there's some latitude in that respect.

Barrels were replaced when either damaged or worn out and there's no guarantee that the brake wasn't also damaged or worn out...and a barrel without a brake meant that it wouldn't be serviceable due to excessive recoil. I would expect as a rule that replacement barrels would always include a replacement brake to go with them as a result. Would exceptions occur? Probably here and there as we all know that you can "never say never" when it comes to that type of possibility. However in this case we are dealing with a prototype under development being hurried into fight in the "last days" type of scenario. It would stand to reason that "if" they had replaced the barrel with a brand new one because the previous field one had been used/worn out, they would also replace the brake but hadn't yet gone through with full hull painting yet. Ergo my suggestion to have them look the same. Wink  

  • Member since
    July 2003
  • From: On my kitchen counter top somewhere in North Carolina.
Posted by disastermaster on Friday, February 10, 2012 3:45 PM

Well, the new forum format precludes history and destroys the text I entered here 3 years ago.

Sherman-Jumbo-1945

"I was so much older then, I'm younger than that now"


  • Member since
    April 2003
  • From: 41 Degrees 52.4 minutes North; 72 Degrees 7.3 minutes West
Posted by bbrowniii on Saturday, February 11, 2012 9:09 AM

Hehe.... Bill said 'ergo'.... Geeked

'All that is necessary for the triumph of evil is for good men to do nothing' - Edmund Burke (1770 ??)


  • Member since
    January 2007
Posted by the doog on Sunday, February 12, 2012 12:38 PM

Thanks, guys---sorry it's taken a while to get back here--I've been a bit busy with these damned tracks! Angry

Ben--remember the advice I gave you--don't limit yourself to any one kind of paint; I use enamels as well for things like washes, details, metallic colors, etc--don't get stuck in a "one paint rut". I'm glad that you got some ideas for your Tiger wheels--I"m going to bop over to your thread after this and offer some advice....

Eric and Jon--I hope that you find something to help you improve your modeling as well here in this WIP. If I can offer any one-on-one advice, don't be afraid to PM me! Thanks for looking in!

Boyd-- You asked about the filters: "I am curious if you gave any time to dry between the layers or did you lay them on in pretty rapid succession?" --a great question, and one that deserves an answer.

When I do this kind of finish, I almost always mix the color either "on the brush" or "on the model". In other words, I just keep adding colors constantly, in rapid succession, not worrying too much about "bleed" or contamination of other colors. That aids in the blending of the colors. If one color tints or occludes another too much, I"ll just add in a little more of the original color until it looks right. At SOME point I"ll step back, let the whole thing dry and have a look at it the next day, and then add what I think needs more attention. I'm at this phase now--and you'll see in the next update what Ive done to bring out the divisions and delineations of individual hatches and panels. Smile

Bill -- Bill, I have to say that I thank you sincerely for your in-depth and encyclopedic-knowledge upon which I can always rely to give a clear and thorough answer to the most obscure and trivial questions regarding armor specifications and peculiarities! In this case, regarding the barrel/muzzle brake painting conundrum, I have to tend to agree with your point of view as far as the historical accuracy and the probability that the muzzle brake was indeed painted in dark grey lacquer to match the barrel. I've seen a picture or two which seems to back this up, and I think that it's probably the way that it should be portrayed.

However...Whistling

I've done a lot of thinking, and went back-n-forth on the question, and even the painting itself, and I think that for purely artistic reasons, I'm going to go with the PLAIN DY coat. I've often said that I choose "artistic" over "dead-on accurate" for .....uh, "artistic" (D'uh?!) reasons Embarrassed and perhaps in any other case I would not be moved in that direction with this piece but for the fact that I could theorize that the shortage of metal and possible chaotic conditions in the spring of '45 would have made it possible to have them re-use the muzzle brake because of supply shortage problems?

In any case, I did a "mock up" of the gun with the dark Grey painting, and it seemed to lack the visual interest of the DY coat. But in any case, the information you provided is great stuff to have in the thread for others' future reference, and was helpful in sorting through my mental processes (which, believe me, is hard enough as it is! Propeller) to make a decision! Thanks again for taking the time to add to this thread's body of knowledge, and to further enlighten me! Big Smile

Steve--thanks, too, buddy! Hey, you got any snow over there in the mountains? Indifferent

Update on the tracks and weathering coming later today!

  • Member since
    July 2003
  • From: On my kitchen counter top somewhere in North Carolina.
Posted by disastermaster on Sunday, February 12, 2012 3:54 PM

Yeah doog, in the mountains....... http://th717.photobucket.com/albums/ww173/prestonjjrtr/Winter/th_1lg090yodel.gif

........meanwhile, 35° here.

All we get here is http://i827.photobucket.com/albums/zz200/pepper2010_bucket/rainy_cloud.gif in Randolph county and crazy weather every other day.

Sherman-Jumbo-1945

"I was so much older then, I'm younger than that now"


  • Member since
    July 2006
  • From: New Jersey
Posted by redleg12 on Sunday, February 12, 2012 6:47 PM

Karl - You are back and better than ever with your toots. From the US side...the muzzle brake is a separate part which screws into the barrel.

It is nice to have you back.

Rounds Complete!!

"The Moral High Ground....A Great Place to Emplace Artillery."

  • Member since
    July 2004
  • From: Texas
Posted by wbill76 on Sunday, February 12, 2012 7:56 PM

My pleasure Karl, glad to be of assistance. Beer

  • Member since
    January 2007
Posted by the doog on Sunday, February 12, 2012 8:39 PM

disastermaster

Yeah doog, in the mountains....... http://th717.photobucket.com/albums/ww173/prestonjjrtr/Winter/th_1lg090yodel.gif

........meanwhile, 35° here.

All we get here is http://i827.photobucket.com/albums/zz200/pepper2010_bucket/rainy_cloud.gif in Randolph county and crazy weather every other day.

UGH! BOOOOOO!!!

I shouldn't complain--I have to go up to NY next week, and I"m dreading going back to the slush and the mush and the snow and the cold!

I hope I can get this baby done by then! Big Smile

  • Member since
    January 2007
Posted by the doog on Sunday, February 12, 2012 8:41 PM

redleg12

Karl - You are back and better than ever with your toots. From the US side...the muzzle brake is a separate part which screws into the barrel.

It is nice to have you back.

Rounds Complete!!

Thanks, Mike! Good to be back! Thanks for the info on US Armor, too! You'd be the man to know about that here--especially US Artillery!

Big Smile

  • Member since
    January 2007
Posted by the doog on Sunday, February 12, 2012 9:02 PM

OK, here's the next update...

I started adding in the next layer of weathering; pigments. I used "concrete" for the most part, laying the pigments down and then rubbing them in with a brush.

I then used MIG's "Thinner for Washes", dropping it over the whole area. I used "T.f.W" because I wanted to have the pigments be still movable, for modifications' sake.

The problem then, as I saw it, was that the pigments left the whole hull rather ..... dull? Too much dust and not enough distinction on the hatches, lines, etc. So I first took some straight Black oils, and added some judicious pin washes in the lines...then, I got my "three grades of Primer Red" here, and ....

..and I started defining the hatches and adding different shades of red to define the hatches...I"d add the paint with one brush...

...and then use another larger brush to blend it in and disperse the degree of color...

Note the subtle shaded differences here on the hull now. You can see the pin washes in the creases, and the different tones of red. I'll have to lighten up that one small hatch...

After I add a little more pigments, the look should be complete.

Now the second issue........Angry..........the tracks....Devil

I have to be honest--I don't care for the MK-style tracks. They're just too much work, and I can't see any appreciable advantage to having "workable" tracks. It's not like I"m going to play with the model?! I looked at wbill's tips on making the sections on the supplied jig, but I just though that it took so freakin' long, and I wasn't convinced that the tracks would be strong enough to go through what I knew I was going to put them through with finished.

So, the heck with it--I laid 'em down and glued em in the "normal way" that I do them--WITHOUT those darned track pins! (I'll add them later!)

I gave them a half-hour to set, and put them on the model, adding in "sag" with some tissue paper balls.

Eventually I added in the track pins with regular glue--what you see are those little "bullets" Whistling that are attached to the track pins. They just get cut off in a moment.....this seems to have strengthened the tracks pretty well. They're off the model right now and ready fr painting tomorrow...

That's it for now! We're almost in the home stretch! I still have to detail the gun ,and do some chipping and whatnot. And paint the figures...

Comments always welcomed, once again! Thanks for looking in, and following, guys! Big Smile

  • Member since
    July 2006
  • From: New Jersey
Posted by redleg12 on Sunday, February 12, 2012 9:11 PM

Karl - I have almost given up on plastic indy tracks myself....love the metal but even still they are a PITA. Now I do like the tampon sag method....definitely different. 

I see you are pinned so I will let you go  Wink

Rounds Complete!!

"The Moral High Ground....A Great Place to Emplace Artillery."

  • Member since
    July 2003
  • From: On my kitchen counter top somewhere in North Carolina.
Posted by disastermaster on Monday, February 13, 2012 12:57 AM

http://i170.photobucket.com/albums/u244/heydoog/w10.jpg

HEh, HE,

http://www.emofaces.com/en/emoticons/c/cut-shaving-emoticon.gif  Looks like 'ya been shavin'.........

In a good way of course.

Sherman-Jumbo-1945

"I was so much older then, I'm younger than that now"


  • Member since
    September 2007
  • From: Truro Nova Scotia, Canada
Posted by SuppressionFire on Monday, February 13, 2012 5:21 AM

disastermaster

http://i170.photobucket.com/albums/u244/heydoog/w10.jpg

I take the road wheels are loose as the third and second from last are outside the guide horns?

Looks good Doog, a bit heavy on the weathering and effects for my taste yet your 'artistic merit' in painting hits the Reich Mark at the finish.


http://i6.photobucket.com/albums/y211/razordws/GB%20Badges/WMIIIGBsmall.jpg


  • Member since
    November 2005
Posted by Anonymous on Monday, February 13, 2012 7:20 AM

the doog

 I'm going to go with the PLAIN DY coat. I've often said that I choose "artistic" over "dead-on accurate" for .....uh, "artistic" (D'uh?!) reasons Embarrassed. ..

Aha!  That's where I was trying to get you in the first place....looks absolutely stunning!!!

  • Member since
    April 2009
  • From: Carmel, IN
Posted by deafpanzer on Monday, February 13, 2012 9:39 AM

I am really digging step-by-step thread... thank you for doing this.  I smell a great article in future FSM issue.  

Everything looks great! Yes  May be too much for some but for me I think its perfect... Third Reich is near its end and those white rags will come very handily for surrendering. 

Andy

  • Member since
    March 2003
  • From: Western North Carolina
Posted by Tojo72 on Monday, February 13, 2012 9:42 AM

great work,and great tutorial,very easy to follow your processes,thanks Karl

  • Member since
    July 2003
  • From: On my kitchen counter top somewhere in North Carolina.
Posted by disastermaster on Monday, February 13, 2012 1:59 PM

deafpanzer

Third Reich is near its end and those white rags will come very handily for surrendering. 

1hi5Laugh1http://th1046.photobucket.com/albums/b461/timetraveller1992/Smiley/th_LMAO.gif

Aw man, that was good..........

Sherman-Jumbo-1945

"I was so much older then, I'm younger than that now"


  • Member since
    July 2004
  • From: Texas
Posted by wbill76 on Monday, February 13, 2012 4:27 PM

Looking good Karl! Definitely like the varied look that the additional pin washes and such achieved.

Sorry to hear the tracks defeated you in terms of making them workable...but you found the "Plan B" option that's always there with styrene workables. Big Smile

  • Member since
    January 2007
Posted by the doog on Friday, February 17, 2012 7:54 PM

Thanks guys--I'm sorry I haven't replied, but I've been trying to get the last of this build done, and to document it all before I have to head north to NY on Monday. I'm happy to say that I've got 'er done now, and will present the final pics shortly!

Thanks, Mike, Steve, and SuppressionFire for comments! And SF--a good eye! I didn't notice the road wheels outside the guide horns on that photo, but yes, the wheels were loose, and came off the tracks when I was moving it around for photos. Mike--the "tampon method"--LMAO!

Manny--I appreciate your perspective on this build. I'm happy where it wound up with the gun barrel and brake!

Eric--yeah, I'll probably be writing this up for an article. Heck, it's such a new kit that I hope that FSM will bite on it!

Thanks, too, Tojo!!

Bill--I have to say, I give you credit for your skill with those tracks! I guess I"m just used to my "usual" method, but then, aren't we all? Smile Thanks for mentioning the varied panels--you ought to try it too on a future build; it's nice how it breaks up the monotony of the one color hull.

And now----the last installment of the WIP tutorial, and then the finished pics!  Stick out tongue

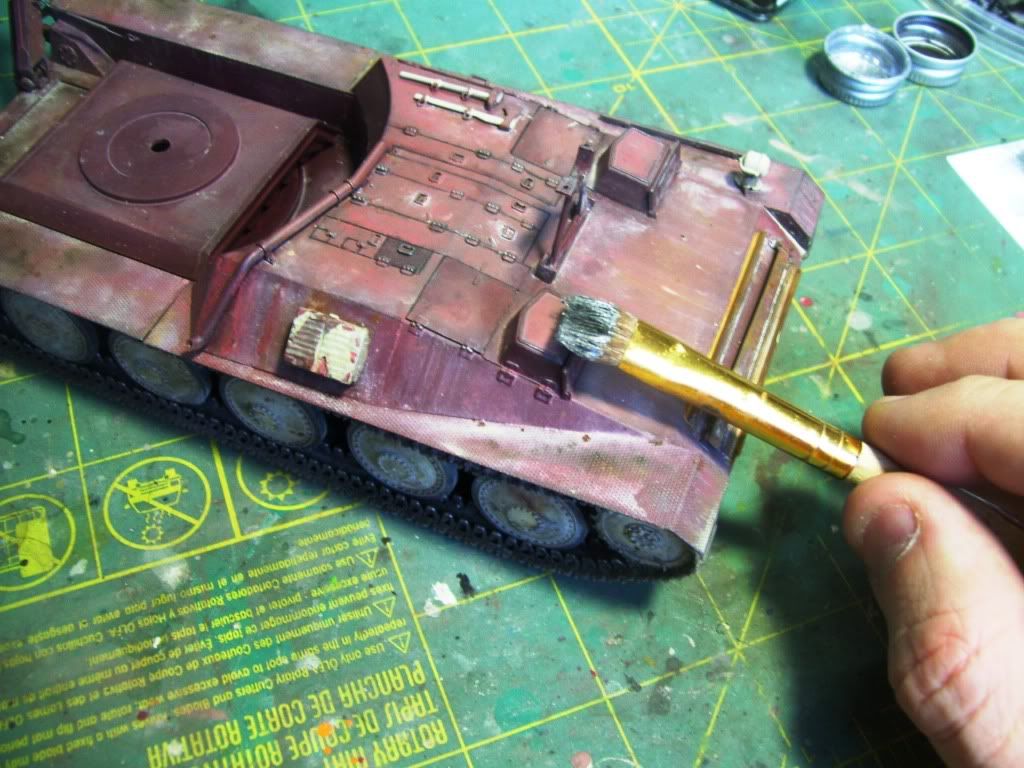
The tracks were first primed with Tamiya grey primer, and then a light overspray of brown added. I then ised a brown mix of oils--raw umber, MIG Gray, and Black in varying amounts--to coat the tracks in oil paint.

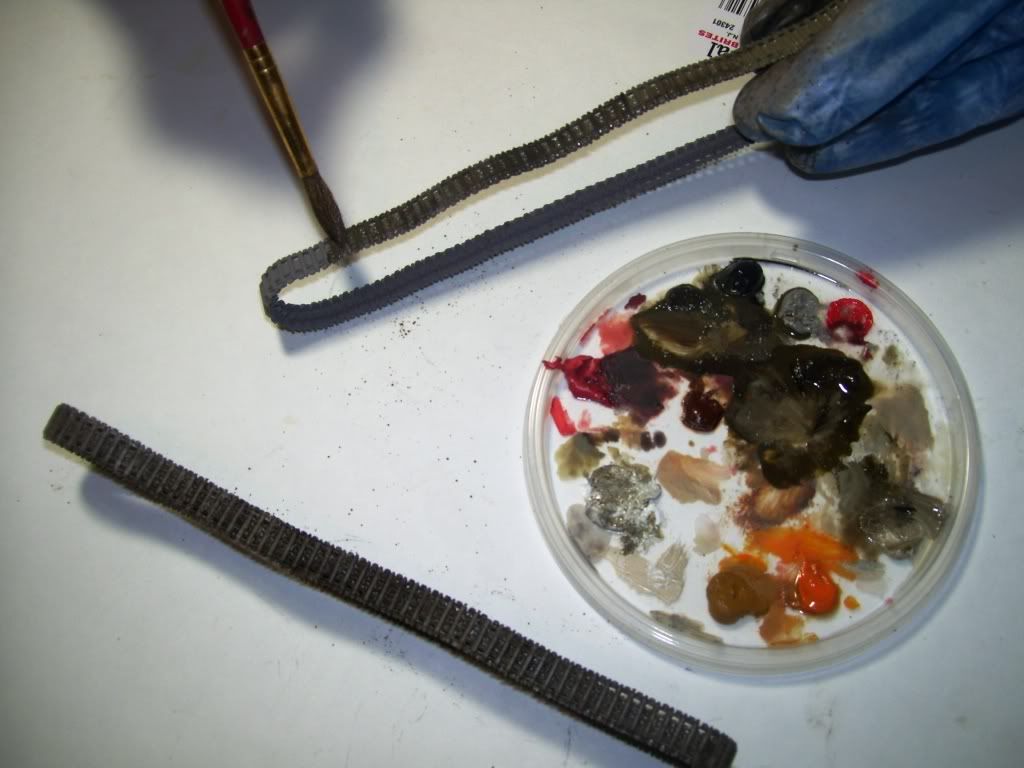
Now, I used MIG's 039 Industrial City Dirt to coat the still-wet tracks.

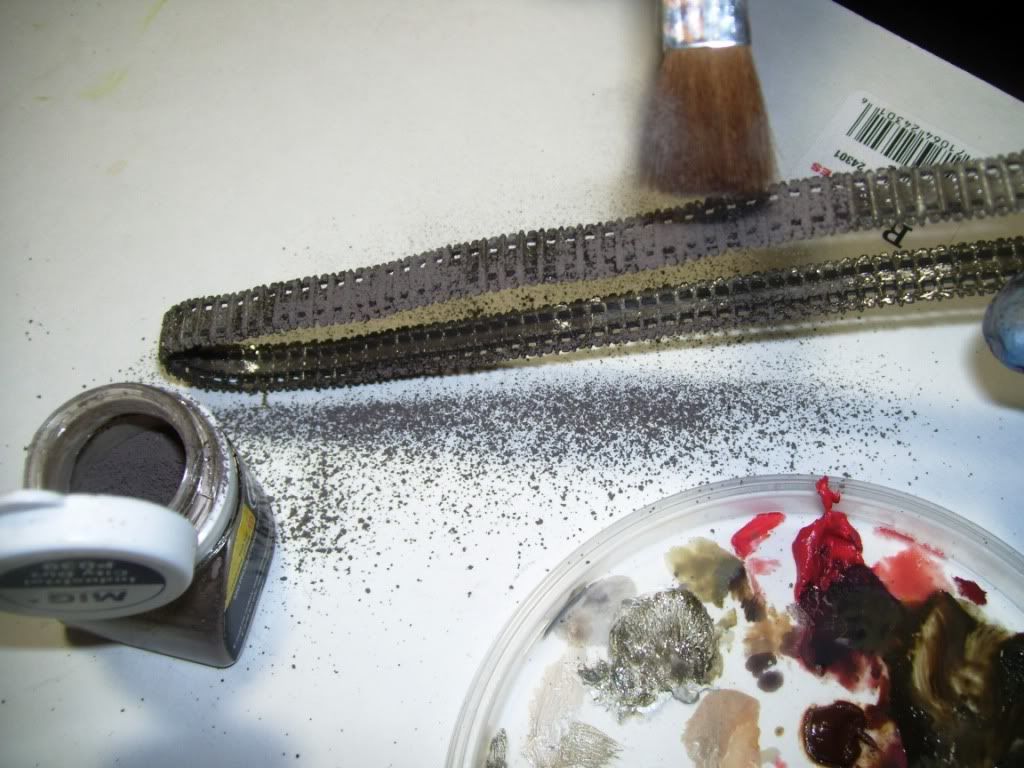
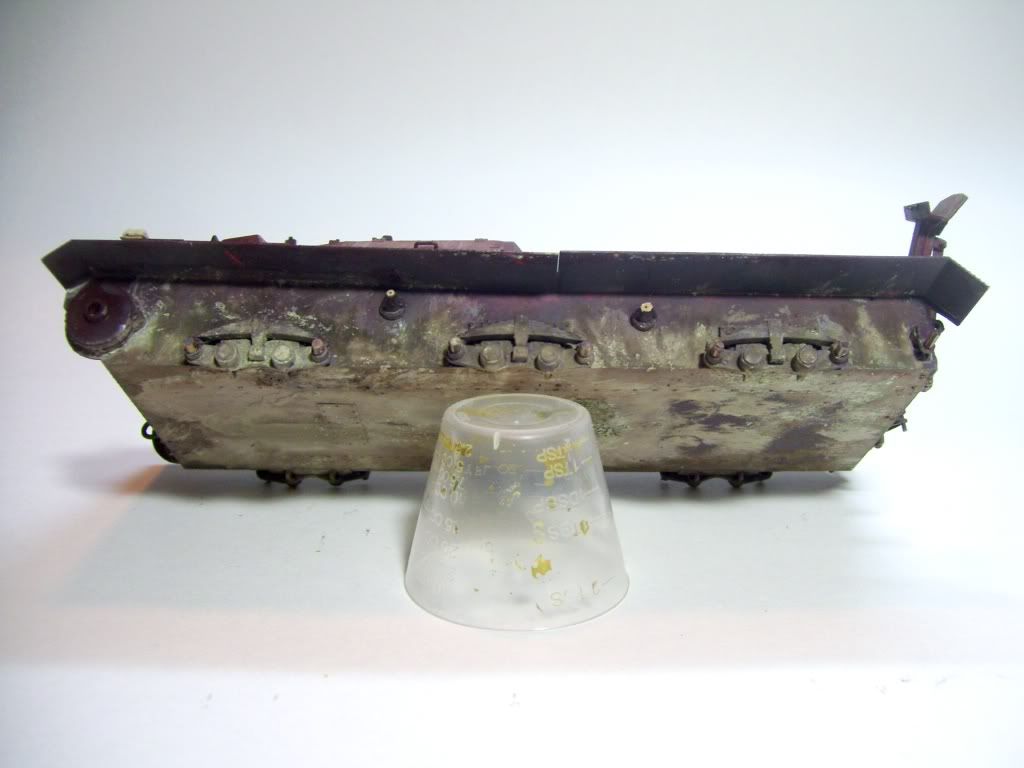
As soon as I was finished coating the tracks, I used my finger to scrape off the pigments from the tops of the track bars, and set them aside to dry. When they had dried, I drybrushed the bare tops of the tracks with metallic grey and then even more lightly in silver. The hull then got the same trearment with the same pigments. I added some MIG Dry Mud to both the completed tracks and the hull bottom, for variety of color tone.

Somebody was asking me how to get metallic chips and "lowlights"--Hinsky? Anyhoo, here's what I use--Testor's enamel "Rubber", plus Silver, plus some oils--ram umber, Black, etc. Mix them up on a flat brush, and then dab most of it off on a paper card...

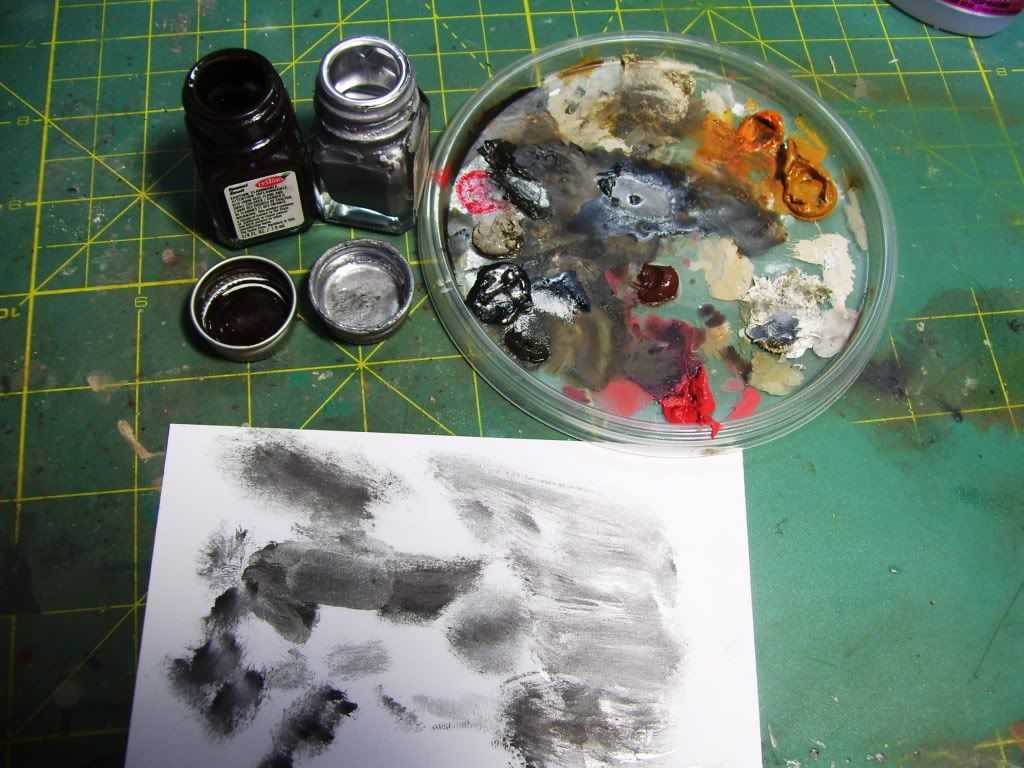
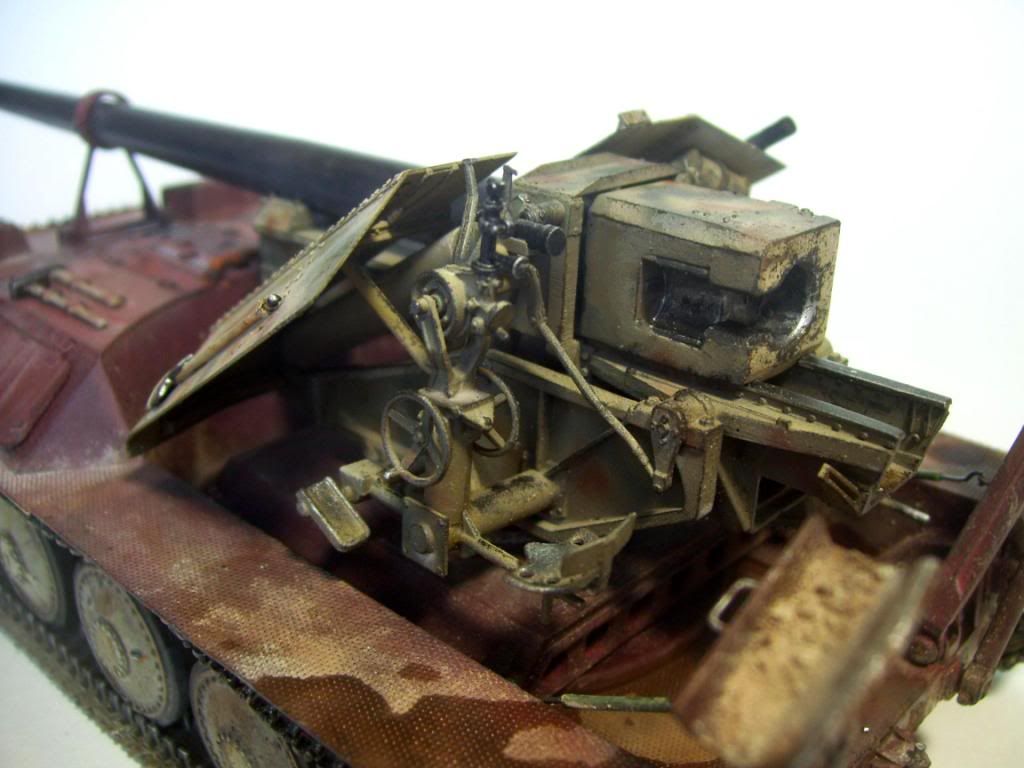
Here I"m chipping the gun trunions and assembly. (I DID clean up that recoil absorber tube...Wink)

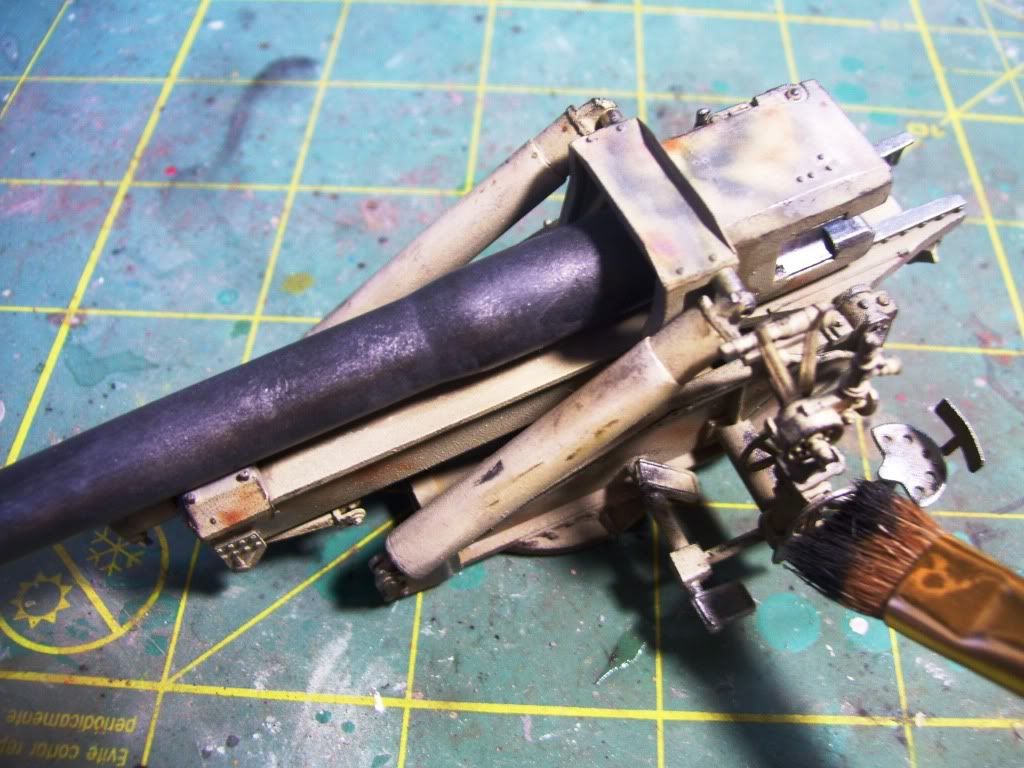
I use the flat side of the brush to "drybrush" the sides and tops of the model. Just drop and drag the flat part of the brush against the edges.

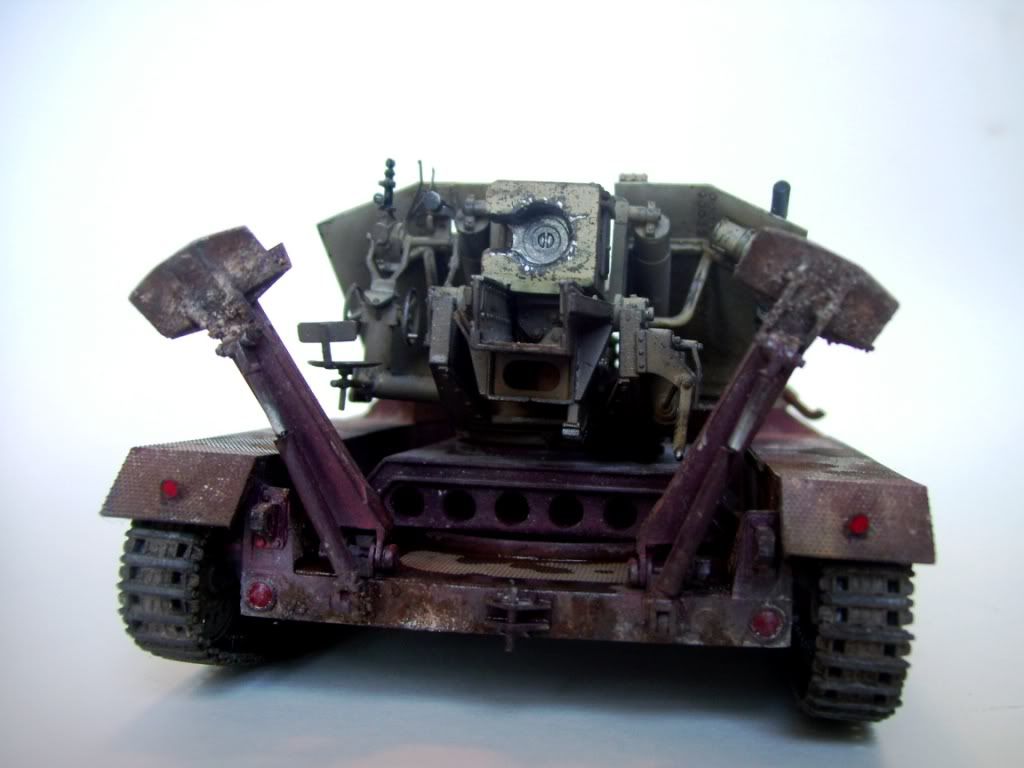
The rest of the build was in small detail painting--adding dirt pigments to the rear spades, touching up some oil stains and some "wet effects" in the rear fighting compartment, rusting the front spare tracks with pigments and oils, painting tools...

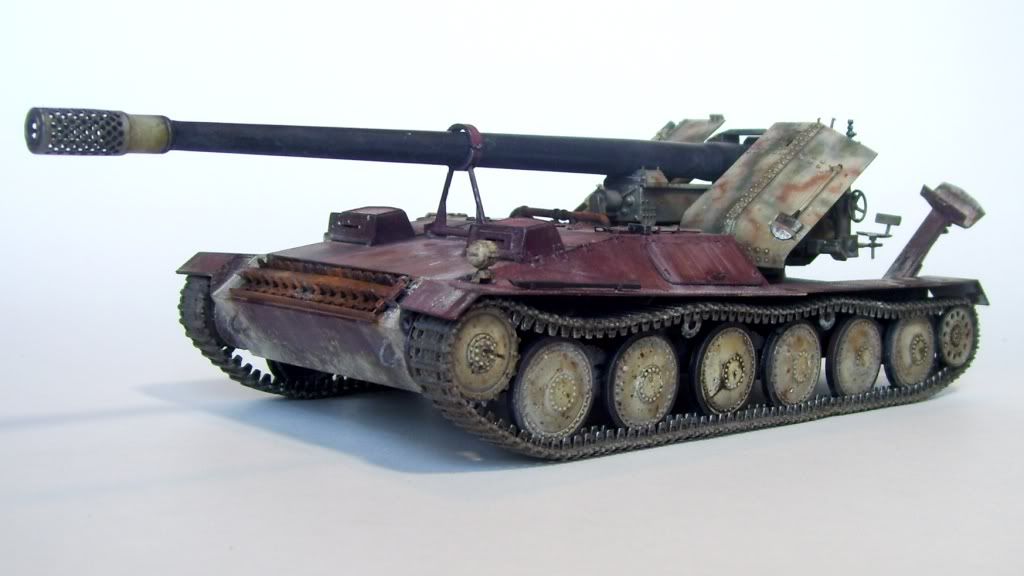
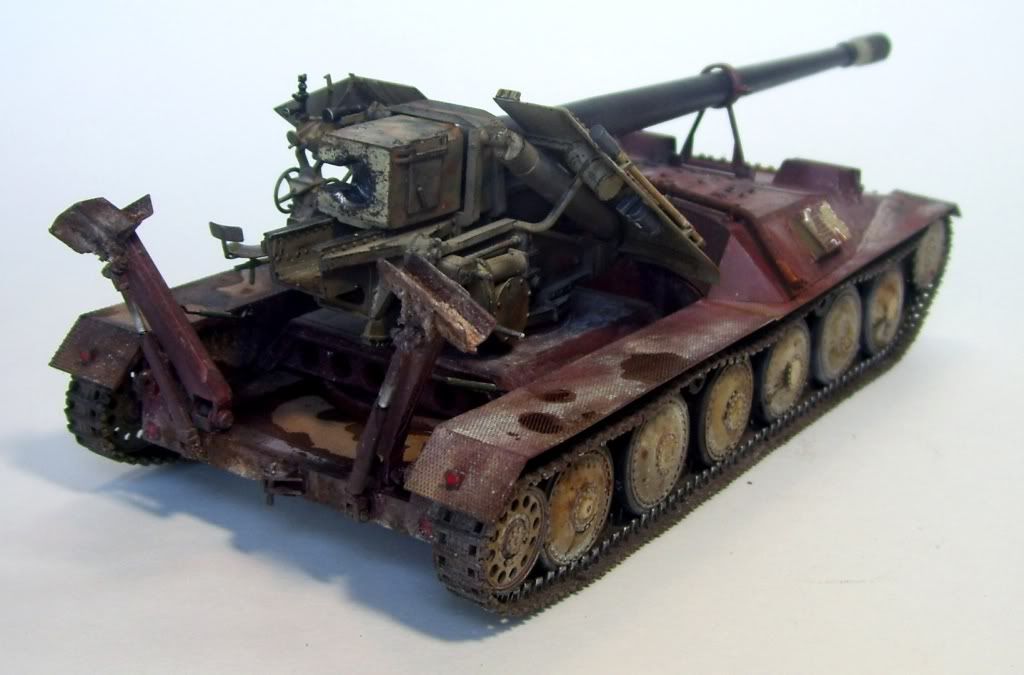
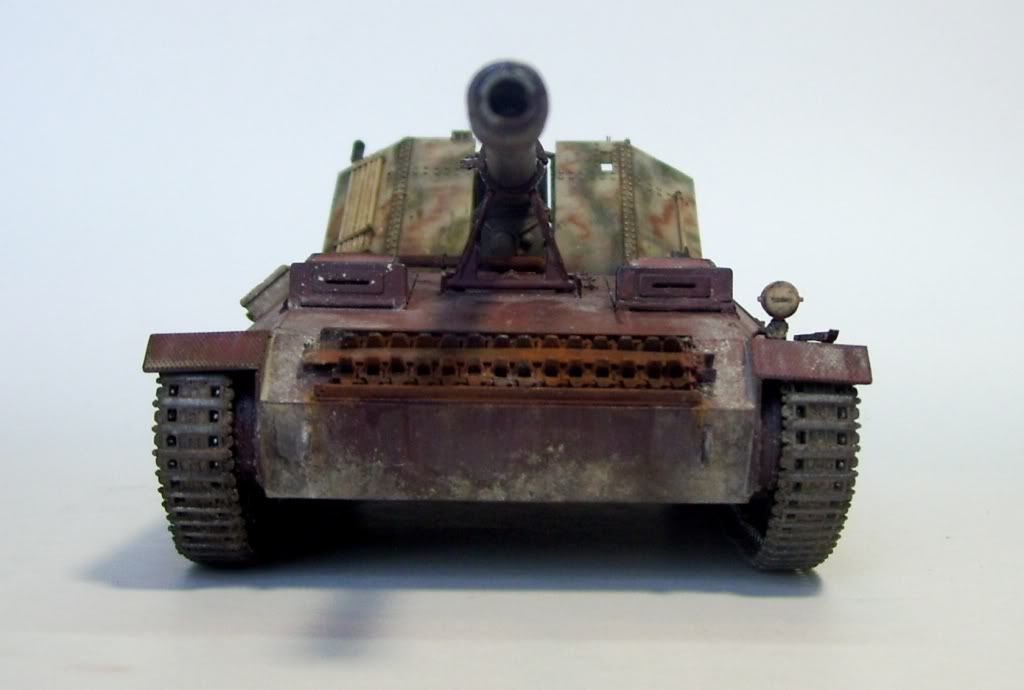
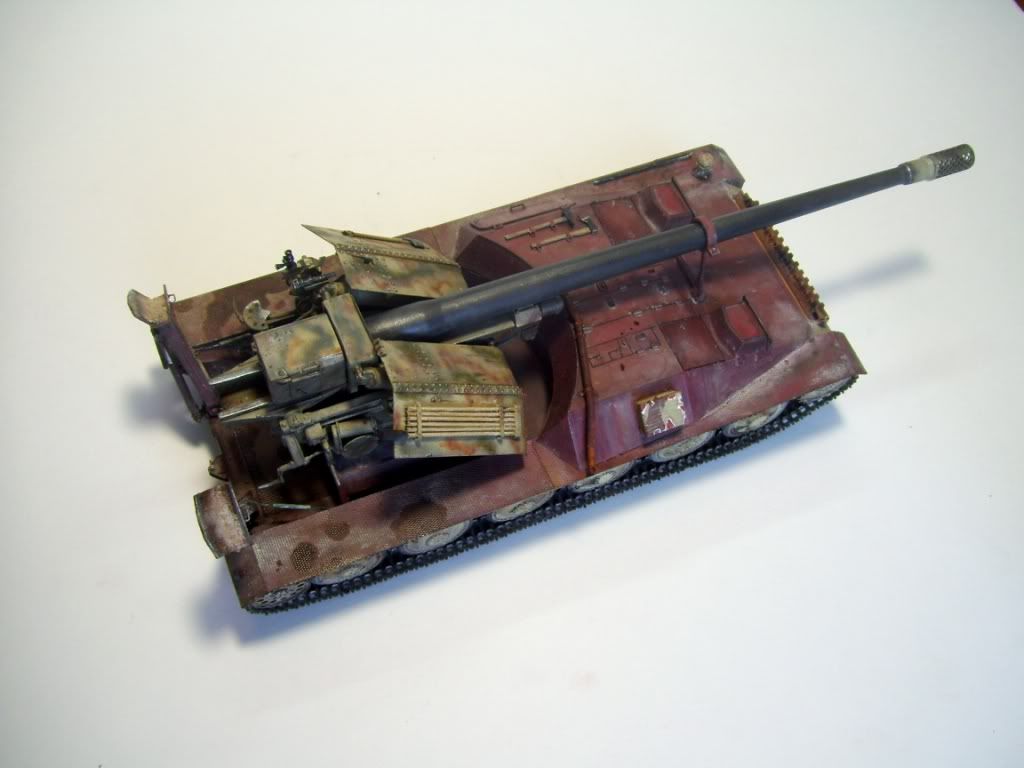
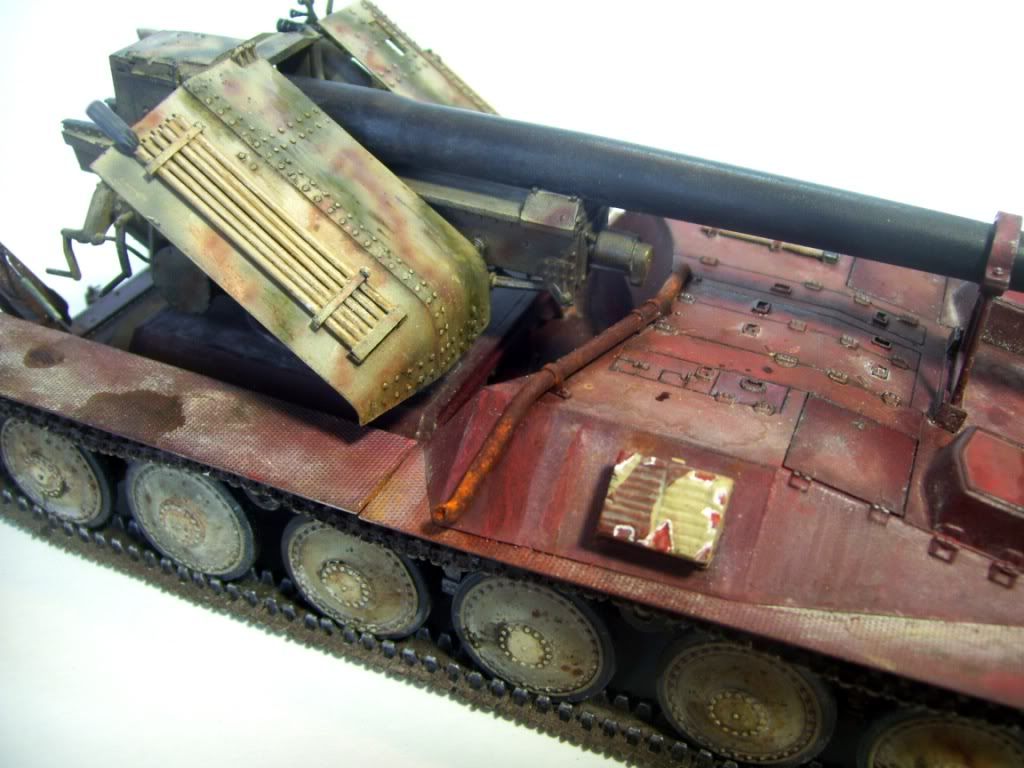
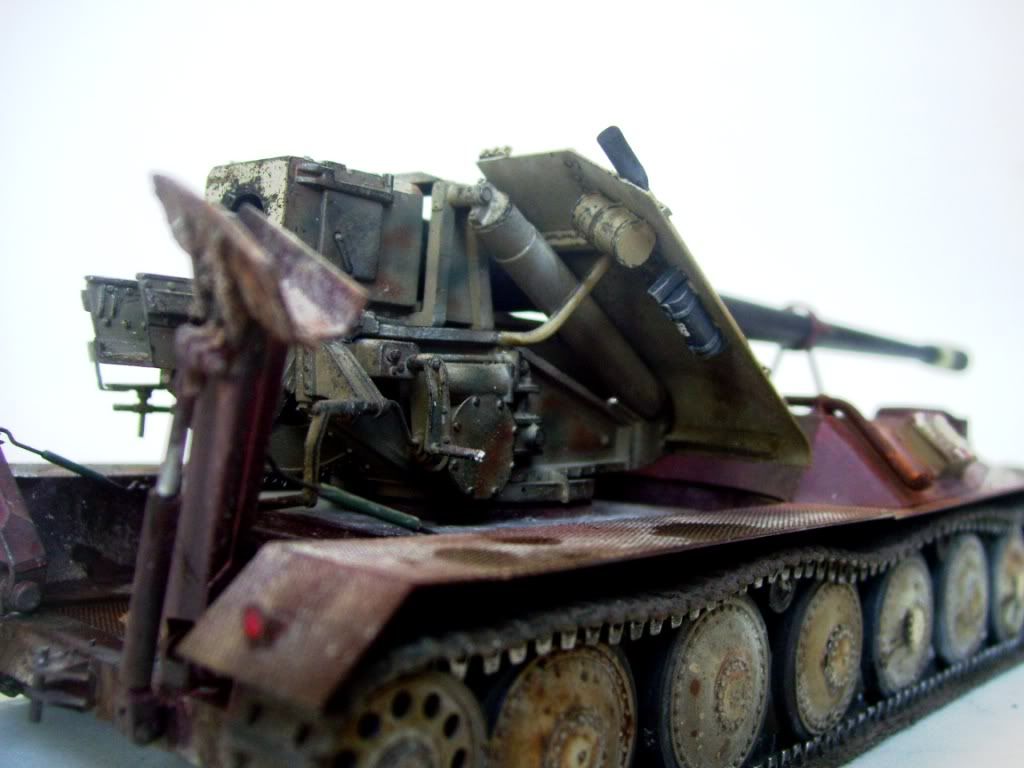
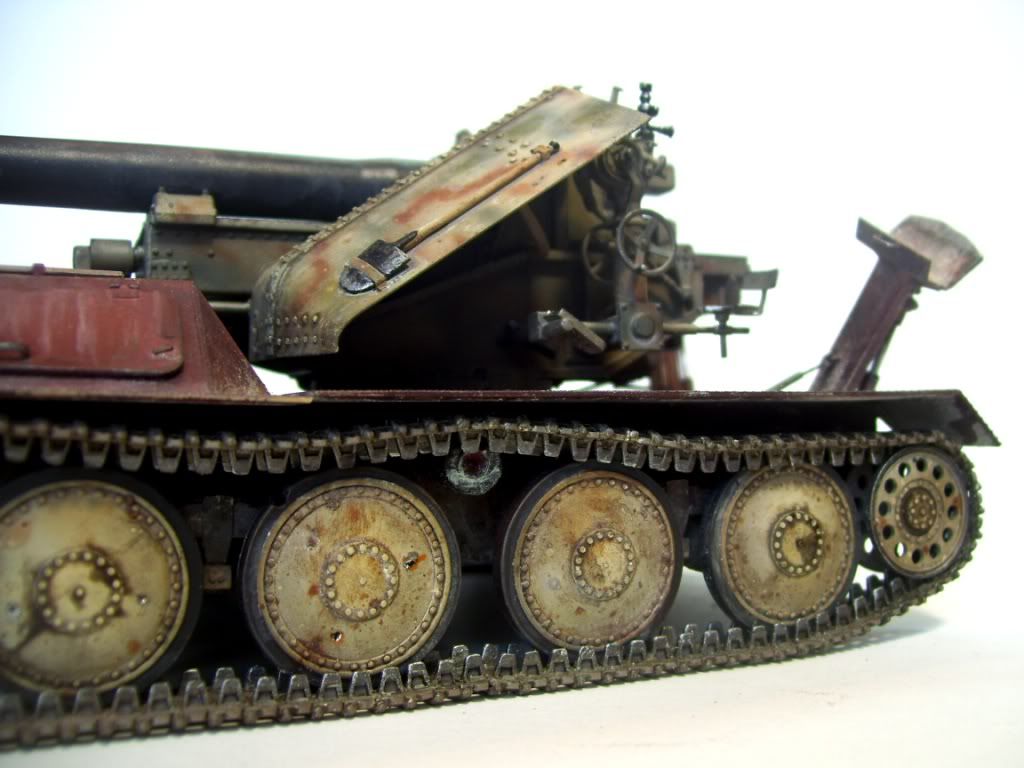
And now, the finished build.... 12.8 cm Waffentrager!

You can see some of the "Wet effects" here in the rear...I didn't put in the shells yet, which would have been stowed under the gun base. I'll put them in when I finally get the figures painted.
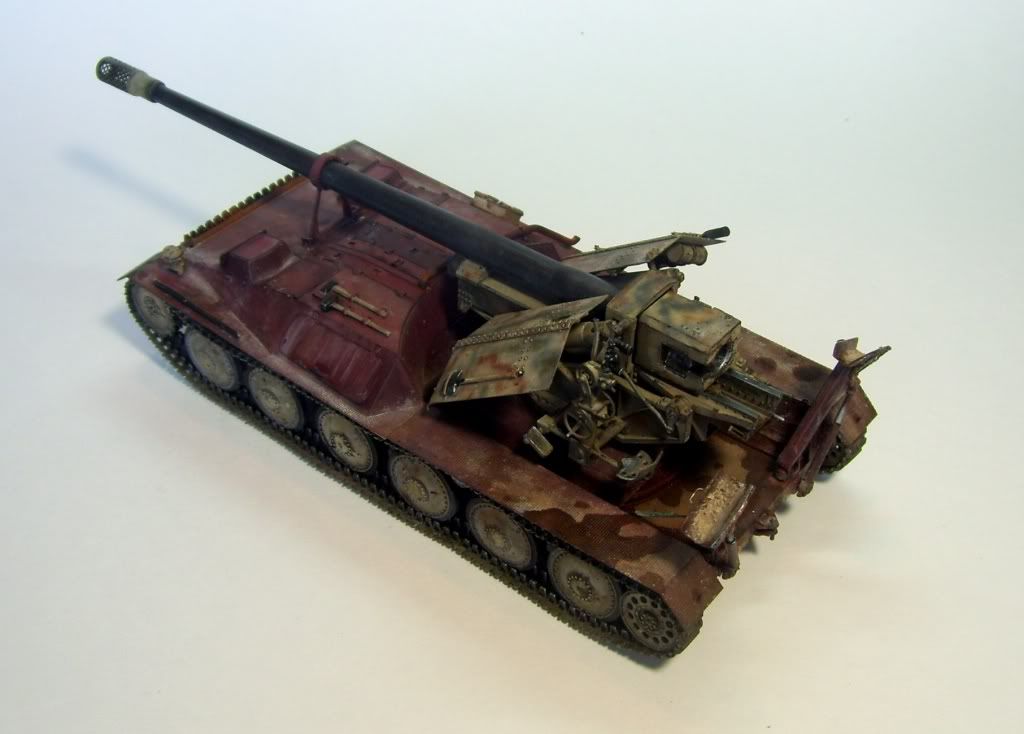
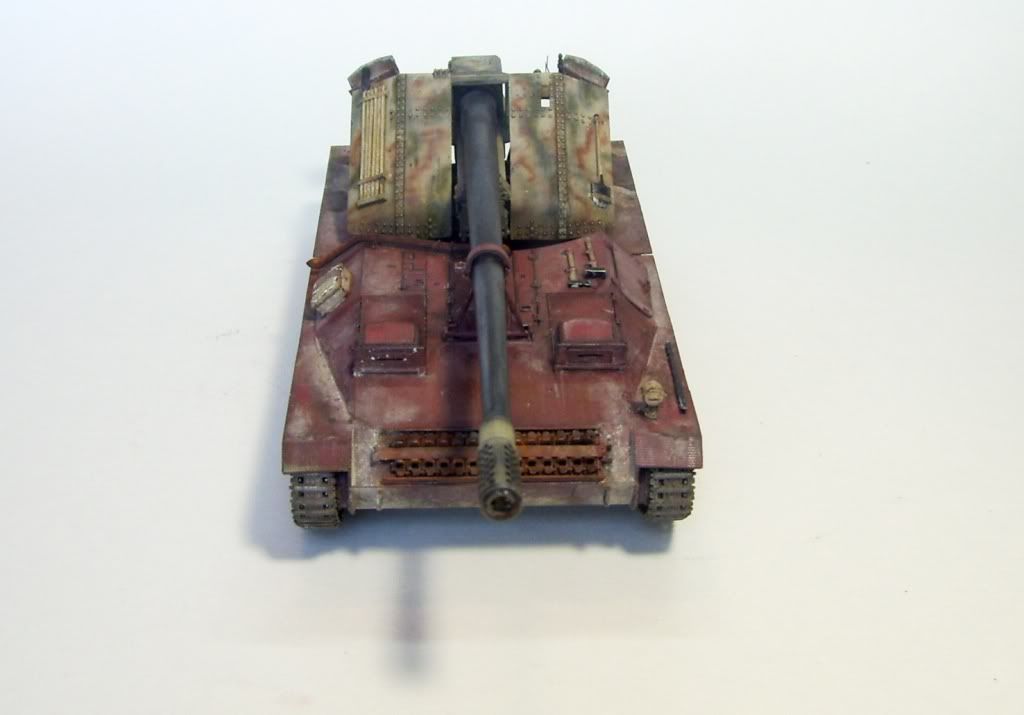
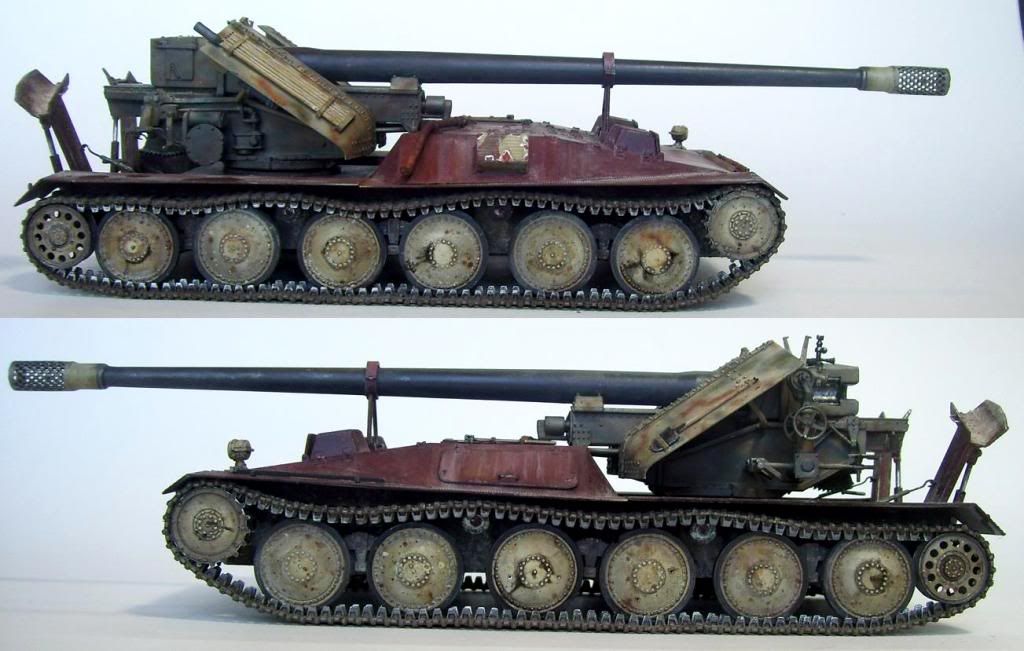
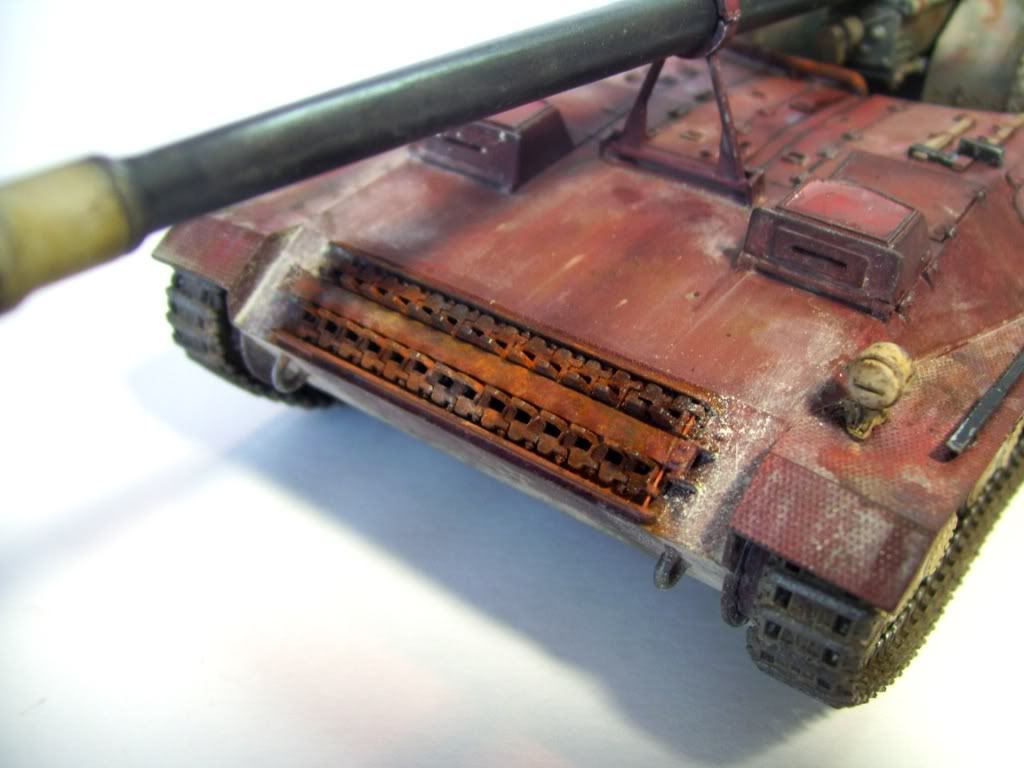
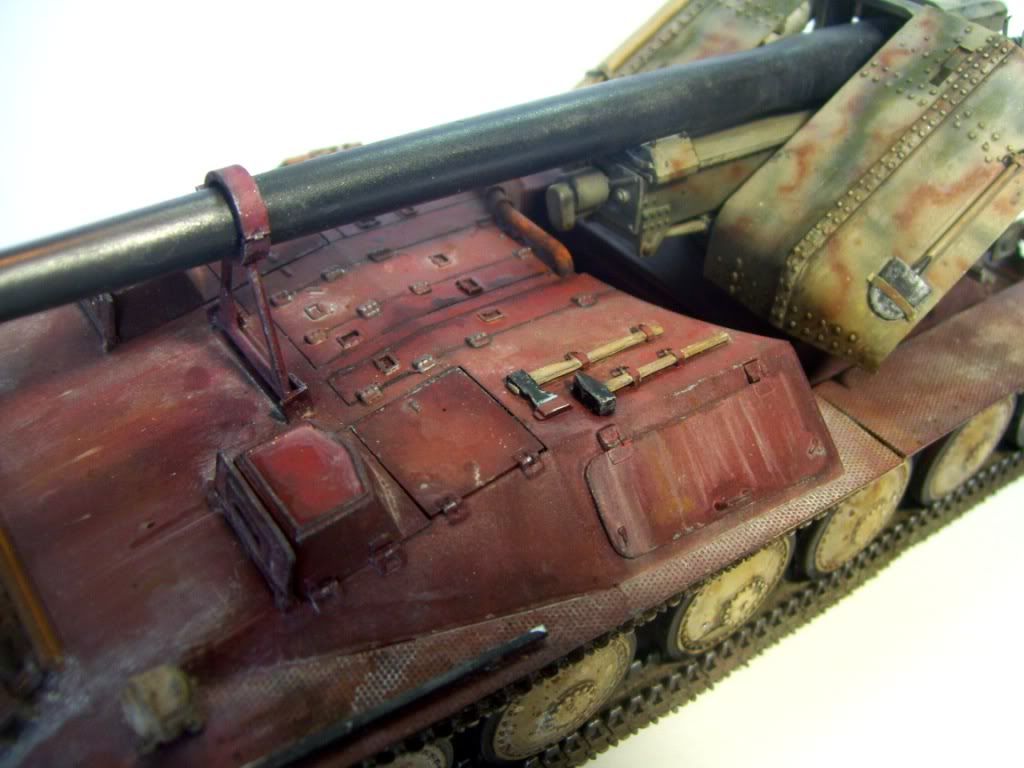
And some close-ups.

I imagined the spare tracks rack to have been a field mod, ergo, rusty.

The tools were painted black, with careful drybrushing of silver. The handles were painted craft store acrylic tan+white, and washed with gray oil and then some raw sienna.

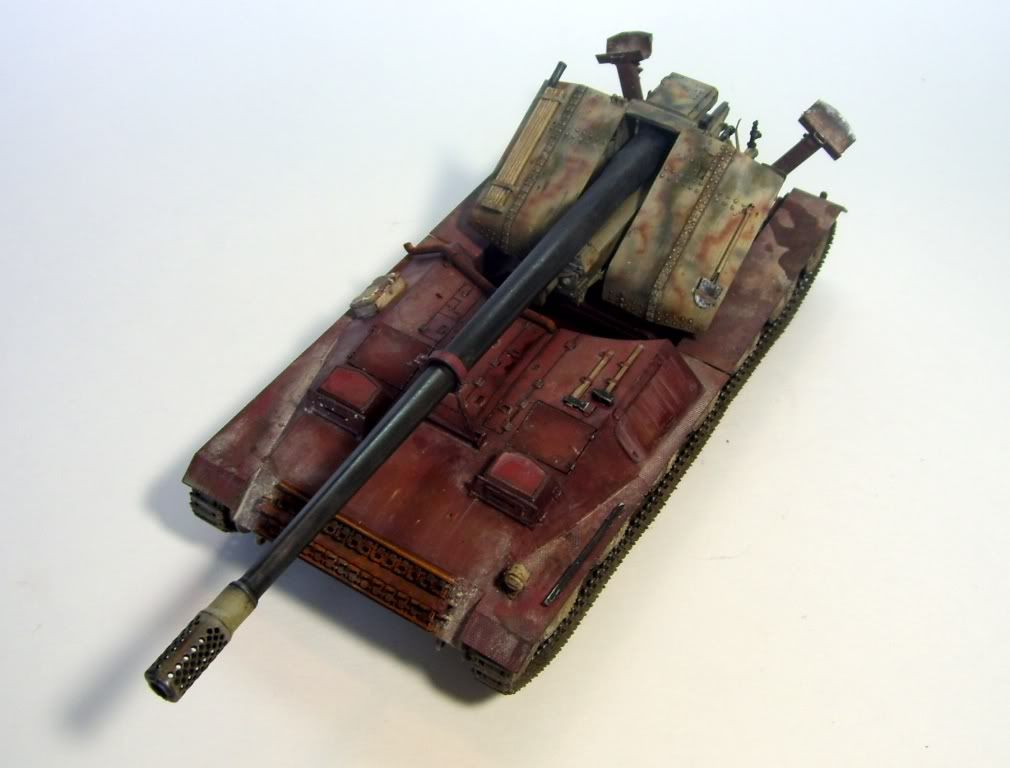
The muffler was rusted using pigments and oils.

The wheels have some MIG "Grease and Oil" mix on the hubs of some of the wheels. Note too that te guide horns are silvered, as they would contact the inside of the idlers.

And that's it, guys. Smile

Thanks to everyone who has followed this build, and taken the time to comment, critique, or send a kind compliment! I appreciate each and every comment, and in many cases, you've helped me in this build with information or suggestions that have only helped to improve the end results. I hope you've enjoyed the WIP and got some inspiration to try something different in your own modeling!  Big Smile

Karl the doog.


  • Member since
    September 2007
  • From: Truro Nova Scotia, Canada
Posted by SuppressionFire on Friday, February 17, 2012 8:12 PM

'August 1945, the last days of the third Reich'

'This 12.8cm Waffentrager survived against all odds and fell into Russian hands after the last 128mm shell had been fired. After almost four months the battle of Berlin is finally over. This prototype weapon is the ultimate example of German engineering keeping pace to meet practical military needs utilizing existing designs. Obsolete at the start of the war the Czechoslovakian 38(t)  was the base of various weapons and transport vehicles, although hard to recognize under the massive cannon this represents its final configuration.'

Dig it Doog!Yes

http://i6.photobucket.com/albums/y211/razordws/GB%20Badges/WMIIIGBsmall.jpg


  • Member since
    August 2008
  • From: S.W. Missouri
Posted by Pvt Mutt on Friday, February 17, 2012 10:17 PM

Karl that is one of if not the best you've done since i've known you.

I am thunder struck at the effects you created with this.

Just Outstanding SirYesStarStarStarStarStar

Tony lee

Shoot Low Boys They're Ridin Ponys

  • Member since
    July 2003
  • From: On my kitchen counter top somewhere in North Carolina.
Posted by disastermaster on Saturday, February 18, 2012 12:46 AM

 Another build blessed by the hand of the ultimate

spruefinger......

                     http://multiply.com/mu/tompremo/image/10/photos/35/1200x120/299/Smiley-Football.gif?et=EBMqeGrtSrQdFvfiPc4b5A&nmid=65449655

http://multiply.com/mu/tompremo/image/4/photos/35/1200x120/240/drunk.gif?et=uVtzJSpHVUKDCet8Jy%2BLug&nmid=65449655

In my opinion, it is just faultless.

  Looks like doog has cornered another one there.....                                    http://th07.deviantart.net/fs71/150/i/2011/272/1/d/drooling_over_by_bullpoopsniperrifle-d4b9ldw.jpg

Sherman-Jumbo-1945

"I was so much older then, I'm younger than that now"


  • Member since
    September 2009
  • From: Rugby, England
Posted by Hinksy on Saturday, February 18, 2012 6:38 AM

Hey Karl,

Superb work my friend. The effects are just mind-blowing and what an amazing machine! I love that huge 'pepperpot' muzzle brake.

Are we going to see it on a base with figures? I know you mentioned figures- or are they going to be standing on this thing with a few stonking great 12.8mm shells/shell cases littered about the place? That would work perfectly!

I see it's in 'travel mode' - that travel lock support for the barrel looks nowhere near substantial enough to support that massive tube!

Brilliant work - I am in AWE! SurpriseWow Bow Down

Keep photos coming!

Are the tracks kit tracks-they look GREAT? Lovely sag! Sorry if you have already mentioned this somewhere dude but I can't find it if you have.

All the best,

Ben Toast

On the Bench - Dragon Pz. IV Ausf. G (L.A.H.) Yes

Your image is loading...


  • Member since
    July 2006
  • From: New Jersey
Posted by redleg12 on Saturday, February 18, 2012 10:37 AM

Karl - As usual a masterful finish. You toots are outstanding. I love the look of the model....it is such a mix of effects. The oil stains are a standout.

In general...another masterpiece....fantastic

Rounds Complete!!

"The Moral High Ground....A Great Place to Emplace Artillery."

  • Member since
    March 2003
  • From: Rain USA, Vancouver WA
Posted by tigerman on Saturday, February 18, 2012 1:45 PM

It really is the weathering that separates the men from the boys. That's why I will always remain in the little boy's corner of the room, because I'm more conservative.

Outlandish subject taken to another level.  Bravo, well done sir.

   http://i7.photobucket.com/albums/y269/wing_nut_5o/PANZERJAGERGB.jpg

 Eric 

  • Member since
    November 2006
  • From: Coastal Maine
Posted by dupes on Saturday, February 18, 2012 2:33 PM

Wow, man...that is a seriously sweet build. Superb weathering as usual!

(PM still forthcoming, sir)

  • Member since
    July 2004
  • From: Texas
Posted by wbill76 on Saturday, February 18, 2012 5:32 PM

Ditto to what the others have said Karl, very nice work on this one and fun to watch it come together. Adding figs and a base will give it all context and add to the finished product I'm sure! Yes

My only small comment would be to tone down the bright orange on the exhaust pipe a bit and darken the mouth with some black pigment or similar...just to give it the look that it's been in use and rumbling about looking for something to destroy with that huge gun. Wink

  • Member since
    August 2006
  • From: Cygnus X-1
Posted by ogrejohn on Sunday, February 19, 2012 3:22 AM

Absolutely beautiful work Karl! 

  • Member since
    January 2007
Posted by the doog on Sunday, February 19, 2012 2:07 PM

Once again, thanks sincerely, guys, for the kind and generous comments! Smile I can't tell you how good it was/is to get "back in the groove" and start modeling Armor again!

SuppresionFire--that was a cool little paragraph you posted. Thanks again for following this build and weighing in!

Tony--wow, that's high praise from one of the most consistent and talented modelers here! Thank you so much for putting a smile on my face! Big Smile

Steve--and I should say the same to you; I"m waiting for your next masterpiece to see what you teach us all about weathering "to the extreme". Thanks, buddy--I genuinely appreciate your comment--and you smileys!

Ben--yup, those are the kit tracks. I managed to get them together with a little help from my friends--uh, wbill76's blogs on his site in particular! Yes Thanks for following and commenting! Unfortunately, although this would look great in a dio, space considerations prevents that at the time. I've been running out of display room for the last two years or so, and I"m at the point of storing some completed models at Jenn's mom's house!

Mike, thanks so kindly as well. My head's going to need a "pop" with all these great modelers here giving me such generous comments!  Embarrassed (I think you know that won't happen!)  Wink

Tigerman--"ditto" as well. Thanks for such a generous comment!

And thanks too, dupes! (Still waiting on that PM if you get the chance? Wink) Take your time though; I'll be right here!

Bill--good call on that muffler pipe! I'll see to that! As I said to Ben, a dio base would look cool, but I'm just not finding the room lately! Maybe a vignette base in the future might work? And abandoned Waffentrager with some Russian soldiers might be pretty keen? Thanks again for the comments, and for your wealth of advice and info on this build!

John--thanks buddy! Glad to see that you're still around here! Big Smile

Big Smile Thanks again, guys!!

  • Member since
    November 2005
Posted by Anonymous on Monday, February 20, 2012 1:19 PM

Wow...extremely nice outcome on this ***'...

Well my first test for all armor is tho ask the question, "Does it LOOK heavy?"  And the answer is a BIG, HECK YES!...partularly nice work with those tracks...this thing wins in all areas...if you decide to show it I predict that it will get a LOT of attention...

YesLIKE!

  • Member since
    November 2004
  • From: Essex England
Posted by spacepacker on Monday, February 20, 2012 3:37 PM

Oh dear, I'm "gobsmacked" again,YesYesYes...cheers....Kenny

  • Member since
    July 2003
  • From: On my kitchen counter top somewhere in North Carolina.
Posted by disastermaster on Tuesday, February 21, 2012 1:59 PM

Hey guys ..... 

   look here......

     doog got a tattoo!

http://sphotos.xx.fbcdn.net/hphotos-ash4/s320x320/405410_10150567043483208_45564118207_8984233_1984901030_n.jpg

Just HAD to put that one up.

Sherman-Jumbo-1945

"I was so much older then, I'm younger than that now"


  • Member since
    May 2005
  • From: Dublin Rep Of Ireland
Posted by terry35 on Wednesday, February 22, 2012 5:06 PM

Karl that is truly an amazing build and one fantastic build log, very informative and well presented. 

I agree with the colour choice on the wheels, they would have been taken from the 38d wheel which was different to the standard 38t and early heater wheel in having a smaller diameter and less bolts, in other words they would have been taken from the late hetzer production lines which was due to change again into the Starr.

Again congrats. On a beautiful model.

Terry.

  • Member since
    January 2007
Posted by the doog on Wednesday, February 22, 2012 9:02 PM

Manny, thanks for the "heavy" Yes. Pretty appropriate I guess for a heavy metalhead like me! Wink I WILL show it at some point--I have to find some shows down here in NC!

Kenny---thanks again for being "gobsmacked"! ha ha. (I love that word!) Big Smile

Terry, thanks for your comment, and for the agreement on the wheels! I had no idea about that whole "D" vs "t" thing? I'm relieved to hear that I made the right call on the color!

Big Smile Thanks again, guys!

  • Member since
    January 2007
Posted by the doog on Wednesday, February 22, 2012 9:05 PM

disastermaster


http://sphotos.xx.fbcdn.net/hphotos-ash4/s320x320/405410_10150567043483208_45564118207_8984233_1984901030_n.jpg

HEEEYYYY DOOG!

I love it, Steve! Big Smile

  • Member since
    September 2005
  • From: Uppsala, Sweden
Posted by bultenibo on Tuesday, February 28, 2012 5:24 AM

Well, what can I say that hasn't been said before - it's plain beautiful! Stick out tongue

What I especially like is that you've really captured a exciting historical situation in one single vehical. Just looking at it I get the feeling of desperation in the spring of 1945:

The Reich is rapidly falling apart, the industrial production is in ruins, but still the germans tried their best to piece together another vehicle to send to the front. The contrast between the naked steel barrel, the red hull and the few parts with camoflage paint signals both the desperation and ingenuity of the german industry at the last days of the war. That's quite an achivement to represent that with a single vehicle!

Have you considered adding one or two figures to it? A german crew or a allied soldier inspecting the monster with amazement would be suitable in my opinion.


/Bultenibo


  • Member since
    March 2006
Posted by TD4438 on Tuesday, February 28, 2012 6:06 AM

The attention to detail around the breach is fantastic!Toast

  • Member since
    January 2007
Posted by the doog on Tuesday, February 28, 2012 9:11 AM

Thanks, Tony! -- I will eventually paint up two crew figures to stand on the fenders or next to it when I get home to NC--right now I"m working up in NY, and won't be back til the 10th or so. An interesting perspective you had on it; I appreciate you posting it! Thanks for the kind words!

Ed--thank you sincerely! I actually spent a lot of time working that to get it looking "Just right"! Thanks for noticing it!!!

Big Smile

  • Member since
    January 2008
  • From: Bournemouth UK
Posted by Bodge on Tuesday, February 28, 2012 4:43 PM

Karl how ya doin? i have been away for a while but wow what a build to return to the forum and see. Superb weathering  and a superb build. Just how i would have wanted to do it. BRAVO

  • Member since
    January 2007
Posted by the doog on Wednesday, February 29, 2012 12:37 PM

Thanks, Andy! I've been .... busy, as usual. Currently up in New York, working; not back until next weekend. and then to start another Waffentrager!

Thanks for the compliment--I'll bet yours would be just as sweet! I KNOW it would be. Wink

  • Member since
    April 2003
  • From: 41 Degrees 52.4 minutes North; 72 Degrees 7.3 minutes West
Posted by bbrowniii on Wednesday, February 29, 2012 2:13 PM

Karl

That thing is ridiculously good! Of course, we have learned to expect nothing else from you!

Good luck with that new CD.


PS Expect a PM from me - I've got a quick off-topic question for ya! Smile

'All that is necessary for the triumph of evil is for good men to do nothing' - Edmund Burke (1770 ??)


  • Member since
    January 2007
Posted by the doog on Wednesday, February 29, 2012 3:53 PM

Thanks, Boyd, for the nice comments, and the wishes on the CD!

I think that this model would make a great CD cover?!? ha ha!

Hi me up with a PM any time! Big Smile

  • Member since
    April 2009
  • From: Carmel, IN
Posted by deafpanzer on Wednesday, February 29, 2012 7:02 PM

Looking GREAT!!!  I smell another magazine cover... no kidding!  

Good luck with the CD!  Please make sure it comes captioned or subtitled... remember I am deaf.  Oh you can't do it? That's OK as long as you send one of your best looking groupies to help translate what you are singing about... Whistling

Andy

  • Member since
    March 2010
  • From: Buffalo, NY
Posted by macattack80 on Friday, March 2, 2012 2:49 AM

deafpanzer

Looking GREAT!!!  I smell another magazine cover... no kidding!  

Ditto  That is awesome!  Nice tutorial with your weathering and scratchbuilding processes.  Thanks for sharing.

Kevin

[


  • Member since
    January 2007
Posted by the doog on Friday, March 2, 2012 8:29 AM

Thanks, mac! I"m happy to share anything I have learned here and in other forums! Smile It's just a way to give back for all the help I"ve received!

  • Member since
    November 2009
  • From: SW Virginia
Posted by Gamera on Friday, March 2, 2012 11:27 AM

Karl, super model of a very interesting subject. And thanks for the WIP/Tutorial. I haven't worked up the guts yet for anything as extreme as the different coloured hull and gun or the heavy weathering but I'm reading all I can and letting it ferment in my noggin.

And great save on the muzzle brake - nice to know that even master modelers have things go south every now and again. I'll try to think of this next time I drop a model on the concrete basement floor while airbrushing it.....

Cliff  

"I dream in fire but work in clay." -Arthur Machen


  • Member since
    January 2007
Posted by the doog on Friday, March 2, 2012 3:46 PM

Hey Cliff--nice to know your real name! Big Smile

Thanks for the nice, thoughtful comment! I don't mind showing where I screw up--if there's one thing I've learned through modeling, it's that sometimes a "failure" is not a failure at all, but a blessing-in-disguise!

Of course, dropping a model on concrete...uh oh...Surprise....Big Smile

JOIN OUR COMMUNITY!

Our community is FREE to join. To participate you must either login or register for an account.

SEARCH FORUMS
FREE NEWSLETTER
By signing up you may also receive reader surveys and occasional special offers. We do not sell, rent or trade our email lists. View our Privacy Policy.