SEARCH FINESCALE.COM

Enter keywords or a search phrase below:

IDF GB 4/20/08 - 4/20/09

94464 views
468 replies
1 rating 2 rating 3 rating 4 rating 5 rating
  • Member since
    April 2005
Posted by Thunderbolt379 on Sunday, July 13, 2008 11:36 PM

Hi all,

Sorry I've not been around lately. I've not had a chance to touch any projects for the last three weeks or so, too much real life. Also I was waiting on parts, in particular the PE set for the Merk II.

I ordered the Airwaves set, plus some resin items for my entry in the Corsair GB, from Great Models Webstore a month ago and they're not shown up. I contacted them a week back with a copy of the email order record, to inquire order status, but they've not replied...

I would have assumed GMW was one of the most reputable firms in the business. Has anybody else had a negative experience with them? This was my first ever order with them, and it doesn't give me much confidence to order again. I also doubt I can afford to re-order the items, even if I could find them elsewhere. This is a shame, I was looking forward to finishing the Merk in style. The Eureka tow cables arrived from another dealer no bother!

Cheers,

TB379

http://worldinminiature.blogspot.com/

  • Member since
    January 2005
  • From: Portland, Oregon
Posted by fantacmet on Monday, July 14, 2008 12:42 AM

No worries about the timeframe, this is a slow paced GB, which is why it is so long.

By GMW I assume you mean Great Models.  I've done business with them before.  Everything went smoothly.  Alot of people have good experiences with them.  Would I do business with them again?  Sure, not sure when though.  Mostly when I order online I order from luckymodel.  Take a bit longer, but I've been really satisfied with their service.  I've placed orders with luckymodel like 5 or 6 times now.  Once with GM, once with Evers Toy Store(good place), and once with squadron.  All transactions went smoothly.  Best interaction was with LM and Evers.

For those who like racing, I just spent that past two days working 12 hour shifts doing security for the local racetrack putting on historical races.  We had alot of old racecars, old Indy, F1, Nascar, Euro, etc.  Richard Petty's car he drove on the road circuits on his farewel season was there, and it drop it's wheel weights on a wheel which gave the car nasty vibrations on the track and sent it into the wall.  I've got the wheel weights.  No I didn't take them off they fell off when the car drove past my heading back to the paddock.  I was in charge of the track exit, and keeping order on the starting grid.  Sorry didn't get any pics I was too busy working. 

Michael


  • Member since
    September 2006
  • From: Dripping Springs, TX, USA
Posted by RBaer on Monday, July 14, 2008 11:45 AM

Looks like everyone's been busy......I've been in Missouri, vacationing, and promptly got the flu. Great. Wife is off on a "girls' weekend" soon, so I'll be back at the modeling....

Russianfist, the IDF paints maintenance items and things that need to be located in a hurry red, so you'll find grease points, tow cable attachments and such painted red.

Apprentice rivet counter.

  • Member since
    October 2007
Posted by White_R34 on Monday, July 14, 2008 11:57 AM

Hay that is one thing I was going to ask all of you why are some parts E.I. Tow hucks and such painted red? I didn't get a chance to ask my friend over there in Israel yet, so I ask you all. Now I have painted the parts on my jeep that red color. I just wont to know why they do that. To me it sticks out but looks good. Oh I'm putting on all the parts and weathering and I will have the finished model up to day just give me alittle more time. It's 11:58 here and I should be done 12:50 if not I will post what ever I have at that time and then finish it after that if I'm not done at 12.

Man this small build was a lot of fun Oh Oh I'm still working on my tanks also.

Building the Impossible Is my main goal!!
  • Member since
    October 2007
Posted by White_R34 on Monday, July 14, 2008 3:01 PM

OK I'm a little late posting but here is what I have done so far. I used black wash on some parts of the jeep as well as the wheels then I added the light colored dirt to the grip spaces on my tires. You will notice that the side rear view mirror is gone I'm making a new one as from looking over my Ref. Phots I see it should be bigger and stand up strate. Not like that little hot rod type I had on. I all so added two more TOW tub holders.

In these photos I used the rong light, sorry for the color.

I think the radio and stuff came out well.

Here's a shot with the right light.

Here's a shot with my TOW MUTT & Merkava Mk. III

I got the book that I thought was the right one but not. It had some photos of the top of the turret that helped but the only cut away was of and the IDF's new APC. I may go and get the book on the Merkava tank History to see if I can find what I need but till I come across the interior images I need I am going to pass on that part of this build till then but I build the turret were I can pull the top off to do the work in it and keep the exterior intacked.

I used two types of putty to help with the armor parts. Types are Squadron Green & Testors light gray as a filler.

Building the Impossible Is my main goal!!
  • Member since
    September 2006
  • From: Dripping Springs, TX, USA
Posted by RBaer on Monday, July 14, 2008 6:08 PM
Mutt looks great, looking forward to seeing the Merk come along as well.

Apprentice rivet counter.

  • Member since
    April 2005
Posted by Thunderbolt379 on Monday, July 14, 2008 8:42 PM

Fantacmet -- hi, thanks for your thoughts on GMW. I wrote to them again and they replied at once -- it turns out they haven't shipped the order yet, they're waiting on one of the items to come into stock. Phew! No worries, whenever it arrives I'll finish the Merk II.

R34 -- Fantastic work! The Mutt looks really great! The cable connections on the TOW came out amazingly well, and the sand in the tires is very realistic. The scratchbuild on the Merk turret is a painstaking piece of work, when it's all flushed together with filler and painted it should look absolutely first rate!

Russianfist -- looking GOOD! I can't wait to see this bad boy go through the paintshop! What page were your early details on? I'd like to go back and look up your sources for turret and barrel.

Cheers,

TB379

http://worldinminiature.blogspot.com/

  • Member since
    July 2004
  • From: Oregon, Rain country U.S.A.
Posted by russianfist on Monday, July 14, 2008 9:47 PM
 Thunderbolt379 wrote:

Fantacmet -- hi, thanks for your thoughts on GMW. I wrote to them again and they replied at once -- it turns out they haven't shipped the order yet, they're waiting on one of the items to come into stock. Phew! No worries, whenever it arrives I'll finish the Merk II.

R34 -- Fantastic work! The Mutt looks really great! The cable connections on the TOW came out amazingly well, and the sand in the tires is very realistic. The scratchbuild on the Merk turret is a painstaking piece of work, when it's all flushed together with filler and painted it should look absolutely first rate!

Russianfist -- looking GOOD! I can't wait to see this bad boy go through the paintshop! What page were your early details on? I'd like to go back and look up your sources for turret and barrel.

Cheers,

TB379


 Hey guys, yeah I have been super busy myself.

My project has a few more details to do and then its to the paint shop it goes.

I picked up the barrel on ebay from a company in hong kong called barrel depot for one of my as-90 kits.

I have a question for you guys, why does the IDF paint some items on their vehicles bright red?

I have seen this many times and yet to find out what it means?

Any ideas?

You got a telegram from headquarters today. Headquarters--what is it? Well, it's a big building where generals meet, but that's not important right now. [ img] f_armorsecretm_ac7eb73[/ img]
  • Member since
    September 2006
  • From: Dripping Springs, TX, USA
Posted by RBaer on Tuesday, July 15, 2008 12:34 PM

The red-painted items are maintenance points (grease fittings, bearing covers, etc.) and items the need to be found in a hurry, such as tow-points. Get a look at the mine rollers on the Magach and Merks, they've also got all the grease-points and disconnect fasteners painted red, both on the attachment points and the roller itself.

The practice of using red on these items seems to have begun during the "Peace for Galilee" operation or directly after it. Must have been lots of recovery operations under fire, and rapid recognition of tow points been an issue.

Apprentice rivet counter.

  • Member since
    July 2004
  • From: Oregon, Rain country U.S.A.
Posted by russianfist on Saturday, July 19, 2008 3:18 AM
 RBaer wrote:

The red-painted items are maintenance points (grease fittings, bearing covers, etc.) and items the need to be found in a hurry, such as tow-points. Get a look at the mine rollers on the Magach and Merks, they've also got all the grease-points and disconnect fasteners painted red, both on the attachment points and the roller itself.

The practice of using red on these items seems to have begun during the "Peace for Galilee" operation or directly after it. Must have been lots of recovery operations under fire, and rapid recognition of tow points been an issue.


Thanks RBaer.

I was scrolling some of the old post on this page and saw I have you repeating yourself.

DOH! Sign - Oops [#oops]

Well I am about to start final assembly of the lower hull.

Their are a few more items that I think I wanna add and clean up.

I am finding that the gun craddle attachment that I have added will have to come off the lower hull and be reset after I put the clam shell attachment on it and fill the seem.

I have a couple of figures might look pretty good with this!

I love being able to run with my imagination on this one, however it's almost to much freedom LOL.


You got a telegram from headquarters today. Headquarters--what is it? Well, it's a big building where generals meet, but that's not important right now. [ img] f_armorsecretm_ac7eb73[/ img]
  • Member since
    October 2007
Posted by White_R34 on Saturday, July 19, 2008 10:33 PM
Ok you all I only have 5 things to do and add to the jeep and I will have the finished model up soon and I think you all may like it. Just one more day and Thumbs Up [tup]"Badge time"Thumbs Up [tup]
Building the Impossible Is my main goal!!
  • Member since
    September 2006
  • From: Dripping Springs, TX, USA
Posted by RBaer on Monday, July 21, 2008 12:01 PM
I got a little more done Saturday, but the wife had the camera over the weekend, so no pics yet. Still have quite a bit to do before paint.......

Apprentice rivet counter.

  • Member since
    October 2007
Posted by White_R34 on Thursday, July 24, 2008 5:38 AM

I know I was to have this project done 2 or 3 days ago but that "dag gum" add more stuff bug bit me once again. So there I am (Oo Oo I found some thing, I thing would look good on my project), here I go Looking up info on items, Cut, sand and glue then mix paint and paint items. So you see that bug bite gets us all from time to time. These are some of the items I wanted to add and some thing's I wanted to change.

The things I changed was the coiled base to radio antenna. I wanted it to have that bint to the front look. Here's some photos of my work.

I also made the side view mirrors larger, like they come on the images from the IDF modeling site and the 1:1 version.

Now about that M16 I did a lot of research on the newer version that is used in Iraq by (US Solders) and by the IDF and what I found is the name now if M16A2. So I had the rebuild or modify the gun from the stock M16A1. I marked all the places that needed to be cut.

4 sections:

I also cut down the gun barrel as well see here in the Image's of the real rifles and then my conversion.

Before Painting:

After Painting:

But that was not all I deeded to add a rifle strap but the black one would hide features on the rifle. So I kep looking for an Image of an IDF solder with a green strap and I found one. So I added the color of light OD Green. As for that ammo box it was to small so I got a bigger one.then I found the best looking amunition and painted it Testors gold and then dark ODG for the bullet holders. I then looked and saw soome images of how the ammo looks like going in to the gun from a box like this one. So I made a cearv to the ammo jacket and ran them in to the gun. I added and IDF helmit with Scott goggles, that I saw in a photo. The Helmit comes from the Academy IDF solder kit and the goggles come from the Tamiya MUTT kit. I painted the goggles clear part with high gloss clear by Testors. All the othere paints are from Tamiya X- what ever.

The painted set:

An without further ado: The IDF M151A2 (Ford MUTT) w/TOW Launcher is done. I must say I thing I earned my badge don't you all think so. I have started an out side post with a lots more Photos in it. go there to see more.

Link to more images: /forums/978415/ShowPost.aspx#978415


Building the Impossible Is my main goal!!
  • Member since
    August 2007
  • From: The Plains of Kansas
Posted by doc-hm3 on Thursday, July 24, 2008 7:18 AM
 Vince, Like I said on your other post... FANTASTIC!!!

All gave some and some gave all.

  • Member since
    September 2006
  • From: Dripping Springs, TX, USA
Posted by RBaer on Thursday, July 24, 2008 12:20 PM
Ditto!

Apprentice rivet counter.

  • Member since
    October 2007
Posted by White_R34 on Thursday, July 24, 2008 5:02 PM

Now on to my Merkava project I my self can't wate to get that one done. OK you guys let's see some progress, I got one done and I'm on to my next one. I don't need to order any thing so you know that all I need to do is get it done. Are you all having fun yet?, I am. 

An thanks for the grate comments guys. Here's and updated or fixed photo of the MUTT.


Building the Impossible Is my main goal!!
  • Member since
    September 2006
  • From: Dripping Springs, TX, USA
Posted by RBaer on Friday, July 25, 2008 11:57 AM

Got off my kiester this morning and got a few pics of the Magach turret work from last weekend, finally. Added the commander's MG mount, the MG on the mantlet (still needs the remote firing device) and the bustle mesh (yech, but the baslet will be pretty full later). Getting closer. Next is tow cables and spare road wheel on the OCD and turret stowage. Then maybe paint. Whoopie!

Thanks for looking and comments! And yes, I'm having FUN!

Apprentice rivet counter.

  • Member since
    October 2007
Posted by White_R34 on Friday, July 25, 2008 7:47 PM

The detail work on that turret is just stunning Bow [bow]Bow [bow]Bow [bow] you da man! Hay how did you all like my M16A2 assault rifle conversion it was a blast to build I'm going to order up some more kits so I can do more. I plan on building a Volvo Tank Transporter by getting two Italeri M923A1 5-ton trucks and converting them in to my own version of what I think a new IDF Vovlo tank traspoter should look like, but once I get the kits I will start a new post on the full scratch building project. It will be for my Merkava III tank. As I don't realy like the Volvo use in Israel to day.

IDF Volvo Tank transporter:

http://idfmodelling.free.fr/refview.php?name=ref_veh_pictures/transport/volvo_02

http://idfmodelling.free.fr/refview.php?name=ref_veh_pictures/transport/volvo_09

About the kit I will use to pull off one realy cool looking transporter. I know some of you may feel a littleConfused [%-)] See I need a set of 1/35 wheels, tires, and a chassis,that this kit has. I can convert just what I need to pull this off.

http://www.squadron.com/ItemDetails.asp?item=IT0279

See I think the transporter should look as beefy as the tanks it transports. See here are some that look realy "Beefy", Bold or Ruff and Tuff  images I found that will help me come up with just what I want.

http://www.armyrecognition.com/moyen_orient/Emirats_arabe/IDEX_2003_Pictures_Gallery/IDEX_2005/pictures/Transport_Truck_armyrecognition_idex_2005_01.jpg

http://www.armyrecognition.com/moyen_orient/Emirats_arabe/IDEX_2003_Pictures_Gallery/IDEX_2005/pictures_4/Tank_truck_army_recognition_IDEX_2005_01.jpg

Look at the tires, some thing like the kits but just smaller, the kit tires that is. The truck cab will be a Volvo CO-(Cab Over) type and I realy like those two front steering tires. Oh there is a Volvo that has a set up like that all so.

http://upload.wikimedia.org/wikipedia/commons/7/7b/Belarus-Volot_Transporting_BMP-2-1.jpg

http://www.hankstruckpictures.com/pix/trucks/len_rogers/2005/jan01/volvo-sammans.jpg

http://www.hankstruckpictures.com/pix/trucks/len_rogers/2007/04/scammell-army.jpg

Even if I don't build my crazy concept transpoter I still can build it mostly stock but use the IT- kit tires to give it a more military look. Well what do you all think of my idea?

Building the Impossible Is my main goal!!
  • Member since
    January 2005
  • From: Portland, Oregon
Posted by fantacmet on Saturday, July 26, 2008 1:44 AM

Lookin fantastic.  After looking more closely at my Centurion, I think if I can figure out how to get the front half the the tank buried up to the fenders, in sand.........  The damage done to the kit will be hidden by that sand, and I can just finish out the rest of the tank, and make it look like it basically got stuck in a sand trap.  Or I suppose I could bury it in "mud" instead, but not sure how much mud there is in that part of the world.  White_R34 seems to have done his research and knows more about the region then most on here, so maybe he canhelp shed some light which might be the better option, sand or mud.  Things are so tight right now, I don't know when I'm gonna have any $$ to try and find another centurion kit to convert, so if I can somehow get this thing to work, I'd really like to start participating in this build.

I just got home from out of town tonight, and a gift had shown up in the mail while I was gone.  the older version of Shepard Paine's book, how to build Diorama's, so it might be able to give me some insight.

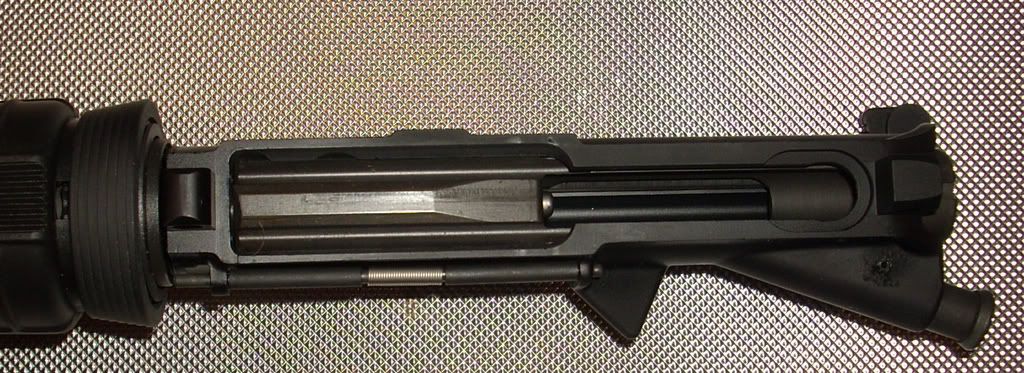
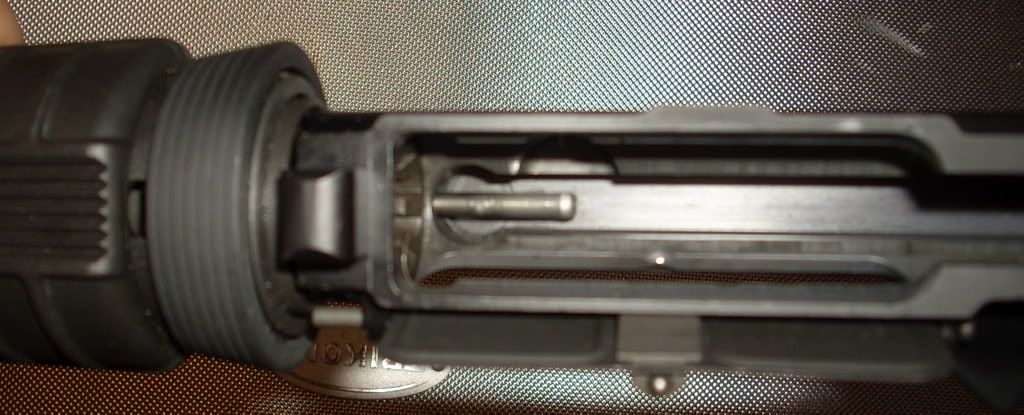
White speaking of which, (also to others), I noticed your detailing of the M4/M16 up there.  If you would like some up close details for anything let me know, I'll take a few pics of MY M4A3 carbine, and upload them.  Visually speaking mine is almost 100% identical to the ones they are using.  As for the action, visually speaking that hasn't changed since the rifle was first introduced.  I'd also be happy to take my rifle down to field strip level and take photo's if you would like to maybe display a soldier cleaning his rifle.  I mean you could look all over online, or I can just get some nice macro closeups of my rifle at the right angle.  :)  IF anybody would like that, just let me know.  Same with any 1911A1 Pistols.


  • Member since
    October 2007
Posted by White_R34 on Saturday, July 26, 2008 7:38 AM

Mud is your best bet, most part of Israel has some soft places were Even the mighty Merkava can get stuck in the mud here are some images of a realy muddy places in Israel.

http://www.militaryimages.net/photopost/showphoto.php/photo/7764

Scroll down to see more muddy pics. The region is in the north part of Israel "Golan Heights" or in Katzrin. My build og a Merkava Mk. III is based on the pull out from the GH as seen on CNN. The Golan Heights is a beautiful region.

Reed this:

http://www.damascus-online.com/history/1967.htm

An if any one is thinking dose it ever snow over there the answer is "Yes"! MUD "hint hint"

http://cache.daylife.com/imageserve/03Tic0peSEdti/610x.jpg

From JERUSALEM and up........

IDF snow ball fight, there's nothing like a good snow ball fight till you get hit!Laugh [(-D] An about the reason I dig in to learning a lot about Israel first I'm Roman catholic in faith and my girl is a Messianic Jew and some of her family is or still leaves in Israel. I hope some day to go there with her.

An about the your rifle images that would help out a lot. Ok the last fixed photo of my MUTT all the colors on the TOW cases are done and I'm not going to fix any thing more on this project as I'm only thinking about my tank now.

Building the Impossible Is my main goal!!
  • Member since
    January 2005
  • From: Portland, Oregon
Posted by fantacmet on Saturday, July 26, 2008 3:50 PM

OH YEAH THAT FIRST PICS IS PERFECT!  That is almost EXACTLY what I had pictured in my head, except a Centurion.  WOOT!  I guess my "realistic water" from woodland scenics is finally gonna get used.  Probably take the whole 20 dollar bottle.  Gonna have to use some plaster to embed part of the tank as well, as I don't have enough of the stuff.  To do it that deep would take about 120 bucks worth of the stuff I think.  WOOOOOOO  PERFECT.

As for pics of the rifle, I'll snap some today and get them on here.


  • Member since
    January 2005
  • From: Portland, Oregon
Posted by fantacmet on Saturday, July 26, 2008 4:46 PM

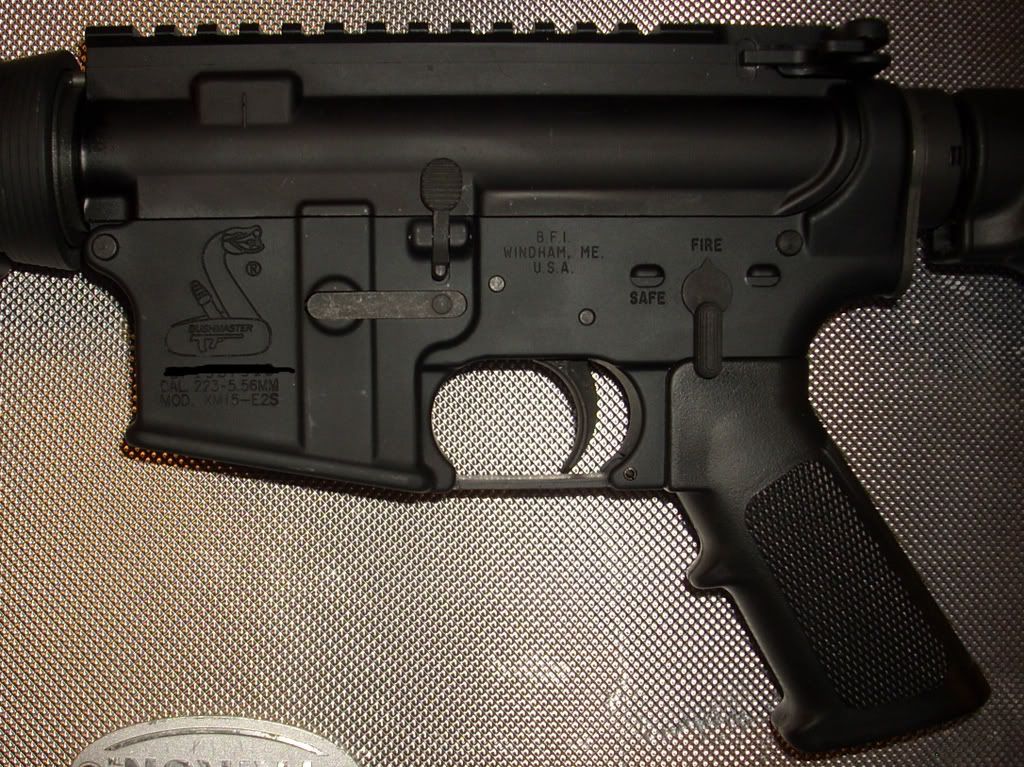
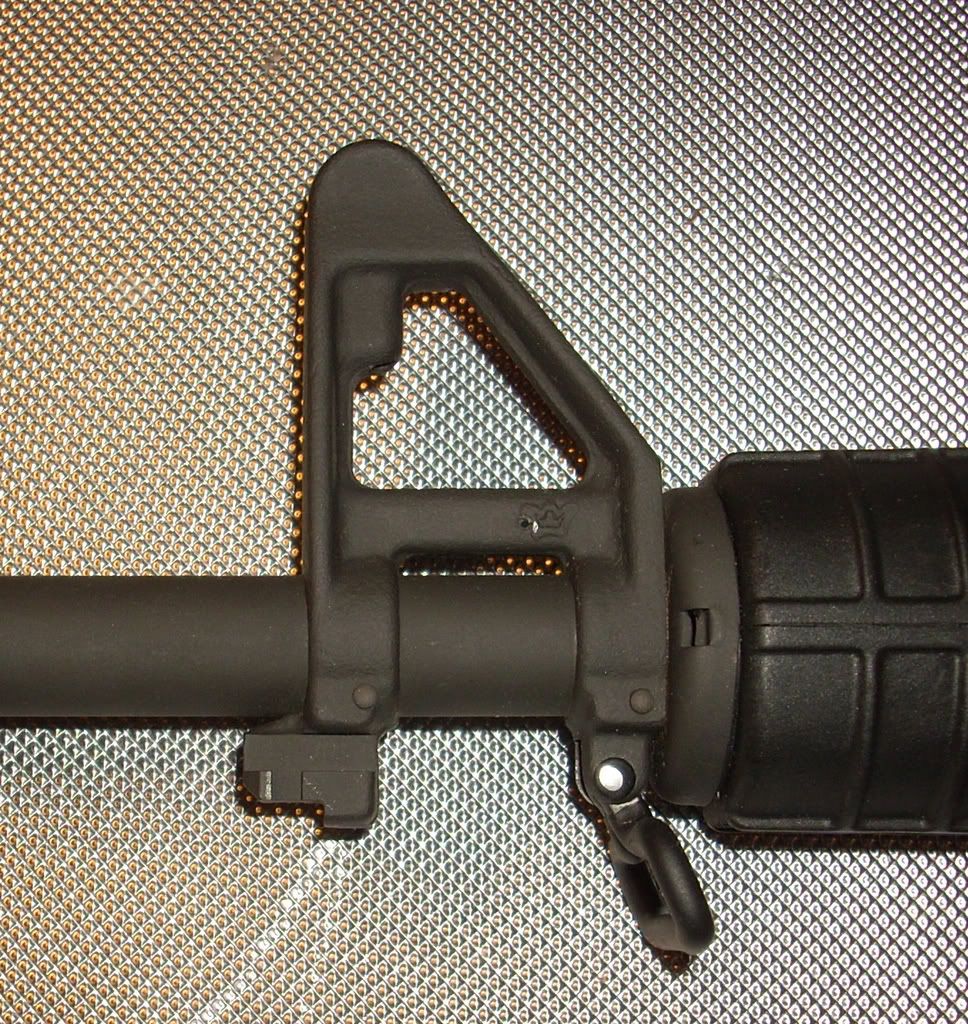
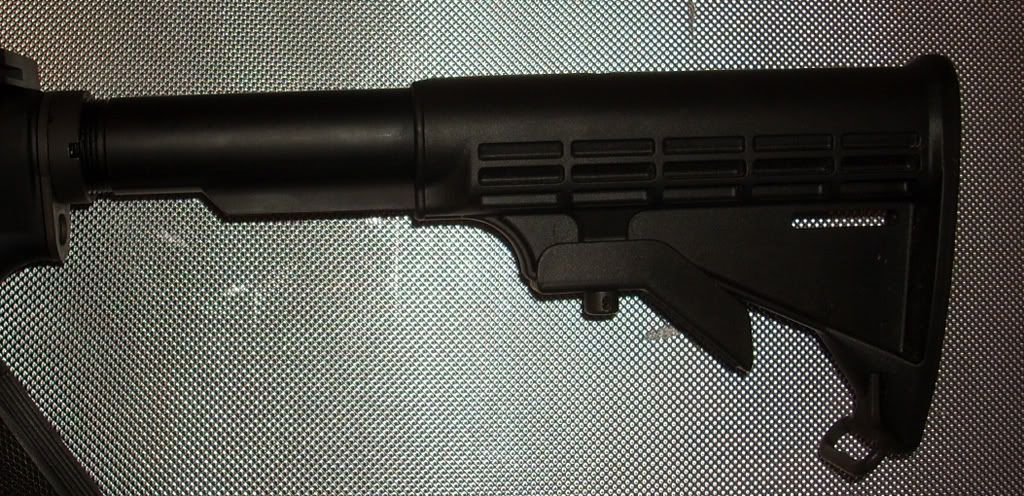
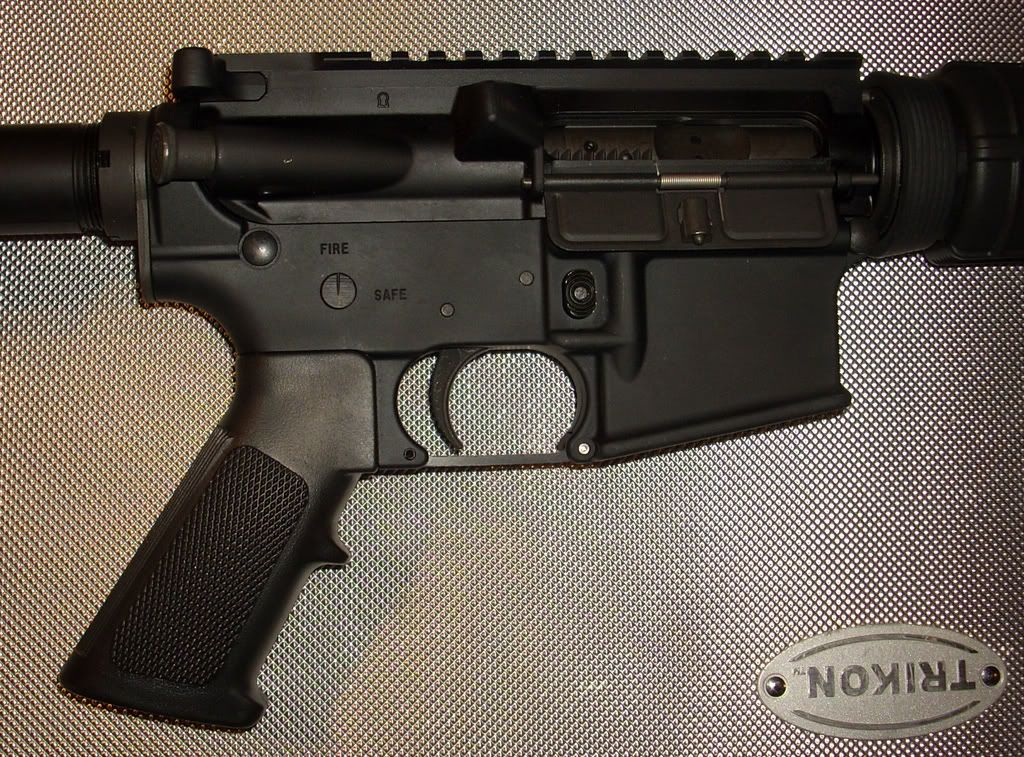
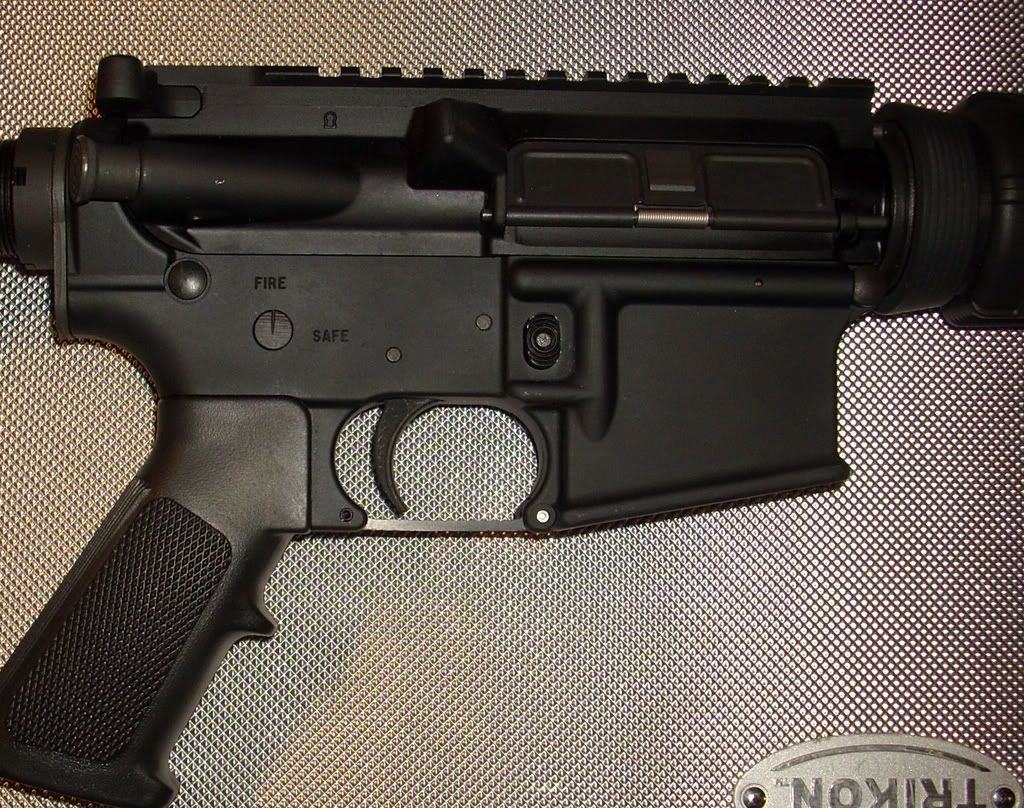
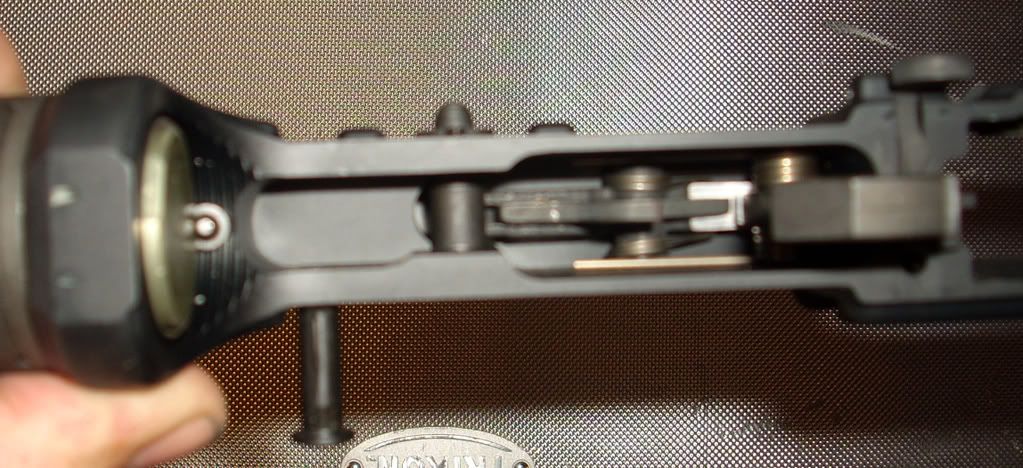
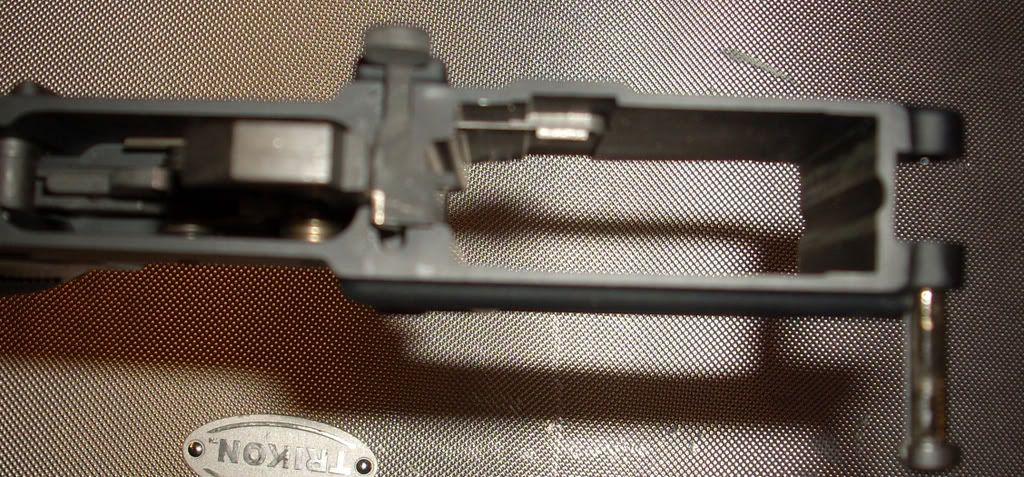
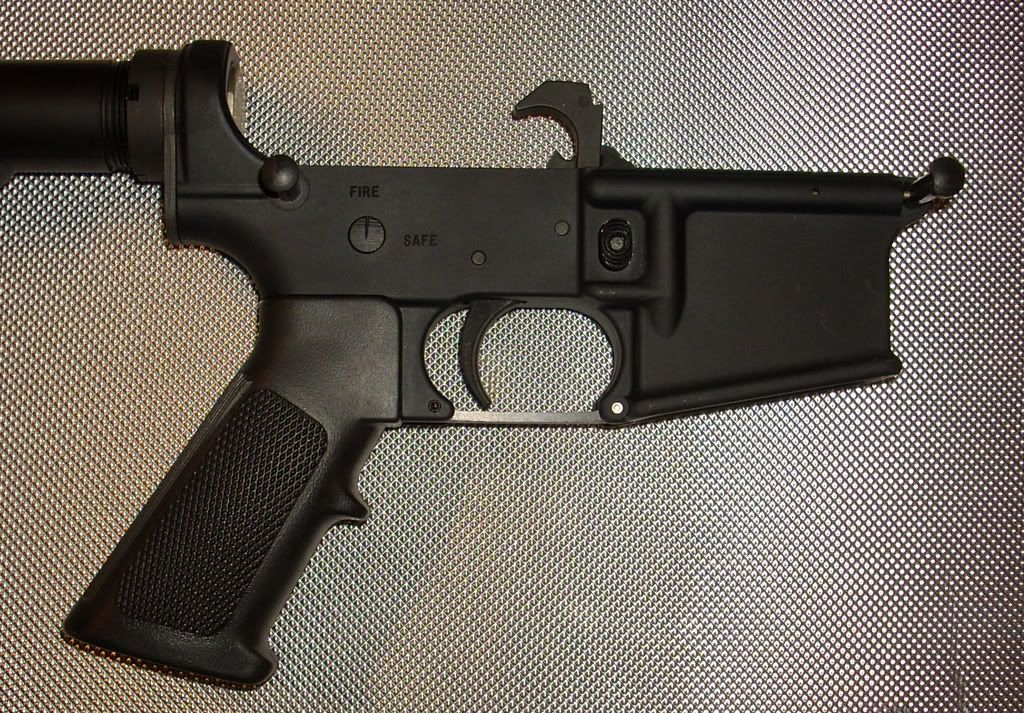
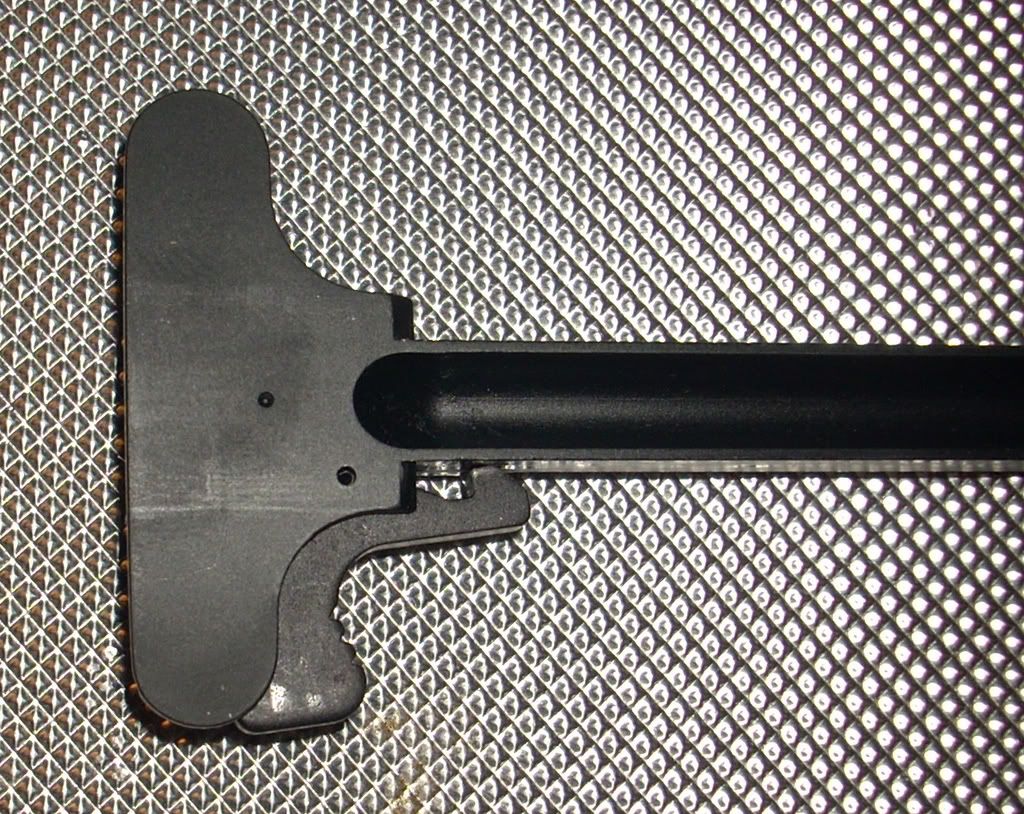
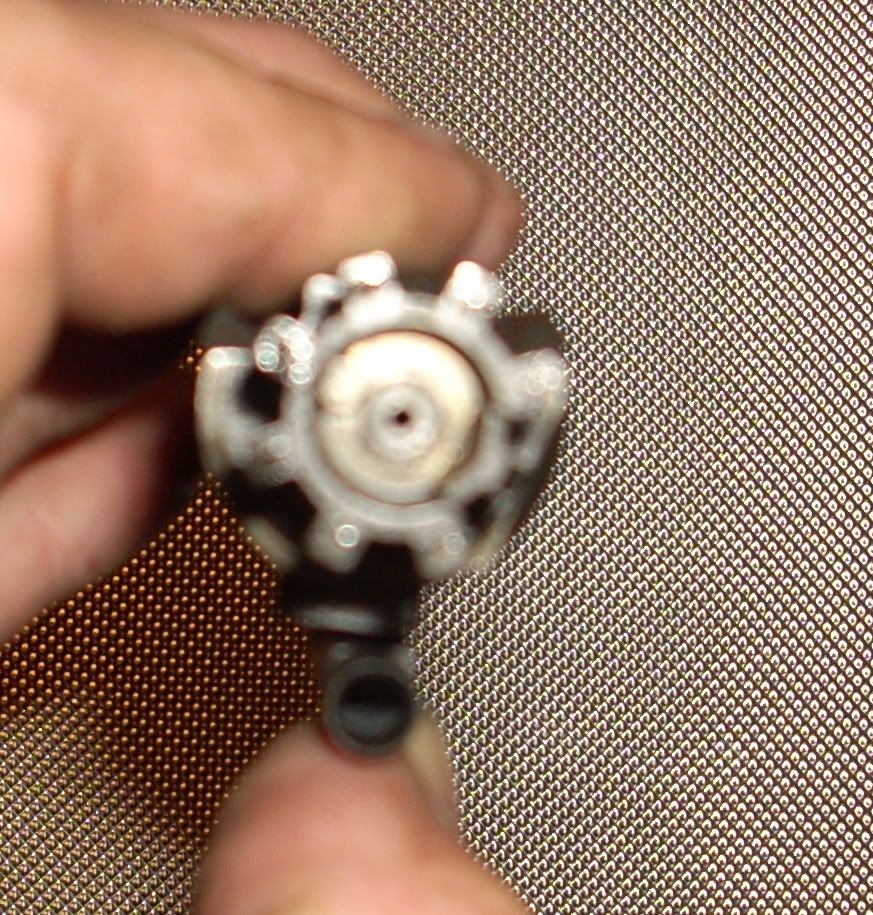
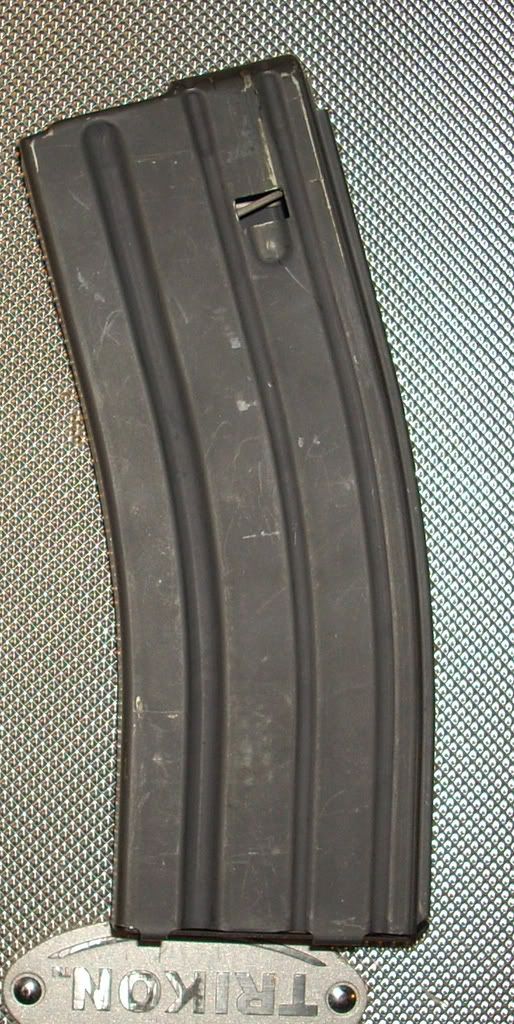
Ok here are a bunch of pics of my Mil Spec AR-15.  There are a few noteable differences.  The first is the snake emblem on the mag well is not present on military rifles, that is the logo for Bushmaster, the manufacturer of my particular rifle.  Military rifles were made by Colt, Singer, S&W, etc.  The design is Colt, but licensed to others to be able to meet with demand.  Speaking of which if you ever run accross one made by Singer, and have the $$, buy it.  It's EXTREMELY valuable.  Anyway....  Also on the fire/safe switch, the military has a third position.  The three positions are labeled safe, single, burst/full.  Granted on that tiny scale you wouldn't be able to read it, but a squiggly line at all three positions to indicate something is there might be in order.  The other main differences would be the handguard on SOME rifles will be different.  Same with the flash supressor.  Actually on mine it's not a flash supressor it's a compensator.  The flash supressor would have the holes going all the way around.  Notice the flat spots at the rear of the flash supressor, that is for the wrench to remove it and replace it or to attach a sound supressor in it's place(rare).  Most American GI Rifles, I've noticed have the solid non adjustable stock, as well as the slab sided handuard on the front end.  Also take note of the little release lever on the charging handle.

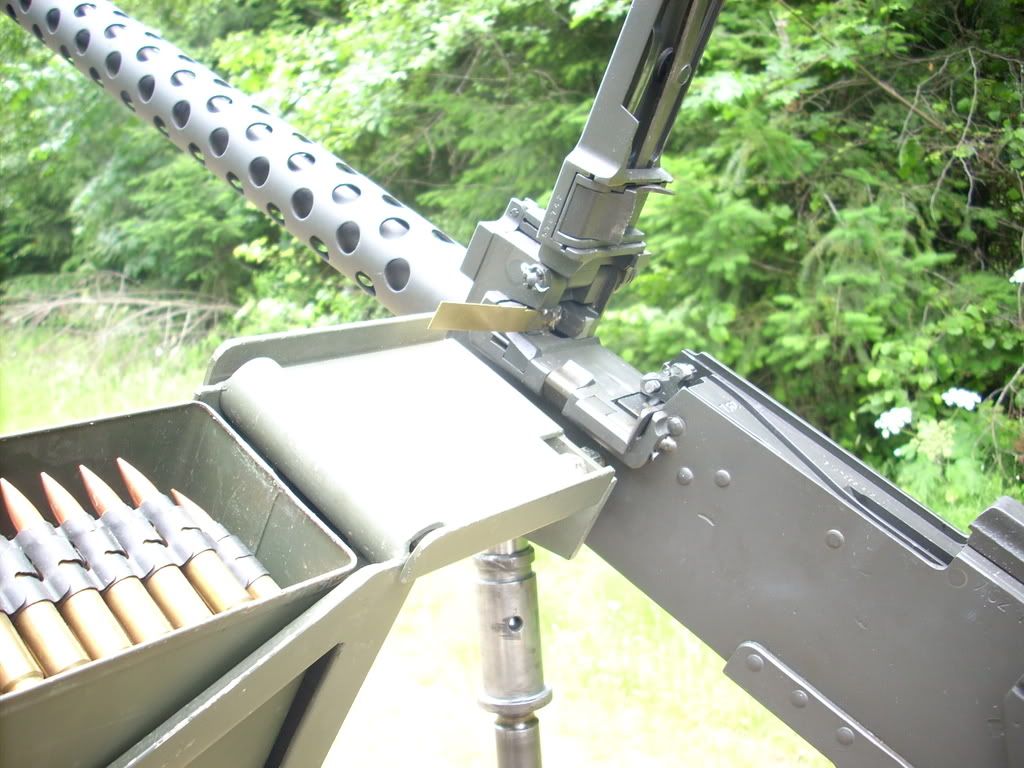
Also at the very bottom is an open close picture of a military surplus M1919 .30 Cal Browning.  The internal part of the sideplate has been machined to make it semi-auto, it belongs to a friend of mine.  The ammo can is correct, and the can holder was made using blueprints for the original military piece.  Same with the pintle if you can see it.  The difference is, on the military version, the ammo can holder is mounted to the pintle and doesn't move with the gun like the one in the picture does.

I can also do pictures of a WWII Russian Battle Rifle, including the bayonet, sling, cleaning kit, and the oil can.  Mine was manufactured in Russia in 1939 if I remember correctly, I would have to double check my research sheet.
    

  • Member since
    October 2007
Posted by White_R34 on Saturday, July 26, 2008 4:52 PM

First off hello ever one woodland scenics is have realy good product to use. Ok now to you Fantacmet and I quote you: "Probably take the whole 20 dollar bottle".  I have a way for you to do this with out using all of what you have. I'm going to take some images later to night to show more if you need me to. Any way make the depth of the hole around the lower half of the tank not so deep. I know I know your thinking WHAT!?Confused [%-)] See if you cut off some of the lower half of the tank you can put the tank lower in the hole like in the first image. (Oh fill in the part that is left with new paper to fill up space). Ok now if you use that pink modeling foam only dig out enough so you can submerge the tank, to show only some of the upper hull and turret. (There is a reason for this much to be shown) now on the rim of the rectangle shape hole trim some of the edges off at alow angel, man what's lower that a 45 degree angel ah man hold on let me look this up. "Oh man" I gave my tool to the kids for school aaaaaaaaaa ok look here at the angel next to the letters ABC:

http://library.thinkquest.org/2647/geometry/angle/measure.htm

An make the angel lower than that so once you pour in you clear resion of what ever, most of the space around the tank and the walls will fill up and keep you from having to use all your stuff. Now this is very important the fluid must not be clear remember you stuck in the mud and in the area like heights the soil there is dark. Oh one more thing to make your Dio stand out run some small chains from the top of the hull and over the mud hole but remember now one will see what is pulling the or trying to pull the tank out, (If you chouse to build the M88 that is up to you) put or use super glue on the chains to keep them strate with "tenchen" like there is some thing pulling them.

Ok I hope you get what i'm talking about. Let me know what you think. First read over it more than one time to see what I see in my mind.

Building the Impossible Is my main goal!!
  • Member since
    October 2007
Posted by White_R34 on Saturday, July 26, 2008 4:59 PM

WOW your images are better that any thing out there thanks man now I see just were the sholder straps are hook on the rifle. All your images are be-ing saved as you read this.

I knew that the but of the gun moved I saw on and IDF site that the black paint on the rifles adjuster pole was rubbed off showing a silver hugh from be-ing mover up and down. "Cool"

"Thanks man"Thumbs Up [tup]Wink [;)]

Ok I do need to get back to work on the tank so I can show some new progress photos. I like how you edited you photos good job!Thumbs Up [tup] My girl pointed that out.

Building the Impossible Is my main goal!!
  • Member since
    January 2005
  • From: Portland, Oregon
Posted by fantacmet on Saturday, July 26, 2008 7:23 PM

Cool.  Another possibility with the chains, I got an idea from seeimg a different type of dio.  Simply find a way to make the chains stand on end like they have tension on them, as if the tank is being drug out of the hole, but have the ends of the chain stop at the edge of the dio, hinting that something is pulling it, without modeling the actual vehicle.  Adds a kind of visual interest.

I saw this done with a train hauling german tanks, and the barrel was shown cut off, at the edge of the scene, just resting in it's imobilizing thingy mounty majiggy.  If that makes sense.  I can't think right now.


  • Member since
    October 2007
Posted by White_R34 on Sunday, July 27, 2008 2:40 PM

Yes I know of the mag in wich you speak, it's Great Scale Modeling 2007's April issue on page 92 top photo #7 By Georgios Tsapanos: "Eastern Front". The part you stated making the chains stop at the edge is the same thing I was trying to convay, so I see you got it good luck with that project. later to knight I'm getting back to work on y tank so i can post some new photos. Oh one last thig before I go I don't will not be using and real PE item I'm going to cut up shapes from thin brass sheet and make some of the parts that I need with out haveing to buy a full resin kit to get the PE set that I would need. I think you all will like what I come up with. I need to save some money. GASS GASS GASSYuck [yuck]Thumbs Down [tdn] and Bills. I'll have new images up soon "Later yall"

Oh and you all need to look at this tut on U-tube it will help out and give a lot of realy good ideas There are a lot of videos there.

http://www.youtube.com/watch?v=yMfCLuzy0c0

Building the Impossible Is my main goal!!
  • Member since
    September 2006
  • From: Dripping Springs, TX, USA
Posted by RBaer on Monday, July 28, 2008 4:47 PM

Factamet, good idea about burying the front of the Cent. On a trip to Israel in '97, I had the great fortune to see a platoon of Merks on exercise, and they were NASTY! The Golan can get hugely muddy. A couple of the old Concord books have pics of IDF tanks that look like they're operating in Europe or Kentucky, in the midst of the rainy season, just totally caked up with mud and even snow.

White, on the same trip I saw lots of Mack trucks hauling AFVs on trailers. I think ESCI made a 1/32nd Mack that may still be obtainable. IIRC, ther's a conversion based on this one in an old "Verlinden Way" booklet. I have it at home, will try to remember to dig it up.

Hope to get a little more done this Saturday, thanks for the comments so far.

Apprentice rivet counter.

  • Member since
    August 2007
  • From: Peterborough, Ontario
Posted by Townsy11 on Tuesday, July 29, 2008 12:31 AM
Whoa RBaer, your Magach is looking Fantastic! It looks Seriously mean with all that ERA and scratchbuilt additions. Great Work!Cool [8D]
"The object of war is not to die for your country, but to make the other bastard die for his."-- General George S. Patton
  • Member since
    September 2006
  • From: Dripping Springs, TX, USA
Posted by RBaer on Tuesday, July 29, 2008 3:50 PM
Thanks! This one is a real stretch for me. I've done a couple of Magachs before but they were both using all the goodies in the Academy kit. This one is a mish-mash of Verlinden and other parts, with more scratchbuilding involved than ever before. I'm really trying to stay out of the one Acad kit in the stash cuz I've got plans for it.

Apprentice rivet counter.

  • Member since
    September 2006
  • From: Dripping Springs, TX, USA
Posted by RBaer on Monday, August 4, 2008 12:58 PM

Progress! Finished the hull with the addition of tow cables and a spare road wheel, shot it with Tamiya a/c gray in a can for primer. Added the commander's MG, went ahead and robbed my Acad Blazer kit and once that was done, took the loader's MG and mount as well, since they were better than what I had in the spares......

Stowage is all Aves 2-part putty, with a couple of IDF water cans. Firing/charging mechanism for the mantlet MG is scratched from pieces of a brass fret, alum. tube and copper wire. I used the same Tamiya gray for primer. It works pretty good, dries hard and tight.

Next is the IDF sand, and then I can start with detail washed and such. Thanks for looking, and comments welcome, as always.

Apprentice rivet counter.

JOIN OUR COMMUNITY!

Our community is FREE to join. To participate you must either login or register for an account.

SEARCH FORUMS
FREE NEWSLETTER
By signing up you may also receive reader surveys and occasional special offers. We do not sell, rent or trade our email lists. View our Privacy Policy.