SEARCH FINESCALE.COM

Enter keywords or a search phrase below:

IDF GB 4/20/08 - 4/20/09

94463 views
468 replies
1 rating 2 rating 3 rating 4 rating 5 rating
  • Member since
    September 2006
  • From: Dripping Springs, TX, USA
Posted by RBaer on Friday, September 12, 2008 10:39 AM

Tbolt, welcome back!

CosmicJ, that thing looks neat! Saw one in the LHS a couple of weeks ago, may have to think again.......

The Magach is nicely dusted up, need to go back and add some "oily" dirt around things that are lubed be the crew, like the gun travel lock, external mg mounts, etc, but it's very close. Wife is using the camera still, will have pics as soon as I get it back.Whistling [:-^]

Apprentice rivet counter.

  • Member since
    December 2007
  • From: Louisville, KY.
Posted by Cosmic J on Saturday, September 13, 2008 10:35 PM

Thanks guys. I hope my effort is worthy when said and done.

I'm interested in seeing how you weather your Magach, RB. I don't want to do a lot of 'damage' type weathering to my truck (chipped paint, dents, etc.), but w/ those hoverfans I imagine it would get really dusty. Tips in this regard appreciated.

  • Member since
    April 2005
Posted by Thunderbolt379 on Saturday, September 13, 2008 10:46 PM

CJ -- my take on weathering is that there's no subtitute, when working with dust, for dust! Get some MiG pigments, mix them if you want a particular shade, and brush them on dry. I was amazed by how easy and how realistic the job is. Of course, you can intensify the caked-on effect by first spraying a dust color in appropriate areas as a build-up of mist coats to give body to the effect the pigments will bring. I'm really looking forward to seeing this one unfold!

RB -- glad to be back! I'm dying to finish the Merk, and will get to it as soon as the PE arrives (which has always been my intention, thank GMW for the 14 week hiatus...!)

Cheers,

Mike/TB379

http://worldinminiature.blogspot.com/

  • Member since
    January 2005
  • From: Portland, Oregon
Posted by fantacmet on Sunday, September 14, 2008 7:17 AM

This may sound a bit strange, but for weathering idea's, this is what I would recommend.  If you have any area that has dry but very fine and loose dirt, like say an outdoor offroad radio control car racetrack or BMX track in the mid day sun.....  Try taping a small fan of some sort, probably battery powered, and then hold it an inch or two from the dusty dirt, and move it around a bit for a few minutes.  This should give you some sort of idea on how and where the dust would settle.  I suspect it would be an overall even coating, easily wiped off around access area's from hands and feet rubbing against it all the time, and be really heavily dusted on the very bottom edge and underneath, so much as to be almost completely opaque in those spots, and then diminishing very rapidly the further up the hull.

Some Tamiya Flat Earth lightened with Model Master Acryl Buff, then diluted a fair bit with Tamiya thinner, would probably provide a very nice dust medium.  I realize it's not recommended to mix paint brands and thinner/paint brands, however, through my own extensive experimentation, I have found that Tamiya Acrylics and Model MAster Acryl lines are mixable with each other and they do so nicely.  Tamiya thinner works EXCELLENT on either one.  Alcohol works on Tamiya nicely as well, but not so much on Model Master.  Createx Acrylic airbrush cleaner also works well to thin these paints, and is much less expensive, and is easily dispensed from the squeeze bottle.  Look for Createx paints and thinner from either Bearair, or from Michaels Crafts.

 Hopefully this helps.  I'm planning on using the above mixture very soon on a build or two.  Right at this very moment, I'm using my Russian T72 to practice mud, in a "mud pit" diorama.  So that way I will have plenty of practice for burying my IDF Centurian in mud.  Speaking of which, White_R34, I've found a product similar to celluclay(same manufacturer), that will work quite well for doing the mud fill before filling in with the realistic water.  I've already used it to create mud on the T72, and on the base.  I will be posting pics in a few days in the main armor forum when it's completed.


  • Member since
    September 2006
  • From: Dripping Springs, TX, USA
Posted by RBaer on Monday, September 15, 2008 1:09 PM

I'm gonna call the Magach finished! Dusted and dirtied up with ceramics pigments, some grime with pinwashes and darker pigments, almost no chipping since this thing is supposed to be freshly converted and painted. I did the "Yanush" stripe with a rattle can after basic masking, since most were hand-painted and none too pretty. Tracks were painted black, wear areas highlighted with Games Workshop "bolt gun silver" or something like that.....then scrubbed with the same pigment the tank was dirtied with. After that, gray/black pigment was rubbed onto the pads and inside wear areas with my finger and fixed with Dullcote. Tires on road wheeels got the same gray/black pigment, about the only thing that stuck to the Acad rubber parts, BTW.

I liked it well enough that I brought to a local contest Saturday (Supercon 08) and it didn't look out of place, IMHO. Here's one pic that's a little dark, shot last night with experimental lighting (failed experiment....)

Am I badged?Big Smile [:D]

Edit: A couple more pics:

I'll get come better pics tonight and postup a "completed build" thread.

Thanks for looking and commenting, as always. Critiques ARE welcome, as I'd like to improve, maybe enough to be "contest-worthy".Big Smile [:D]

Apprentice rivet counter.

  • Member since
    April 2005
Posted by Thunderbolt379 on Monday, September 15, 2008 8:28 PM

RB -- stupendous piece of work! Your concept, ambition, attention to detail, meticulous work and sheer patience to stick with a complex build over so long are the mark of a darn good modeller. You've used an enormous range of techniques and your result is extremely realistic.

Badge? A build like this deserves a medal!

Mike/TB379

http://worldinminiature.blogspot.com/

  • Member since
    September 2006
  • From: Dripping Springs, TX, USA
Posted by RBaer on Monday, September 15, 2008 8:53 PM
Thanks, Tbolt. It was fun, and a good reason to actually finish something.

Apprentice rivet counter.

  • Member since
    December 2007
  • From: Louisville, KY.
Posted by Cosmic J on Monday, September 15, 2008 9:56 PM

That's a fine looking model right there, RBaer. Excellent work sir.

Hope you don't mind if I steal a bunch of your techniques... Cool [8D]

  • Member since
    September 2006
  • From: Dripping Springs, TX, USA
Posted by RBaer on Tuesday, September 16, 2008 11:47 AM
Thank you, CJ, and please do.

Apprentice rivet counter.

  • Member since
    October 2007
Posted by White_R34 on Tuesday, September 16, 2008 12:45 PM

RBaer  your builds are always stunning manBow [bow]Bow [bow]Bow [bow]Bow [bow]  Sorry I't bean a wile since I have bea back but I'm at the end of my WWII projects so I can jump on my tank real soon.

Cosmic J those scratchbuilt handes look awesome, see it's the little things that make a build stand out.Thumbs Up [tup]

Building the Impossible Is my main goal!!
  • Member since
    September 2006
  • From: Dripping Springs, TX, USA
Posted by RBaer on Tuesday, September 16, 2008 1:22 PM
R34, you flatter me......your scratch building simply amazes me.

Apprentice rivet counter.

  • Member since
    October 2007
Posted by White_R34 on Tuesday, September 16, 2008 4:56 PM
You know if I can just get my paint jobs to stand up to all the detailed work I do than I would feel on top of the world.
Building the Impossible Is my main goal!!
  • Member since
    September 2006
  • From: Dripping Springs, TX, USA
Posted by RBaer on Tuesday, September 16, 2008 7:47 PM
I know the feeling, believe me.

Apprentice rivet counter.

  • Member since
    January 2005
  • From: Portland, Oregon
Posted by fantacmet on Wednesday, September 17, 2008 12:37 AM
Ok, found a great deal at the hobby shop tonight at the club meeting.  I had a few bucks and Found Tamiya's M151A2 TOW Jeep.  My idea is to convert this to IDF configuration using White_R34's TOW Jeep as a guide(thanks man for posting the progress LOL).  I might put it with some figs on a diorama of the Centurian buried in the mud, if I can ever get around to getting to work on it.  Just hurts everytime I look at it.


  • Member since
    January 2005
  • From: Portland, Oregon
Posted by fantacmet on Wednesday, September 17, 2008 12:58 AM
White_R34 I was just going over some of the previous posts and you mentioned something about someone doing a TOW MUTT with an engine.  The Academy version I looked at tonight at the shop has an engine.  Not sure if it is correct ornot but one is there.


  • Member since
    October 2007
Posted by White_R34 on Wednesday, September 17, 2008 7:07 AM
Realy! the Tamiya did not come with one (Ha Ha Ha)Laugh [(-D] I goofed I scratch build the top of one for my MUTT but glued the hood down so that sucked. But you can see it some what from under the Mutt I will take some new images and post them here for you.
Building the Impossible Is my main goal!!
  • Member since
    January 2005
  • From: Portland, Oregon
Posted by fantacmet on Wednesday, September 17, 2008 7:25 PM

Oh man that sucks.  I hate it when I do stuff like that.  I call it a brain fart, my wife calls it a blonde moment.  Oh well.

Anyway here are pics of what I have of my MUTT so far.  Remember I said I'm using yours as a guide but not copying it.  Also using the photo's in the links you provided.  I'm gonna add ALOT of stowage to this thing I think.  Would there be IDF specific markings on these?  Or is it just configurational changes that really visually identify it as IDF?


  • Member since
    January 2005
  • From: Portland, Oregon
Posted by fantacmet on Wednesday, September 17, 2008 8:27 PM

How different are IDF and U.S. Military figures?  I have none of the former and plenty of the latter.  Would it be passable to just paint the U.S. figures up like IDF?  I know alot of the equipment is the same but don't know about the uniforms.


Well I located and bought some IDF figs.  They are technically a tank crew, however, all but one are standing, and I want the figs outside of the vehicle standing around doing stuff so hey.  I also bought A U.S. Machinegun set, I plan to use the 1919 in place of the M60.  The figs I bought appear to be a bit more modern, but my understanding is that this vehicle is still in use, so it would be appropriate.


White_R34 I found some GREAT pics of the TOW Mutt in IDF service.  Here are some links.  The first one is a list of links to pics.  I can't tell you much beyond that as I don't read Hebrew.  The second link is a link to one of the pic sets on that page, that is GREAT.

http://www.fresh.co.il/dcforum/dcboard.cgi?az=show_thread&om=7888&forum=Army

http://www.fresh.co.il/dcforum/dcboard.cgi?az=show_thread&om=7888&forum=Army#65


  • Member since
    October 2007
Posted by White_R34 on Thursday, September 18, 2008 11:55 AM

Ok my man your off to a realy good start there. An don't even think of it as copying anything your just adding to the GB and your build is the resion I put up all those step by step photos of all my work to help any one that may want to do any of that to there model. As fot the IDF Figures this is what I have:

You can see the box in the background, I tell you what I will do to day after I do this order I will pull out one of my IDF solders and build one up along with all the images that I have of IDF solders and post the work on the solder and all the Photos I have I'll beback soon.  

http://s162.photobucket.com/albums/t248/White_r34/1-35%20scale%20Figures/

Later Duds Oh and stop haveing those "blond days".Bow [bow]

Building the Impossible Is my main goal!!
  • Member since
    October 2007
Posted by White_R34 on Thursday, September 18, 2008 1:57 PM

Ok I'm back here some images of IDF soldiers. Oh one thing I think to US army uniform used in the Nam conflict looks a lot like the IDF uniform. First the IDF uniforms then the V-nam styles.

In this photo is where I got the word Scott for the Goggles band on the helmit.

IDF Soldiers and a ground TOW lancher.

In this next image is just WOW not a bad one in the bunch!!!

Full front view of Uniform.

Concept Rifel:

I'm stimm painting the one I started on so once I get it to a place I feel it should be I will show it. Cool?

A link to some IDF Paratrooper boots:

http://www.zahal.org/gear/p3.htm


Building the Impossible Is my main goal!!
  • Member since
    October 2007
Posted by White_R34 on Thursday, September 18, 2008 2:22 PM

Ok you guys it's not like there are a lot of clear and color photos from that I see so I got would I could.

It looks to my like that most of the IDF soldiers don't tuck there pants legs in there boots and some do, that part is up to you and the figures you  may use. I't look also the the regular solder and the tankers have the same thing on, the only difference is the halmets. Here a link to look at IDF soldiers helments:

http://images.google.com/images?um=1&hl=en&sa=X&oi=spell&resnum=0&ct=result&cd=1&q=IDF+helmets&spell=1

I do know that in some of the conflicks that what there boots color and flack vest color is is some times based on those comflicks so you may need to google it.


Building the Impossible Is my main goal!!
  • Member since
    January 2005
  • From: Portland, Oregon
Posted by fantacmet on Thursday, September 18, 2008 5:23 PM

Super wow to the lovely ladies, I agree not a bad one in the bunch.  If I weren't married, I wouldn't turn down a date from ANY of them.  Unless of course attitude stepped in the way, but they are all smiling too much to be meanies.  Big Smile [:D] 

Major help on showing which figs you have.  I bought the Academy IDF Tank Crew.  I was afraid it was going to be too modern, but evidently not.  They provide the poses and stances for the most part I am looking for.  Some minor tweaks with some milliput, but aside from that great.  I don't particularly like that they all have helmets with the earphones on though.  However I do have plenty of other heads I can stick on them.  Nice thing about doing these figs is that with the exeption of a couple of races, you can pretty much swap heads around as you please without having to worry about national origin.  I have U.S. and German heads I can stick on here to have them look a bit better.  One thing I plan to do is instead of making the headset like you did, since these guys have them in their helmets, is go ahead and build one with the helmet and have his headset hooked up to the radio.  There are some good up close shots online showing how and where the headset cord went into the headset.  I'm glad you did the wiring for the radio's, as it will allow me to add those same wires.

Antenna wire to the antenna was a SPECTACULAR idea on your part, and one most people don't ever bother with.  However now that I've seen it done, I will be adding that little missing detail to everything I can.  LOL.  Man you just made that much extra work for me, for the rest of my model building life.  Whistling [:-^]  It's one of those things that will just make it look right.  Unfortunately usually it's one of those kinds of details really that you won't notice unless it's missing.  If it's missing then something just doesn't look right, and you can't put your finger on it. 

Anyway thanks for the comments, and MAJOR thanks for the pictures.  (Not just the beautifull lasses either Big Smile [:D])


  • Member since
    October 2007
Posted by White_R34 on Saturday, September 20, 2008 1:25 AM

fantacmet hay there man just keep in mind that the skin color may look pale or cream it has a bit of brown in them they stay in the sun a good bit. Like you I to have that Tanker figure set and I also found my self buying resin heads to.

I do plan on making a small base for my Mutt.

Here's that helmit with that scott logo in the goggles band. An that shot of a small view of my motor work.

I did not glue the helmit to the seat, once I build the driver it will be on his head.


Building the Impossible Is my main goal!!
  • Member since
    January 2005
  • From: Portland, Oregon
Posted by fantacmet on Saturday, September 20, 2008 3:28 AM

That engine work looks SWEET from that angle.  Thanks for the tip about the tan from being in the sun all day.  Good idea.  I too am making a small base for mine.  Probably dirt with a bit of grass on the side or dirt with some taller grass on the side.  I'll snap a pic of the grass I bought awhile back.  Been waiting for a project worthy of it's expense.  What color should this little bugger be?  In early stages it looked like you painted yours green, but then in finished pics it looks like sand with green seats.  I was thinking green with red brown seats, shrug no idea.  You have more expertise then I do when it comes to IDF.  I've not been able to turn much up in the way of research other then some occasionally interesting pics.

I know I'm gonna add a shoulder fire to it laying somewhere around.  I'm thinking of laying a Ma Duece on the hood with a bipod or something.  Not sure yet.  I gotta be careful not too add too much in the way of small arms.  There are only 3 guys.  I was thinking 3 pieces of handheld small arms(bullet firing longarms), and then a rocket launcher or two.  I have a beltfed grenade launcher that is tripod mount as well.  I could collapse the tripod perhaps, or set it up on the ground as if they were gonna use it.  Not sure yet.  It depends on which base I go for, the smaller one or the larger one, or if I pickup another one.


  • Member since
    October 2007
Posted by White_R34 on Saturday, September 20, 2008 11:04 AM

If your going to use a large base with the tank in it the background and the ground TOW unit It may not look right in it. Most of the people that look at it will be looking at the tank and over look that cool looking ground TOW and MUTT an then the questions will start and you realy need to have a good story lined up to tell them. Ok I would say the small base but wood at Hobby Lobby is here only 99c so I would pick up a mid size base just for the MUTT and do your grate idea with the ground TOW. As for the item all over,(The MUTT) if your build is from one of the conflicts in the passed you do need to put a lot on stuff on the MUTT try to look at the time or area of your build you realy should not see any othere type of shoulder type rocket launcher othere than the RPG that you can get in the M113 kit and the IDF solder kit., NOTE:(only if it's a past conflict)-(Up to date confilcts use the Javelin rocket launcher)Any way I think you and I must think a lot a like. On my base I plan to pose that sniper and MUTT at a road side posed near a rock, just off the frount side off the MUTT and one othere man in the Mutt. As for the grass color in some places it should be darker or lighter it's up to the conflict or area your base is based on. As for my build it will be in a place like the Golan heights in Israel in the years after the 6-Day war in about 2006.

Here's some land images of Israel and some confilct photos.

(Israel-Lebanon Conflict):

Out side the city.

Othere conficts you may want to look info up on: Israel-Palestine conflict,Israeli-Hezbollah Confict,

Oh one this I must point out ona ll foot soldier around there wast is a lot of amo powches or pockets. the tankers dont need all that as it would get in there way and give them a hard time geting in and out of the tanks.

Tankers and Tank girl.

Oh one last thing weman aren't realy  used in combat rolls there the boot camp insrucktors. That sucks!! As a guy that has a girl working in Iraq and she can hold her own with a rifel from my point of view weman can do all most any thing now at days.

But back to you MUTT's colors the seat color sound like and old confict like the 6 day war at the Golan Heights in 1967. These are the othere part of that comfilct battel was in the West Bank, Gaza and East Jerusalem. ...

Here's a good link to help you out. http://www.boyntonweb.net/Policy/Israel/1973.htm

I have a lot of photos from the 6-Day War but there all in B&W, I'll post them if any of you want me to.


Building the Impossible Is my main goal!!
  • Member since
    January 2005
  • From: Portland, Oregon
Posted by fantacmet on Saturday, September 20, 2008 8:32 PM

Well I'm gonna leave the TOW on the MUTT.  As for weapons I have that I can add to the scene laying around or stashed on the MUTT are the following.

The M249

http://sebaraya.com/images/ERA-CA-249P-007.jpg


MK19 40mm Beltfed GRenade Machinegun.

http://www.fas.org/man/dod-101/sys/land/mk19a3-2.jpg


2 versions of the M72

http://www.designation-systems.net/dusrm/app4/m72a4.jpg


The SMAW

http://www.designation-systems.net/dusrm/app4/smaw-1.jpg


Of course M60's and M2's of various types.  The M60 on the front of the MUTT I've already replaced with an M1919A3 .30 cal Browning.  Which you will find closeup pictures of the real deal earlier in this thread somewhere along with the AR15 pics I posted.

Not sure which of those weapons to use.  Still unsure as to the color.  The groundwork though is going to be dirt instead of sand.


  • Member since
    October 2007
Posted by White_R34 on Sunday, September 21, 2008 4:55 AM

Well the reson I started out with that dark olive green was to keep up with the way most MUTT's went over to Israel in 1980'2 from the US they where all olive green but once they wher over there they had been repainted a basic IDF color for the regon they wher in. An keeping that in mind and  knowing what will happon when you put a lighter color over a darker on. An knowing that outcome helped keep my model close in appearance to the real thing I painted my MUTT the same way as the real 1:1 model was done. So as I see the type of MG your using I think you can stay with the solide OD Green  body color with the red-Brown seats and that will look just right. All othere items are up to you.

Note: there's no RPG in the IDF soldiers kit but the there is a n MG that can be used on any MUTT from the 80's and 90's.

I'm thinking of going back and putting on the right MG but first I will paint it and put the sholder strap on it and if and only if I feel I can take the one on there off I will then try it and show my work on here.

Building the Impossible Is my main goal!!
  • Member since
    January 2005
  • From: Portland, Oregon
Posted by fantacmet on Sunday, September 21, 2008 3:52 PM

Cool.  Much tanks for the information.  Ishould be able to get preliminary painting done tonight then.  I've got the small dio base started for it.  It's not very big maybe 5x7.  Plenty for the MUTT and 3 figs.

I did some research and found out that the U.S. SMAW launcher is based on the IMI B-300 Launcher.  Visually there are only a couple of small but very noticeable differences.  It would be a trivial thing to modify it to Israeli configuration.  Althuogh to be honest I probably won't just for the sake of not risking incongruity.

Time for me to get my rear in gear and get to work on it.  I'll try and get some pics sometime today.


  • Member since
    April 2005
Posted by Thunderbolt379 on Saturday, September 27, 2008 9:28 AM

Hi all,

Thunderbolt379 reporting back for duty on the burning sands of the Sinai!

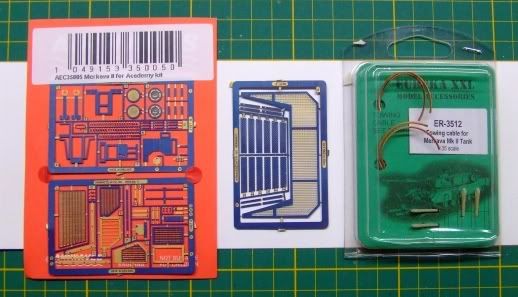
Guess what was in the mail? YES! The Airwaves PE set for the Merk II was waiting on my bench for me this morning, and I was not about to let the grass grow under my feet. I was VERY impressed with the quality, the parts appear anodised to create relief. Here they are, along with the Eureka XXL towcables set I laid in months ago:

Photobucket" border="0" />

I'm not sure how many bits I'll be using. I really only wanted the basket grill! The grills for the hull vents are beautifully etched but would require me to grind away the exising detail, and I really can't be bothered. The ammo can holders are possible users, though! We'll see... Must get some single-edge razor blades to fold with. There are even sets of individual foundary numbers -- how you're expected to trim and apply them I don't know!

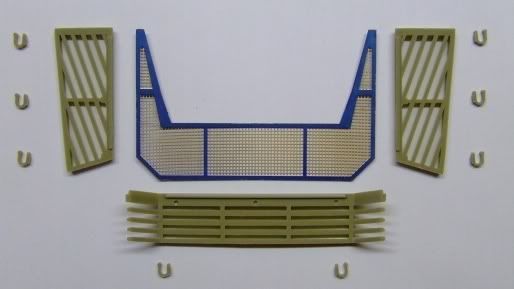
Well, I trimmed out the plastic parts for the basket and the cable clamps and got everything filed up smooth. Here's the parts layout:

Photobucket" border="0" />

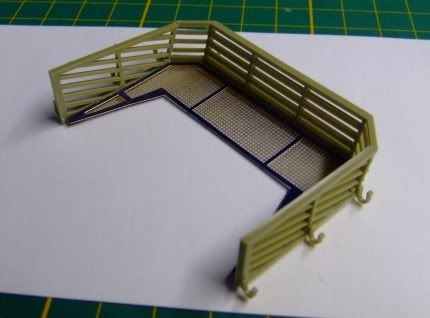
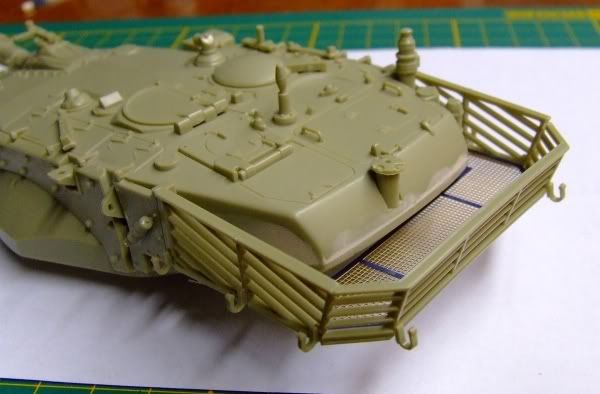
I wish I could say assembly was easy but 'fiddly' is a good word for it. I spent a while getting the plastic-to-metal bonds firm, then added the teensy cable holders, and re-added them as they keep falling off. The carpet ate one but Academy thoughtfully include a spare or two. The angle of the mating faces between the three plastic parts don't match, and needed filing, and the metal floor does not quite fit the contours of the rear plastic part. But I got it all together:

Photobucket" border="0" />

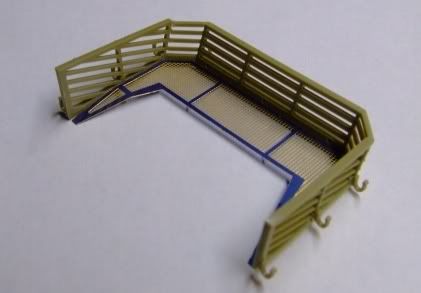
Naturally, at this point I dry-fitted the basket to the turret, and found out it didn't. Fit. It took a bit of pondering to figure out why, but the PE was meant to be bent. I realised this when I compared it to the plastic part, which is molded with the narrow arms of the floor inclined downward to clear the turret flanks. This does not appear in the instructions for Academy or Airwaves, and the side panels of the basket walls are molded with a straight-line locator flange which would inhibit the fit of an inclined floor anyway, unless the floor was meant to be fitted from below (which makes no sense, as the flange would then be visible). What to do? Fortunately, the plastic-to-metal bond is not so strong that it wouldn't readily part if flexed with a knife blade, so I parted the floor from the side panels, then pared away the flange back to the fold point of the PE. When it was smoothed back, I reattached the PE with a subtle bend introduced simply (and remounted half the cable guides which fell off in the process). Note the bend, below:

Photobucket" border="0" />

The subassembly was then dry-fitted and found to match up acceptably well. I went ahead and superglued it into place on the turret:

Photobucket" border="0" />

This round of work added another 12 parts to the model. Remaining structures include all topside MGs, a few top and tail-end fittings, tow shackles, a few bow fittings, mount the rear hatch, the skirts and join the hull. Overall, this model has generally built easily, so I'm optimistic I'll be getting her into the paintshop in the near future.

I'm glad to be back in the saddle here, after more than three months out!

Cheers,

Mike/TB379

http://worldinminiature.blogspot.com/

  • Member since
    January 2005
  • From: Portland, Oregon
Posted by fantacmet on Saturday, September 27, 2008 12:13 PM

OOOO NICE!!!  I love it when the postman comes bearing gifts.  GRIN


Now in the best redneck talk/accent I can muster......... GIT R DUN BUDDY!  Big Smile [:D]


JOIN OUR COMMUNITY!

Our community is FREE to join. To participate you must either login or register for an account.

SEARCH FORUMS
FREE NEWSLETTER
By signing up you may also receive reader surveys and occasional special offers. We do not sell, rent or trade our email lists. View our Privacy Policy.