SEARCH FINESCALE.COM

Enter keywords or a search phrase below:

Model T 1913 Speedster WIP ( Done 4/30/22)

13083 views
192 replies
1 rating 2 rating 3 rating 4 rating 5 rating
  • Member since
    April 2003
  • From: USA
Posted by keavdog on Sunday, March 20, 2022 11:29 AM

Those turned out fantastic!  This is turning out to be quite the beauty of a build!

Thanks,

John

  • Member since
    November 2018
Posted by oldermodelguy on Sunday, March 20, 2022 1:26 PM

Bakster

Bouncing around a bit-- here is what I have worked on the last few days. I am quickly coming to the point in this build where my updates are real time and where I am at in the build.

So -- more masking. Because of how I painted these--I probably made my mask job more difficult. Maybe if I painted the wood spokes first it would have been easier to mask. But--I didn't, so I must work with it. Oh-- I suppose I could hand paint it but I am not a fan of my hand painting. 

I purchased this punch set for this purpose. In the end-- I am so glad I did, and I wish I had it years ago. It is so handy for making circular masks. And I love the little cutting matt they send with it. I use it to cut all my tape.

I cut the punched mask in half, then tape the half circles around the base of the wood spoke.

Filler mask is added between the spokes and liquid mask applied over it to secure the tape and to fill any gaps.

Notice the center hub masks. Because the hub has a low profile, I needed a stronger tape to hold it in place. In comes the vinyl tape. It was perfect for this. Then I cut circular masks for the centers and filled them with liquid mask for good measure. Why make circular masks for the center? I try to minimize liquid mask getting on paint. I have found certain liquid masks can affect paint finishes. Anyway--the vinyl still has its purpose in my processes. They are ready for paint.

Oh-- because my VMS Liquid Mask dried out, I had bought what the local hobby store had. They had Vallejo's version and I have to say that I like it. It is watery, giving you the opportunity to push the rubber around before it sets. VMS was the same way and that is what I liked about it. The sales guy said people like it for masking canopies too. I have not tried that, so I can't speak to that. I always prefer tape when it comes to canopies, but he said people can make this stuff work.  FYI.
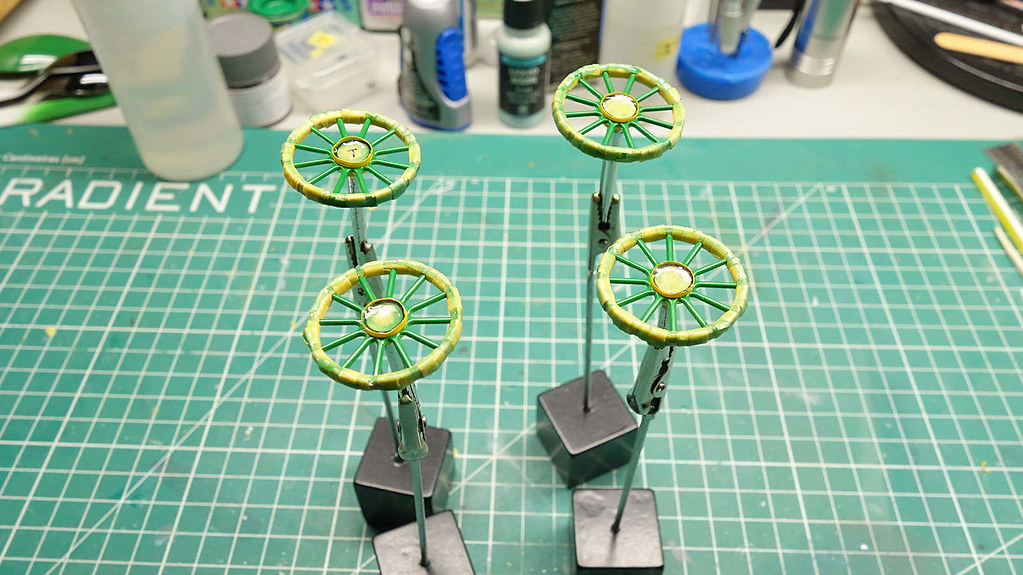
And to the paint. Ugh. Once again, I reach for what I was limited to buy in the local HS. They had the Ochre I needed but in Revell Acrylic. I have written about Revells Acrylic paint before. It is awful in an airbrush. Tip dry is horrendous. I had to wipe the tip every two or three sprays. The tip is a mess just after one spray. Terrible. I used their thinner and I tried various mixtures. I got a little improvement but still-- terrible tip dry. I won't be buying their paint again...if I can help it.

In spite of all that-- I managed to lay a good spray without any major disasters.
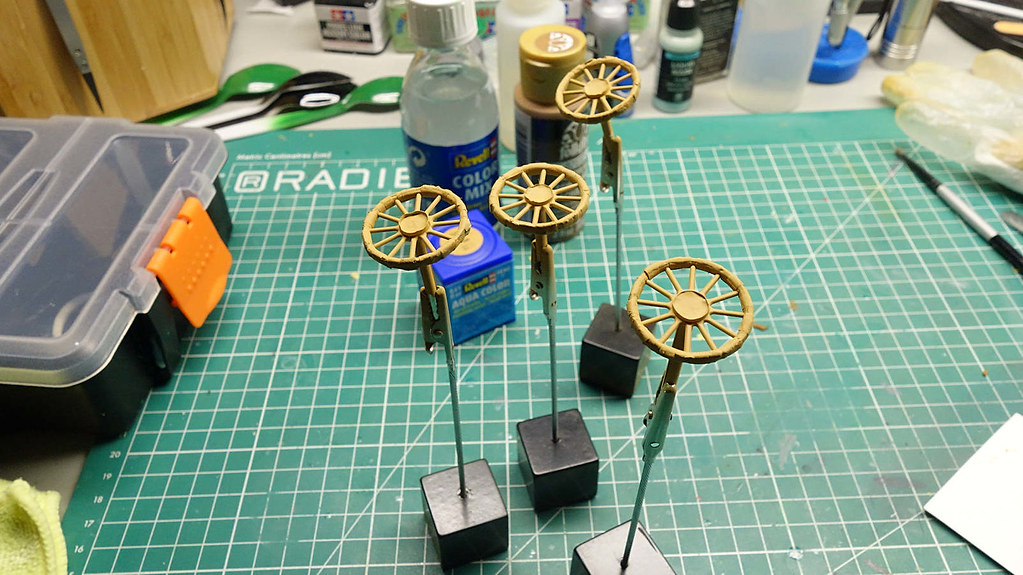
Demasked, the rubber is not attached. After paint I dry brushed FolkArt Raw Sienna. The dry brushing really pulls things together.
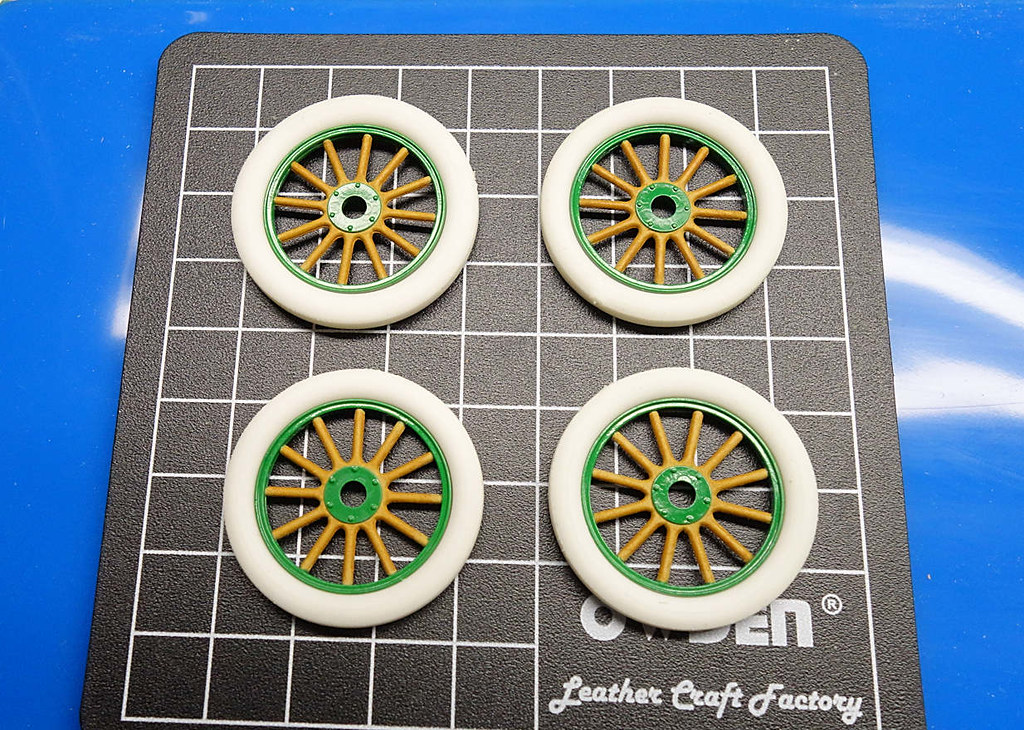
And that is my update for today. Cheers.


Turning out awesome.

  • Member since
    July 2014
  • From: Franklin Wi
Posted by Bakster on Sunday, March 20, 2022 3:24 PM

Thanks Dave, and John. I like how they turned out too. I am glad that paint didn't screw me up. Phew. Minor miracle.

  • Member since
    July 2014
  • From: Franklin Wi
Posted by Bakster on Monday, March 21, 2022 2:33 PM

Todays post will bring things up to the current state of this build.

Below: Using my punch set I made masks for the posts and I painted them with MRP White.

Below: More masking. All brass are painted using Alclad.

Below: All brass were primed, sanded, clear coated, sanded, painted, then an acrylic wash applied, and finally, cleared coated again. 

Below: I call this candyland. It's the place where you have some gating parts painted and for the most part, ready for install.

Below: MRP black, then I dry brushed a mixture of Tamiya black/white. I then sealed it with MRP Flat. This is my first time using MRP flat and I am so so about its performance. To my eye it appears more of a semi-gloss or semi-flat.

The final process with this piece is to paint the Ford emblem brass. I had an issue where tape pulled some brass off that emblem. So, I had to paint it all black and I will  go back and repaint that emblem. It's been a muddle and it won't be an easy task masking that. I am still not sure how I will pull that off. It would be easier to hand paint it but hand painting seldom works well for me.

I think I will first try using liquid mask around the emblem. Other portions maybe tape.

And this is where I am with the model today.

The seats were painted with MRP black, then dry brushed as I did with the radiator. And finally, sealed with MRP semi flat.

I can't progress on the front end until I get the radiator finished. The front end builds off of it. So, my next step is to tackle the emblem so that I can install it.

End of update.

  • Member since
    April 2003
  • From: USA
Posted by keavdog on Monday, March 21, 2022 2:45 PM

Great progress.  Plug wires look great.  

Thanks,

John

  • Member since
    July 2014
  • From: Franklin Wi
Posted by Bakster on Monday, March 21, 2022 5:02 PM

keavdog

Great progress.  Plug wires look great.  


Thanks, John. It is a fun build.

  • Member since
    August 2007
  • From: back country of SO-CAL, at the birth place of Naval Aviation
Posted by DUSTER on Monday, March 21, 2022 11:09 PM

Bakster

Below: MRP black, then I dry brushed a mixture of Tamiya black/white. I then sealed it with MRP Flat. This is my first time using MRP flat and I am so so about its performance. To my eye it appears more of a semi-gloss or semi-flat.

The final process with this piece is to paint the Ford emblem brass. I had an issue where tape pulled some brass off that emblem. So, I had to paint it all black and I will  go back and repaint that emblem. It's been a muddle and it won't be an easy task masking that. I am still not sure how I will pull that off. It would be easier to hand paint it but hand painting seldom works well for me.

I think I will first try using liquid mask around the emblem. Other portions maybe tape.


As a wild thought have you considered useing gold leaf? Well in a brass color, but the principle is the same.

Find an online suppler, local art supply/ craft type store. Looking for the gold leafing supplys. It is not an expencive proceedure.

First take a liquid ( called Size)  you pre apply to only the surface(s) you want the leafing to be applied to. Let it set, then carfully pick up only one sheet of the leaf, its about like picking up a cloud with a base ball bat. Though using static electricty on a flat brush, carefully move the sheet over the area to be leafed and very gently lay it down then very lightly tap the leafing on to the -in this case, the Ford letters and after it is set completly and covering the object, simply brush and or wipe away the excess remainder.  This leaves only the areas you treated with the pre treatment /size and the leafing on the model and no where elseHmm See? Simples Angel 

p.s. https://www.midwestairbrush.com/    for example

Keep the glue out of yer ears. 


Steve

Building the perfect model---just not quite yet  Confused

  • Member since
    July 2014
  • From: Franklin Wi
Posted by Bakster on Tuesday, March 22, 2022 10:04 AM

Say Duster--  Thanks for your input and the link too. I will consider it. Before I go down the leafing trail, I will try liquid mask. With some luck and by using a sewing needle, I might be able to position masking material into most of the nooks and crannies. It does not hurt to try, and it is easy enough to remove.

I will let you know how it comes out. 

Thanks again!


Steve

  • Member since
    March 2013
Posted by patrick206 on Tuesday, March 22, 2022 12:17 PM

Hi, Steve -

Well now, this is one fine example of craftsmanship and skill. I'm not overstating when I say I was really impressed, when I saw the way you handled painting the stripes on the fenders and the painting of the wheels. Very well done and realistic.

When I encountered the raised ridge painting task, I used tape for the straight runs and Metal Foil for the curved ends. It was easy enough 40-50 years ago, now at 81 and shaky I couldn't begin to do the rounded cutting of the foil edges. 

I'm really enjoying following this one, I'm sure it'll be a right beauty when done. Thanks for the post, details and photos. Cheers.

Patrick


  • Member since
    July 2014
  • From: Franklin Wi
Posted by Bakster on Tuesday, March 22, 2022 7:16 PM

patrick206

Hi, Steve -

Well now, this is one fine example of craftsmanship and skill. I'm not overstating when I say I was really impressed, when I saw the way you handled painting the stripes on the fenders and the painting of the wheels. Very well done and realistic.

When I encountered the raised ridge painting task, I used tape for the straight runs and Metal Foil for the curved ends. It was easy enough 40-50 years ago, now at 81 and shaky I couldn't begin to do the rounded cutting of the foil edges. 

I'm really enjoying following this one, I'm sure it'll be a right beauty when done. Thanks for the post, details and photos. Cheers.

Patrick


Hey there Patrick, nice to hear from you. And you are too kind sir. Thank you...

I like your idea of using foil. A steady hand could have made quicker work than how I masked it. Unfortunately, for me, a steady hand is probably not part of my repertoire. Tongue Tied

Thanks for enjoying my thread. I was starting to wonder if maybe I am overdoing it with the updates and with the detail that I post. Knowing that there is at least one person enjoying it with with me, it's enough for me to keep going. Thanks for appreciating my effort!

More to come... I hope. Wink

  • Member since
    August 2020
  • From: Lakes Entrance, Victoria, Australia.
Posted by Dodgy on Tuesday, March 22, 2022 7:19 PM

Well Bako, I've read right through this thread and to say I'm impressed with the build is a vast understatement. Your attention to detail and painting skills are amazing. Between you and Mustang the pair of you will have me attempting a car model yet, but with nowhere near yours and Mustang's skill.

As a funny coincidence, I actually have an ignition coil for this car. Picked it up years ago in a junk shop and purchased it because it looked old and cool. I didn't know what it was untill I read this thread.

Ferg

I long to live in a world where chickens can cross the road without having their motives questioned

  • Member since
    March 2012
  • From: Corpus Christi, Tx
Posted by mustang1989 on Tuesday, March 22, 2022 9:39 PM

I just knew there had to be a thread on this bad boy and whadday know.......here it is. Gonna be going back through this to get me a good look at what's been going on.


 Forum | Modelers Social Club Forum (proboards.com) 

  • Member since
    July 2014
  • From: Franklin Wi
Posted by Bakster on Tuesday, March 22, 2022 10:13 PM

mustang1989

I just knew there had to be a thread on this bad boy and whadday know.......here it is. Gonna be going back through this to get me a good look at what's been going on.


Hey Joe, you are the person that motivated me to start this thread. Wink

  • Member since
    July 2014
  • From: Franklin Wi
Posted by Bakster on Tuesday, March 22, 2022 10:24 PM

Dodgy

Well Bako, I've read right through this thread and to say I'm impressed with the build is a vast understatement. Your attention to detail and painting skills are amazing. Between you and Mustang the pair of you will have me attempting a car model yet, but with nowhere near yours and Mustang's skill.

As a funny coincidence, I actually have an ignition coil for this car. Picked it up years ago in a junk shop and purchased it because it looked old and cool. I didn't know what it was untill I read this thread.

Ferg


Hey Ferg, you need to do a build on that space project of yours. Now that would be cool. But if you want to build a car, jump in, the water is fine!

Thanks for the kudos but Mustang Joe is way ahead of me. Stick out tongue

That is funny about the ignition coil. Small world hey? 

  • Member since
    July 2014
  • From: Franklin Wi
Posted by Bakster on Tuesday, March 22, 2022 10:40 PM

PS Ferg: If you want to start small in the auto world, you could get something like this. I purchased this several weeks back and when I get back to building the Bullion Express, I might work on this in tandem. The beauty of this kit is, no detailed engine, no interior. The windows are blacked out and all you have to worry about is good plastic prep, good decaling, and good paint. In the end, a cool looking car and it advances your car finish skills.


  • Member since
    March 2012
  • From: Corpus Christi, Tx
Posted by mustang1989 on Tuesday, March 22, 2022 10:47 PM

Bakster

PS Ferg: If you want to start small in the auto world, you could get something like this. I purchased this several weeks back and when I get back to building the Bullion Express, I might work on this in tandem. The beauty of this kit is, no detailed engine, no interior. The windows are blacked out and all you have to worry about is good plastic prep, good decaling, and good paint. In the end, a cool looking car and it advances your car finish skills.


 Excellent choice!!! 


 Forum | Modelers Social Club Forum (proboards.com) 

  • Member since
    March 2012
  • From: Corpus Christi, Tx
Posted by mustang1989 on Tuesday, March 22, 2022 10:49 PM

Bakster


mustang1989

I just knew there had to be a thread on this bad boy and whadday know.......here it is. Gonna be going back through this to get me a good look at what's been going on.


Hey Joe, you are the person that motivated me to start this thread. Wink


Hey man.....inquiring minds wanna know. 


 Forum | Modelers Social Club Forum (proboards.com) 

  • Member since
    July 2014
  • From: Franklin Wi
Posted by Bakster on Tuesday, March 22, 2022 10:56 PM

"Hey man.....inquiring minds wanna know."

I hear ya...

  • Member since
    July 2014
  • From: Franklin Wi
Posted by Bakster on Tuesday, March 22, 2022 10:59 PM

mustang1989


Bakster

PS Ferg: If you want to start small in the auto world, you could get something like this. I purchased this several weeks back and when I get back to building the Bullion Express, I might work on this in tandem. The beauty of this kit is, no detailed engine, no interior. The windows are blacked out and all you have to worry about is good plastic prep, good decaling, and good paint. In the end, a cool looking car and it advances your car finish skills.


 Excellent choice!!! 


Yeah I want to start on it now! Lol. So on this slammer I plan to do a clear coat followed by a full sanding and polishing gig. I want that kit to sparkle.

  • Member since
    March 2012
  • From: Corpus Christi, Tx
Posted by mustang1989 on Wednesday, March 23, 2022 5:27 AM

Those are definitely the kind of kits to learn that kind of stuff on. If anything goes wrong at least there's not a whole lot of time invested in the build. Will be looking forward to that one.


 Forum | Modelers Social Club Forum (proboards.com) 

  • Member since
    August 2020
  • From: Lakes Entrance, Victoria, Australia.
Posted by Dodgy on Wednesday, March 23, 2022 4:49 PM

Thanks for the advice Bakko, I'll keep that in mind.

Cheers

Ferg

I long to live in a world where chickens can cross the road without having their motives questioned

  • Member since
    February 2011
Posted by knox on Thursday, March 24, 2022 10:42 AM

I don’t know anything about cars, so it’s best to stay silent, but I am enjoying following along. Thanks for posting. 


  • Member since
    July 2014
  • From: Franklin Wi
Posted by Bakster on Friday, March 25, 2022 9:36 AM

knox

I don’t know anything about cars, so it’s best to stay silent, but I am enjoying following along. Thanks for posting. 


Greetings Knox! Thanks for following along; I appreciate your interest in this project! More to come...


  • Member since
    July 2014
  • From: Franklin Wi
Posted by Bakster on Friday, March 25, 2022 10:31 AM

Bakster

Say Duster--  Thanks for your input and the link too. I will consider it. Before I go down the leafing trail, I will try liquid mask. With some luck and by using a sewing needle, I might be able to position masking material into most of the nooks and crannies. It does not hurt to try, and it is easy enough to remove.

I will let you know how it comes out. 

Thanks again!


Steve


 With great intrepidation I moved forward using liquid mask. The result is a good news bad news thing. The sewing needle worked very well moving LM into all the nooks and crannies. I got the logo masked nicely. That is the good news part. The bad news comes after demasking.  As I feared--jagged edges as you pull the masking off. It looked like hell. It's a complete do-over. A few hours soak in Testors ELO and I had the piece at reset to start again. 

So, now, I am racking my brain how to get the look I am after. I did some research into Dusters gold leafing idea. In the videos I have found, their finish is rather gnarly. I think this is mainly because of how they applied the underlying glue layer. If there are any brush strokes at all, that will project through in the leaf. I'd have to experiment with it. Duster--if you have your ears on-- have you tried this?

Then, I found something called Rub N' Buff. It's paste that you apply and then buff. I have my doubts about this because, again, the finish is so so. Coverage seems spotty and you can't apply a clear over it. 

I am currently making masks using rubber mold compound. Not sure this will get me closer to the goal, but it shows a little promise. It behaves different than LM, so a BIG maybe. I have a few other ideas in the chamber, but I am not hitting the target just yet. 

So... while I work on that, I am also working on the lanterns. I will be doing some custom work on those. More on that later and I hope to have an update later this weekend.

A comment about liquid mask. I mentioned my concern how it might affect the underlying paint layer. Though, I had not seen evidence of that on the radiator, I did have issues on other parts. The difference seems to be that radiator had a lacquer sealant applied, the other parts did not. So, on the unsealed parts, the LM removed paint as I pulled it off. I am very disappointed in LM.  What I think is important is either you need to seal the paint, or, as soon as you mask it, you need to paint and remove it. I had the LM on for about 24 hours and that seems to be the problem. The stuff etches into the paint. I ended up having to touch up areas with a paint brush. Fortunately, the pieces are in inconspicuous areas. My two cents.


  • Member since
    March 2022
  • From: Twin cities, MN
Posted by missileman2000 on Friday, March 25, 2022 1:46 PM

Here is a method I have tried with raised letters.  I cut a little rectangle of cardboard a bit bigger than the logo.  Uncoated cardboard usually works better than the plastic coated stuff.  Glue a short stick of wood or plastic to make a handle so you can work with it.  Brush some paint out on another piece of coated plastic leaving a continuous layer of paint.  Dip the face of the cardboard into the paint layer (depth of paint layer somewhat important).  Now press the wet face of the cardboard against the lettering, keeping it exactly parallel to surface.

  • Member since
    July 2014
  • From: Franklin Wi
Posted by Bakster on Friday, March 25, 2022 8:00 PM

missileman2000

Here is a method I have tried with raised letters.  I cut a little rectangle of cardboard a bit bigger than the logo.  Uncoated cardboard usually works better than the plastic coated stuff.  Glue a short stick of wood or plastic to make a handle so you can work with it.  Brush some paint out on another piece of coated plastic leaving a continuous layer of paint.  Dip the face of the cardboard into the paint layer (depth of paint layer somewhat important).  Now press the wet face of the cardboard against the lettering, keeping it exactly parallel to surface.


Hey Don, good thought. Basically, you are talking about pad printing. In this case, pad painting. If I can't get my other options to work I will test this.

Thanks for the suggestion! Good idea...

  • Member since
    March 2012
  • From: Corpus Christi, Tx
Posted by mustang1989 on Saturday, March 26, 2022 7:46 AM

missileman2000

Here is a method I have tried with raised letters.  I cut a little rectangle of cardboard a bit bigger than the logo.  Uncoated cardboard usually works better than the plastic coated stuff.  Glue a short stick of wood or plastic to make a handle so you can work with it.  Brush some paint out on another piece of coated plastic leaving a continuous layer of paint.  Dip the face of the cardboard into the paint layer (depth of paint layer somewhat important).  Now press the wet face of the cardboard against the lettering, keeping it exactly parallel to surface.


That sounds bad A$$! I may give that a shot too Don!! Thanks for the tip.


Sorry to hear that you're having the issues that you are with the liquid mask Steve. I've used that stuff with the same results as you and got rid of it because of those issues.


 Forum | Modelers Social Club Forum (proboards.com) 

  • Member since
    July 2014
  • From: Franklin Wi
Posted by Bakster on Saturday, March 26, 2022 12:05 PM

mustang1989


missileman2000

Here is a method I have tried with raised letters.  I cut a little rectangle of cardboard a bit bigger than the logo.  Uncoated cardboard usually works better than the plastic coated stuff.  Glue a short stick of wood or plastic to make a handle so you can work with it.  Brush some paint out on another piece of coated plastic leaving a continuous layer of paint.  Dip the face of the cardboard into the paint layer (depth of paint layer somewhat important).  Now press the wet face of the cardboard against the lettering, keeping it exactly parallel to surface.


That sounds bad A$$! I may give that a shot too Don!! Thanks for the tip.


Sorry to hear that you're having the issues that you are with the liquid mask Steve. I've used that stuff with the same results as you and got rid of it because of those issues.


I was hoping but this seals it's fate for me.

  • Member since
    May 2013
  • From: Indiana, USA
Posted by Greg on Saturday, March 26, 2022 1:23 PM

This post is several days late, but that pinstripe job (masking, etc) looks pretty awesome from where I sit.

And those tires and rims are a knockout. Yes

Now, back to enjoy more of page 3.....


  • Member since
    November 2018
Posted by oldermodelguy on Saturday, March 26, 2022 1:36 PM

I don't know this will work with alclad but I would try spraying everything the metal color. Coat the Ford letters with glycerin, paint the flat black. And wipe away the glycerin.Hopefully the metal color will stay on the letters. The good news is with black you don't need to have ten coats. I've used glycerin as a mask in the past. Also vasoline, though that was on chrome.

You could also do basically the same as above but brush in the black. You just need the right brush.

JOIN OUR COMMUNITY!

Our community is FREE to join. To participate you must either login or register for an account.

SEARCH FORUMS
FREE NEWSLETTER
By signing up you may also receive reader surveys and occasional special offers. We do not sell, rent or trade our email lists. View our Privacy Policy.