SEARCH FINESCALE.COM

Enter keywords or a search phrase below:

"Rite of Passage" the 1/96 Constitution

60929 views
155 replies
1 rating 2 rating 3 rating 4 rating 5 rating
  • Member since
    June 2012
"Rite of Passage" the 1/96 Constitution
Posted by arnie60 on Tuesday, July 16, 2013 12:40 AM

It seems that building the Revell 1/96 scale U.S.S. Constitution has become something of a “Rite of Passage” for ship modelers. Everyone, or just about everyone, who builds model ships has done this one or has it lined up to do. There are numerous build logs for her on this site and other sites to attest to this, and so I guess it’s my turn.
I had originally planned to build this straight out of the box, but after following Force9’s current build of her I decided to duplicate some of his modifications (particularly the gun deck bulwarks) and will no doubt continue w/ more as the build progresses. (once you start making changes it's hard to stop)
I also found a hearty discussion there not only of the mechanics of the build, but the history and controversy of accurately depicting the ship, as well as the characteristics of ‘ships of the period’ that piqued my interest to start doing my own research (in part just to understand some of the terminology being used) and as a result have now spent a considerable sum in acquiring reference and reading materials of my own.
My original plans for an OOB build have changed to the following:
Where ever possible, to make any ‘doable’ (ie… within my skill level) modifications that add to the accuracy and detail of the models representation of the Constitution. [I will do my best to justify as I go]
[Adjunct to this, I plan to try to depict her just after her 1858 overhaul by mounting her on a slip way, ready for launch, with new decking, plate, etc. It seems reasonable that she would still have had many of the characteristics of her 1812 fittings allowing me to justify using the models transom as is. ]
To do a complete and accurate as possible rigging, including constructing from scratch the masts from the top mast up along with replacing the models shrouds and deadeyes and chainplates. I have purchased the Bluejacket plans for their model of the Constitution to help me with this, as well as an amazing (to me) book by Lennarth Peterson that illustrates every line and how it was attached and belayed.
I had not planned on posting this until I had gotten farther along, but friends have been asking me how things are going and I figured this was an easy way for them to keep track. I anticipate this build to take a considerable amount of time, so there will no doubt be large time gaps between posts. With all that said:
Progress to date:
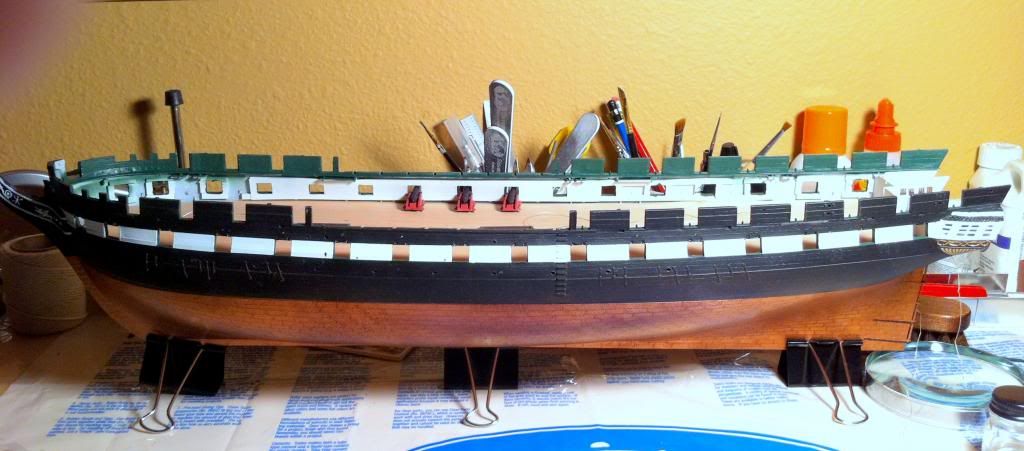
Hull is painted and assembled with some detailing to finish on the galleries and hawse holes.
Hull modifications:
I built up the gun deck bulwarks using Force9's idea w/ some modifications of his steps by using 0.01" sheeting for the planking inside the gun deck which I scribed and then glued on. I only did a section that would be visible through the spar deck hatches. As it turns out, it was pointless since about all you can see is the but end of the gun carriages once the spar deck is on. I did enjoy the challenge tho, and don't regret having done it.
I used the same method for doing the spar deck gunwales and added the riveting w/ a potters awl that I filed down the tip just enough to give me the right sized rivets. There was just no way, to my satisfaction, of depicting the correct number of rivets across each panel (14 by my count) without it looking like a shotgun had been taken to it. These took a lot of time, but came out pretty damn good.
All guns painted and assembled w/ some minor touch ups yet to do, and the tramsom has been detailed
[ possible re-do on this? Stupidly used Tamiya flat black from the bottle on the transom and Tamiya flat black from the spray can on the rest of the hull naively thinking they were the same color]
Gun deck has been assembled w/ veneer decking and placed in hull.
I haven't decided wheter or not to glue it in place. Seems not to need it. Any thoughts on this are welcome, especially if it means not gluing it in will cause me problems later.
The veneer decking is from Scaledecks.com and runs the whole length of the deck so I did not have to worry about the seams from the deck coming in three parts. It's also less that 1/100 of an inch thick so I did not have to make any modifications to the hatch coamings or mounting pads. I tested some background colors and the 'tint' of the deck changes w/ what color you use. Green actually works pretty nice, Red not so much. I just left the background color as primer grey in the end. I did not add a butt pattern (a test came out looking like bricks instead of planks laid out) and am letting the color variations "imply" the butts.
Captains quarters painted and ready for gluing.
I didn't bother with detailing this very much. All the pieces were riddled w/ gate marks for one, and I used Kristal Klear on the windows for the transom, so you really cant see a darn thing. Could have painted it all purple and you wouldn't be able to tell.Well..maybe not purple.
Trail boards and hawse holes.
The detailing on the boards came out fairly decent considering that when you are painting white over black, it means 5 or 6 coats (finger cramps and eye strain!). I will be changing out the hawse holes. They just looked sloppy to me and I found these pics from the 1858 and 1927 overhauls that show them as much larger and more or less perfectly round.

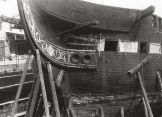
  top pic is 1858 (supposedly first photo ever of the Constitution)

Okay... That's pretty much all for now. I welcome questions, coments and criticism (constructive). It's summer, so I tend to get outside as much as possible, which means it may be a while before I have anything new to post.

  • Member since
    March 2012
  • From: Marysville, WA
Posted by David_K on Tuesday, July 16, 2013 5:30 PM

Looks great, Arnie!  I don't think there can be too much discussion about the Revell Connie builds...like you said, everybody's gonna build at least one!  I have a vintage one in my stash, just waiting for the right time!  Looking forward to your updates!

        _~
     _~ )_)_~
     )_))_))_)
     _!__!__!_         
     (_D_P_K_)
   ~~~~~~~~~~~~~
    ~~~~~~~~~~~

Current Project:  Imai/ERTL Spanish Galleon #2

Recently Finished: Revell 1/96 Cutty Sark

Next Up:  ???


  • Member since
    February 2003
  • From: Lacombe, LA.
Posted by Big Jake on Wednesday, July 17, 2013 8:20 AM

I always thought that "Right of Passgae" was building the USS Arizona and blowing her up with firecrackers.


  • Member since
    March 2004
  • From: Spartanburg, SC
Posted by subfixer on Friday, July 19, 2013 8:00 AM

Big Jake

I always thought that "Right of Passgae" was building the USS Arizona and blowing her up with firecrackers.

I second that.  Big Smile It's like crossing the line and becoming a shellback.  Pirate

I'm from the government and I'm here to help.

  • Member since
    June 2012
Posted by arnie60 on Monday, July 22, 2013 1:39 PM

Gun deck is finished. I execised some 'poetic license' here w/ the details. No doubt, having freight stowed on the gun deck would not have been prudent in times of war, but I am staging her in peace time, so arguably she could have had some freight on the gun deck. I only partially rigged the guns where they can be seen through the hatch of the spar deck. I still need to do the gun port doors before putting on the spar deck, but that should go fairly quickly and then its on to the spar deck.


  • Member since
    June 2013
Posted by scaledecks.com on Monday, July 22, 2013 4:26 PM

Nicely done, sir!  I love the contrast of the red gun carriages with the green trim.  The colors really pop.

I look forward to following along as you progress.  With the rate that you are going, it might not take as long as you currently think!

-- John D. --

  • Member since
    June 2012
Posted by arnie60 on Wednesday, July 24, 2013 11:28 AM

Thanks John....the carriages are actually the same salmon color as in her current incarnation, not red. My Iphone camera just does not seem to accurately reproduce some colors which is a real shame especially since it does not do adequate justice to the decking.

  • Member since
    December 2003
  • From: 37deg 40.13' N 95deg 29.10'W
Posted by scottrc on Wednesday, July 24, 2013 1:47 PM

Nice build!

  • Member since
    August 2011
Posted by Blueline on Wednesday, July 24, 2013 2:19 PM

Big Jake

I always thought that "Right of Passage" was building the USS Arizona and blowing her up with firecrackers.

Yep.  I remember doing that when I was a wee child in a fish pond in our backyard.  Mom got really mad too.  Dad helped :)

  • Member since
    June 2012
Posted by arnie60 on Saturday, July 27, 2013 11:05 PM

Here is a couple of shots of the spar deck going in. As you can see, I am having a few 'minor' (I hope) issues w/ it. The gap between the deck and the waterways its supposed to snug up to is rather significant. I may well have gotten in over my head on this one, but I think I have it figured out. The clips up by the bow are there to keep the deck flush to the top of the waterway. I have glued in the bow of the deck up to where the gaps begin on both P and S. After that sets, I will glue up the rest of the starboard side. The strings you see in the second pic will be my clamps. I put them on using a rolling hitch that allows you to keep cinching the loop tighter and tighter w/ out slipping. I did a dry run on this and it looks like it should work. After that sets, I will tackle the port side in the same manner. I am not sure just where this problem came from and now am curious if this is common for the Constitution, although I have  never seen it mentioned before. I haven't put on the veneer decking yet because I suspected this would end up being a messy job.  So.... wish me luck.

  • Member since
    July 2012
  • From: Douglas AZ
Posted by littletimmy on Sunday, July 28, 2013 11:31 PM

HEY   Big Jake    I can do you one better.

I built the Constitution way back in the day AND blew it up with firecrackers !!!

I wound up using it as a sunken wreck in my 50 gallon fish tank for several years.

 Dont worry about the thumbprint, paint it Rust , and call it "Battle Damage"

  • Member since
    June 2012
Posted by arnie60 on Thursday, August 29, 2013 11:28 PM

UPDATE 8/29/13

Well...as it turns out, the problem w/ the spar deck quickly turned into a nightmare and I have not felt like smashing up a model this much since I built the Revell 1/96 HMS Beagle.

Thanks to GMorrison in convincing me into not settling for close enough, I painstakingly removed the spar deck which was 3/4 glued in at this point. GM was right, there were two pins on the aft port side of the the gun deck that had not gone over the deck as they were supposed to, causing the hull to bow out. I cleaned that up, another little nightmare in its self, and went back to install the spar deck. There was still a gap and though there was much less tension up there now, there was still enough that my good old Testors still couldn't hold it closed.. The final solution turned out to be using  epoxy instead of glue. [Gods help me now if I ever have to remove the spar deck again.]

I

{some touch up painting needed, otherwise ready for veneer}

After hours of clean up... I started gluing down the veneer decking from Scaledecks using Tamiya extra thin and working my way out from the middle to the sides, but it just drys too fast I guess and I ended up w/ a lot of bubbling. It also melts the paint so I had some spots where the paint "stained" the underside of the veneer. Fortunately, i guess, the Tamiya didn't hold that well and I was able to very slowly and carefully scrape under the veneer w/ a flat blade exacto and get it back off. I was also able to sand the back of the veneer and get almost all of the paint stains off. [patience and determination can never be over rated]

I wrote to John at Scaledecks for a recommendation on the best way to glue the deck down.[I have decided on contact cement] and he told me that he is working on adding the butt pattern, and if I could wait two weeks, he should have it available. So....I guess I am going to turn my attention to either the pinnace (which needs a huge amount of work) or the masts while I wait.

Cheers and happy modeling to all for now.

  • Member since
    June 2012
Posted by arnie60 on Monday, September 16, 2013 5:40 PM

Okay then.... I finally got the spar deck glued in and got my "upgraded " version of the Scaledecks veneer. John added the butt pattern and joggling.

The butt pattern is really a bit fainter than I would have liked personally, But it really makes the difference.

I didn't like the cap-rails that came w/ the kit and decided to replace them w/ basswood. I think it just would have been a crime to put the plastic rails on next to that beautiful wood decking. I had to figure out how to bend the wood for the bow. I ended up using our vegetable steamer and letting it go for about an hour w/ some slats in the pot. I ended up, through a fair amount of trial and error, using the plastic rails for a jig to get the bend started and somewhat set, then finish up by clamping them in place until they dried out completely before gluing them on. This is the first time I have ever tried working with wood like this, and I have to admit to ending up w/ a significant trash pile before I was happy w/ the results.

So.... on to the deck furniture which I will post later.

  • Member since
    September 2012
Posted by GMorrison on Monday, September 16, 2013 6:45 PM

You Dah Man! Trash shmash, what's a good boat yard without a huge pile of shavings.

That's just great that you got the deck 2.0, I've never seen any AM wood deck that rose to that level.

 Modeling is an excuse to buy books.


  • Member since
    June 2013
Posted by scaledecks.com on Tuesday, September 17, 2013 11:54 AM

Wow - that is super-nice!  Want to go into bending basswood that I can include in the package with my decks???

You are doing a superb job, sir.  Well worthy of the first 2.0 deck!

  • Member since
    June 2012
Posted by arnie60 on Tuesday, September 17, 2013 3:08 PM

Thanks for the compliment GM, and again for encouraging me to go the extra mile as it were.Bow Down

  • Member since
    June 2010
  • From: Irvine, CA
Posted by Force9 on Sunday, September 22, 2013 12:39 PM

Your build is coming along nicely.  I very much like the new decking - the margin planking and joggling, in particular, looks well executed by Scaledecks.  

I will offer up a small quibble, however, on the veneer decks... Only relevant to those modelers who strive for complete authenticity.  It looks as though the butt ends of the planks are not centered over the theoretical positions of the underlying beams. The planks would need to be fastened into the beams and not "dangling" in thin air. Certainly this is most noticeable along the waist where the path of the beams is most apparent.   The hatch edges would also be important indicators for the positions of the beams.  After fashioning my own exposed beams on my build, I've gained a measure of respect for the original artisans who made the Revell kit... The general spacing of the hatches seems to correspond correctly across the entire spar deck to the even spacing of the appropriate theoretical beam positions.

Here is a look at the underside of my spar deck which gives some idea of how the beams might lay out:

Keep in mind that the plank ends would need to align to the main beams, not the smaller Carlings in between.

Here was my attempt to center the plank ends over the beams:

I should add that most modelers neglect this detail - it is a common miss.  I would expect that the vast majority of folks would never know the difference either way, but if John at Scaledecks is striving for authenticty, he may want to consider a 3.0 version at some point.

Your build is terrific and it is exciting to see such significant progress.  I am following along with keen interest!

Thx

EG

  • Member since
    September 2012
Posted by GMorrison on Sunday, September 22, 2013 7:31 PM

A very good point, 9.

Another good indication is the gun ports. By nature they occupy the space between two ribs, and the deck beams are supported by knees attached to the ribs, forming a frame.

So the butt ends of the deck should align with the gun port sides, offset by half of a beam width in either direction.

 Modeling is an excuse to buy books.


  • Member since
    June 2013
Posted by scaledecks.com on Monday, September 23, 2013 2:47 AM

No argument from me - you are right, of course.  The Constitution represents our first foray into wood ships.  Normally we work on wood planking for armored ships, where the planks are laid over steel.

I considered precise alignment of the ends, but I was hard pressed to get exact plank lengths and to know exactly where the butts were - short of visiting the ship itself and marking them out.  Unfortunately, most books on the subject to do not provide this detail, and the occasional photo of the ship's deck in small pieces is insufficient to set a full pattern.

I will visit the Constitution some day, and take those meticulous notes for every plank and how it is laid.

Let me confess, too, to this "deliberate" error: the "jogging" (or "nibbing" as it is called on armored ships) on my pattern follows the traditional rule.  There is an excellent reference to this is the fine book on the Cutty Sark (*See note), which also closely follows the pattern that I have personally inspected on the Iowa Class Battleships.  But the Constitution seems to get it wrong on the actual ship, and the pattern seems to be "inverted" going into the curve, with the cuts going completely the wrong way...

Here is a link to a fantastic photo:

http://www.history.navy.mil/ussconstitution/Images/Photos/WebRes/Restoration/20100105-N-5403C010.JPG

I am providing the link because it is high-resolution, and if you click on it you get a great close-up look at the planking.  Look closely at the planks between the two diagonal ropes at the left of the image, and note where they meet the bulwarks.

In all my studies, and personal visits to ships, the blunt end would be forward on the plank, and exactly half the width of the plank, and the angle cut would sweep aft.  But notice the cut here - it is a sharp point forward, and the blunt cut forms a notch at the rear, with a crude cross-cut into the wood visible between the ropes and just below the snow.  You can see another "backwards" cut in the lower left corner of the image, too.

Can somebody help me with this here?  To me, it seems like the actual ship got it wrong.  I chose, instead, to replicate a traditional jogging pattern - because I thought it looked better.  Here is a "blunt ends forward" image from a ship model

http://i1021.photobucket.com/albums/af335/seagull47/Ships/Fair%20Rosamund/plank-bow.jpg

If you want to see many more examples, Google "Ship Deck Nibbing" and look at the images that it finds.

Again, it seems like the actual USS Constitution in Boston got it backwards.  Was there some other nibbing technique that I am not aware of?


*Note: The "Cutty Sark" book that I mention is a two volume set, sometimes sold as a combined volume, by C. Nepean Longridge.  If sold in two volumes, you want Volume 1 for info on decking, which bears the ridiculously impractical title

"The Cutty Sark, The Last Of The Famous Tea Clippers V1: An Account Of The Ship Itself, With Plans And Full Instructions For Building The Hull, Bulwarks And Deck Fittings Of A Scale Model."

Volume 2 is entitled:

"The Cutty Sark, The Last Of The Famous Tea Clippers V2: Describing The Masts, Spars And Rigging Of A Scale Model, And Including The Builder's Specification For The Construction Of The Original Ship"

They are available on Amazon for about $20-$30 each.  I bought the two separate volumes, but they are offered in a single combined edition as well.  And the meticulous detail of the titles is a good indication of the quality of the content of these books!  They are an invaluable resource for any builder of model sailing ships, and well worth the investment.


  • Member since
    June 2010
  • From: Irvine, CA
Posted by Force9 on Tuesday, September 24, 2013 11:22 PM

Hello Scaledecks...

You were right to ignore the "joggling" on the restored ship - it is not accurate for 1812.  Here is my own picture of the forward area:

The modern folks obviously took a shortcut.  This is just one of many historic inaccuracies inherent in the modern restoration of Old Ironsides.

I don't think you'll need to get caught up in plank measurements of the existing ship either... Most of what you find will not correspond to our Revell model.  I think you're better off just coming up with an appropriate beam pattern for the Revell spar deck and letting that guide your planking... If you lay out a common step pattern using the beam locations as a guide, you should get a nice distribution of the planking lengths and a good representation of an 1812 era deck.  I've used the Longridge "The Anatomy of Nelson's Ships" book for guidance on the joggling and step patterns (ppg 118-122).

If we really want to get pure... Tyrone Martin outlines the interlocking plank pattern for the gun deck in his book "Creating a Legend".  Apparently part of the structural integrity of the ship involved two strakes of wide planking down each side that were scarfed together in an interlocking join that further added to the strength of the construction.  You can kinda see this in another photo I took on my last visit:

I think Martin says these joins are spaced about 40 feet apart, but the modern version of the ship has them spaced much closer.  Might not be worth the extra effort since most of the gun deck can't be seen once the spar deck is in place.

Thanks for the good discussion - and sorry to hijack this build log.

Evan

  • Member since
    June 2012
Posted by arnie60 on Wednesday, September 25, 2013 7:09 PM

Force9

First off, thanks for the compliment and I am looking forward to your next post on your Connie build. As for highjacking....please feel free. Your insight and knowledge is always a welcome addition.

And thanks again John for the beautiful deck. I think it takes the model to a whole other level. (And no one I know that will ever see this first hand will be any the wiser about the butt pattern).

I got started on the spar deck by pulling parts and laying them out for fitting and replacing the belaying pins. I got to the ramp thingy (part 140) that goes up from the deck to the bow sprit, took one look, and thought "No effing way am I going to use this!" So I pulled out my Bluejacket plans and am going to do my best to follow their layout.[ I am soooo happy I invested in them]

In doing so, I had to overcome a few problems. The first being that as I went to set the bow sprit in for fitting, the part that it seats on popped out of place. Of course! The part being on the gun deck, and the spar deck now and forever in place, getting it put back in, entailed a copious amount of not for prime time language (I was the only one home at the time, so I just let it rip). That situation remedied, I was then looking at an un-centered, in relation to the deck, bow sprit that has a 1/16" gap on the port side and is flush against the deck on starboard. I honestly don't know if this is Revells fault or mine. The pieces are all in their allocated slots per assembly directions, so I am going to ausage my ego and blame Revell.Anyway, the following pics show my remedy.

I filled in the gap with a piece of scrap basswood and then covered that with a cutting from one of the deck cutouts that, thankfully I saved.  As you can see, the mounting tab for the ramp thingy isn't centered and it is a little bit too far aft to follow the Bluejacket plans exactly.

I didn't have the right size styrene, so I made the coamings from basswood and used the Bluejacket PE grating.[I finally convinced them to send me the PE set after all. Yeah Bluejacket!] According to the plans, the grating should nearly butt up against the boom, but since that damned mounting tab had to be covered, I ended up making the coaming sides a tetch longer. The bucket is sitting on the part of the tab that sticks out to port. There is still a bit of a gap between the bow sprit and the coaming on the port side, but to do it any other way would have been even uglier. As it is, I can live w/ it.

I haven't glued anything dow here, and some touch up and dull-coat are in order, but, all in all, much better than that ugly ramp thingy. [painting wood is a whole different animal than painting plastic.In hindsight, I should have sealed the wood with a varnish or something before painting] And yes, the buckets and rope coils are hiding the tab part that still shows, and a couple of scrapes on the decking [more not for prime time language] that I made while paring down the tab. I may just redo this in styrene at some point. I don't like how 'bumpy' the paint finish came out.

Things are going much, much slower w/ the spar deck, so it may be a while before another post.

Axiom: There is no such thing as trash when modeling.

  • Member since
    March 2012
  • From: Marysville, WA
Posted by David_K on Wednesday, September 25, 2013 7:20 PM

Looks fantastic, Arnie!  You've gone a long way from OOB!  

        _~
     _~ )_)_~
     )_))_))_)
     _!__!__!_         
     (_D_P_K_)
   ~~~~~~~~~~~~~
    ~~~~~~~~~~~

Current Project:  Imai/ERTL Spanish Galleon #2

Recently Finished: Revell 1/96 Cutty Sark

Next Up:  ???


  • Member since
    September 2012
Posted by GMorrison on Thursday, September 26, 2013 3:24 PM

Nicely done. If you know ahead of time that you will be painting the parts, I recommend using styrene. Wood is finicky stuff, and only the best hardwoods like holly avoid a discernable, non-scale grain. It's good stuff at 1/48, problematic at 1/87 and 1/96 unless you use only the smoothest and best quality, and gets very awkward as the scale gets finer. I built a series of wood railroad stations (5 slightly different based on the Southern Pacific Railroad Common Standard Plan) in 1/160 completely out of styrene sheet and strip and they looked better than if I had tried to use wood.

 Modeling is an excuse to buy books.


  • Member since
    June 2013
Posted by scaledecks.com on Friday, September 27, 2013 2:12 AM

I must confess that when I am not building model ships, I like to build aircraft and rockets.  Balsa is great to work with, as it is soft and sands so incredibly easily.  However, it is very soft, and when you paint it, it "fuzzes up" something terrible.  UNLESS you use a good sanding sealer.  Aero Gloss is by far my favorite brand.

www3.towerhobbies.com/.../WTI0001P

Do about three coats, sanding with a fine grit paper in-between each one.  The first coat really gets soaked into the wood in a big way; the second coat less so, and the third really lays down a smooth surface.  When all is said and done, the sealer fills in all the pores, and virtually transforms your wood into a plastic-like material that is very hard and strong (hard enough for rocket fins that bounce on the ground upon landing.)

I would think it would work good on basswood, too.  You might want to pick up a bottle and check it out.  (Oh, and get the matching thinner, too, for cleaning up your brushes!)


Advantage balsa for ease of shaping and bending; advantage styrene for no need to finish prep the surface prior to painting.  I use both, depending on the needs at hand.

  • Member since
    June 2012
Posted by arnie60 on Friday, September 27, 2013 11:20 AM

Thanks John and GM for the tips. I think I will get a bottle of the Aero Gloss, sand down the coamings that I made from the basswood, and give it a try. No doubt it would be less work to just rebuild it from styrene, but I want to see how it comes out for possible future use.

  • Member since
    June 2012
Posted by arnie60 on Tuesday, October 1, 2013 6:13 PM

Here's a small update

With our Oregon rains setting in hard and early, being outdoors has been less than pleasant so I have been spending more time at the work bench. i replaced all the belaying pins w/ ones from Bluejacket and gave all a coat of paint, I put in shot racks along the hatch just abaft ot the capstan, and the capstan as well.

The racks and the capstan are modeled after pics from the current Connie.

I aplogize for the poor quality of the pic. The capstan on the current Connie had a brass cap and stainless steel sides. I did not think they would have stainless steel in 1858 so I painted that part light grey, and the brass paint I have for the cap was just wrong, so I painted it dark grey. I am pretty happy w/ it, but I would love to get some input on color scheme here, also w/ the pin rails. I painted the top pin rails green and the heavey support timbers brown. I am thingking all brown or maybe all green. Nothing except the shot racks are glued down at this point, so easy to change. The shot racks are brass wilre that I used blacken it on. Getting the 'bends to be the same length and parallell was tricky. Installing them even trickier, but nothing worth seamans language about. I plan to do one more up near the foremast.

The little shot trays on the deck are pure supposition on my part. I wondered how they got the shot to the decks and came up w/ the trays. i figured two men (boys) could easily transport 3 balls at a time this way. I found plenty of info on what the 'powder monkeys' do, but nothing on how the balls were moved,. If any one has insight/ info on this I would appreciate knowing about it; Input on the paint scheme is also very welcome. Right now I guess I like it but am ambivilant.

I added the capstan arms? spokes? usind bass wood stained colobnial maple. Rough,Not my best effort . I shall try some more later and see if I can do a better job (good practice for doing the yards?) I left it at four for the time being ( 8 total) as I havent decided that I really want to do more than that. So let me know what you think about that as well.

Moving sooo slowly now. I like it.

Axiom: if its going to end up hidden, it's not a mistake.

  • Member since
    June 2012
Posted by arnie60 on Tuesday, October 8, 2013 12:14 AM

Following Force9's lead, I decided to redo the wheel housing using the current Connie's helm as my guide.

I came up w/ what I thought was an awesome idea. I downloaded the drawings from the Connie site.

Then I re-sized the pic to scale and printed it out. Then I cut out the stand part and glued it to some basswood sheeting and carefully carved it out using the pic as my guide. Then I glued a piece of .01 styrene sheeting to the back and cut it out. The next step was going to be to glue another piece of the .01 to the other side, cut it out, sand, file and shape for a finished product.

You can see why that's as far as I got w/ that idea.Maybe if I did 20 or so of them I would get two that worked, but I couldn't face it. Just getting these took far too long. So I fell back on Force9's method w/ a slight variation. Instead of laminating two pieces of styrene, then bending them to shape, I used a single solid piece. I made a jig first, then I had read somewhere that boiling the styrene would allow you to bend it like steaming wood does. I am happy to say that in fact that does work, but not quite as well as it does w/ wood. Still, I was able to get the shapes that I wanted pretty near perfect after a few tries (you need to let it boil for about ten minutes at least, and then you need to work quickly w/ it) The end result is not nearly as nicely done as the ones Force9 did, but considering my skill level, I am fairly happy w/ it.

Haven't decided if this will be the final color(s) or not yet, and I need to do some clean up but overall, much, much better than what came w/ the kit.

Axiom: If you are trying something for the first time, clear your calendar for the day.

  • Member since
    September 2012
Posted by GMorrison on Tuesday, October 8, 2013 12:26 AM

Notice something? The drawing has ten spokes; the kit eight. There's always been something about that wheel. Truly.

Your base color is good. Have a look at the WW1 guys' GB. They do wonders with that umber, and Testors "wood" grain effect.

 Modeling is an excuse to buy books.


  • Member since
    June 2012
Posted by arnie60 on Tuesday, October 8, 2013 10:34 AM

i did not notice the discrepancy being so focused on the stand and not the wheel. Good catch there GM.

  • Member since
    June 2012
Posted by arnie60 on Sunday, October 20, 2013 9:54 PM

Tackled by the Tackle:

So I decided that I wanted to run the side tackle on the carronades on the spar deck. I ordered some 2mm single and double blocks from Syrene [amazing quality! Not a single bad block out of 100 total, and I have not had to file, sand, or  re-drill a single hole that I didn't accidentally get glue into. I can not recommend them enough. http://www.syrenshipmodelcompany.com/ ] and set to work, and set to work, and set to work. I knew there was going to be a learning curve on this one, but not so damned steep a one.

Here's my objective:

A single block on the carriage and double on the bulwark. I would have done well to reference this photo before I got started on this.

Axiom: Do your homework first.

I had it in my head that the blocks were stropped in iron w/ the hook end, Not as in the above, stropped in rope w/ the hook attached. So I started out by trying to figure out how to strop the blocks using twist tie wire, which was the smallest gauge I could find that was still flexible enough. I did try a smaller guage of brass also, but it was just too hard to bend at that size of block. So I stuck w/ the twist tie wire and also added eyebolts to the carriage using it. The wire seemed a bit too large for the scale but looked reasonbly good. Sometimes you have to use a bit of "willing suspension of disbelief" when trying to work in scale. Threading the blocks turned out to be the easiest [although not by any means easy w/ my shaky hands] part, and I got a practice run placed.

Not the worse, but far from my expectations. I freaked out having spent many hours getting to this point and threw it out to the forum hoping for help. As it turns out, the best help I got was the pic of the carronade on the present day Connie.[remember? The one I should have looked up in the first place.]

Back to the grindstone, I pulled the eyebolts and moved them to the rear of the carriage. As it turns out, there is a little lip at the back end where I could place and glue the eyebolts under the carriage. Then I went back and tried some different cordage till I got one that worked for me to strop the blocks w/ and just bagged the idea of the hooks. At this scale its not really an issue and made my life considerably easier.

Still room for improvement, but much much better. Moving the blocks to the end of the carriage and the other one to the center of the bulwarks expanded everything enough to catch that wonderful geometry going on there. The breech tackle is somewhat frazzled, and I may replace it, but it came out pretty good as well. The hardest  for this part was getting the slack right. So, as it stands, this is going to be my template for the rest. [21 more? sigh.]

"Until the time Eustes, until that time."

JOIN OUR COMMUNITY!

Our community is FREE to join. To participate you must either login or register for an account.

SEARCH FORUMS
FREE NEWSLETTER
By signing up you may also receive reader surveys and occasional special offers. We do not sell, rent or trade our email lists. View our Privacy Policy.