SEARCH FINESCALE.COM

Enter keywords or a search phrase below:

Moebius Seaview 1:350 scale WIP

42510 views
928 replies
1 rating 2 rating 3 rating 4 rating 5 rating
  • Member since
    April 2016
  • From: Parsons Kansas
Posted by Hodakamax on Tuesday, August 29, 2017 10:37 AM

Yikes! Sub wake is a challenge I've never even considered in modeling. I see that some of the wake is below the water line which makes it even more interesting!

As for the motorcycle project I've gotten past most of the bad part which is de-crudding all the parts. I'm into the mock-up stage with parts arriving and planning going on. In reality it's just another challenging model heavy on the scratch building. Same deal, a series of challenges but luckily no simulated wake to deal with lol. I do have quite the 1/1 mess going on in the shop.

Anyway, reporting and always watching, keep up the good work!

Max

  • Member since
    July 2014
  • From: Franklin Wi
Posted by Bakster on Tuesday, August 29, 2017 8:15 PM

Hey Max, it sounds like you are making nice progress on the bike. That is a nice project. When I was in my teens I purchased a very used and beat up 250cc Zundapp. The intent was to turn it into trail bike. With my dad's help we got it running, but it didn't run very well. It had an electrical problem that we were unable to nail down. Time passed, interests changed, and I eventually sold it. It was fun though, and I can totally appreciate the fun you are having by rebuilding your bike.

Yeah, that is something about that waterline isn't it. There is no easy way I could do that with this build. You really need to use the foam method, or something similar to cut those deep recesses. Anyway, that image is something else. The wake that sub produces seems to trail back for miles. I bet that could be seen from space! Not too stealthy while running on the surface.

  • Member since
    July 2014
  • From: Franklin Wi
Posted by Bakster on Sunday, September 3, 2017 2:50 PM

Update

First things first. I learned rather quickly that I need to use paper that is not only thin, but that is free of any relief. Any sort of relief on the paper causes too much disruption to the final look.

Lastly, thinner paper seems to produce a more convincing wave pattern. And, you are able to shape the wave much more readily. I experimented with using facial tissue, thicker TP, and with using more than three layers of TP. None of these options performed as nice as the example outlined below. For once, contrary to popular opinion, thinner TP is better! Who'd a thunk.

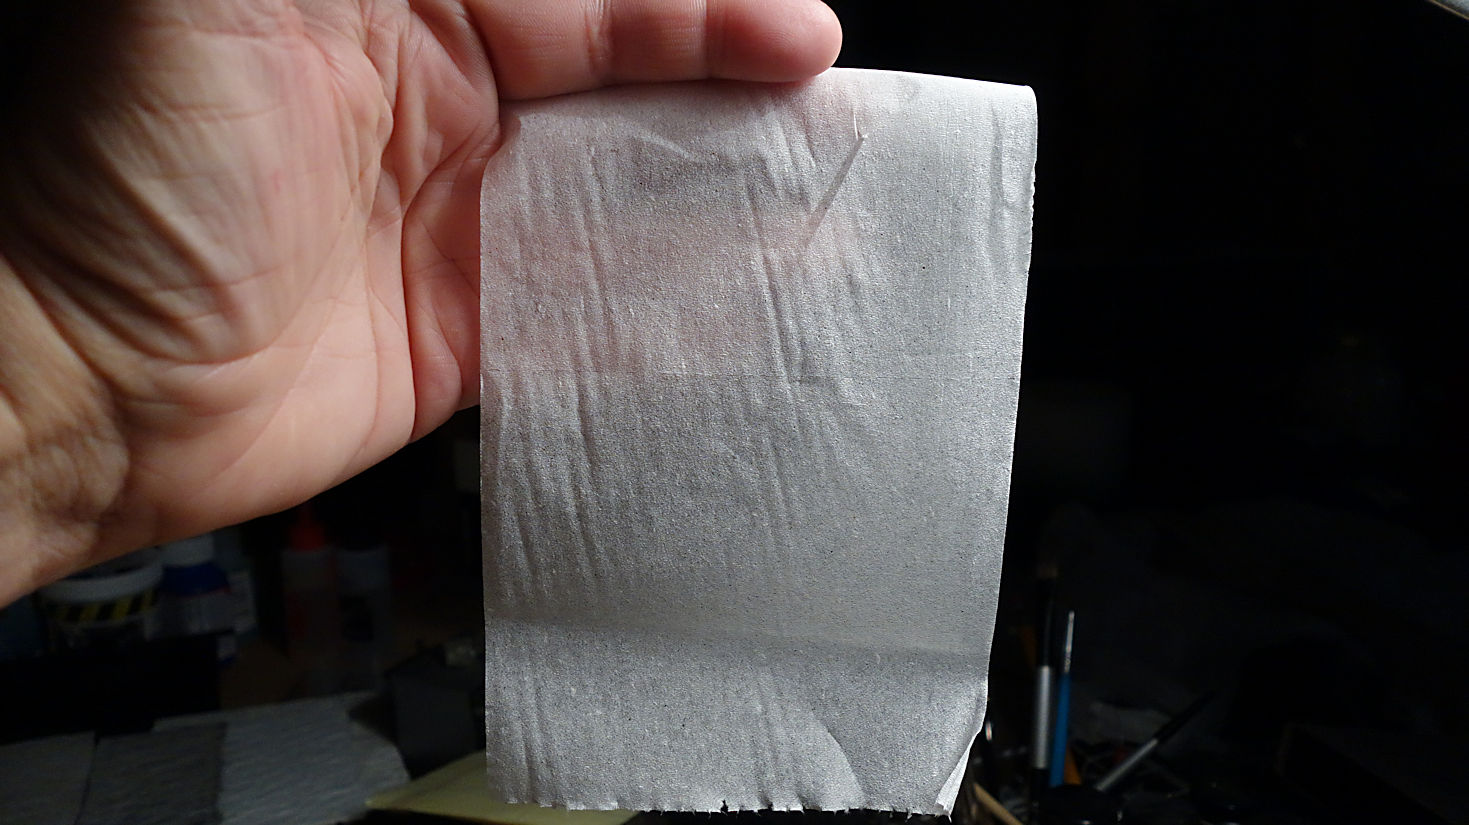
Below: Look how thin this stuff is. I found this at a Woodmans grocery store. It's called Spirit, and you can buy it one roll at a time. That is nice that I didn't have to buy a whole pack. The packaging says it has 1100 sheets, and, they claim no other roll lasts longer. Rrrrright.

A few more things to note: The author of the video suggests using at least 3 layers of paper. Secondly, he forms the waves by means of pushing the paper around with his brush. I followed his steps in my first test sample posted earlier on. Though it does work, I find that the waves are too narrow, and they lack volume to them. It is not quite what I want. Also, the process will often create waves that fold over onto themselves.

By trying this, and trying that, I came up with the following:

1. I first smear the glue concoction to the base.

2. I then lay the paper sheet onto the base in a way where it sort of rolls on. This minimizes wrinkles. It's best to start each layer as wrinkle free as possible.

3. Using a flat brush, and by using the flat tip of it, I dab at the paper in patterns to create the wave troughs. I wet the brush often with the glue concoction. Wetting the brush helps to glue the paper down, and, it causes the paper to wrinkle some via wicking. The wrinkles help to form a more convincing wave form.

What is interesting is that I have to do this same process to each layer of paper. This is the case even though that the two layers don't match other, and, the bottom layer is not even seen. I have found that if I don't do this, the final wave layer will not form the way that I like it to. It is very strange, but it's proved true more than once. They seem to work in concert with each other.

4. I use no more than 2 layers of paper. More than that... I start to lose the papers ability to form the more intricate waves.

5. Here is the problem though. The waves are very delicate. In my process, not all of the paper gets glue applied to it. This presents a problem at step 7 because doing that step can mash the waves either by physical pressure, or, the waves collapse when they are dampened. I had to devise a way around this. This leads me to step 6.

6. I AB a coating of PFC onto the paper. This seals the paper, and firms it up just enough to receive step 7.

7. (Note: See my 9/10 update regarding the gesso) I apply gesso to remove any paper texture and to smooth things out. This is a multilayer process. The thing that I learned here is that you should thin the gesso with water prior to its application. This minimizes brush marks. With my first attempts the gesso was not thinned and it left brush marks with each application. Not good. I read that you can thin it by up as much as 25%.

The next steps would read as... apply the paint, apply cotton, and then apply the clear gel. I will probably test those next. I don't expect any major issues. My famous last words...

Below: Self-explanatory. 

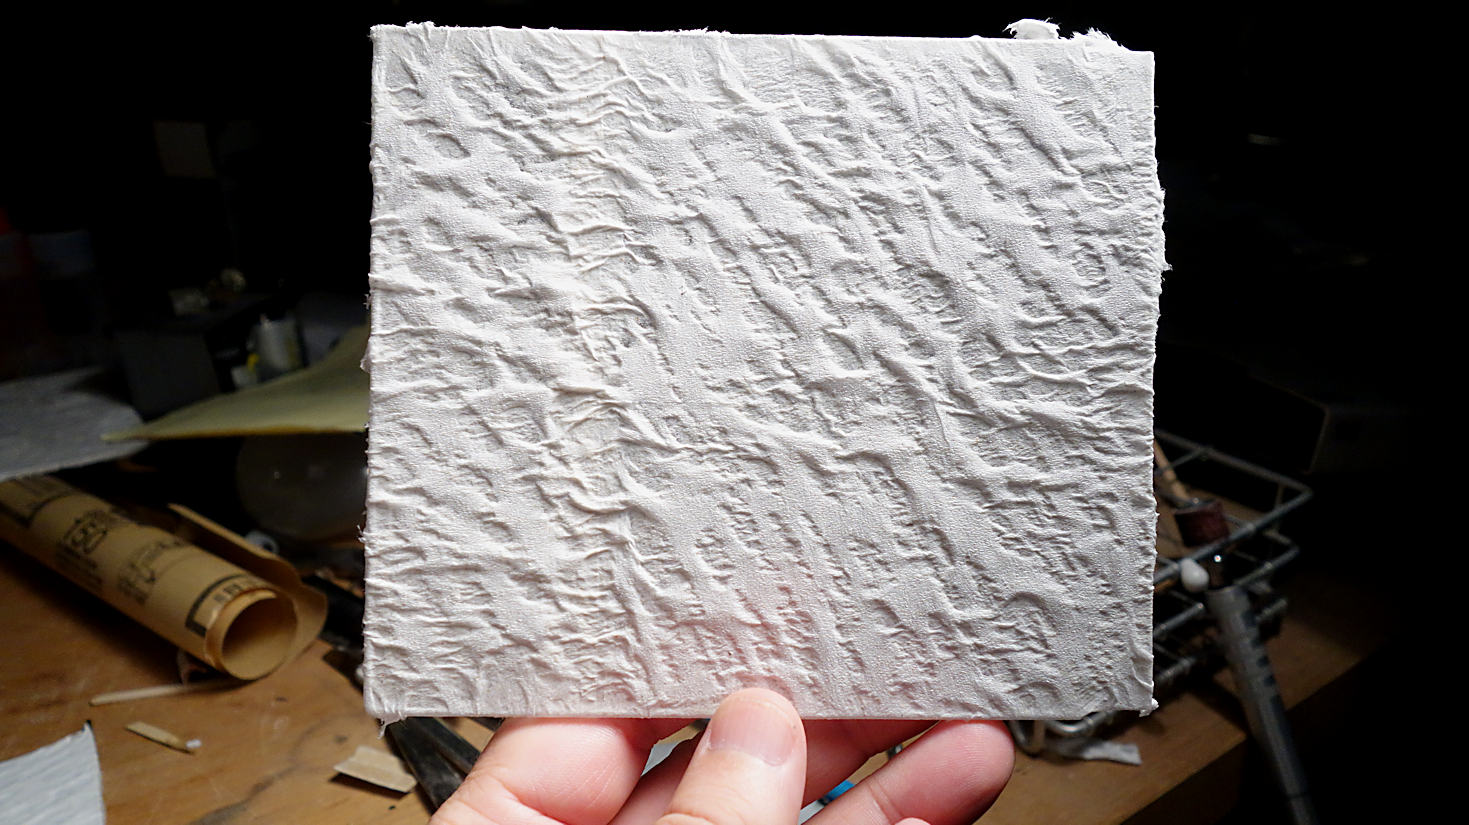
Below: In this example I tested other wave patterns. I will probably use this type of pattern nearer to the sub where there will be a lot of frothing. This test piece is without the PFC applied.

I want to say that I am not bashing the authors process. I think that his process is pretty dang creative. I am merely tweaking it to my taste. His is an excellent idea and my hats off to him for creating it.

What else am I working on? I am applying CA around the edges of the plexiglass bow wave in order to seal gaps, and, to smooth out/blend them to the main plexiglass substrate.

Lastly, it is time for my disclaimer. All of this is just my opinion.

I am much closer to actually doing this on the dio.

Long read.

THE END


  • Member since
    July 2012
  • From: Douglas AZ
Posted by littletimmy on Sunday, September 3, 2017 4:05 PM

Bakster
For once, contrary to popular opinion, thinner TP is better! Who'd a thunk.

This remindes me of a bad joke. It's not "politicaly correct" so I cant tell it here .... but the punch line is... ( I altered it slightly )    

"I got a name for your generic toilet paper. I call it John Wayne toilet paper.... because it dont take crap off  of nobody!"

 Dont worry about the thumbprint, paint it Rust , and call it "Battle Damage"

  • Member since
    July 2014
  • From: Franklin Wi
Posted by Bakster on Sunday, September 3, 2017 4:10 PM

littletimmy


Bakster
For once, contrary to popular opinion, thinner TP is better! Who'd a thunk.


This remindes me of a bad joke. It's not "politicaly correct" so I cant tell it here .... but the punch line is... ( I altered it slightly )    

"I got a name for your generic toilet paper. I call it John Wayne toilet paper.... because it dont take crap off  of nobody!"


 Lol. In tears.

  • Member since
    July 2013
Posted by steve5 on Sunday, September 3, 2017 9:56 PM

can't wait to see how this turns out steve , your saving me a lot of work LOL

steve


  • Member since
    July 2014
  • From: Franklin Wi
Posted by Bakster on Monday, September 4, 2017 9:47 AM

steve5

can't wait to see how this turns out steve


You and me both. I wish that I had a fast forward button to see how this all ends up! This could turn out to be a very simple way to make an ocean dio. It may not necessarily be the best way, rather a pretty simple way.

I sprayed some color on the test sample yesterday. I have to let that cure another day. Then, I will start applying the clear acrylic medium to it. If that goes well, I can finshing prepping the base. After that... it's engines at full to lay it all down.

In my last update I noted that the waves won't look right if I don't create wave patterns on the first layer too. Looking at the photo that I posted, I think that I see why. The underlying layer DOES show through. By wetting the brush often, the paper wrinkles, and it make the paper collapse against the underlying layer. Apparently, this reveals the relief that I created on the first layer. That pulls it all together. Knowing this now...I have to be more mindful of how I arrange the first layer. Boy, a person could really make a study of this and tweak the heck out of it.

I am still laughing about LittleTimmys joke. Too funny. I should label this process, John Waynes Tracks.

Onward ho!

  • Member since
    July 2014
  • From: Franklin Wi
Posted by Bakster on Tuesday, September 5, 2017 5:37 PM

Testing continued

The color is laid, and there are about 5 coats of Winsor and Newton Varnish. The color used for this test is what I had lying around, Tamiya Blue. The final color is TBD.

Overall--I feel like I am 90% there. The last 10% is as follows:

After 5 coats of varnish I can still see some graininess to the finish. I see it "mostly" at the very peaks of the waves. I could keep going with the varnish and try to eliminate them completely, but... I am concerned that I will lose too much detail by doing so. The varnish pools at the base of the troughs, and this will only make the waves shallower. At this point, I could just call it good. Unless you have really good eyes, a person "probably" won't notice it. But... some of you know me by now, I hate settling.

So...what to do? Do I change my work flow? Probably so. I believe the graininess is coming from the gesso. I noticed grittiness to it as I was applying it. I pulled the idea to use both the gesso and varnish from FSMs April 2016 Sculpting Rough Seas article. Chris Flodberg wrote the article, and Chris mentions sanding the gesso. I hoped that I could skip that step. At the scale that I am operating at, and with how my waves are formed... it would be a daunting task, if not outright impractical. What I might try doing yet is to replace the gesso filler with light coats of acrylic gel. Then, I would shoot the paint, followed by light coats of Varnish. I will try it on the other side of the test piece. Then we can do a side by side comparison.

If anyone has other ideas, let me know asap.

  • Member since
    April 2016
  • From: Parsons Kansas
Posted by Hodakamax on Tuesday, September 5, 2017 7:18 PM

Wow! Looks good to me. I'm impressed for what that's worth! lol.

Max

  • Member since
    July 2014
  • From: Franklin Wi
Posted by Bakster on Tuesday, September 5, 2017 7:56 PM

Hodakamax

for what that's worth!


Thanks Max...it's worth a lot!

  • Member since
    July 2013
Posted by steve5 on Tuesday, September 5, 2017 10:14 PM

look's great to me too steve , your not just being a little too critical mate , which we all can be of our own work at times . Whistling

steve


  • Member since
    July 2014
  • From: Franklin Wi
Posted by Bakster on Tuesday, September 5, 2017 11:22 PM

steve5

look's great to me too steve , your not just being a little too critical mate , which we all can be of our own work at times . Whistling

steve


Hey Steve, thanks! And yes, you are right. I am probably being too critical. No doubt about it. I enjoy the challenge though. The way that I see this, it is just a small detour. I will know within the next 3 or 4 days if changing the formula makes the difference. I kind of think that it will. It will be a good experiment. And if it works, it will be well worth it. 

Yes

Thanks for the input!

More to come.

  • Member since
    July 2013
Posted by steve5 on Wednesday, September 6, 2017 12:31 AM

be good to see the comparison


  • Member since
    July 2014
  • From: Franklin Wi
Posted by Bakster on Sunday, September 10, 2017 11:20 AM

The outcome


Below: This image does not tell much of the story, but I'm posting it to give you an overall visual. I should mention that the left side lost some of its gloss from the second test. Overspray I think.


Below: This is the side where I used gesso. You will notice a granular look to the finish. It's as if sand was mixed into the finish.


Below: This is the side that I used gel in its place. 


Conclusion


In my opinion, the difference is clear. Hands down, the gel worked better than the gesso.

1. Using the gel eliminated the granular look.

2. I used two thin coats of gel, followed by two thin coats of varnish. I might have been ok to stop at 1 coat of varnish. It was pretty dang close to being good, and I could have easily called it as such. There were a few isolated areas that needed a little more, and for testing sake, I wanted to see what another coat did.

Using the gesso, I had applied at least 3 coats of it, and 4 coats of varnish. With all that, I still hadn't reached the smooth look that I was looking for. I am sure that gesso works fine, but you need to use it on a large dio. Chris used a power drill and wire brush attachment to gouge out the waves of his foam. This is a much larger scale. In that case, the gesso can be easily sanded, and, it absolutely must be sanded. 

What does this all mean? It means that I get better detail. And, the applications of, were so much easier. It worked like a dream.

So... if this process interests anyone... I recommend using a gel in place of the gesso. There are a number of manufacturers that make acrylic gel. I am sure that any of them would work. The gel that I reference below is what I had on hand. I should also mention that that author of the video recommended using wood glue. I used good old Elmers White Glue, with no issues.

Below: This is all that you need. Oh, and some water.

Guess what? It's time to move on and make the water dio.


  • Member since
    April 2016
  • From: Parsons Kansas
Posted by Hodakamax on Sunday, September 10, 2017 11:29 AM

Yikes! Hurricane flags flying as we speak. Maybe you should wait till below Gale for the right size waves. You don't want the waves to be bigger than the subject. More silly advice from:

Max

And yes, the wave experiment looks good.

  • Member since
    July 2014
  • From: Franklin Wi
Posted by Bakster on Monday, September 11, 2017 8:09 AM

Hodakamax
Yikes! Hurricane flags flying as we speak. Maybe you should wait till below Gale for the right size waves. You don't want the waves to be bigger than the subject.:

True true. Thanks for following Max.

  • Member since
    July 2012
  • From: Douglas AZ
Posted by littletimmy on Monday, September 11, 2017 12:45 PM

I think the gel looks spot on! 

I reserve the right to "steal" your process on a future dio..... If I ever get around to it.

 Dont worry about the thumbprint, paint it Rust , and call it "Battle Damage"

  • Member since
    July 2014
  • From: Franklin Wi
Posted by Bakster on Monday, September 11, 2017 4:23 PM

littletimmy

I think the gel looks spot on! 

I reserve the right to "steal" your process on a future dio..... If I ever get around to it.


Hey LT...I am glad you think so. I think that it's good too. And, there is no need to steal it because it's free.

Anyway, you more than earned it with the John Wayne joke. Yes


  • Member since
    July 2012
  • From: Douglas AZ
Posted by littletimmy on Monday, September 11, 2017 6:18 PM

Bakster
Anyway, you more than earned it with the John Wayne joke. 

I really wish I could tell you the entire joke. In person I even do all the different voices..... and everybody falls down laghing (thats my Indian name by the way F.D.L.)

But its definatly an R rated joke.

 Dont worry about the thumbprint, paint it Rust , and call it "Battle Damage"

  • Member since
    July 2014
  • From: Franklin Wi
Posted by Bakster on Monday, September 11, 2017 7:40 PM

littletimmy


Bakster
Anyway, you more than earned it with the John Wayne joke. 


I really wish I could tell you the entire joke. In person I even do all the different voices..... and everybody falls down laghing (thats my Indian name by the way F.D.L.)

But its definatly an R rated joke.


I am sure its a hoot! 

  • Member since
    July 2014
  • From: Franklin Wi
Posted by Bakster on Monday, September 25, 2017 4:48 PM

Welcome to the Moebius Seaview WIP 2.0 upgrade. This upgrade adds functionality allowing viewers access to the Bakster comic book series, Seaview Chronicles. This is the latest advent in WIP presentations.

We hope that you enjoy this upgrade.

Thank you.

Bakster

PS: Hey, Admiral Nelson mandated this. Don't shoot the messenger. 


To be continued...


  • Member since
    July 2012
  • From: Douglas AZ
Posted by littletimmy on Monday, September 25, 2017 6:37 PM

LOLOLOLOL !!!!!!!!!

I use to work with some guys just like that...... I almost thought this was a documentary.

I will be printing this out so I can add it to my comic collection..... 25 years from now it will be worth "Millions" !

 Dont worry about the thumbprint, paint it Rust , and call it "Battle Damage"

  • Member since
    July 2014
  • From: Franklin Wi
Posted by Bakster on Monday, September 25, 2017 7:24 PM

littletimmy

LOLOLOLOL !!!!!!!!!

I use to work with some guys just like that...... I almost thought this was a documentary.

I will be printing this out so I can add it to my comic collection..... 25 years from now it will be worth "Millions" !


LT, thanks for having a sence of humor. It made all the work that I put into it worth while. Lol.

  • Member since
    July 2012
  • From: Douglas AZ
Posted by littletimmy on Monday, September 25, 2017 9:16 PM

I was going to post a picture of myself  "anxiously waiting..... hovering" over the computer screen. In the hope of episode II ariving.

But Postimage is down for maint.

 Dont worry about the thumbprint, paint it Rust , and call it "Battle Damage"

  • Member since
    July 2013
Posted by steve5 on Monday, September 25, 2017 9:52 PM

very good steve , me think's you might be in the wrong field of expertise , LOL


  • Member since
    April 2016
  • From: Parsons Kansas
Posted by Hodakamax on Tuesday, September 26, 2017 7:46 AM

Darn funny and good work Steve! You do seem to be multi-talented! Life really should be funny.

Max

  • Member since
    July 2014
  • From: Franklin Wi
Posted by Bakster on Tuesday, September 26, 2017 11:47 AM

Thanks Max, Steve, and LT. If what I did made you smile, then my job is accomplished. Like you said Max, life should be funny. Life gets too serious at times. I like to stay on the sunny side of life, whenever possible. If I can help others do the same, even better. 


  • Member since
    February 2007
  • From: Bronze Squadron - Battlestar Cerberus
Posted by Lodni Kranazon on Tuesday, September 26, 2017 4:01 PM
Very inspiring work!!

[Admiring Starbuck's space fighter] Cassiopeia: It's a perfect machine! Born to dance amongst the stars! Starbuck: Yeah, it's bumping into them that has me worried.

  • Member since
    May 2013
  • From: Indiana, USA
Posted by Greg on Tuesday, September 26, 2017 8:51 PM

Just checking in and as I read the last couple of pages had planned on commenting on the waves.

But the cartoon pretty much trumps the waves.

Pretty good, there, Steve. And good to see progress still progressing.

  • Member since
    July 2014
  • From: Franklin Wi
Posted by Bakster on Wednesday, September 27, 2017 5:08 PM
Greg—thanks for stopping in. Yeah, the comics are a fun diversion for me, and hopefully, a fun diversion for all of you.  
 
I think that Littletimmy will be happy to hear that episode 2 is in production. It should be released in the not too distant future.  After that, I promise, I'll get back to the project at hand.
 
Thanks Lodni... I am glad that you like my work!


JOIN OUR COMMUNITY!

Our community is FREE to join. To participate you must either login or register for an account.

SEARCH FORUMS
FREE NEWSLETTER
By signing up you may also receive reader surveys and occasional special offers. We do not sell, rent or trade our email lists. View our Privacy Policy.