SEARCH FINESCALE.COM

Enter keywords or a search phrase below:

75th Anniversary of 1941 Group Build (World at War)

36961 views
712 replies
1 rating 2 rating 3 rating 4 rating 5 rating
  • Member since
    September 2003
  • From: AandF in the Badger State
Posted by checkmateking02 on Wednesday, September 5, 2018 4:09 PM

A wise and discerning philosophy!


  • Member since
    December 2003
  • From: 37deg 40.13' N 95deg 29.10'W
Posted by scottrc on Thursday, September 6, 2018 10:32 AM

I had a good night of building and am now at the final chapter of this build.  All I have left is to put on the boats and then do some touching up and a final dull coat.

I had to admit, this kit was a pain as far as fit went.  I learned that 1/700 Trumpeter kits that derived from 1/350 scale really need a lot of test fitting and trimming.  I noticed after I secured parts that they didn't look right because of holes did not line up or worse, the raised flanges that guide the superstructure was off.  I don't hold that against Trumpter, and that for future builds, the old addage of measure twice, cut or glue once, needs to be practiced.

Starting the rigging.  I am trying some new techniques, so its going to look a little juvenile.

Final shot from last night.

  • Member since
    September 2003
  • From: AandF in the Badger State
Posted by checkmateking02 on Thursday, September 6, 2018 2:51 PM

Very nice, Scott.  You've done a great job with it, despite the fit problems. 

Interesting about their scaled down kits.  I've only build two Trumpeter ships, but I don't know if they were scaled down.  I've got some more, so I'll have to be watchful.

Anyway--good work!


  • Member since
    December 2003
  • From: 37deg 40.13' N 95deg 29.10'W
Posted by scottrc on Friday, September 7, 2018 9:22 AM

A couple of years ago, I remember seeing on the forums complaints about fit and how it was due to the scaling down from 1/350.  This is the second Trumpeter build I have done.  The first was the Lexington and there was fit/scale issues with the sponsons on the hull and then the fit between the hull, flightdeck, and island.

I always thought its part of modelbuilding.  Usually, if there are placement holes, I either drill them out or cut off the nubs and don't use them.

One issue I am dealing with this morning is the distance between placement holes for the lifeboat racks are about 1mm shorter than they should be.  I had seen this with just about all the placement holes on this kit.  So I just cut the nubs off, center the part, and glue it down.

A couple of parts I did not do this, such as the hydraphones, so they are at a slight angle and not perfectly verticle.  They are glued too well to try to remove and reposition, so I will need to display the ship in a way that I can't notice it and drive me nuts, since I'm OCD.

  • Member since
    July 2014
Posted by modelcrazy on Friday, September 7, 2018 10:21 AM

The Prinz is looking great Scott. Yes

Steve

Building a kit from your stash is like cutting a head off a Hydra, two more take it's place.


http://www.spamodeler.com/forum/

  • Member since
    September 2003
  • From: AandF in the Badger State
Posted by checkmateking02 on Friday, September 7, 2018 2:33 PM

That is good information to have, Scott.

I've built New Orleans and North Carolina from Trumpeter, and didn't notice those issues, but your experience is a warning to be careful with future builds.  I have Lexington waiting around, so it's good to know these difficulties ahead of time.


  • Member since
    December 2003
  • From: 37deg 40.13' N 95deg 29.10'W
Posted by scottrc on Monday, September 10, 2018 3:48 PM

Thanks Steve and Check.

The Prinz is done, now I just need to set up my picture stand and take some decent pictures.

  • Member since
    September 2003
  • From: AandF in the Badger State
Posted by checkmateking02 on Monday, September 10, 2018 5:50 PM

Great!  Anxious to see it.


  • Member since
    July 2014
Posted by modelcrazy on Monday, September 10, 2018 6:23 PM

Check,
I started the 1/350 Tamiya Prince of Wales last week and just have the wood deck on and am painting the hull camo. I want to get that done at the very first so I don't break stuff off painting it later. Is it too late to enter it in the GB? As you know, she was sunk in Dec 41.
I have all my WIP pics (what there is of them) up to now.

Steve

Building a kit from your stash is like cutting a head off a Hydra, two more take it's place.


http://www.spamodeler.com/forum/

  • Member since
    September 2003
  • From: AandF in the Badger State
Posted by checkmateking02 on Tuesday, September 11, 2018 8:09 AM

Sounds good, Steve.  I'll add it to the build roster.  Thanks for another entry!


  • Member since
    July 2014
Posted by modelcrazy on Tuesday, September 11, 2018 8:35 PM

You bet Check, thanks for allowing me. Here's what I've got so far.

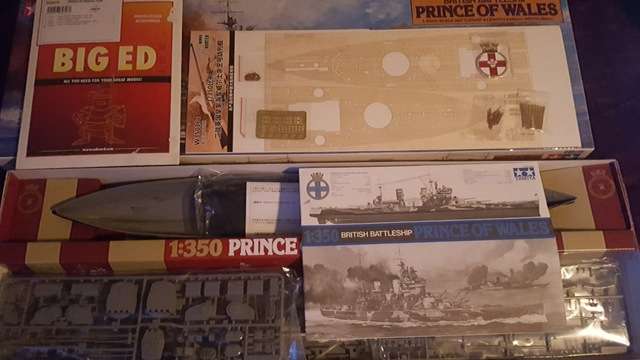
The box with all the AM. Eduard Big Ed set, Hunter wood deck, brass barrels and coat of arms for the display.

I am going to put it on a seabase depicting a scene where the POW is dodging the air launched torpedoes just prior to the crippling hit on the port screw.
I plan to show her, so I wrote a timeline which will go with the display.

The loss of the Prince of Wales

On Dec 8th, 1941 (Dec 7th Hawaii time) Force Z consisting of HMS Prince of Wales, HMS Repulse and accompanied by the destroyers Electra, Express, Vampire and Tenedos, sortied from Singapore to attack a reported Japanese landing force north at Kota Bharu on Dec 10th. Force Z was shadowed by Japanese observation planes during the late afternoon of Dec 9th and since surprise seemed impossible, Force Z turned to return to Singapore around 2000 hours. Unaware, Force Z was also spotted by a Japanese Submarine that day and as a result the Japanese transports had been moved north to safety. Shortly before midnight, Force Z received another report of a Japanese landing at Kuantan, which is on the Malayan coast nearer Singapore, and set course for there. Upon arriving off Kuantan on the morning of Dec 10th, the British fleet did not find a Japanese landing force. After investigating a tug towing several barges nearby, Force Z set course for Singapore once again. Shortly afterward, Force Z was sighted and attacked by a force of Japanese twin engine G3M1 Nell and G4M1 Betty Bombers armed with bombs and torpedoes. 
1113 hours, HMS Repulse was the first to be attacked               with eight 250-Kg bombs, one striking and exploding amidships.
1141 hours, another attack commenced on the port side of the HMS Price of Wales with nine bombers carrying type 91 aerial torpedoes. The aircraft made their initial approach at a speed of 150 to 180kts at an altitude of around 180 feet (55 meters). The torpedoes were set to a depth of 12 to 20 feet (4 to 6 meters). Eight of these planes attacked the Prince of Wales while one peeled off to attack the Repulse. The Prince of Wales began a slow turn to port while at a speed of 25kts to comb the wakes, but before the maneuver could be completed, eight torpedoes were released at a height of 100 to 115 feet (30 to 5 meters) and at a distance of 1970 to 4920 feet (600 to 1500 meters) from the ship.
1144 hours the Prince of Wales avoided seven torpedoes however one impacted port aft, severally damaging and bending the port propeller shaft, breaking the shaft struts while debris from the impact severally damaged the port center propeller blade. The bent port shaft failed and broke at several flanges due to severe vibration. This took several minutes as Lt Wildish, in command of boiler room B, which drove the port shaft, did not have any idea to the extent of the damage due to the loss of communications caused by the torpedo explosion. Because of the forward speed of 25kts, the shaft began to windmill despite the efforts of Lt Wildish to slow the shaft which put immense strain on the flange bolts. Eventually, vibration caused by the damaged shaft, caused failures at several flanges which also critically damaged the stern shaft tube and several bulkheads allowing thousands of gallons of sea water to fill the engine room’s bilges. Emergency pumps were started, and the space was abandoned, and watertight doors were sealed.
The loss of the port side shaft and center propeller severely limited the maneuverability of the ship which left her vulnerable to additional attacks.
1223 hours two torpedoes struck the starboard side. One at the bow and another stern further damaging the shafts and bending the outer shaft so far, the propeller wedged under the center starboard shaft.
1223 1/2 hours the last torpedo struck the starboard side under the compass platform. At this point the Prince of Wales was in serious trouble.
1241 hours she fell under attack again from eight high level bombers approaching from the port side. One 500Kg bomb hit the ship, six miss and one bomber failed to drop its bomb.
1243 hours Lights out.
1245 hours HMS Prince of Wales is listing 3 degrees to port and increasing the angle,
1250 hours HMS Prince of Wales radios Singapore for tug assistance.
1300 hours destroyer Express comes along side to evacuate personal and receive the wounded.
1310 hours all shafts stop and the order to abandon ship was given.
1324 hours HMS Prince of Wales capsizes and sinks.
327 sailors were loston the Prince of Wales, 513 off the Repulse. Nearly 1000 survivors were rescued from both ships.
On Dec 11th Lt Haruki Iki flew to the site of the battle, dropping two wreaths of flowers into the sea to honor combatants from both sides who had died in the battle. One was for the fellow members of his Kanoya Air Group, while the other was for the British sailors whose display of bravery in defense of the ships had gained them the utmost admiration from all pilots in his squadron.
The Prince of Wales rests upside down at the bottom of the South China Sea at a depth of 232 feet (68 meters) about 75 miles (120 kilometers) off the coast of Kuantan
 

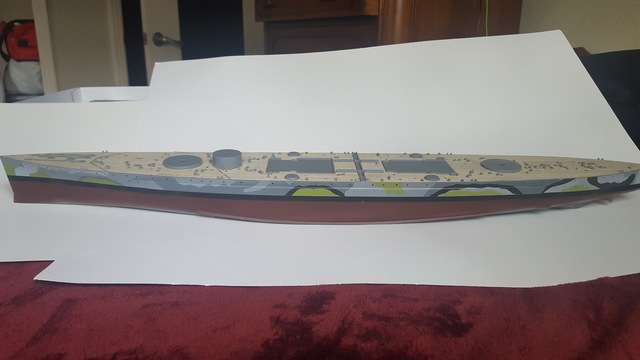
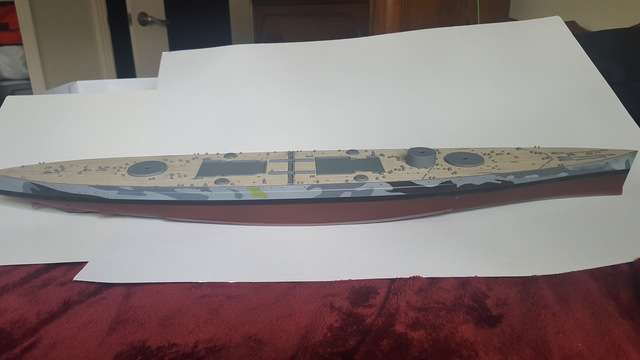
I started on the deck and painted the hull first. This way I won't break stuff off trying to paint at the end.
She got pretty beat up from England to Singapore and I doubt the crew had much time to repaint before heading back out.

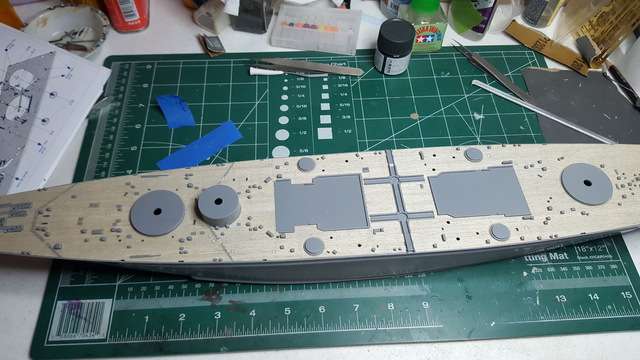
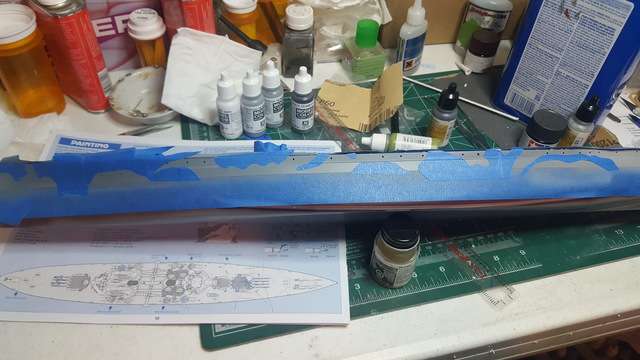
I sprayed the light gray, masked that off and added increasingly darker shades, pulled the tape off and voila! I think I got it close enough.

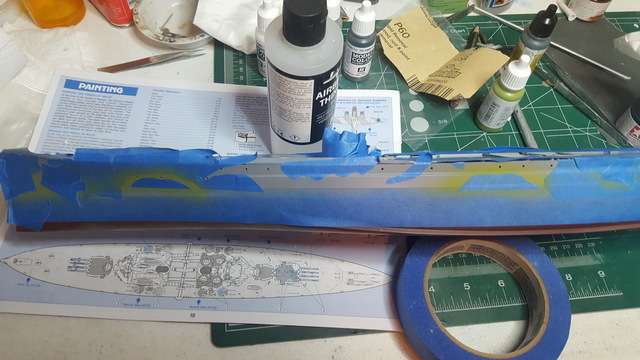
Now that I'm caught up, next I'll weather it and spray it with flat top coat to protect it.

Steve

Building a kit from your stash is like cutting a head off a Hydra, two more take it's place.


http://www.spamodeler.com/forum/

  • Member since
    September 2003
  • From: AandF in the Badger State
Posted by checkmateking02 on Tuesday, September 11, 2018 9:13 PM

Great start, Steve.  Thanks for the background information, too.


  • Member since
    April 2005
  • From: Australia
Posted by taxtp on Wednesday, September 12, 2018 11:49 PM

Looking really good Steve.

Cheers

Tony

I'm just taking it one GB at a time.

  • Member since
    December 2003
  • From: 37deg 40.13' N 95deg 29.10'W
Posted by scottrc on Thursday, October 4, 2018 4:53 PM

Well Check,  here are the finished pictures of my Prinz Eugen pseudo 1941.

Use this picture for the front cover

Now the rest of the details

  • Member since
    September 2003
  • From: AandF in the Badger State
Posted by checkmateking02 on Friday, October 5, 2018 5:26 PM

Great looking ship, Scott!  Thanks for your participation in the GB.  It's always a pleasure to see your ship building skills.


GAF
  • Member since
    June 2012
  • From: Anniston, AL
Posted by GAF on Wednesday, August 7, 2019 6:21 PM

I started this over 3 years ago, but due to life issues had to drop it. It's always been there awaiting the day that I could give it some attention, and after picking up an Airfix P-40B a few months ago, I decided to pull this one out and finish her. Better late than never, I suppose!

Originally, I was going to paint this up as a British Tomahawk, but when I got the Airfix kit, I changed my mind and decided to go with George Welch's P-40B at Pearl Harbor. Since the orignal pictures have disappeared (lost in the Great Photobucket Disaster), I'll post some work in progress pictures from 3 years ago. I didn't make any progress pics of the new stuff, but it's mostly on the outside so is visible in the finished images.

First, this is the kit. The old Monogram/Revell P-40 kit. It was a new release, so the plastic was flimsier than the older versions. Still, it didn't present too many problems for fit that weren't my own fault.

The cockpit I painted interior green. I don't know if the Curtis green was close to this, but it was not something that I was worried about. Just know that I'm aware that the color may not be quite right.

I cut out a lower floor plate and installed the rear exhausts that were behind the flaps. You'll never see these, but it was a nice modification.

The instrument panel was wrong, but I reasoned that since I was going to use the closed canopy it would be difficult to see it anyway. That turned out to be right.

I first modified the bottom of the aircraft to reflect what was actually there and removed the drop tank holes, and cut off the flaps that I planned with some plasti-card to replace. I also used plasti-card to create some wheel wells that were lacking. With some aluminum duct tape, I scored ridges and applied these to the upper wheel wells. Of course, puttying some seams was par for the course.

Afterwards, I painted the wheel wells interior green.

Once the modifications to the bottom of the aircraft were done, I glued the bottom wings to the fuselage and used some tape to help keep them aligned.  Once the bottom wing was on, I cut out the flaps and prepared to install them. I also glued the top wings to the bottom and that's where things stopped.

Then, 3 years later...


GAF
  • Member since
    June 2012
  • From: Anniston, AL
Posted by GAF on Wednesday, August 7, 2019 6:31 PM

After pulling this out of the closet, I decided to forgo the more complicated British paint scheme and lack of proper decals and went with the Pearl Harbor scheme from the Airfix kit. Since I will probably use the Airfix kit for a British version or a Flying Tigers scheme, it was not a problem.

I gave the aircraft a coating of neutral gray, then masked and shot it with OD green. I did make the mistake of not spraying the OD under the horizontal stabilizers, but corrected that later. Once the paint was on, I made some modifications to the landing gear by adding small actuator levers that the Monogram/Revell kit lacked. I used the kit tires as I could not afford some nice resin ones. I also used thin wire to add brake lines.  The wing walk-ways were merely black painted Tamiya tape.

I painted up the kit pilot and added him to the cockpit. For the canopy, I used the one piece version that came with the kit. I polished off the front ridges that are not supposed to be there and cut out a small piece of clear plastic that I glued in as the armored glass inside. For the gas and oil openings, I marked them on the side panels and then drilled holes for the openings. The canopy I masked and painted the frame, but the result was less than stellar, so I went another route. Using a piece of clear decal paper, I sprayed it the same OD as the aircraft then cut thin strips which I applied across the frame. This worked fairly well. On the bottom ramps for the canopy, I cut out and applied pieces of OD decal paper to help cover the obvious seams between the fuselage and canopy. The canopy for the P-40 slid along a rail and the bottom was one piece, so I tried to show it that way.  I also punched out some small circles from some aluminum duct tape and used them for the ID lights on the side of the fuselage, though some earlier P-40Bs apparently didn not have them.

A coat of gloss coat and I applied the decals from the Airfix kit. They went down well with no major problems some Microsol couldn't solve. I did use the prop decals from the Mongram/Revell kit, though they do seem a bit over-sized.  Some minor wash and a coat of dullcoat and she was done.

These are the final pictures.

After looking at these pictures, I realize that I left off the aerial wires, though I'm not sure how prevalent they were on P-40s of this period.  Also I need to knock down the shine on the tires.

Thanks, CMK02 for the GB and sorry for the delay!

Gary


  • Member since
    September 2003
  • From: AandF in the Badger State
Posted by checkmateking02 on Friday, August 9, 2019 11:14 AM

Great looking P-40, Gary.  All the modifications really paid off.  Three years in the making was worth the wait.

Thanks for being part of the GB.

Do you have a preference for the finish-photo?


GAF
  • Member since
    June 2012
  • From: Anniston, AL
Posted by GAF on Friday, August 9, 2019 12:21 PM

Thanks!  I'm not sure the 3 years wait made it any better! Big Smile

I think the first photo is probably the best.  Thanks again!

Gary

  • Member since
    September 2003
  • From: AandF in the Badger State
Posted by checkmateking02 on Friday, August 9, 2019 4:40 PM

Front page is updated, Gary.  Thanks again for participating in the GB.


  • Member since
    April 2019
  • From: South west, PA
Posted by Tomcat on Wednesday, September 11, 2019 7:05 PM

Onto 1941. Who can forget December 7, 1941 a date that will live in infamy...

So for my entry will be this 1/48 Monogram A6M Zero painted/lettered as she might have been on that date in history...

Mark aka Tomcat

On the workbench: Monogram 1/24 '69 Pontiac GTO and a Monogram 1/67 (box scale) B-26 Invader

  • Member since
    September 2003
  • From: AandF in the Badger State
Posted by checkmateking02 on Thursday, September 12, 2019 4:12 PM

Glad to have you participate in this GB, Mark.  I've added your Zero to the build roster.

I remember having a number of Monogram's 1/48 planes years ago.  They were pretty good.


  • Member since
    April 2019
  • From: South west, PA
Posted by Tomcat on Tuesday, October 22, 2019 2:09 PM

Finally got a little work done on the Zero. Prop, engine and cowl have got some color as well as the landing gear...

The pilot painted and added to the cockpit, sparse as it it...

and fuselage all clamped up waiting for the glue to dry...

Just the wing assembly needs mated to the fuselage, check the seems and onto paint.

Mark aka Tomcat

On the workbench: Monogram 1/24 '69 Pontiac GTO and a Monogram 1/67 (box scale) B-26 Invader

  • Member since
    September 2003
  • From: AandF in the Badger State
Posted by checkmateking02 on Tuesday, October 22, 2019 4:50 PM

Tomcat:  none of your photos are showing up--just a little "minus sign" in a circle.  


  • Member since
    April 2019
  • From: South west, PA
Posted by Tomcat on Tuesday, October 22, 2019 6:41 PM
OK...I can see them. not sure what the problem is,

Mark aka Tomcat

On the workbench: Monogram 1/24 '69 Pontiac GTO and a Monogram 1/67 (box scale) B-26 Invader

  • Member since
    September 2003
  • From: AandF in the Badger State
Posted by checkmateking02 on Wednesday, October 23, 2019 3:52 PM

Hmmmm.  I still can't see them; still the little minus sign in a circle.  Don't know if it's something with my computer or another issue. 

We just cleared out the "cookies and cache," so I don't know if that had any effect or not.


GAF
  • Member since
    June 2012
  • From: Anniston, AL
Posted by GAF on Wednesday, October 23, 2019 7:02 PM

Mark,

I cannot see the photos, though when you originally posted them I was able to.  I think you're using a Google account if I saw the links correctly.  I will note that Lostagain had this problem with photos in the "Japanese VIII GB".  Check his last posts for information.  You might wish to check your "share" settings, as Piers related that was the problem on his end.

Just a suggestion.  Smile

Gary

  • Member since
    April 2019
  • From: South west, PA
Posted by Tomcat on Thursday, October 24, 2019 3:34 AM
Thanks. I'll check it out. Repost if necessary.

Mark aka Tomcat

On the workbench: Monogram 1/24 '69 Pontiac GTO and a Monogram 1/67 (box scale) B-26 Invader

  • Member since
    April 2019
  • From: South west, PA
Posted by Tomcat on Thursday, October 24, 2019 8:01 AM

Reposting the pics, lets see what shows...

Mark aka Tomcat

On the workbench: Monogram 1/24 '69 Pontiac GTO and a Monogram 1/67 (box scale) B-26 Invader

  • Member since
    September 2003
  • From: AandF in the Badger State
Posted by checkmateking02 on Thursday, October 24, 2019 12:21 PM

Excellent!  The photos are showing up now, Mark--even the ones from your earlier posting.  Whatever you did, it worked.

And things look like they're progressing very well in the build.  Brings back memories seeing the "classics" still around and coming together so well.    


JOIN OUR COMMUNITY!

Our community is FREE to join. To participate you must either login or register for an account.

SEARCH FORUMS
FREE NEWSLETTER
By signing up you may also receive reader surveys and occasional special offers. We do not sell, rent or trade our email lists. View our Privacy Policy.