SEARCH FINESCALE.COM

Enter keywords or a search phrase below:

Bf-109: Reich Defender GB The End

186020 views
1406 replies
1 rating 2 rating 3 rating 4 rating 5 rating
  • Member since
    June 2004
  • From: Akron ohio
Posted by phoenix7187 on Saturday, November 29, 2008 8:25 PM

The pit is almost done. From the pics I see I need to straitghten the trim wheel and fix some of the paint work on the IP. This is one of Aires older cockpit sets and you can tell. I just built a 1/48 K-4 with the aires new masters set and boy what a difference. This set is by no means bad but their new stuff is the best out right now IMO. This set the molds not as crisp and some things are not as well done.  I just laid the IP up there, the gun sight and shoulder belt not yet installed.


Stan
  • Member since
    September 2003
  • From: South Central Wisconsin
Posted by Daywalker on Saturday, November 29, 2008 9:48 PM
Stan- Now THAT is a jaw-dropping office!  What is the paint you used for the base color?  I like it very much.  Has that slight-blue hue to it not often seen.  Subtle weathering is very, very nice.  You make it look so easy!  Have you built a 109 before? Wink [;)]

Frank 


  • Member since
    July 2003
  • From: waynesboro va, via Ireland
Posted by sidure on Saturday, November 29, 2008 10:31 PM

Well I got off to a flying start last night and have the it completed and painted and every sub assembly also completed. Hope to start some detail paint in the pit and start sanding everything. With that said it does not take too much when it's a Revell kit. The surface detail is pretty good so hopefully she will finish well. I will post pics soon.

Steve

  • Member since
    September 2003
  • From: South Central Wisconsin
Posted by Daywalker on Saturday, November 29, 2008 11:53 PM

Looking forward to those pics Steve! Big Smile [:D]

Question regarding the G-10 cockpit...

The panel on the bulkhead behind the pilot (the one with the battery cover), how tight of a fit is it between the panel and the bulkhead?  The Hasegawa kit part is a pretty loose fit, and I am wondering whether I need to modify the fit (or replace the panel).  Anyone have a photo of an aircraft in this area?  The only ones I can find are either earlier variants without the battery cover or are photos of built-up models with varying degrees of fit.  Some look like one part, others like a 1/2" gap.  TIA!

Frank 


  • Member since
    December 2004
  • From: Yokosuka, Japan
Posted by luftwaffle on Sunday, November 30, 2008 9:50 AM

Marc and Scott- Great looking birds!

Stan- That office looks superb, wow!!!

aka Mike, The Mikester My Website

"He has all the virtues I dislike and none of the vices I admire."   -Winston Churchill

  • Member since
    June 2004
  • From: Akron ohio
Posted by phoenix7187 on Sunday, November 30, 2008 10:34 AM

Frank it depends on how well the guys doing the retro fit were. I see some that have gaps and don't seem well secured, while others look very fight fitting. here's some info you 109 nuts. The battery was moved for 2 reasons. One to make room for additional/different radio eqiptment, second to accomdate the MW50 tank. Since I have these pics already up I'll explain the canopies as well. there are 3 different types of erla style canopies.

Frank note the gap in this one. Also note there is no head armor. This is a production line canopy fitted to a late G-14. Both the lower and rear seals are on the canopy. Also at the rear of the canopy frame where the frame make the upward turn note the tie in bar for the hold down. This is also sometimes called a strengthing bar. It's solid. Finally the canopy sit on flush with the fuselage. Late G-14/G-10.

Frank this one has a gap and fit is poor. canopy same as above.

This canopy is a replacement or retro fit. Note the notch at the bend in the frame. Many call this the notch type canopy. The seal at the rear is attached to the buckhead not the canopy (old glass section would have seal here that's way) also note how the frame extends over the fuealage on the bottom and is not flush like the others. This is the type used to replace the standered type canopy or a field replacement for a damaged unit. G-6 early G-14's.

Finally it seems the K-4 had it's own canopy. This is often refered to as the late style or K-4 style erla canopy. It seems both through documentation and photos that the this canopy was differs greatly from the others and was unquie to the K-4. Note the rounded notch for the bar like the first canopy but open not solid. Also note how it sits flush with the fuselage but the fit is not as  good, replacement canopy look to the frame work. Finally it hard to tell but the K-4's canopy actually has a different shape to it. The slope and the upper frame is slightly different than the other 2. It has been noted by restorers that this canopy doesn't seem to fit the G variants. It would appear that new fuselage of the K-4 required and new canopy. Seals on this type were on the canopy. K-4/G-10?

In closing it has been noted that very few (2) G-10's seem to have a K-4 style canopy. We are not yet sure what this is. many speculate that the K-4 canopy was adopted to some very late G-10's. 

Thanks frank, it came out pretty good, but I like the newer set better.

Stan
  • Member since
    June 2004
  • From: Akron ohio
Posted by phoenix7187 on Sunday, November 30, 2008 10:59 AM

You know what after looking at that last pic I think it's labled wrong. I don't think that is a canopy from a K-4. I'll look around and see what I can find. But the canopy of the K-4 look alot like the production line canopy. except the round notch is hollow and doesn't protrude as far out. The shape of the canopy is different at the rear top. You can't really tell unless you see the 2 side by side. This is for general info only. No 1/48 scale model will show that type of odd detail. But franks doing a 1/32 so he better get it rightBig Smile [:D].   

A little trivia question, in the last pic who knows what the line on the clear part of the canopy is for? anyone anyone bueller.

Thanks mike.

frank this might be the place to talk about cowling on the 109's. what do you think? we had tossed this idea around awhile back. Add a little more info.   

Stan
  • Member since
    September 2003
  • From: South Central Wisconsin
Posted by Daywalker on Sunday, November 30, 2008 12:04 PM

Stan-

Thanks for those pictures, that's exactly what I was looking for.  Hasegawa molds the cover as a piece that fits down into a recess.  Looks like the cover actually sat above the bulkhead.  Does that sound right? 

Now for that line on the canopy...

I do not know what it is for, but I recall the Stuka having lines on the side of the canopy to aid in correct dive angles.  Does the line on the 109 canopy share a similar purpose?  Or, possibly a climb indicator?

Now, about that Erla hood...

Excellent little detail often overlooked!  Thanks for that, I'll try to get it right lest I disappoint you Stan! Big Smile [:D]

Cowling variations would make an excellent discussion.  I am aware of the Type 100 and Type 110 engine cowlings, but I believe there are variations to them.  Bring it on big boy! Smile,Wink, & Grin [swg]

Frank 


  • Member since
    June 2004
  • From: Akron ohio
Posted by phoenix7187 on Sunday, November 30, 2008 12:43 PM

Your right on both accounts frank. that buldge is on the access door behind the pilot. In eariler 109's this was a storage/ access hatch. so it actually fit's on top on that bulkhead. The line is a dive angle gauge just like the stuka's.

While looking where I found that info on the K-4 canopy I came across this from the 109 bible. Not only does it show more clearly your door, but also gives info on the production vs replacment canopies.

unless you were going for super realistic detail and actually had good photos of the canopy of 109 being modeled I don't think this info will help out much. But most think there are only 2 canopies ever used. Infact there were many. even the standered canopy had several different types. Food for thought.   

See if this doen't help out.

Stan
  • Member since
    September 2003
  • From: South Central Wisconsin
Posted by Daywalker on Sunday, November 30, 2008 2:20 PM

WOOHOO!! I guessed right. Wink [;)]

That third photo really helps, going to fabricate a new hatch to sit proud of the bulkhead as opposed to the kit one that fits into a recess.  Two questions for you on the G-10 cockpit:

1. The blue hose on the right cokpit sidewall.  My rather limited references do not show this on the G-10.  Quite possibly, it is just missing as the photos I have are of a restored aircraft and the photos also show the oxygen system is not plumbed at all.  Did the G-10 have this?  I would assume so.

2. The little lights mounted on the forward canopy sills.  My G-6 photos and earlier airframes show these, but again my G-10 photos do not.  Were they still installed on these?

Thanks Stan, hope I'm not being a pest!

Frank 


  • Member since
    July 2003
  • From: Bicester, England
Posted by KJ200 on Sunday, November 30, 2008 3:45 PM

Stan, great job on the pit.

I knew 109s were a minefield, but I never realised that extended to the canopies as well!

Karl


Currently on the bench: AZ Models 1/72 Mig 17PF

  • Member since
    February 2007
  • From: Bournemouth UK
Posted by Luftwoller on Sunday, November 30, 2008 4:24 PM

Great info on the cockpits Stan. So great to have the font of all 109 knowledge on board. Yours looks painted to perfection. Ive got the Aries cockpit for mine. Not sure if its the new one or the old. Looks nicely detailed though.

As for the pipe/ tube, whatever it is. Is it a heater element to help demist the cockpit? Either that or a handy wire for the pilot to tuck his parking tickets behind. Big Smile [:D]

...Guy

..'Your an embarrassment to the human genus, makes me ashamed to call myself Homo'.
  • Member since
    June 2004
  • From: Akron ohio
Posted by phoenix7187 on Sunday, November 30, 2008 6:24 PM

Frank the K-4 cockpit is very different from the G's. Becasue the K is basically a new aircraft nothing much about them is the same as the G's. The blue thing hanging on the right side wall is for the pilot to talk through so he can order at the drive through without having to lift the canopyBig Smile [:D]Mischief [:-,].  

Ok, ok I lie. The hose hanging no the right side wall is the oxygen hose. The left side wall of the K-4 is very similer to the G-10 but not the same. Two thing I hate about most 109 kit cockpits is the lack of a fuel line and oxygen hose. two big obvious thing I think should be provided. I just apinted up a true details resin G-6 cockpit wall for a demo I did at a model show. It's not my best work but it's the easiest way to show you what it should look like(yah others have messed with it too so it looks bad) Late G-6/14 and G-10 cockpit are basically the same.

 What I do to replicate this in 1/48 scale is take 34 gauge beading wire and wrap it tightly around a strait pin. pull it off and shape it to look like it dose here. Finally I tack it on with some super glue. 1/32 or 1/24 scale I use 28/30 gauge wire and do the same thing but around a slightly larger sewing needle. The wire I used is already gray in color. The oxygen hose could habe been either gray or a flat blue in color.   

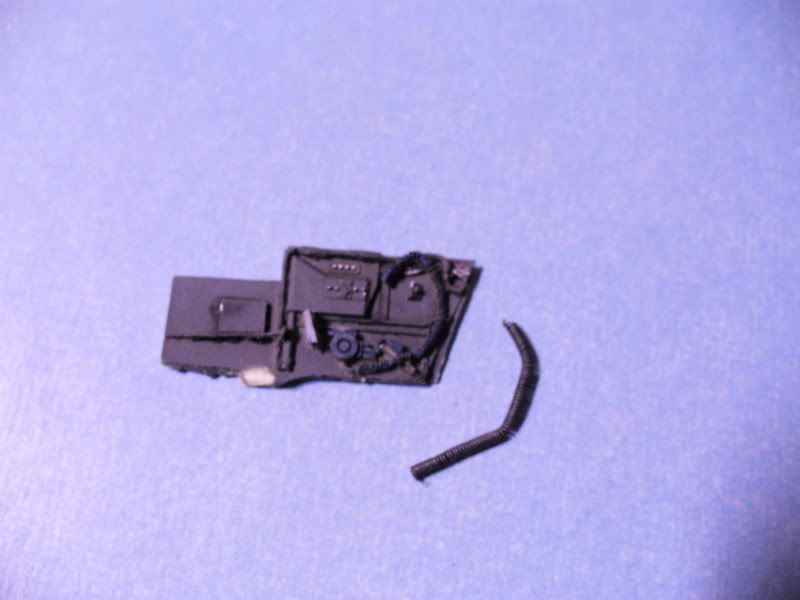
aires  1/48 g-6 cockpit wall. i used  for weathering demo so it's beat up. but you can see the molded oxygen hose from the regulator to the hanger.

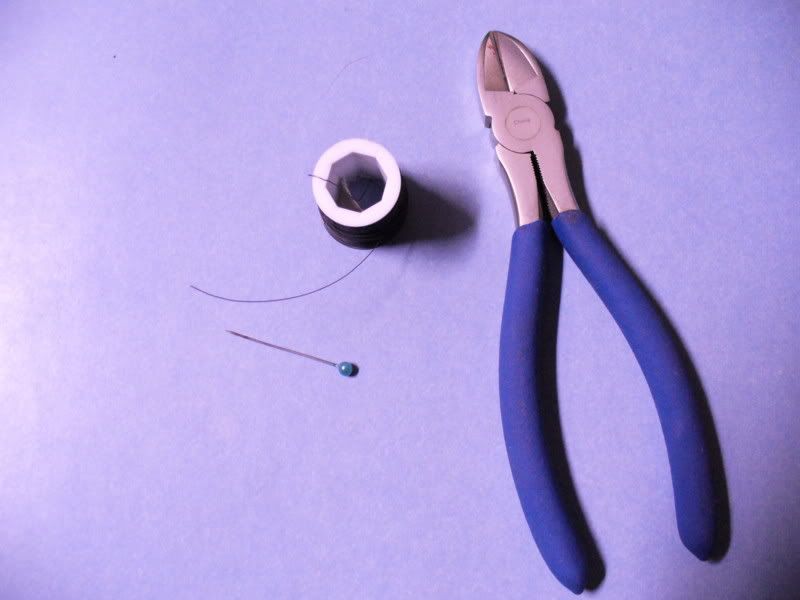
wire cutters, 34 gauge beeding wire (1/48) scale and your common strait pin.

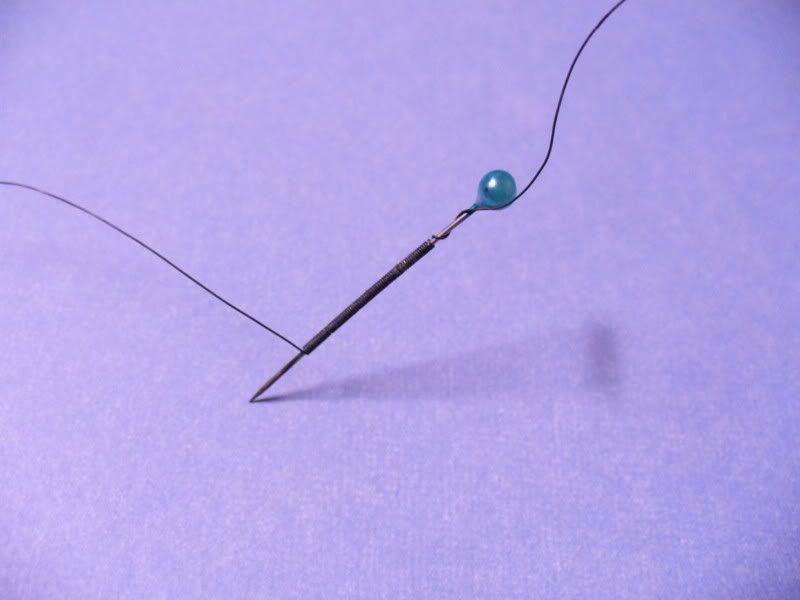
Wire wraped around pin, pull it off the pin from the back side so you don't stretch it out.


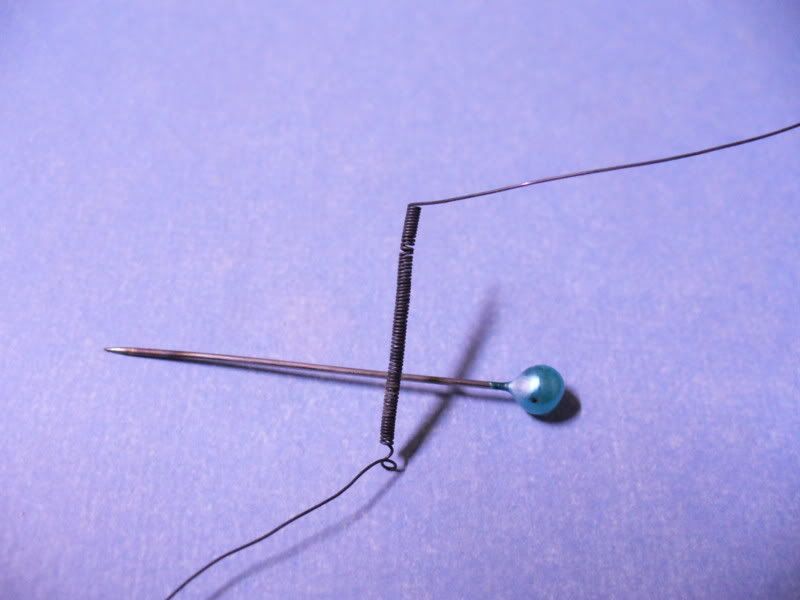
it should look like this when you done. next cut the extra wire off and shape it to the cockpit wall. Make sure it's long enough. Then paint it and tack it too the side wall.

ta daaaa, It looks just like the resin one but it's scratchbuilt. you just added a very important detail to you 109 cockpit. Quick, easy and looks cool when your doneSmile [:)].

I did this real quick as an example, but you guys get the drift.

aires masters cockpit sets gives you both types of read buckhead in there G-10/K-4 sets. it looks real nice when complete. Check out my K-4 posted eariler. 


alright Frank! any other trade secrets you want me to give awayBig Smile [:D]

Stan
  • Member since
    June 2004
  • From: Akron ohio
Posted by phoenix7187 on Sunday, November 30, 2008 6:32 PM
Lights?? are you talking about the little ultra violet lights that illuminates the gauges at night?  There should be one on either side there about half way between the end of the wind screen and the IP.  They are tucked up in the corners there.  almost under the lip of the wing screen side glass.
Stan
  • Member since
    June 2004
  • From: Akron ohio
Posted by phoenix7187 on Sunday, November 30, 2008 6:51 PM

No way frank, you not being a pest. If any of you have question ASK. If I can't answer it, mike, frank, wing nut, luftwoller or someone will. If not i'll find out. it may not be a quick answer, but I will find out. there is a ton of knowledge around here. Mike has proven he knows just an much as I do. I just have a bigger mouthWink [;)]

Guy knows where the parking tickets goSmile [:)], after that they get shoved under the seat and forgotten about untill the crew chief finds them.

Stan
  • Member since
    September 2003
  • From: South Central Wisconsin
Posted by Daywalker on Sunday, November 30, 2008 7:14 PM

Stan,

Great lil' demo!  Yes, that's the hose I was referring to.  I made one for my last 1/48 G-10 (Yellow 5) that was too large for the scale, so I'll probably use it here on my 1/32 bird.  As for those lights, the ones you mention are the ones I was referring to.  My G-10 photos do not show them, but I figure it's because they either didn't have any to add to the aircraft in question, or possibly hadn't installed them yet.  Good to know they are there!  I'll be adding those to mine.  Here's what I have done to mine so far:

Opened up lightening holes in rudder pedals, added straps from lead foil and buckles from formed wire...

Used a tiny round dental bur to remove material between fuel line and fuse panel.  Also removed clear section of fuel line for strecthed clear sprue replacement.  End of fuel line replaced with brass wire to get proper curve...

Using thin brass sheet, beginning fabrication of new rear bulkhead panel...

Need to pick up some square stock tomorrow at my LHS for the box on the cover. Thumbs Up [tup]


Frank 


  • Member since
    December 2003
  • From: Indiana
Posted by hkshooter on Sunday, November 30, 2008 9:54 PM

Ok, guys. Tomorrow I'll be starting my Academy G-14. Right up front let me tell you I'm no 109 expert.Shock [:O] I've heard there are accuracy problems with the kit so I wondering what they may be to determine what I may be willing to fix. Getting a game plan going on, ya know? I'm not so worried about the cockpit but more about the airframe. I think I have some PE belts to toss in the office and that'll be about it inside.

What say you?

Thanks.

  • Member since
    September 2003
  • From: South Central Wisconsin
Posted by Daywalker on Sunday, November 30, 2008 10:23 PM
hk- Glad to hear you're geetting ready to start!  I do not know too much about the Academy kit, hopefully somebody else here can help you with that one.

Frank 


  • Member since
    July 2004
  • From: Sonora Desert
Posted by stikpusher on Monday, December 1, 2008 1:12 AM
The Academy kit is a rebox of the Hobbycraft kit. Not bad, but a somwwhat saprtan when compared to Fujimi or Hasgawa. It will end looking like a 109, but wont have all the fine detail inside unless you add it yourself.


F is for FIRE, That burns down the whole town!

U is for URANIUM... BOMBS!

N is for NO SURVIVORS...

       - Plankton

LSM


  • Member since
    May 2004
  • From: Dallas
Posted by KINGTHAD on Monday, December 1, 2008 8:29 AM

Wing nut I struck out on the decals. i dont have the ones you are looking for.

Thad

  • Member since
    February 2007
  • From: Bournemouth UK
Posted by Luftwoller on Monday, December 1, 2008 10:57 AM

Well Stan? Was i right on the demisting tube? or was it for thier parking tickets. Enquiring minds need to know Big Smile [:D]

...Guy

..'Your an embarrassment to the human genus, makes me ashamed to call myself Homo'.
  • Member since
    July 2003
  • From: Bicester, England
Posted by KJ200 on Monday, December 1, 2008 3:09 PM

Guy, do you mean the tube on the front windscreen?

If so, it was a means of spraying fuel onto the scrteen to clear oil thrown off by the engine.

Karl 


Currently on the bench: AZ Models 1/72 Mig 17PF

  • Member since
    September 2008
  • From: North Carolina
Posted by WarHammer25 on Monday, December 1, 2008 5:39 PM

The 109s are really coming along nicely guys.

Stan, that is some really good info. It seems you are a wealth of knowledge!Cool [8D]

There are some great tips on here everyone. They will really help me with my K-4.

I really want to start my K-4 but the Endgame 1946 GB doesn't start until January 1. I will probably be waiting at the bench with it infront of me watching the ball drop. Big Smile [:D]

The only easy day was yesterday - U.S. Navy Seals
  • Member since
    June 2004
  • From: Akron ohio
Posted by phoenix7187 on Monday, December 1, 2008 7:04 PM

Progress so far. 

panel lines scribed on wings.

radiator wing cooler actuators added

rear gear doors removed and closed door built and installed.

and finally cockpit gluded into fuselage.

Luftwoller what hose are you talking about? Me thinks me missed something.

Stan
  • Member since
    April 2005
Posted by Thunderbolt379 on Monday, December 1, 2008 8:15 PM

Lovely work, Stan --

I was just about to get started on my own with some interior painting. May I ask what shade of gray you settled on for the cockpit, overall?

I might as well get to scribing those wing lines and prepainting the rads and scoops. What are these actuators you added? My K-4 refs are distressingly thin!

Cheers,

Mike

http://worldinminiature.blogspot.com/

  • Member since
    June 2004
  • From: Akron ohio
Posted by phoenix7187 on Monday, December 1, 2008 9:58 PM

Thunderbolt, I use MM acryl paints, the base color RLM 66. The actuator rod on the front allows the front radiators ducts to open and close. these is also one in front of the oil cooler mounted on the chin. I just use a piece of stretch sprue or thin wire.

Stan
  • Member since
    April 2005
Posted by Thunderbolt379 on Monday, December 1, 2008 10:14 PM

Ah, 66! Yes, that's what I was intending to use, I thought I'd super-check before loading up the AB. I had a good result with the panel decal for my Corsair so I'm hopeful I can get this one to play as well.

I'll have a look at some micro-rod for the actuators, or fine wire, it's an interesting extra detail. The plane I'm doing had the tailwheel still fully articulated, so that's an OOB detail.

Have scribed the wing lines and am doing the wheel well corner surgery.

Cheers,

Mike/TB379

http://worldinminiature.blogspot.com/

  • Member since
    February 2007
  • From: Bournemouth UK
Posted by Luftwoller on Tuesday, December 2, 2008 3:39 AM
 phoenix7187 wrote:

A little trivia question, in the last pic who knows what the line on the clear part of the canopy is for? anyone anyone bueller.

Line / tube / pipe, i dunno. What was the answer to your little trivia item, Stan. Im still saying Demister...Big Smile [:D]

...Guy

..'Your an embarrassment to the human genus, makes me ashamed to call myself Homo'.
  • Member since
    June 2004
  • From: Akron ohio
Posted by phoenix7187 on Tuesday, December 2, 2008 6:48 AM
oh that, is a dive indcator just like the ones on the stuka. The pilot never wanted to exceed that angle in a dive.
Stan
  • Member since
    December 2003
  • From: Indiana
Posted by hkshooter on Tuesday, December 2, 2008 10:17 AM
Was the line on both sides of the canopy or just the left side?
JOIN OUR COMMUNITY!

Our community is FREE to join. To participate you must either login or register for an account.

SEARCH FORUMS
FREE NEWSLETTER
By signing up you may also receive reader surveys and occasional special offers. We do not sell, rent or trade our email lists. View our Privacy Policy.