SEARCH FINESCALE.COM

Enter keywords or a search phrase below:

Hooray for Hollywood 2014 GB extended til July 4th

63406 views
561 replies
1 rating 2 rating 3 rating 4 rating 5 rating
  • Member since
    October 2009
  • From: Oil City, PA
Posted by greentracker98 on Monday, November 25, 2013 4:53 PM

Bish

Ken, not at all. I know this sort of stuff isn't everyone's cup of tea.

Thanks, I'm easy to get along with Geeked

Yea, I wear glasses. That's why I use this Geeked little guy

A.K.A. Ken                Making Modeling Great Again

  • Member since
    September 2003
  • From: AandF in the Badger State
Posted by checkmateking02 on Monday, November 25, 2013 11:57 PM

I'm in the final stages of finishing up USS New Orleans for the Pearl Harbor 2013 GB, so I thought I better get back to this one.  It's CV-6 USS Enterprise, from both John Ford's wartime documentary and the later flick with Henry Fonda, Charlton Heston, et. al

Tonight I glued the waterline plate to the Big E's hull, and added the metal weight.

Not very interesting, but it's a start.


  • Member since
    September 2003
  • From: AandF in the Badger State
Posted by checkmateking02 on Tuesday, November 26, 2013 8:27 PM

Installed two parts on Enterprise tonight.  The gap around the deck will have to be filled and sanded, looks like--a project for tomorrow, or maybe for Black Friday.

Happy Thanksgiving, everyone!


  • Member since
    December 2002
  • From: Bury St Edmunds, Suffolk, England
Posted by Bish on Thursday, November 28, 2013 1:44 PM

Looking forward to this as I do all your ships check.

I am a Norfolk man and i glory in being so


On the bench: Airfix 1/72nd Harrier GR.3/Fujimi 1/72nd Ju 87D-3

  • Member since
    September 2003
  • From: AandF in the Badger State
Posted by checkmateking02 on Thursday, November 28, 2013 2:43 PM

Thanks, Bish.  USS New Orleans CA-32 is over at the Pearl Harbor GB.

Enterprise here is a Tamiya kit, dating from the 1970's, and somewhat shows her age, with less-than-stellar parts fit.

I bought Eduard's PE set for Yorktown-class carriers, and will add a few bits from that, but New Orleans has nearly cured me of PE.


  • Member since
    September 2003
  • From: AandF in the Badger State
Posted by checkmateking02 on Thursday, December 5, 2013 11:42 PM

I installed the hanger deck.  It was a fairly poor fit--nice and close on the port side; huge gap on the starboard side, plus it sat lower on its location flange, and not level with the top of the hull as it should.

I had used Testors tube glue, so after it partially dried, I pried it loose on the starboard side, propped it up underneath with a paintbrush handle and reglued with Testors and MicroWeld.

I let it dry for two days and the results are below.  Still a huge gap, but I will fill it with superglue and sand it down.  Hopefully it will end up with some tolerable degree of smooth.


  • Member since
    September 2003
  • From: AandF in the Badger State
Posted by checkmateking02 on Friday, December 6, 2013 6:38 PM

These are some of the final assemblies for construction step 1.

With the hanger deck installed and sanded, I added the three walls.

I also got the forward deck sanded, and installed three walls for some structure (which I don't know what it is, but it will help prop up the flight deck in due time, I guess).

And last, an overall shot of the finished assembly step.  Step one includes a couple of walls, port and starboard, behind the forward 5" gun positions.  Doors are included, which I used.  There is no deck piece for the forward hanger deck. If you leave the doors off, the instructions say it would have to be cut to shape from plastic sheet.  Since the configuration here is complicated and I'm not much good at geometry,(look at those curves!!!), I thought it would be beyond me to do this, so I just closed it up.

Assembly step one also call for attaching the 5" guns to their base, but I bought some after-market parts for these, and will get around to them later.


  • Member since
    October 2009
  • From: Oil City, PA
Posted by greentracker98 on Saturday, December 7, 2013 10:34 PM

It's looking pretty good CMK. And I'm i'm sure it will turn out to quite a show piece. I don't know what happened to a MIG 17 I did last year. I had a good size gap in top front fuelsalage, but it worked out.

A.K.A. Ken                Making Modeling Great Again

  • Member since
    September 2003
  • From: AandF in the Badger State
Posted by checkmateking02 on Sunday, December 8, 2013 12:56 PM

Thanks, Ken.

Some of these huge gaps developed in models take perseverance.  I filled and sanded three times, thought I had it conquered, so then I painted the interior deck of the hanger deck #20 Standard Deck Gray, and it revealed one place that was still unsatisfactory, where the exterior deck meets the hull on the starboard side.  So I'll give some more attention to it.

If that doesn't work, I have some PE railing that ought to disguise the imperfection after its installed.


  • Member since
    September 2003
  • From: AandF in the Badger State
Posted by checkmateking02 on Saturday, December 21, 2013 1:17 PM

Finally managed to get some painting done:  the interior of the aft hanger deck.

Floor is #20 standard deck gray, from WEM's Colourcoats.  Walls are Testors MM white.


  • Member since
    October 2009
  • From: Oil City, PA
Posted by greentracker98 on Thursday, January 2, 2014 4:27 PM

I'm waiting on parts for my halftrack now. When they come in, I'll have more pics. Everyones builds look good.

A.K.A. Ken                Making Modeling Great Again

  • Member since
    December 2002
  • From: Bury St Edmunds, Suffolk, England
Posted by Bish on Thursday, January 2, 2014 5:41 PM

Nice work there again CMK, nice to be able to follow one of your ship builds.

I got started on the Stromtrooper today. Another one with only a few parts, 7. I am actually going to prime this one, which I never normally do. Going to try and pick up some primer and will get some pics before I put that on.

I am a Norfolk man and i glory in being so


On the bench: Airfix 1/72nd Harrier GR.3/Fujimi 1/72nd Ju 87D-3

GAF
  • Member since
    June 2012
  • From: Anniston, AL
Posted by GAF on Thursday, January 2, 2014 7:40 PM

Well, the Star Trek "USS Enterprise" is awaiting primer at this moment, and has been for awhile.

As soon as I get over my latest illness (pneumonia this time) I'll try to get some work done.  It's hard to hold a spray can steady while coughing your lungs up.  Sad

Gary

  • Member since
    October 2009
  • From: Oil City, PA
Posted by greentracker98 on Thursday, January 2, 2014 11:38 PM

Don't rush things Gary. It will still be there when you are feeling better.

A.K.A. Ken                Making Modeling Great Again

  • Member since
    September 2003
  • From: AandF in the Badger State
Posted by checkmateking02 on Saturday, January 4, 2014 2:51 PM

Thanks, Bish.  

I've been masking and painting the decks and horizontal surfaces on CV-6, and it's been tedious and slow, because of all the cast-on details.  Each one of those "doorposts" had to be masked all the way around, so the exterior Deck Blue meets up with the interior Deck Gray in the hanger deck.  Then, there's a bunch of catwalks at various places.

Good to know there's another "Enterprise" under construction, even if they are a couple of hundred years apart!


  • Member since
    December 2002
  • From: Bury St Edmunds, Suffolk, England
Posted by Bish on Sunday, January 12, 2014 5:27 AM

Heres the pics of the trooper. Just like the Probe Droid, there not much to it. 7 pieces in all. The hand and blaster are one piece and I will leave them off while I paint the rest.

Once the Darth Vader for the heroes and villains GB is ready, I will be priming both together.  

I am a Norfolk man and i glory in being so


On the bench: Airfix 1/72nd Harrier GR.3/Fujimi 1/72nd Ju 87D-3

  • Member since
    May 2005
Posted by pyrman64 on Sunday, January 12, 2014 5:43 AM

Your Stormtrooper has a very nice boxing pose going there.

Greg H

"There is many a boy here today who looks on war as all glory, but, boys, it is all hell." Gen. Wm T. Sherman (11 April 1880, Columbus, Ohio)

  • Member since
    December 2002
  • From: Bury St Edmunds, Suffolk, England
Posted by Bish on Sunday, January 12, 2014 5:58 AM

lol, ye, it does a bit. Should look better once the blaster is added.

I am a Norfolk man and i glory in being so


On the bench: Airfix 1/72nd Harrier GR.3/Fujimi 1/72nd Ju 87D-3

GAF
  • Member since
    June 2012
  • From: Anniston, AL
Posted by GAF on Sunday, January 26, 2014 11:35 AM

"Hmmm... When is Oscar night this year?"  *checks internet*  "Holy &(*@^#(*!!  It's MARCH 2nd!  I've got just one month to finish this!!"

Which means it's time for an update.  Having earlier decided to abandon my attempt at modifying the USS Enterprise model (for the GB at least) and just build one as is, I obtained a few models off E-Bay in varying condition.  This one is partially done, but since a very generous "50% complete" GB requirement was stipulated, this falls easily into that category (at least in my mind  Tongue Tied ).

First to get the Secondary Hull together.  These models really are badly fitting in this area.  So far both models I've worked on are terrible in this regard.

Putty.  Lots of putty.

I decided to add a little detailing to an otherwise bland kit. 

Then gluing the sections together and more putty.  Need more Advil.

Finally, shoot some Mr. Surfacer 1000 onto the parts.  Hull color will be lighter, but it almost matches the darker color for some of the parts.

This is actually a few weeks of work.  It's going to be a race to the finish line...

Gary

  • Member since
    October 2009
  • From: Oil City, PA
Posted by greentracker98 on Tuesday, January 28, 2014 7:17 PM

GAF Don't worry about the deadline, I'm not even close to finishng the halftrack

I still need some parts for it.

I'm thinking of an extension to July 4th ????

A.K.A. Ken                Making Modeling Great Again

  • Member since
    September 2003
  • From: AandF in the Badger State
Posted by checkmateking02 on Wednesday, January 29, 2014 1:32 PM

I'm hoping to get USS Enterprise CV-6 finished up by March, but an extension might still be appreciated, Ken!  

I've been working on fitting up and painting the smaller pieces, and can probably post some photos soon--but nothing has been too interesting lately; mostly drudge-work.  I did begin painting the flight deck last night.

Gary:  nice going on USS Enterprise NCC-1701.  I built the AMT kit years ago, and remember the problems with fit and the large amount of filler necessary.

"It's been a long road, gettin' from there to here. . ."


  • Member since
    December 2002
  • From: Bury St Edmunds, Suffolk, England
Posted by Bish on Thursday, January 30, 2014 2:52 PM

Looking forward to this one GAF. I remember building this many years ago, not the best kit in the world. I didn't do anything to mine and it showed.

Nice start.

I am a Norfolk man and i glory in being so


On the bench: Airfix 1/72nd Harrier GR.3/Fujimi 1/72nd Ju 87D-3

  • Member since
    September 2003
  • From: AandF in the Badger State
Posted by checkmateking02 on Monday, February 3, 2014 6:31 PM

Here are the painted parts for construction step 02 in Tamiya's USS Enterprise (CV-6, not NCC-1701!).  Next procedure will be to install them.

While I was fiddling around with all the tiny parts, I managed to get the flight deck painted, so it'll be ready when progress gets that far.

Paint is WEM Colourcoats.  The wooden part of the deck is Norfolk 250 Deck Stain.  The metal parts are Deck Blue.


  • Member since
    October 2009
  • From: Oil City, PA
Posted by greentracker98 on Monday, February 3, 2014 6:45 PM

Ok New   end date is July 4th

A.K.A. Ken                Making Modeling Great Again

  • Member since
    December 2002
  • From: Bury St Edmunds, Suffolk, England
Posted by Bish on Sunday, February 23, 2014 1:55 PM

Right, I think I am well over due an up date. Last weekend I gave the trooper a coat of Mr Surfacer 1500. After leaving it for a couple of days, I started on the white. Using Humbrol white gloss enamel I gave it 3 coats over 3 days and then left it for about 5 days, I didn't want to take any risk's.

So this is how it looks now, ready to fill in the black areas.


I am a Norfolk man and i glory in being so


On the bench: Airfix 1/72nd Harrier GR.3/Fujimi 1/72nd Ju 87D-3

  • Member since
    September 2003
  • From: AandF in the Badger State
Posted by checkmateking02 on Sunday, February 23, 2014 5:42 PM

Nice and evil, Bish, like an imperial storm trooper should be.


  • Member since
    September 2003
  • From: AandF in the Badger State
Posted by checkmateking02 on Monday, March 10, 2014 8:16 PM

In construction step 3 for Tamiya's CV-6, I installed the parts on the fantail.  At this point, the gun tubs for the aft 5 inch guns was called for, as well as a boat davit and some walls on the port side.

The black line in the second picture is the result of trying to crop the photo with "Paint," and forgetting to delete the first errant attempt.  It does not appear on the original!

For anyone building Tamiya's 1/700 Enterprise in the future, it's noteworthy that the boat deck has two slots, into which those two braces are supposed to fit.  They don't line up, so you have to enlarge the slots in the boat deck to get the upright supports to sit horizontally.  Otherwise, they lean toward the stern.  Not very shipshape.


And the two little parts (cable spools, I think) to the bow.


Before going any further, I wanted to put some PE railings in place so I painted those up ahead of time.


  • Member since
    September 2003
  • From: AandF in the Badger State
Posted by checkmateking02 on Monday, March 10, 2014 8:56 PM

Doing some research on the Tamiya Enterprise (mostly at www.modelwarships.com), I found out that the kit is a hodge-podge of several different time periods during the ship's service.  At Midway, CV-6 carried 1.1 inch AA weapons (not the 40mm that come with the kit), thirty-two 20mm's in a different configuration than the kit's armament, plus an indeterminate number of .50 cal machine guns--most sources say six.

But that meant some after-market parts.  I picked up some really tiny 20mm's from Corsair Armada, some 1.1's from Paper Lab,


some new 5 inch guns from Niko (to replace the lamentable kit guns)

and the PE set from WEM for the .50's (I forgot to take a photo of them).

The kit uses simple metal wires to represent the 20mm gun barrels, so I decided to use the 20mm's from Eduards Enterprise PE set.

I found the rest of the Eduard PE set nearly impossible to work with.  It must need to be annealed or something.  The parts were too "springy" and wouldn't co-operate by holding their position.  Plus, I thought the diagonal ladder runs were far to large for the size of the model and the radar seemed crude and lacking detail.  I ruined most of the cranes, so I ordered a set of carrier cranes from Lion Roar, which will appear later in the build.

I also had some left-over PE from USS New Orleans I built for last year's Pearl Harbor GB, so being the parsimonious, thrifty individual that I am, I decided to use some of them for Enterprise.

Waste not; want not. 

//////// 


  • Member since
    September 2003
  • From: AandF in the Badger State
Posted by checkmateking02 on Monday, March 10, 2014 9:05 PM


Here's the view of the fantail with PE rails installed (the aforesaid NO-boat left-overs) and the resin pylons for the 20mm's from Corsair Armada.  They were tiny!

In the photo below, I don't have the Eduard guns mounted yet between the shields.


There is a photo of USS Yorktown prior to Midway showing this arrangement, and it is believed that Enterprise carried two 20mm's in the same position.  The rest of the 20mm's were arranged in gun tubs along the catwalks at the sides of the flight deck.

Here is the bow with the PE rails installed (again, NO-boat remnants; these were the last I had of the three-bar railings, so the rest will come from another source--whose name escapes me right now).

I think I have a love/hate relationship with PE stuff.  It can get awfully frustrating, and doesn't always obey very well.


  • Member since
    September 2003
  • From: AandF in the Badger State
Posted by checkmateking02 on Monday, March 10, 2014 9:29 PM

Last run of photos for tonight.  I hope I haven't bored anyone--too much.

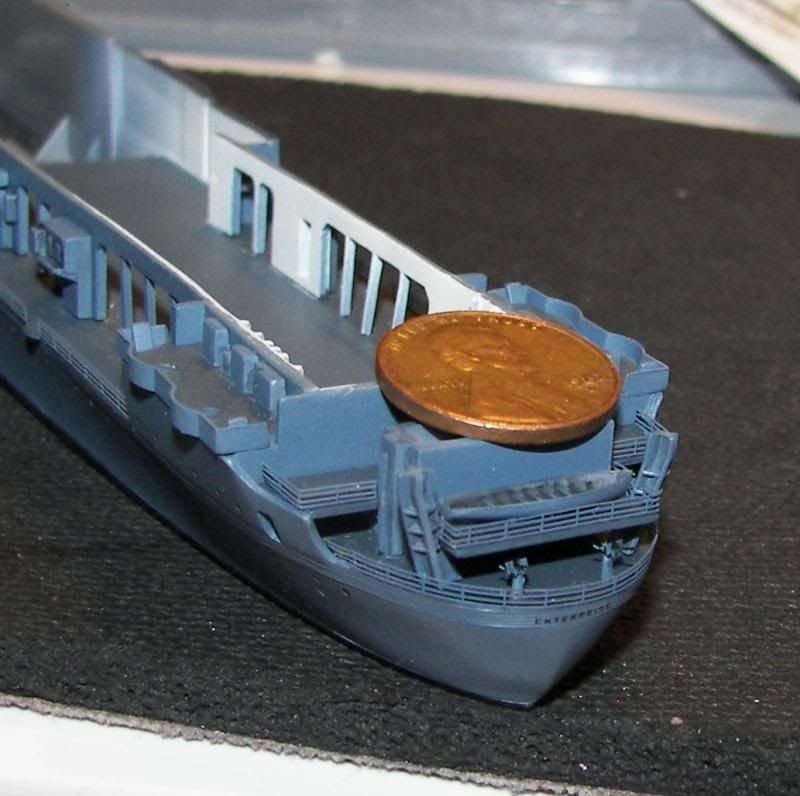
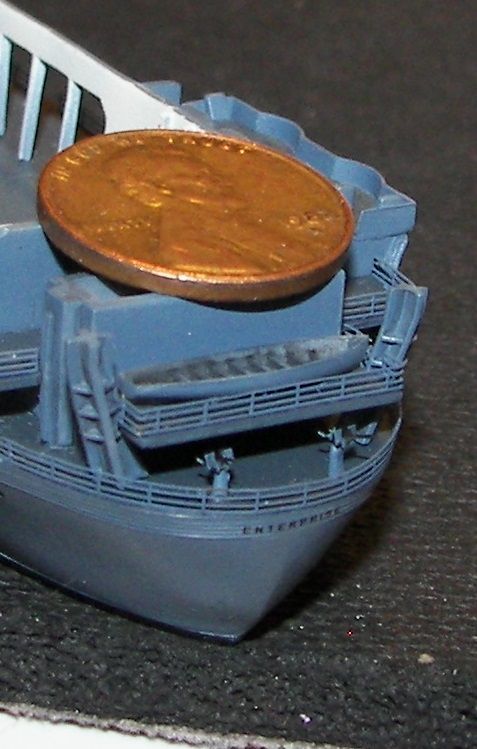
Here are a couple of view of the stern, with all the PE rails and the PE 20mm's in place.


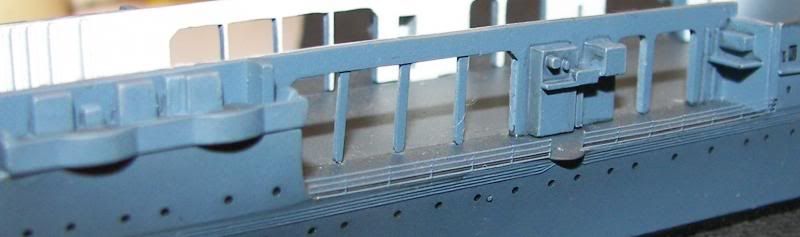
Below, is a photo of the boat deck at the aft port side.

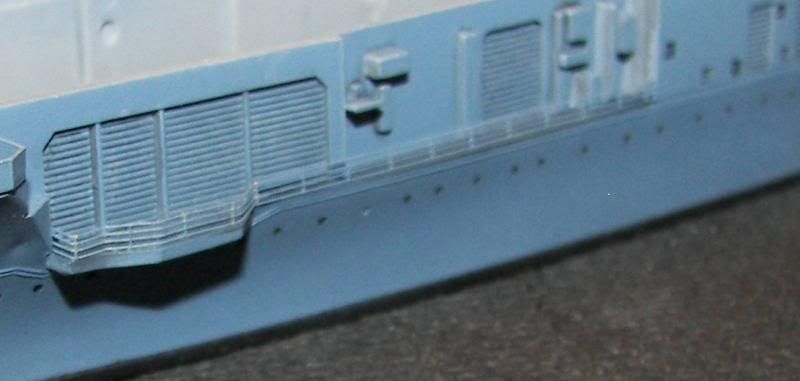
And now a photo of the boat deck at the starboard aft side. 


A boat crane fits between the two sets of rails on each side, surrounded by a rounded railing.  But the crane can't be installed until the flight deck is in place, so I hope I can shape the railing, then just slide it into place.  But with PE, you never know.

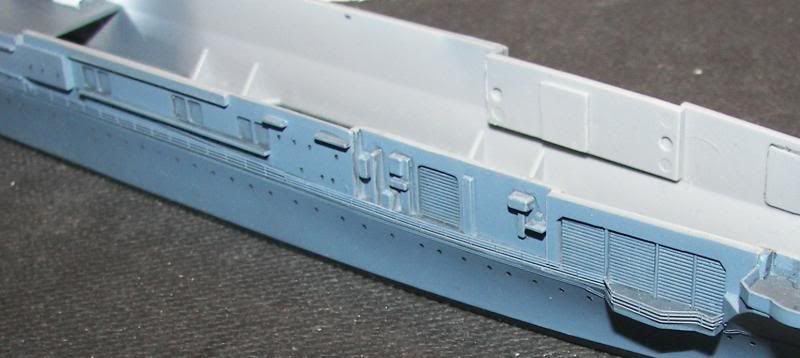
At the fore end of the ship, there was a odd shaped arrangement just behind the 5 inch gun tubs, which gave me no end of headaches to bend and fit.  I finally decided to do them in two parts--a straight run and the peculiarly bent portion.  It worked much better than trying to bend it out of one piece.

Above is the portside configuration.

Below is the starboard side, which requires a longer straight section of railing.

Before I can move much further forward, I have to construct a few SBD's to put on the hanger deck.  I joined Clemens second carrier aircraft group build to make these up.  I have them decaled now, and need to add landing gear.


JOIN OUR COMMUNITY!

Our community is FREE to join. To participate you must either login or register for an account.

SEARCH FORUMS
FREE NEWSLETTER
By signing up you may also receive reader surveys and occasional special offers. We do not sell, rent or trade our email lists. View our Privacy Policy.