SEARCH FINESCALE.COM

Enter keywords or a search phrase below:

Hooray for Hollywood 2014 GB extended til July 4th

63406 views
561 replies
1 rating 2 rating 3 rating 4 rating 5 rating
GAF
  • Member since
    June 2012
  • From: Anniston, AL
Posted by GAF on Tuesday, March 11, 2014 6:07 PM

Wow!  That's some fine work!  Up until these pictures, I didn't realize just how TINY this model was!

You must have exceptional hand and eye coordination to even attempt something like that.

Bow Down

Gary

  • Member since
    September 2003
  • From: AandF in the Badger State
Posted by checkmateking02 on Tuesday, March 11, 2014 8:05 PM

Thanks, Gary.  

A 10x Optivisor helps, and perseverance.  I bet I tried to install some of those railing 3 or 4 times before they decided to co-operate and do what they were supposed to do.  Also had a couple of outright failure, when I ruined the railing and had to cut a new one.

As for 1/700 scale, they are a lot less expensive than their 1/350 cousins, and the small size means they take up less space.


  • Member since
    December 2002
  • From: Bury St Edmunds, Suffolk, England
Posted by Bish on Wednesday, March 12, 2014 1:26 AM

Some great stuff there CMK.

I am a Norfolk man and i glory in being so


On the bench: Airfix 1/72nd Harrier GR.3/Fujimi 1/72nd Ju 87D-3

  • Member since
    September 2003
  • From: AandF in the Badger State
Posted by checkmateking02 on Wednesday, March 12, 2014 10:29 PM

Thanks, Bish.  It'll be something of a relief to return to 1/72.  Once I finish with this, I'll be turning to the B-24 for the D-Day GB.

At this point I should probably mention that it takes kit-bashing to obtain an accurate Enterprise for Midway.  Tamiya's offering is a mixture of different years, and the flight deck and gun tub/catwalk arrangements are not suitable for 1942.

It takes Tamiya's Hornet to provide the necessary parts.

Actually, it turned out pretty well, cuz the extra parts come in handy.  I was soaking some liquid mask off some parts in a little plastic container near the kitchen sink when my wife decided to clean.  I came home from work, and she told me she'd emptied the water so the cat didn't drink it.

I nearly had a stroke.  I asked her if she took the parts out first.  Her response nearly added a seizure to the stroke.  She said:  "What parts?"

The sprue was still coming out of the garbage disposal two days later.  Fortunately, the Hornet kit provided replacements.

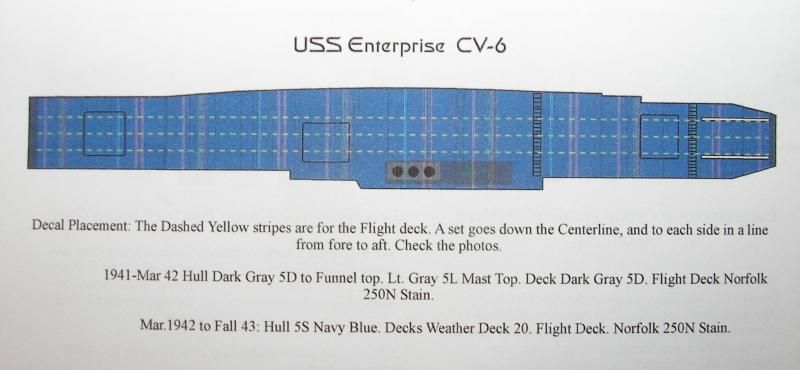
Moving on to the flight deck, Starfighter decals issued a set of 1/700 decals for all the Yorktown class CV's at Midway, including markings for all the air groups and the flight deck.

So next up, I'll post pictures of the flight deck during the decaling process.  I was concerned whether I'd be able to keep the dotted lines straight without wobbling all over, but they ended up OK.


  • Member since
    September 2003
  • From: AandF in the Badger State
Posted by checkmateking02 on Wednesday, March 12, 2014 10:47 PM

To start the flight deck decals, I measured a half-way point at the bow, and then back along the flight deck a few inches, and marked it with a pencil on masking tape.  Then I started applying the decals in short segments, a little at a time.

After getting a good run from the bow, I repeated the procedure from the stern and moved forward.  I checked constantly against a straight-edge, to make sure the dashes wandered as little as possible.

Once I had the center line of dashes finished, I made a pattern for the distance between it and the outer lines, using plastic card stock.  Then it was just a matter of putting the pattern next to the center line strip, and applying each side of the outer stripes.  Again, I used a straight edge to keep them from straying.

And the final result looks pretty good to these old eyes.

Now I really need to finish up the SBD's for the hanger deck.  I can't really go further now with Enterprise until I get them in place.  Then I can add the catwalks and more PE railings.

Here's the progress of the Dauntlesses, from over at the Carrier Aviation GB hosted by Clemens.


  • Member since
    December 2002
  • From: Bury St Edmunds, Suffolk, England
Posted by Bish on Thursday, March 13, 2014 4:37 AM

I know the feeling, I will be glad to get back to something more familiar. Just about got the trooper wrapped up and the other two builds.

I do like your ship builds, they make 72nd builds look huge and easy. More great work there.

I am a Norfolk man and i glory in being so


On the bench: Airfix 1/72nd Harrier GR.3/Fujimi 1/72nd Ju 87D-3

  • Member since
    September 2003
  • From: AandF in the Badger State
Posted by checkmateking02 on Thursday, March 13, 2014 9:27 AM

Thanks, Bish.  It's tough to be out of the comfort zone!


  • Member since
    December 2002
  • From: Bury St Edmunds, Suffolk, England
Posted by Bish on Thursday, March 13, 2014 9:33 AM

I know, but nice to challenge your self now and again.

And I am looking forward to your B-24.

I am a Norfolk man and i glory in being so


On the bench: Airfix 1/72nd Harrier GR.3/Fujimi 1/72nd Ju 87D-3

  • Member since
    September 2003
  • From: AandF in the Badger State
Posted by checkmateking02 on Thursday, March 13, 2014 9:37 AM

At this point, so am I!


  • Member since
    December 2002
  • From: Bury St Edmunds, Suffolk, England
Posted by Bish on Thursday, March 13, 2014 5:42 PM

Managed to get back to the trooper this week and get him finished. One of the guys on the hero's and villains GB gave me a link to a site with loads of details on Star War's costumes for the Vadar figure I did there and it also really helped with this build. Unfortunaly the pics don't show some of the finer stuff very well, such as the blue tube stripes on the sides of the helmet of the small buttons on the stomach armour. I do need to work on my photo's a bit. But here they are.

So there you are, both builds done, I know fel like I have earned the badge.

Thanks Ken for hosting this GB, I was really glad to get the chance to build these two. And look forward to seeing some more work over the next couple of months from you guys. 

I am a Norfolk man and i glory in being so


On the bench: Airfix 1/72nd Harrier GR.3/Fujimi 1/72nd Ju 87D-3

  • Member since
    October 2009
  • From: Oil City, PA
Posted by greentracker98 on Friday, March 14, 2014 8:21 PM

Bish

Managed to get back to the trooper this week and get him finished. One of the guys on the hero's and villains GB gave me a link to a site with loads of details on Star War's costumes for the Vadar figure I did there and it also really helped with this build. Unfortunaly the pics don't show some of the finer stuff very well, such as the blue tube stripes on the sides of the helmet of the small buttons on the stomach armour. I do need to work on my photo's a bit. But here they are.

So there you are, both builds done, I know fel like I have earned the badge.

Thanks Ken for hosting this GB, I was really glad to get the chance to build these two. And look forward to seeing some more work over the next couple of months from you guys. 

Your very Welcome. I Still haven't got axles for my halftrack. The originals didn't turn out so I think some metal axles will fit You won't be able to see them.

I really went out of my comfort zone on this one. Right now its almost a shelf queen. I'll get the metal axles next pay and try to something with them.

Bish Any ideas on which picture you want on the front page?

A.K.A. Ken                Making Modeling Great Again

  • Member since
    December 2002
  • From: Bury St Edmunds, Suffolk, England
Posted by Bish on Saturday, March 15, 2014 1:58 AM

These things happen Ken, be nice to see that half track finished. I will leave it up to you as to which one you put on the front page.

Thanks for running this GB, a great idea.

I am a Norfolk man and i glory in being so


On the bench: Airfix 1/72nd Harrier GR.3/Fujimi 1/72nd Ju 87D-3

  • Member since
    September 2003
  • From: AandF in the Badger State
Posted by checkmateking02 on Saturday, March 15, 2014 10:25 AM

NIce work, Bish; very well painted!.  His menace comes through very clearly.  


  • Member since
    September 2003
  • From: AandF in the Badger State
Posted by checkmateking02 on Saturday, March 15, 2014 10:52 AM

Here is a step that really slooowed things down on my Enterprise build.

Both the flight deck and the forward catwalk around the bow were sourced from Tamiya's Hornet kit,  Before Enterprise sailed for Midway there were gun tubs added to both the port and starboard sides of the bow catwalk for a .50 cal MG in each.

I removed the tubs from some Hornet catwalks that wouldn't be needed, and attempted to splice them into the catwalk.  The problem was, there isn't much surface there for gluing.  I tried tube glue and liquid cement, but managed to break the tubs off every time I tried to sand the seams.  This happened three times.

Finally, with a combination of tube glue, liquid glue and CA, I managed to get the assembly to hold long enough to sand, paint and install it.

To make matters worse, the port catwalk snapped in two, and had to be fixed.  That proved reluctant, too, and had to be fixed a couple of times before it was willing to co-operate.

There were also gun tubs for .50's at the stern on each side, that will probably be another adventure!


GAF
  • Member since
    June 2012
  • From: Anniston, AL
Posted by GAF on Sunday, March 16, 2014 3:59 PM

Bish>  You're on a Star Wars roll, what with Vader in the "Heroes and Villains" GB.  What a great rendition of an Imperial Stormtrooper!  It also saves on paint!  All you need are Black and White!  Wink

CheckmateKing02>  Why is it that Enterprise models are such a pain?  Big Smile  I would post some stuff about my own Enterprise build, but why share the misery?

Gary

  • Member since
    December 2002
  • From: Bury St Edmunds, Suffolk, England
Posted by Bish on Sunday, March 16, 2014 5:55 PM

Thanks guys, I do need some better pics though.

Gary, tell me about it, not only have I built these two, but I have just added 4 more Star Wars kits to the stash ove rthe last couple of weeks. What with the black and white on those two and the desert 88 I will be glad to get back to some camo schemes.

Sound like your struggling with that CMK, but its looking good.

I am a Norfolk man and i glory in being so


On the bench: Airfix 1/72nd Harrier GR.3/Fujimi 1/72nd Ju 87D-3

  • Member since
    September 2003
  • From: AandF in the Badger State
Posted by checkmateking02 on Sunday, March 16, 2014 10:47 PM

GAF

Bish>  You're on a Star Wars roll, what with Vader in the "Heroes and Villains" GB.  What a great rendition of an Imperial Stormtrooper!  It also saves on paint!  All you need are Black and White!  Wink

CheckmateKing02>  Why is it that Enterprise models are such a pain?  Big Smile  I would post some stuff about my own Enterprise build, but why share the misery?

Gary

 
Maybe cuz she was such a tough ship--in all her incarnations?  She was probably more trouble to the Japanese than she has been to me; and she will be more trouble to the Klingons than she is to you, in a couple of hundred years.
 
It's a theory.


  • Member since
    September 2003
  • From: AandF in the Badger State
Posted by checkmateking02 on Sunday, March 16, 2014 10:49 PM

Bish

Sound like your struggling with that CMK, but its looking good.

 
That's a good word for it.  I've been working on her since late November.  It didn't take this long to re-fit the original after the Japanese dropped three bombs on her.


  • Member since
    September 2003
  • From: AandF in the Badger State
Posted by checkmateking02 on Tuesday, March 18, 2014 4:57 PM

One of the quirks about the Tamiya Enterprise is that the kit is probably closer to 1/720 scale than 1/700, according to those who've studied this.  That makes normal 1/700 after-market parts slightly oversize.  I wanted to be sure the 5 inch guns from Niko would actually fit before I started them, so I tried them, and the do!

So here they are ready for installation.  I painted them 5-S Sea Blue, then used a lighter shade for highlights, and finished with a thin black acrylic wash.


  • Member since
    December 2002
  • From: Bury St Edmunds, Suffolk, England
Posted by Bish on Tuesday, March 18, 2014 5:52 PM

checkmateking02

Bish

Sound like your struggling with that CMK, but its looking good.

 
That's a good word for it.  I've been working on her since late November.  It didn't take this long to re-fit the original after the Japanese dropped three bombs on her.

LOL, I guess the guys fixing her didn't have to use a magnifying glass and fine tweezers'. Those guns look good.

I am a Norfolk man and i glory in being so


On the bench: Airfix 1/72nd Harrier GR.3/Fujimi 1/72nd Ju 87D-3

  • Member since
    September 2003
  • From: AandF in the Badger State
Posted by checkmateking02 on Tuesday, March 18, 2014 6:50 PM

Bish

checkmateking02

Bish

Sound like your struggling with that CMK, but its looking good.

 
That's a good word for it.  I've been working on her since late November.  It didn't take this long to re-fit the original after the Japanese dropped three bombs on her.

LOL, I guess the guys fixing her didn't have to use a magnifying glass and fine tweezers'. Those guns look good.


You're right about the tweezers, Bish.  I hadn't thought of that!

The Niko guns are worlds apart from the kit offerings--nicely detailed


GAF
  • Member since
    June 2012
  • From: Anniston, AL
Posted by GAF on Tuesday, March 18, 2014 8:55 PM

CMK>  You're making my eyes hurt!  Cool  The guns look good!

  • Member since
    September 2003
  • From: AandF in the Badger State
Posted by checkmateking02 on Wednesday, March 19, 2014 2:44 PM

Thanks, GAF!  


  • Member since
    September 2003
  • From: AandF in the Badger State
Posted by checkmateking02 on Thursday, March 20, 2014 11:04 PM

I've been dealing with the flight deck while I finish up four SBD's for the hanger deck.

Installed the catwalks; views from the bottom--

and views from the top--

I was concerned that the catwalks might interfere with the fit of the flight deck to the hull, but I test-fitted it at each point when I glued them in and they fit like a charm.  It was a pleasant surprise given the age of the kit.

Most of the catwalks had to be modified to bring them into line with the way Enterprise was equipped at Midway.  Usually it was just a matter of cutting off the emplacements that weren't there in 1942.

Also installed lifeboats.  There's a photo of Enterprise from May 1942 showing boats on the starboard side, so I added them also to the port side per the instructions.

Here's a view of the bow, with the posts that support the flight deck in place.  Looks like I need to do some dusting!

The gun tub at the front comes from the Hornet kit, and carried two 20mm's.  In Tamiya's Enterprise, there is a single round tub there, for a 40mm, which Enterprise didn't carry at Midway.

I also spent some time checking the PE rails for chips, and touched up the places needed with a brush.

Hopefully, I can get the planes into the hanger deck and close up the flight deck this weekend.


  • Member since
    September 2003
  • From: AandF in the Badger State
Posted by checkmateking02 on Friday, March 21, 2014 11:33 AM

I was looking at the hull and noticed I'd forgotten to install a railing along one walkway on the starboard side, so I added that.  It's the shorter one in front of the three pairs of doors.

I've been concentrating on the aircraft for the hanger deck, and managed to get them finished up last night.  I post a few photos later.


  • Member since
    September 2003
  • From: AandF in the Badger State
Posted by checkmateking02 on Friday, March 21, 2014 12:04 PM

Here are four SBD's that will go to fill up the hanger deck.

According to the combat report, these four did not take part in the 4 June, 1942 attack on the Japanese fleet, but they did launch during the actions on 5 and 6 June.

Their crew are listed as:

6-B-4  Lt.     L.A. Smith       CARUTHERS, H.H., AMM2c


6-B-10 Lt.     H.P. Lanham      GARAUDY, E.J.,ARM1c

6-B-17 Ensign  A.L. Rausch      JONES, H.L., AOM3c

6-S-13 Lt. PATRIARCA    BADGLEY, J.R., ACRM(AA)

Of course, none of them appear by name in either John Ford's "The Battle of Midway" or the Henry Fonda/Glenn Ford later film.  Since this is a Hollywood build, I'll have to check the movie to see if I can find out what Charleston Heston or Edward Albert or Monte Markham was flying.  At this point, I don't remember if they were Dauntlesses or Devastators.


GAF
  • Member since
    June 2012
  • From: Anniston, AL
Posted by GAF on Friday, March 21, 2014 4:33 PM

CMK> Those really are a masterpiece of the miniature art.

You know, I have to ask, but did the "actual" Enterprise even appear in either of those movies?

  • Member since
    September 2003
  • From: AandF in the Badger State
Posted by checkmateking02 on Friday, March 21, 2014 5:32 PM

Thanks, GAF.

There are short shots of stock footage in the '70's "Midway" film, showing each carrier leaving for the battle.  A subtitle identifies each.

In John Ford's 1942 film, "The Battle of Midway"--which garnered an Oscar--there are shots of flight deck operations, which I'm assuming are Enterprise or Hornet, since Yorktown probably took any film down with her.

That's my story, and I'm sticking to it!


GAF
  • Member since
    June 2012
  • From: Anniston, AL
Posted by GAF on Friday, March 21, 2014 5:49 PM

Well, speaking of the Enterprise...

I finally got her together and primed, sanded and filled.  Then I tried a bit of shading work on the saucer grids.  Not really sure why.  They're hardly noticeable in the series, but these molded grids are just way too obtrusive.

I then had a choice to make about the exterior color.  Now there are sites online that show what the exterior color is on the 11 foot model, but I was unable to find the color recommended in a spray can, so I decided to wing it.   Sad

There was a beautiful color called "Azure Snow" from Valspar, and I decided to give it a try.  Now, the first thing I should have realized was it is enamel... and an enamel coating takes a LONG time to dry.  A very long time.  This lead to some rather disappointing spots of paint actually lifting off the base coat.

Did I mention this stuff takes a long time to dry?

 Well, after some soul-searching and gnashing of teeth, I managed to get a coat onto the model I could live with.

She's actually much further along than these photos show, and detailing is about over.  I hope to have the paintwork finished up this weekend (at least, that's the plan) and begin decaling.  Maybe by the end of March she'll be ready to leave dry-dock.

Stay tuned!

Gary

  • Member since
    September 2003
  • From: AandF in the Badger State
Posted by checkmateking02 on Friday, March 21, 2014 6:06 PM

That's a very appealing color, Gary.  Looks like it went on smoothly.  I think it's great.


JOIN OUR COMMUNITY!

Our community is FREE to join. To participate you must either login or register for an account.

SEARCH FORUMS
FREE NEWSLETTER
By signing up you may also receive reader surveys and occasional special offers. We do not sell, rent or trade our email lists. View our Privacy Policy.