SEARCH FINESCALE.COM

Enter keywords or a search phrase below:

100th Anniversary of WWI GB

75524 views
879 replies
1 rating 2 rating 3 rating 4 rating 5 rating
  • Member since
    January 2014
  • From: Toronto
Posted by Rob S. on Sunday, September 14, 2014 6:29 PM

A bit more work today. Gotta stop, as the rib taping decals are getting too tedious and I need a break!!

The whole fuselage was coated with several coats of Future and some decalling took place. Spent a whole bunch of time on the real wing decals and have to wait for that whole thing to dry to start patching up the missed spot (as mentioned above to SchattenS).

Lots of surface sheen, thus, got no ghosting on the decals so far:

Lower wing with rib taping. Started at the trailing edge with a long piece then folded over leading edge and then back down to trailing on the underside...big time and effort saver:

Oh, and a big 'ole Balkenkreuz on one side:

This is where I should have set the decals on the rear wing 'before' inserting the control arms and inserting it into the fuselage...lots of trimming and final patchwork required, oh well Embarrassed:

Need a break from it, back at it tomorrow, perhaps.

______________________________________________________________________________


On the Bench: Nothing on the go ATM

  • Member since
    October 2008
  • From: Georgia
Posted by Rigidrider on Sunday, September 14, 2014 6:42 PM

Rob... That is BEAUTIFUL!

When Life Hands You A Bucket Of Lemons...

Make Lemonade!

Then Sell It Back At $2 Bucks A Glass...

  • Member since
    February 2005
  • From: Proctor. MN
Posted by 65ss on Sunday, September 14, 2014 7:10 PM

Rob-That is some terrific work your doing!

Wing Nut-The interior looks great!

Rigidrider-your plane looks good! That is a striking camo(?) theme.

John-That little plane is looking good! Can't wait to see it in it's decals.

Rocker-Looks good so far!

Blue-The work you have done so far looks great!

As for myself between work, and the weather I have not got much done. We had a unseasonable cold snap, and all my painting stuff is in the garage. When the weather warmed up and I could get some of the interior pieces painted I thought I had an extra bottle of flat white. Got the floor primed and painted using up the rest of one bottle of white, The next day (yesterday) I opened the second bottle of flat white and found out I mixed some other colors in it to make a cream color. Well I had some other things to do around the house, and figured I go to the one hobby shop that's open on Sunday and get some more. They had no flat white. I'm kind of stuck until I can get the interior painted.

Dale

  • Member since
    September 2011
  • From: Milaca, Minnesota
Posted by falconmod on Monday, September 15, 2014 7:11 AM

Well I got some good work done this weekend.  got all the decals on except the small ones on the wing struts.  I was really scared about the four piece decal on the side of the fuselage, but It wasn't to bad at all.

I thought i was going to be spared this on this build but no!  the plane did fly out of my hands and flew 3 feet,  straight down of course breaking 2 wing struts.  UGH!    But anyway here are the most current pics.  Still need to finish the propeller.

Almost ready for a plat coat and final weathering.  Woo Hoo!

John

On the Bench: 1/72 Ki-67, 1/48 T-38

1/144 AC-130, 1/72 AV-8A Harrier

  • Member since
    January 2014
  • From: Toronto
Posted by Rob S. on Monday, September 15, 2014 2:40 PM

Just a beauty John...very nice!! YesYes

______________________________________________________________________________


On the Bench: Nothing on the go ATM

  • Member since
    December 2002
  • From: Bury St Edmunds, Suffolk, England
Posted by Bish on Monday, September 15, 2014 2:42 PM

Now that is nice John. I was wondering how the dragon decals would turn out. Glad to hear that were not to bad. I just hope I can do as well, I hope to start mine in the new year.

I am a Norfolk man and i glory in being so


On the bench: Airfix 1/72nd Harrier GR.3/Fujimi 1/72nd Ju 87D-3

  • Member since
    December 2002
  • From: Bury St Edmunds, Suffolk, England
Posted by Bish on Monday, September 15, 2014 2:43 PM

Rob, wow, that is beautiful.

I am a Norfolk man and i glory in being so


On the bench: Airfix 1/72nd Harrier GR.3/Fujimi 1/72nd Ju 87D-3

  • Member since
    October 2008
  • From: Georgia
Posted by Rigidrider on Monday, September 15, 2014 6:15 PM

OK, I finished up today...

There is virtually no rigging to the DVII and all in all its a nice little kit.

I have the new SPAD Kit in now and will begin on it after satisfying 1 other commitment... Ive noted and learned a few things from my mistakes and some masterful building here, Maybe the SPAD part 2 will go abit smoother. Thanks all and back soon!

Doug

When Life Hands You A Bucket Of Lemons...

Make Lemonade!

Then Sell It Back At $2 Bucks A Glass...

  • Member since
    January 2014
  • From: Toronto
Posted by Rob S. on Monday, September 15, 2014 6:57 PM

Doug....epic build!! That black/white is absolutely striking!! Love it...well done and thanks for the inspiration for a future WW1 build...YesYes

Thanks Mike for the encouraging words on my challenging build...I'm in this one because of you..Cheers...

______________________________________________________________________________


On the Bench: Nothing on the go ATM

  • Member since
    October 2013
Posted by Big Blue on Monday, September 15, 2014 7:24 PM

Marc: Sorry to hear about the challenges from Wingnuts, but it looks like you have overcome them with grace.  That's a great looking build so far.

RR: I love that scheme!  The painting and weathering look first rate.  Very convincing!

Rob: Wow!  Your Roland is turning out to be a real show piece!  I love the wood graining effect you have achieved (colored pencils, yes?), and the paint job is lovely.  I am also amazed at how you can produce this nice work at a relatively quick pace (at least versus me).  The engine and Spandaus look quite nice as well.  Great tip regarding the rib tapes.

Mike: I am sure the time away from your Tripe will be well spent.

Steve & Dale: Looking forward to seeing your progress.

John:  Very sorry to hear about your mishap, but the pictures look great!  I hope the repair goes/went smoothly for you.

As for my build, I have been plodding along at my slow pace.  Here is where I am now:

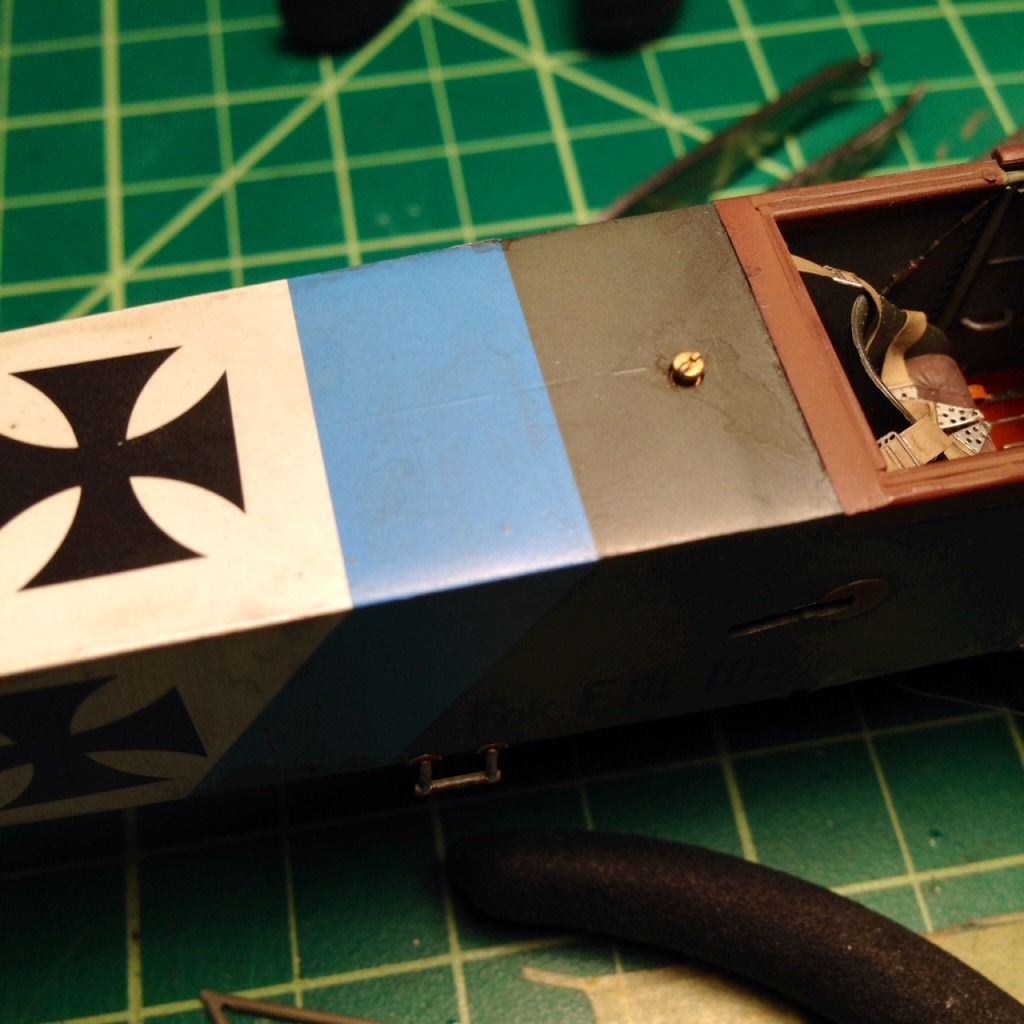
The pictures of the top and (particularly) the bottom are overly green due to poor color balance by me.  The reflection from the flash also obscures much of the grunge on the underside of the fuselage.

All of the "fabric" surfaces received a coat of Alclad Matte to take down the gloss finish and blend the weathering into the surface.  I finished the various leather grommets using Tamiya Red Brow, and added the oil leaks along the bottom of the airframe using a combination of MIG pigments (Russian Earth and Black Smoke), and thinned AK Interactive Fuel Stains enamel paint applied with a brush.  I removed the masking from the metal work, and assembled the front end of the aircraft.  I also added the trigger cable from the back of the control stick to the Spandau machine gun using EZ Line (it is currently attached below the cowling where the butt end of the gun will be.)

I have made a small start on the rigging process by drilling and adding eyelets made from fine wire to the undercarriage, and running monofilament elevator wires from the bottom of the control stick to the small opening where they re-enter the fuselage:

I ran a small piece of medium weight wire through the hole that I had pre-drilled through the control horn, and looped the control line over it.  Additionally, I finished off the wing warping control lines that have been sticking out of the fuselage by attaching them to 1/48 scale Gaspatch turnbuckles.  I closed the loops off using polyimide tubing to represent the wrappings.

On a less positive note, the top seam where the fuselage halves meet seems to have reappeared at some point over the weekend:

I noticed it after dry fitting one of the wings.  The fit is exceptionally tight, and I think in working the wing back and forth to insert and remove it, I must have put excessive pressure on the fuselage which unsettled the filler.  It has a bit bummed out, and I am debating stripping the top down to repair it.  I'd likely have to paint the blue band around the entire fuselage as I doubt I could match the color (not to mention that the white and black could be off as well), and I'd have a tough time getting the gray-green to match the sides given the oil washes etc.  I would also have to either mask and paint or replicate the Iron Cross decal.  I need to decide if I can live with the seam line before I continue on to rigging, because that would be a point of no return.  Bummer.

That's all I've got to share at the moment.  Comments, questions and advice are welcome.  

Keep up the good work all!

Blue

  • Member since
    January 2014
  • From: Toronto
Posted by Rob S. on Monday, September 15, 2014 8:15 PM

Blue...thanks for sure...it's coming along. Your build is moving along at a pace commensurate with the outstanding showpiece you are producing!! Slow and steady!! I seem to be moving along quickly, simply cuz I have no life, LOL!! No, really, I live alone and have little else to do, so, I get lot's o'bench time!!

About my rib tapes...I think using the decals was a mistake: I should have masked and painted every rib!! The problem is, the decals, even with lots of Sol are not showing the fasteners underneath. Got the second lower wing Balkenkruez on and finished the rib taping. Now, i have to struggle with the thoughts of doing it again on the upper wing....not looking forward to that. 

Here's the thing..with the sensitivity of using exclusively decals for the both wings, would the lozenge decals survive being masked repeatedly for 44 ribs?? I'm thinking not...so, I'll have to finish it off with the decals.

______________________________________________________________________________


On the Bench: Nothing on the go ATM

  • Member since
    October 2013
Posted by Big Blue on Monday, September 15, 2014 8:31 PM

Rob,

Have you tried using a hairdryer for the decals?  I'd go slow and steady until you see how they respond, but I know that a number of people have been using this method with success on other decals.  Just a thought.

Thanks for the kind comments.  I'm really bumming about that damn seam line appearing...

  • Member since
    January 2014
  • From: Toronto
Posted by Rob S. on Monday, September 15, 2014 8:48 PM

Thanks Blue, gonna try that method. Funny, on my Eindekker last year, the exact thing happened to me!!

______________________________________________________________________________


On the Bench: Nothing on the go ATM

  • Member since
    October 2013
Posted by Big Blue on Monday, September 15, 2014 9:41 PM

Rob Sherman

Funny, on my Eindekker last year, the exact think happened to me!!

Hmm... maybe I should think twice before ripping things up and trying to fix it.  If it happened again after all that.... Angry

  • Member since
    April 2005
  • From: Piscataway, NJ!
Posted by wing_nut on Tuesday, September 16, 2014 7:05 AM

Rigid... That's some cool striping.

Falcon... looking really nice.

Rob... The fuselage is just awesome.   I just read the part about the large size of the wing decals giving you fits.  Sorry that I am too late with this to do any good now but you'll have it for the next one.  

The WNW lozenge decals are printed the same way the real fabric was in a long continuous bolt of cloth.  The cloth was cut in lengths equal to the chord of the wing.  The chord is the distance from the leading edge to the trailing edge. These panels were turned 90 degrees and sewn together.  So there would be a seam every few feet along the wing. And there would be a mismatch of the pattern at these seems.  The same needs to be done with the WNW decals.  This not only gives you the correct orientation of the pattern, you are dealing with smaller squares of the decals instead of 1 huge, long decals. 

Here's the lower wing of the Roland I built a few years ago. Same aircraft but I opted for the red band. Note the mismatch at the seams. Click the pic for a larger view.

1 thing has to be done to the strip before you cut it into smaller panels. There is a barely perceptible dark line at the long edges of each strip.  A thin silver needs to be trimmed from both edge before cut into the smaller panels.  If you don't, that line is double in size when the panels are rotated and butted together making an obvious dark line between each panels. 

I had a few spots that didn't want to snuggle down over some small details.  Poking with the point of a sharp blade and applying some Solva-Set and when just about dry light pressure with a q-tip pushed it all down tight.  If you never used Solva-Set this stuff is really aggressive.  This stuff compared to Micro-Sol is like comparing a nuke to a hand grenade.  Do not touch it at all until near dry or your decals will smear like wet paint.

Lastly, a tip for getting the decal around the control horns without any need for patching.  Trim the decal to the rough shape you need as usual.  Before you dip it in the water position it on the elevator, for example, correct from side to side and slide it forward so it buts up to the controls horn.  Mark the spot and make a tiny still in the decal.  When soaked and moved into position the control horn slips right into the slot and a little decal solution gets the side the settle down around it without leaving a mark or gap

Sorry for the long winded post but now this is REALLY the last thing.  Stick with the rib tape decals.  Tedious?  Yes indeed.  But the thought of tape pulling up the lozenge decals is sending shivers down my spine.  I also think it will be less tedious than taping all that and getting them all the exact same width.

Marc  

  • Member since
    February 2006
  • From: Smithers, BC, Canada
Posted by ruddratt on Tuesday, September 16, 2014 9:17 AM

I remember when I built my Eindecker for the FSM GB, those fuselage joints looked real thin, so I glued two long runs of evergreen .015 x .06 plastic strip inside from front to back, one along the top seam and one along the bottom seam to reinforce them. 

Mike

 "We have our own ammunition. It's filled with paint. When we fire it, it makes pretty pictures....scares the hell outta people."


  • Member since
    January 2014
  • From: Toronto
Posted by Rob S. on Tuesday, September 16, 2014 11:16 AM

Marc...OK, NOW I get what the 'arrows' in the instructions are. I have to say, WNW did not do a good job with describing what they meant for that part. Yes, it makes total sense now...cut in strips, then apply in the direction of the arrows..sheesh..

Yes, I will keep on with the decal rib tapes. I can see a ton of total wing decalling coming to a dead halt by destroying the surface with masking material!! Gonna try the hair dryer on the tapes to see if I can get 'em to conform better.

I really like the red stipe..kinda wish I'd have done that version now.\

Oh, I really can't see that dark line on the long edge of the decals you mention?

______________________________________________________________________________


On the Bench: Nothing on the go ATM

  • Member since
    April 2005
  • From: Piscataway, NJ!
Posted by wing_nut on Tuesday, September 16, 2014 11:52 AM

Oh, I really can't see that dark line on the long edge of the decals you mention?

Trust me... it's there.  Take a couple of scrap pieces and try putting them together along the edge. You'll see it.


BTW Blue... so sorry but I didn't mean to by pass you.  The Endecker looks really sweet.  And I feel your pain about that seem.  It's happened all to often.

Marc  

  • Member since
    January 2014
  • From: Toronto
Posted by Rob S. on Tuesday, September 16, 2014 2:56 PM

Hey Marc...for sure...gonna trust you!! I'll trim em up beforehand.

______________________________________________________________________________


On the Bench: Nothing on the go ATM

  • Member since
    January 2014
  • From: Toronto
Posted by Rob S. on Tuesday, September 16, 2014 7:51 PM

Ok, another evening of intense decalling done for now (will cover that next time). Got a bunch more stuff done before that though:

Exhaust. Also, the bit of weathering/paint damage was done with the hairspray method.

Upper wing supports/struts:

One of my favourite additions: GasPatch turnbuckles. WHERE have these things been my whole life?!. Installed them early to avoid having to work around the upper wing:

And the tailplane rib taped and the thin black line added flush to the lozenges:

Also, got the 'purple' upper wing lozenges completed in strips, thanks to Marc, again....Big Smile. Yup, Marc, I did definitely see that dark 'line'. It was quite pronounced. I trimmed it away. This was a tough decal job. More to follow on that next time. Thanks for lookin'.

______________________________________________________________________________


On the Bench: Nothing on the go ATM

  • Member since
    April 2005
  • From: Piscataway, NJ!
Posted by wing_nut on Tuesday, September 16, 2014 8:36 PM

Rob my friend I am happy to help.  That is just beautiful.

Marc  

  • Member since
    January 2014
  • From: Toronto
Posted by Rob S. on Wednesday, September 17, 2014 6:37 AM

Top of upper wing, almost done. Need to apply decals on the ailerons AND a spot repair on the right side as you'll see in a bit:

AND, here's that line. I trimmed every piece on Marc's advice, BUT, for this tiny 5mm wide final piece, I neglected to trim the long edge.....AND....there it is, VERY obvious (also, minor chip on top, but, easy to fix):

______________________________________________________________________________


On the Bench: Nothing on the go ATM

  • Member since
    September 2011
  • From: Milaca, Minnesota
Posted by falconmod on Wednesday, September 17, 2014 7:06 AM

Almost done,  got the prop done last night and the tail dragger on.  now some flat coat a little weathering.Propeller

Oh yea and the exhaust still needs to be attached.

John

On the Bench: 1/72 Ki-67, 1/48 T-38

1/144 AC-130, 1/72 AV-8A Harrier

  • Member since
    April 2005
  • From: Piscataway, NJ!
Posted by wing_nut on Wednesday, September 17, 2014 7:33 AM

Nice John.  Looks like a 3D picture on top of the boxYes

Marc  

  • Member since
    January 2014
  • From: Toronto
Posted by Rob S. on Wednesday, September 17, 2014 7:43 AM

Fantastic John, looking forward to your big finish!! Cheers!

______________________________________________________________________________


On the Bench: Nothing on the go ATM

  • Member since
    October 2013
Posted by Big Blue on Wednesday, September 17, 2014 9:15 AM

Marc, thanks and no worries.  It is hard to keep track of all the updates here... a good "problem" to have in an active group build!

Rob, your Roland just keep looking better and better!  I'm afraid I will miss something between when I start typing this and when I post it!  Really great work.

John, your Albie really came together beautifully!  Lovely work in a tiny scale; congratulations.

Mike, it sounds like you made a good call when reinforcing your Eindecker's seams.  My progress on this build has basically stopped while I wrestle with the decision to strip the top down to attempt to repair.  I know that trying to match the required new painting, weathering, etc. to the rest of the fuselage is risky, and I'd hate to go through all that if it is just going to re-appear.  I've sent an inquiry to WnW to see if they'll sent me the top decals since I know it would be close to impossible to match the color of the blue fuselage band.  If they come back with a "no", I'll probably just have to live with the seam.  

Blue

  • Member since
    April 2013
Posted by SchattenSpartan on Wednesday, September 17, 2014 2:58 PM

Rob: Thanks for all the tips on those decals! This is going to be my first biplane model, so there's plenty of new stuff to learn... Your Roland looks magnificent! The perfect finish and your attention to detail makes it truly inspiring! I'm by far not brave enough to paint mine with the natural wood finish on fuselage, but the "EdelweiƟ" color scheme cought my eye right when I first looked at the box, so I'll probably go with that one...

Doug: I love that fancy black'n'white striped scheme! Overall some really great work on the Spad!

Blue: Your Eindecker is looking awesome as well! I especially like the metal finish you achieved on the cowling!

John: She's coming along very nicely! That colorful scheme sure looks bad-a!

  • Member since
    October 2008
  • From: Georgia
Posted by Rigidrider on Wednesday, September 17, 2014 4:08 PM

John... Great finish! Looks just like the picture...

Blue... I LOVE the Eindecker! coming along nicely! Very cool aircraft.

Rob... I for one am absolutely in awe of your progress! Stunning job...

Clemens my friend... Good to here from you! You are too kind sir! Eagerly watching your progress on the Butcher Birds! Bring them home now...

When Life Hands You A Bucket Of Lemons...

Make Lemonade!

Then Sell It Back At $2 Bucks A Glass...

  • Member since
    April 2013
Posted by SchattenSpartan on Wednesday, September 17, 2014 4:21 PM

Oh believe me, I'm working on that everytime I sit down at the bench. I'm still missing a couple of goodies though and I want to wait for some tools to arrive before doing all the major PE and resin work (and I can't do a whole lot of stuff before I get that done)

  • Member since
    February 2006
  • From: Smithers, BC, Canada
Posted by ruddratt on Wednesday, September 17, 2014 8:37 PM

Blue, sorry I didn't get that info to you earlier.  When I saw how thin those edges were,  figured they could use a bit of reinforcing. Those WnW guys are awesome. Hoping they come through with the markings for ya! Yes

Rob, just loving that Roland, so much in fact that it was the deciding factor in my temporarily putting the Tripe aside and having a go at it instead.  The color schemes available for it are stunning, more colorful than plain ole'  PC10.  Those black & white horizontal stripes look killer - just have to do that one and hope I can produce one half as nice as yours is looking.

Mike

 "We have our own ammunition. It's filled with paint. When we fire it, it makes pretty pictures....scares the hell outta people."


JOIN OUR COMMUNITY!

Our community is FREE to join. To participate you must either login or register for an account.

SEARCH FORUMS
FREE NEWSLETTER
By signing up you may also receive reader surveys and occasional special offers. We do not sell, rent or trade our email lists. View our Privacy Policy.