SEARCH FINESCALE.COM

Enter keywords or a search phrase below:

100th Anniversary of WWI GB

75527 views
879 replies
1 rating 2 rating 3 rating 4 rating 5 rating
  • Member since
    January 2014
  • From: Toronto
Posted by Rob S. on Wednesday, September 10, 2014 5:16 PM

Cheers, Marc!! Gonna get to the exterior prob this wknd. Thanks again!!

Thanks all for the kind words. Lots of work left on this project...

______________________________________________________________________________


On the Bench: Nothing on the go ATM

  • Member since
    January 2014
  • From: Toronto
Posted by Rob S. on Wednesday, September 10, 2014 8:56 PM

Got the engine finished up this eve. Wired and ready to mount:

Matching Spandau's:

Engine all tucked in:

All buttoned up for the night:

______________________________________________________________________________


On the Bench: Nothing on the go ATM

  • Member since
    October 2013
Posted by Big Blue on Wednesday, September 10, 2014 11:15 PM

That looks great, Rob.  You are moving right along.

What did you use for the engine wiring?

Blue

  • Member since
    December 2002
  • From: Bury St Edmunds, Suffolk, England
Posted by Bish on Thursday, September 11, 2014 2:44 AM

Looking really nice Rob.

I am a Norfolk man and i glory in being so


On the bench: Airfix 1/72nd Harrier GR.3/Fujimi 1/72nd Ju 87D-3

  • Member since
    January 2014
  • From: Toronto
Posted by Rob S. on Thursday, September 11, 2014 5:17 AM

Big Blue

That looks great, Rob.  You are moving right along.

What did you use for the engine wiring?

Blue

Thanks Blue...that is fine wire used for fly fishing, I believe. I bought it at a fishing supply store. It is green and very fine and easy to work with.

______________________________________________________________________________


On the Bench: Nothing on the go ATM

  • Member since
    September 2011
  • From: Milaca, Minnesota
Posted by falconmod on Thursday, September 11, 2014 6:46 AM

Thanks for all the kind words on my itty bitty plane.  And now for some more pictures.  I sat down at my bench and dove into the rigging,  don't know what possessed me.

Now I can clean up the rigging attachment points and give the fuselage a clear gloss and start the decals.

John

On the Bench: 1/72 Ki-67, 1/48 T-38

1/144 AC-130, 1/72 AV-8A Harrier

  • Member since
    November 2008
  • From: Central Florida
Posted by plasticjunkie on Thursday, September 11, 2014 7:35 AM

Rob, Blue, falcon.........Fantastic details and work.

 GIFMaker.org_jy_Ayj_O


Too many models to build, not enough time in a lifetime!!

  • Member since
    December 2002
  • From: Bury St Edmunds, Suffolk, England
Posted by Bish on Thursday, September 11, 2014 7:49 AM

John, nice work on the rigging. Has it been pull through the wings or simply attached to the insides.

I am a Norfolk man and i glory in being so


On the bench: Airfix 1/72nd Harrier GR.3/Fujimi 1/72nd Ju 87D-3

  • Member since
    April 2005
  • From: Piscataway, NJ!
Posted by wing_nut on Thursday, September 11, 2014 7:49 AM

Rob the engine looks terrific.  John that is some mighty fine rigging  In both size and appearance.

Marc  

  • Member since
    September 2011
  • From: Milaca, Minnesota
Posted by falconmod on Thursday, September 11, 2014 7:56 AM

Bish

John, nice work on the rigging. Has it been pull through the wings or simply attached to the insides.

Yes about half of them I drilled straight through the wing.

John

On the Bench: 1/72 Ki-67, 1/48 T-38

1/144 AC-130, 1/72 AV-8A Harrier

  • Member since
    October 2013
Posted by Big Blue on Thursday, September 11, 2014 8:29 AM

Nice work John!  The rigging looks awesome.  Man that thing is small!

Thanks for the info, Rob.  I am a fly fisherman who at various times has tied my own flies, so I've got spools of fine wire and such.  Good call.

  • Member since
    November 2008
  • From: Central Florida
Posted by plasticjunkie on Thursday, September 11, 2014 10:55 AM

Speaking of rigging, this is how I do mine:


I use invisible thread, hollow plastic Q Tip handles stretched out for turnbuckles and thin ca to secure things.

Here's a picture of the finished product:


What I like about this method is that the rigging doesn't have to be initially stretched  tight. You can have some light slack that will be stretched drum tight with a hair drier.

 GIFMaker.org_jy_Ayj_O


Too many models to build, not enough time in a lifetime!!

  • Member since
    January 2014
  • From: Toronto
Posted by Rob S. on Thursday, September 11, 2014 5:05 PM

Hey plastic, can you expand more on the 'hollow Q Tip handles' stretched out? Thanks..

______________________________________________________________________________


On the Bench: Nothing on the go ATM

  • Member since
    November 2008
  • From: Central Florida
Posted by plasticjunkie on Thursday, September 11, 2014 5:28 PM

Rob Sherman

Hey plastic, can you expand more on the 'hollow Q Tip handles' stretched out? Thanks..


Get the plastic hollowed  Q tips. Got mine at Target really cheap. Stretch the tube over a candle as it will keep the hollow cavity in place. Slice up to approximate size. This method works with any scale as you can adjust the thickness of the tube as you stretch.
 
I use invincible thread for the wires which is thin and made of nylon and comes in different diameters. I loop the thread in the turnbuckle and secure with thin ca applied with my modified sewing needle applicator (featured in the last FSM issue under reader tips). Make your connections as tight as you can and it's ok to have slight slack. Then I take a hair dryer and gently blow hot air on the rigging. The heat will tighten up the rigging. Then paint it silver or steel.
 
I submitted the entire procedure with pictures in the magazine tip section.

 GIFMaker.org_jy_Ayj_O


Too many models to build, not enough time in a lifetime!!

  • Member since
    October 2013
Posted by Big Blue on Thursday, September 11, 2014 10:01 PM

That rigging looks great PJ.  Thanks for the walkthrough.  I usually seem to have trouble managing not to overdue the Q-tip stretching so I use metal tubing, but the idea is basically the same.  I like the idea of using a hairdryer to tighten things up.

  • Member since
    January 2014
  • From: Toronto
Posted by Rob S. on Friday, September 12, 2014 4:50 AM

Thanks plastic...that really makes sense. Nice technique.

______________________________________________________________________________


On the Bench: Nothing on the go ATM

  • Member since
    April 2005
  • From: Piscataway, NJ!
Posted by wing_nut on Friday, September 12, 2014 9:59 AM

That is a handy tip PJ.  I've made thin CA applicators that fit the end of the bottle from the tip of a plastic pipette about he size of an #80 bit and its stay hollow.  I wonder how thin you can go?


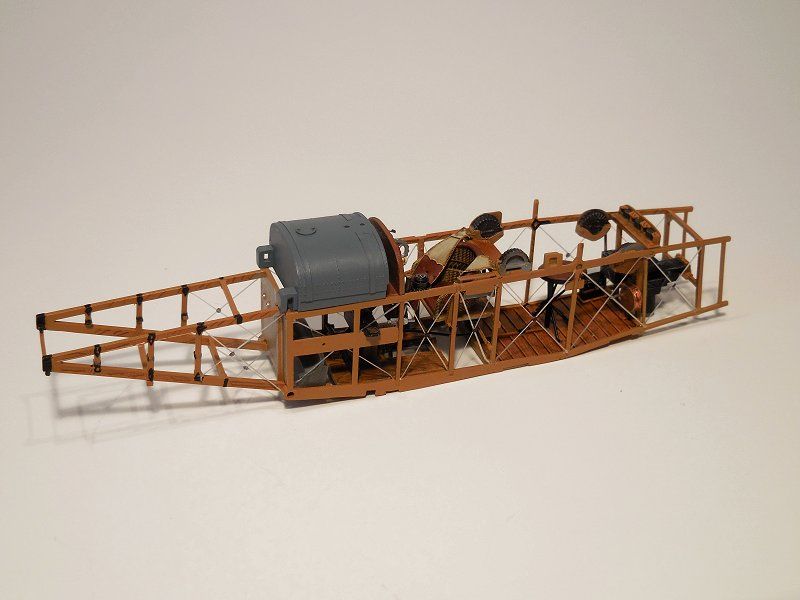
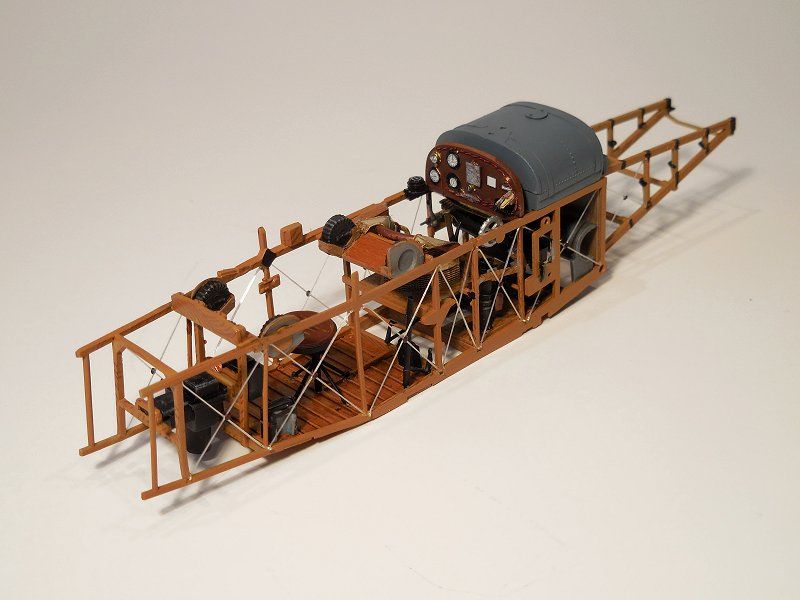
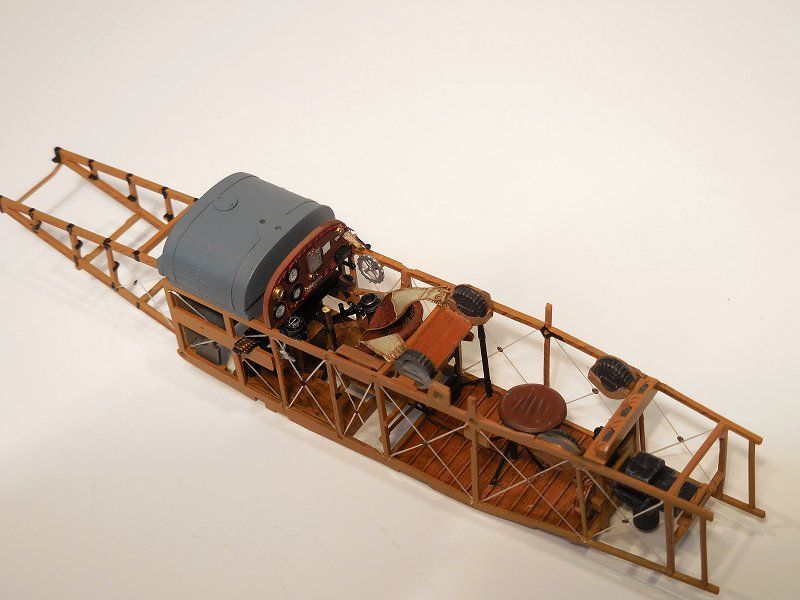
1st major sub-assembly photos and a couple of gripes.

 Seems this would be a good time to make some observations about the engineering of this kit.  So far I have found this to be quite different than the other WNW kits I’ve built.  That is just 3 different aircraft so it may be that what I feel is superior about them may be the exception and the RE.8 is the norm.

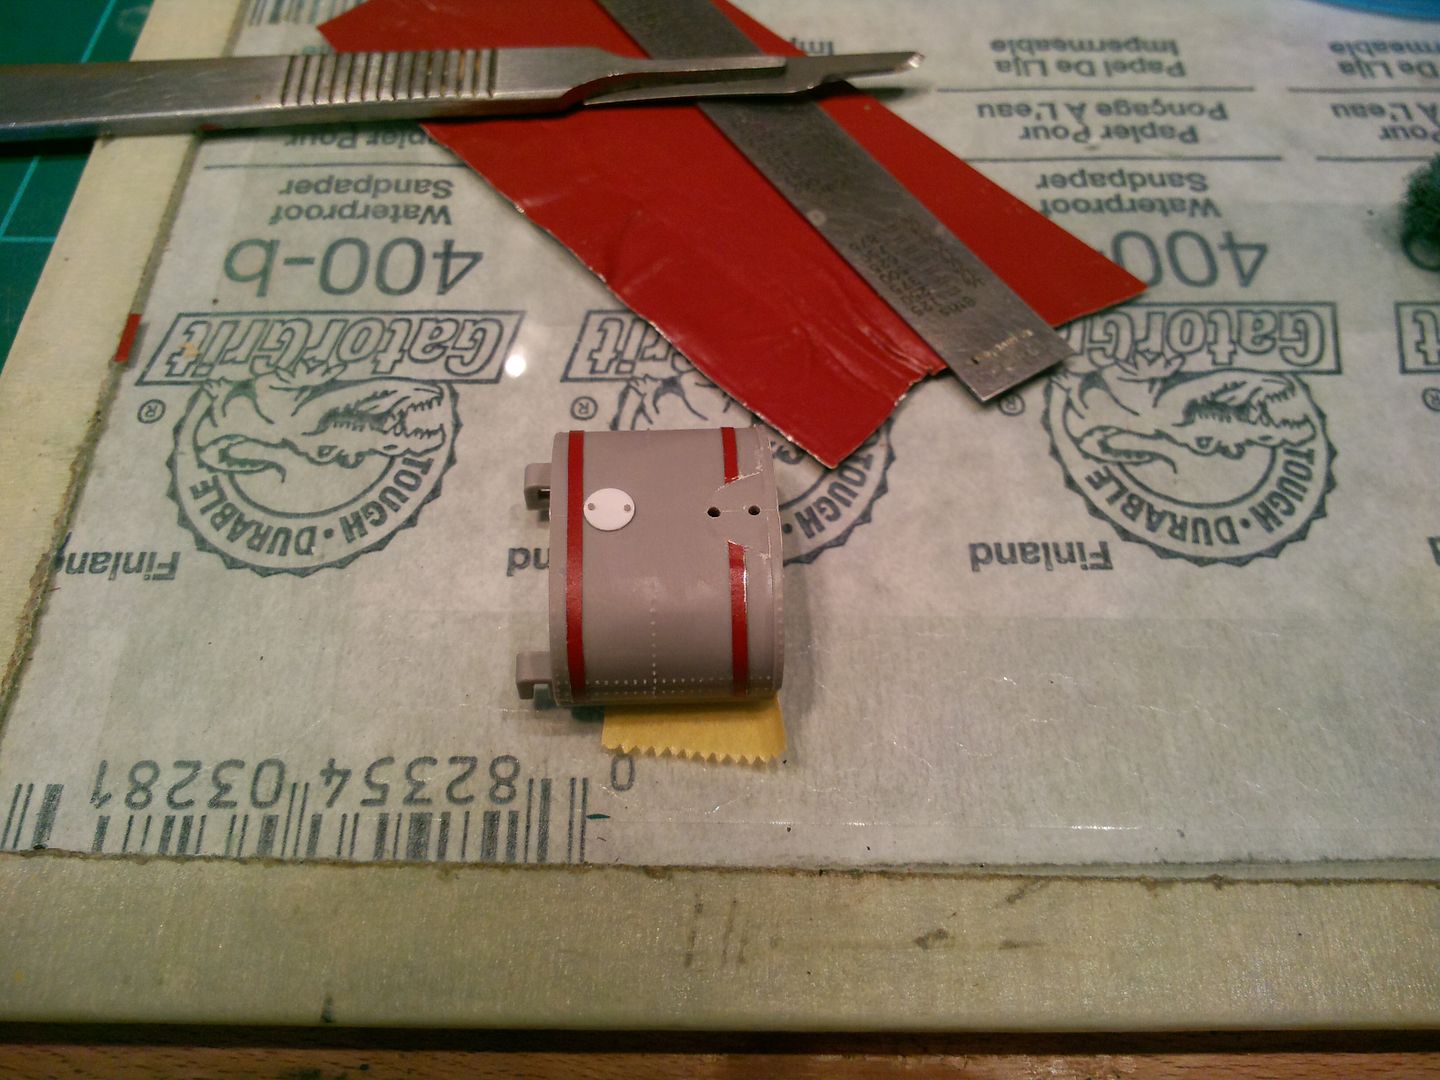
 The interior frame work is very thin and fragile and molding as 2 halves puts a mold line along the edge that are fair big compared to other kits, and not just their own. Lots of delicate clean up.  In the case of the tank on the interior frame, this is molded as 2 halves side by side.  The seam runs down the center across some very fine detail.  This tank is exposed when the fuselage it put together so there isn’t any, “Oh well, that won’t be seen once all buttoned up.”  The easiest thing to do was sand it all clean, fix he seam and re-make the detail.  Given the size and shape of other parts of the kit I would have though it could have been down as a top and bottom half.  Like I said, no clue what dictates that kind of decision. In the end not a big job and more of a head scratcher.


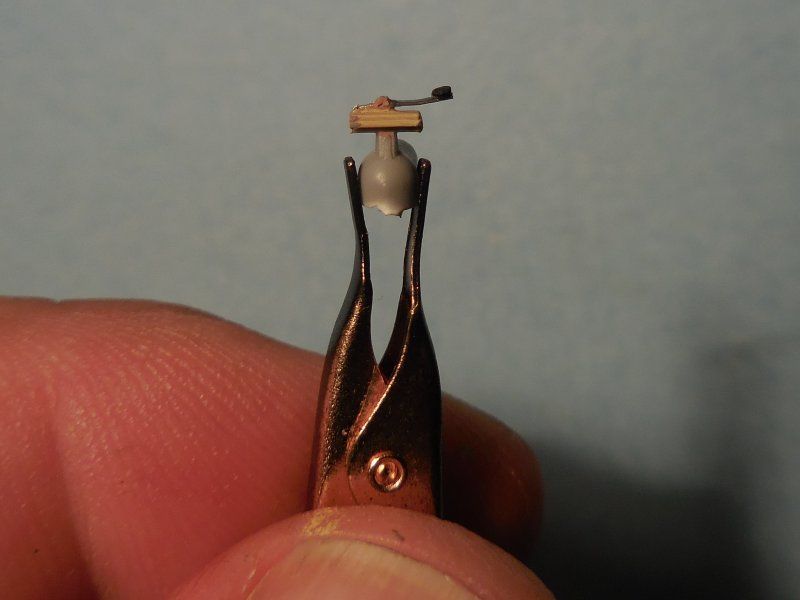
I reworked the telegraph key that was just a little layered chunk of plastic with a round thing for the end of the key.  Some spare PE fret and a slice off a .3” did the trick.


Here’s the interior to go into the fuselage.  More stuff will be added later for the “passenger” as the instruction refers to the guy in the back.  Some how I don’t think that guy is kicking back waiting for the flight attendant to bring more peanuts when there’s an Albatros hot on their tail.


Marc  

  • Member since
    April 2005
  • From: Piscataway, NJ!
Posted by wing_nut on Friday, September 12, 2014 10:02 AM

dupe

Marc  

  • Member since
    April 2005
  • From: Piscataway, NJ!
Posted by wing_nut on Friday, September 12, 2014 10:03 AM

Oops sorry, dupe of a dupe.

Marc  

  • Member since
    November 2008
  • From: Central Florida
Posted by plasticjunkie on Friday, September 12, 2014 11:21 AM

Thanks guys and hope you can use my technique. Just look for it in a future FSM issue. Mine with the needle was in the last issue. It's simple, cheap and works every time.

Wnut... beautiful work on that frame and components. That's what I like about these WW I planes.

 GIFMaker.org_jy_Ayj_O


Too many models to build, not enough time in a lifetime!!

  • Member since
    January 2014
  • From: Toronto
Posted by Rob S. on Friday, September 12, 2014 5:10 PM

Epic work, of course, Marc...

______________________________________________________________________________


On the Bench: Nothing on the go ATM

  • Member since
    October 2008
  • From: Georgia
Posted by Rigidrider on Saturday, September 13, 2014 8:36 PM

Marc... That frame is amazing! Beautiful job!

When Life Hands You A Bucket Of Lemons...

Make Lemonade!

Then Sell It Back At $2 Bucks A Glass...

  • Member since
    October 2008
  • From: Georgia
Posted by Rigidrider on Saturday, September 13, 2014 8:51 PM

Got a little more done between yard work and painting the house... Blasted interuptions... LOL...

Well, shes on her wheels...

The upper wing and support struts in place...

Starting to get the markingd on...

And thats about all for now... should be finished soon...

Thanks. 

When Life Hands You A Bucket Of Lemons...

Make Lemonade!

Then Sell It Back At $2 Bucks A Glass...

  • Member since
    January 2014
  • From: Toronto
Posted by Rob S. on Saturday, September 13, 2014 8:57 PM

Made some big progress tonight (mostly thanks to NOT having to paint the Roland's wings due to the massive lozenge decals!!).

Anyway, woodgraining of the outer fuselage and start of white fuselage stripping:

2nd white and wide black band:

Rearward black and white tail section and Spandau's fixed:

Lower wing lozenge pattern decals in place. That's all for today:

______________________________________________________________________________


On the Bench: Nothing on the go ATM

  • Member since
    February 2006
  • From: Smithers, BC, Canada
Posted by ruddratt on Sunday, September 14, 2014 4:32 AM

Man, you fellas are just cruisin' right along! I have to say that the level of skill I'm seeing on the Albies, Eindeckers, Harry Tates, Rolands, D.VII's, Nieuports & SPAD's has been a real joy to watch!  You guys are doing awesome work!  Yes  As for myself,  it seems I've reached a point where I'm not quite sure where I want to go with the Tripe at the moment,  which is why progress has been so slow - very little progress in the past few weeks to the point where I've put it aside to rethink a few things.  Nothing to be alarmed about - that happens a lot in this workshop, but they all get completed eventually. Focus for the time being will probably be shifting to a WnW Roland and Emil Koch's mount (the one with the black & white horizontal stripes) - a sharp looking aircraft that got my attention as soon as I received the kit in the mail.

Keep up the great work guys!

Mike

 "We have our own ammunition. It's filled with paint. When we fire it, it makes pretty pictures....scares the hell outta people."


  • Member since
    December 2002
  • From: Bury St Edmunds, Suffolk, England
Posted by Bish on Sunday, September 14, 2014 4:39 AM

I can only echo Mike, some stunning work. I am really impressed with all of the wood effects, I could swear there were real wood. Its not something I have to deal with in my usual models, a box maybe or a few rifles, but that's it. What I am seeing here is amazing.

And the variety of paint schemes is just endless. Awesome work guys.

I am a Norfolk man and i glory in being so


On the bench: Airfix 1/72nd Harrier GR.3/Fujimi 1/72nd Ju 87D-3

  • Member since
    April 2013
Posted by SchattenSpartan on Sunday, September 14, 2014 3:01 PM

It's been quite some time since I last checked in here and I have to say you guys are making some fantastic progress. Lots of great stuff going on in here! I especially love the awesome wood-grain effect on every single aircraft model!

  • Member since
    April 2013
Posted by SchattenSpartan on Sunday, September 14, 2014 3:02 PM

Rob, how did those huge decals on the wings work out for you? I#m really scared of that part regarding my Roland kit...

  • Member since
    August 2007
  • From: back country of SO-CAL, at the birth place of Naval Aviation
Posted by DUSTER on Sunday, September 14, 2014 3:28 PM

WOW You guys are really making spectacular progress. 

But no matter how great your builds are; I'm still gonna build my St Chamond ,as soon as I get a couple more chores done      an'   

Steve

Building the perfect model---just not quite yet  Confused

  • Member since
    January 2014
  • From: Toronto
Posted by Rob S. on Sunday, September 14, 2014 6:09 PM

SchattenSpartan

Rob, how did those huge decals on the wings work out for you? I#m really scared of that part regarding my Roland kit...

Hey SS. Not gonna lie...not having fun with them. Some suggestions. The lower wing 'upper sufrace', luckily, can be done in two parts as well as the 'lower'. The upper wing, however, may have to go on in one piece, above and below. I am using Microset and sol for this as well. I am always 'freaked out' when the sol starts to wrinkle these huge decals SOOO much!! The temptation is to jump on right away and start blotting, but, wait it out. I did a final air-bubble wrinkle check after about an hour. they are working out fine so far. Fortunately WNW give extra decals for mistakes. 

The individual 'rib tapes' are tedious!! I am finding you can do the upper and lower surface in one strip by running it to the edge, folding it over and running it to the opposite edge. Glad I didn't cut them in half and try to do the upper and lower tapes as separate jobs (double work for nothing).

Oh, don't do what I did and apply the rear wing decals BEFORE you fix the wing on the fuselage. I'm now having to do some patch work because of my lack of foresight!! I got too focused on the paint job and masking that I didn't think it was going to be much trouble..I was wrong Sad.

The decals are extremely fragile at the trailing edge and I've been having trouble with minor chipping and bunching up while handling. 

______________________________________________________________________________


On the Bench: Nothing on the go ATM

JOIN OUR COMMUNITY!

Our community is FREE to join. To participate you must either login or register for an account.

SEARCH FORUMS
FREE NEWSLETTER
By signing up you may also receive reader surveys and occasional special offers. We do not sell, rent or trade our email lists. View our Privacy Policy.