SEARCH FINESCALE.COM

Enter keywords or a search phrase below:

100th Anniversary of WWI GB

75524 views
879 replies
1 rating 2 rating 3 rating 4 rating 5 rating
  • Member since
    December 2002
  • From: Bury St Edmunds, Suffolk, England
Posted by Bish on Sunday, September 7, 2014 3:28 AM

That sounds interesting with the rippled fuselage. Given the look of that frame work, it would not have surprised me if they supplied fabric to cover it, so I had to ask.

I am a Norfolk man and i glory in being so


On the bench: Airfix 1/72nd Harrier GR.3/Fujimi 1/72nd Ju 87D-3

  • Member since
    February 2006
  • From: Smithers, BC, Canada
Posted by ruddratt on Sunday, September 7, 2014 7:44 PM

Lookin' good PJ!  The IP definitely looks the part and the wood work is really very impressive.  Nice attention to detail!  Yes

Mike

 "We have our own ammunition. It's filled with paint. When we fire it, it makes pretty pictures....scares the hell outta people."


  • Member since
    October 2013
Posted by Big Blue on Sunday, September 7, 2014 8:22 PM

Looks good, PJ!  

  • Member since
    December 2002
  • From: Bury St Edmunds, Suffolk, England
Posted by Bish on Monday, September 8, 2014 3:02 AM

Nice work PJ, I do like how you have done the IP.

I am a Norfolk man and i glory in being so


On the bench: Airfix 1/72nd Harrier GR.3/Fujimi 1/72nd Ju 87D-3

  • Member since
    October 2008
  • From: Georgia
Posted by Rigidrider on Monday, September 8, 2014 7:10 AM

PJ... Nice looking pit, love the wood look!

When Life Hands You A Bucket Of Lemons...

Make Lemonade!

Then Sell It Back At $2 Bucks A Glass...

  • Member since
    October 2008
  • From: Georgia
Posted by Rigidrider on Monday, September 8, 2014 7:32 AM

Morning all... Made a bit of progress this weekend, it rained alot this week so couldnt get to the yard work and such...(awww shucks) But any way, heres a bit more wip...

The molded in padding had to go, It was not a good fit being two different pieces and it looked like crap, so it will be replaced. Got part of it filed off here...

Finished filing it off and it took a bit but I took a piece of 20gauge coated wire and slowly bent it into shape and after many fittings finally got to where I could super glue into place, after painting.

I cut some "nubs" from an old chrome plated sprue to use as instrument bezels. I dont have the faces on yet, I will do kind of like PJ did on his pit, difference is I found and ordered some "Airscale" brand instrument dials from the LHS. They come in a variaty of eras and countries and scales and all they are is the instrument dial face. They also have placards.

Lastly starting some of the filishing details and effects... Tis all for now! (guns are a bit chinsey but didnt have anything in spare pe to dress up)

Thanks

Doug 

When Life Hands You A Bucket Of Lemons...

Make Lemonade!

Then Sell It Back At $2 Bucks A Glass...

  • Member since
    April 2005
  • From: Piscataway, NJ!
Posted by wing_nut on Monday, September 8, 2014 7:44 AM

Nice work on the IP PJ.

Rigid, Takes a big pair of tomatoesWink to make mods AFTER it painted  Well done.

Marc  

  • Member since
    December 2002
  • From: Bury St Edmunds, Suffolk, England
Posted by Bish on Monday, September 8, 2014 7:45 AM

I like what you have done with the padding Doug, and those oil stains are a nice touch.

I am a Norfolk man and i glory in being so


On the bench: Airfix 1/72nd Harrier GR.3/Fujimi 1/72nd Ju 87D-3

  • Member since
    October 2013
Posted by Big Blue on Monday, September 8, 2014 8:14 AM

Well done, Doug; the coaming looks very effective.  Your D.VII is coming along nicely.

My weekend progress is that I have all (well, basically all) of the decals on my Fokker.

No major difficulties with any of them, although I did have some small seams along the upper corners where the side markings meet the top which I have touched up since the photos.  I sprayed some thinned Tamiya Smoke to knock down the blue and white a bit.  The rudder is painted using Gunze Off-White.  I have given everything another gloss coat, and will break out the oil paints for some additional weathering before taking the shine down a couple of notches.

Other than that, I have started painting the undercarriage parts, and planning out where I need to drill for rigging attachment points.  That will be a big task.

Blue

  • Member since
    September 2011
  • From: Milaca, Minnesota
Posted by falconmod on Monday, September 8, 2014 8:24 AM

I got a little more work done this weekend.

I also pre drilled the rigging holes next to the fuselage.   also pre shaded the fuselage and painted it gray as well as paint the tail feathers green.

John

On the Bench: 1/72 Ki-67, 1/48 T-38

1/144 AC-130, 1/72 AV-8A Harrier

  • Member since
    November 2008
  • From: Central Florida
Posted by plasticjunkie on Monday, September 8, 2014 9:46 AM

Thanks gents! Great progress by everyone. Those old birds are looking great.

I wasn't happy with the kit's thick control stick so I scratched out another from sprue and pe which looks more to scale.

The ammo box and oil tank were scratched out of plastic sheet so something is there instead of a hole. I really did not want to spend so much time in this kit but looks like every time I find something else to improve.

Now when the fuselage is closed up that big hole is gone.

 GIFMaker.org_jy_Ayj_O


Too many models to build, not enough time in a lifetime!!

  • Member since
    December 2002
  • From: Bury St Edmunds, Suffolk, England
Posted by Bish on Monday, September 8, 2014 11:02 AM

Some really nice scratchbuilding there PJ.

I am a Norfolk man and i glory in being so


On the bench: Airfix 1/72nd Harrier GR.3/Fujimi 1/72nd Ju 87D-3

  • Member since
    December 2002
  • From: Bury St Edmunds, Suffolk, England
Posted by Bish on Monday, September 8, 2014 11:05 AM

John, that's looking really good. I hope mine can live up to yours.

Blue, that is looking awesome. I really like that scheme, and now I have seen in on the kit rather than just drawings, I think I will defiantly be doing the same one when I get that kit.

I am a Norfolk man and i glory in being so


On the bench: Airfix 1/72nd Harrier GR.3/Fujimi 1/72nd Ju 87D-3

  • Member since
    October 2013
Posted by Big Blue on Monday, September 8, 2014 4:43 PM

John, your Albatross is really starting to look the part; it won't be long before you are rigger her up.

PJ, you may not have wanted to spend too much time on that build, but at least the results of your efforts are worthwhile.  You have really added to that kit.

Bish, thanks for the comments.  I had a hard time picking because I liked a number of schemes for this kit... always a good sign I guess.  I hope I'm doing this one justice.

I've added some streaks and stains using oil washes, and am waiting for them to dry.  From all my reference pictures, the Eindeckers tended towards grubby.   I'll put up pictures when everything has had a chance to dry.

Blue

  • Member since
    October 2008
  • From: Georgia
Posted by Rigidrider on Monday, September 8, 2014 6:40 PM

Blue, I like the decals! That is one cool looking scheme!

PJ, stick looks lots better! Hans would have needed some big hands to work the other one... and I agree, every time you look you see something to improve on! Always do!

John, that is going to be a slick paint scheme... Really do love the WWI colors!

When Life Hands You A Bucket Of Lemons...

Make Lemonade!

Then Sell It Back At $2 Bucks A Glass...

  • Member since
    January 2014
  • From: Toronto
Posted by Rob S. on Monday, September 8, 2014 8:41 PM

Got back from a brief break and took on the interior wood of the Roland. I used a basic Buff as a start and 'drew' on the graining with a Prismacolor pencil (thanks Wing_nut....I still got a bit of work to do on the technique to get it finer, but, still show up against the buff). Overspray of trans. orange then a red-brown wash. The metal bits were done with the green colour then detailed with oil:

______________________________________________________________________________


On the Bench: Nothing on the go ATM

  • Member since
    November 2008
  • From: Central Florida
Posted by plasticjunkie on Tuesday, September 9, 2014 6:40 AM

Thanks Bish, Blue and  Rrider. The stick was the kit supplied one and was way out of scale.

Rob..The wood tone looks very nice and clean.

 GIFMaker.org_jy_Ayj_O


Too many models to build, not enough time in a lifetime!!

  • Member since
    December 2002
  • From: Bury St Edmunds, Suffolk, England
Posted by Bish on Tuesday, September 9, 2014 6:44 AM

Loving the wood work here guys, I think we have a few budding carpenters. Looks really god there Rob.

I am a Norfolk man and i glory in being so


On the bench: Airfix 1/72nd Harrier GR.3/Fujimi 1/72nd Ju 87D-3

  • Member since
    June 2010
  • From: Rochester, New York USA
Posted by rocker286 on Tuesday, September 9, 2014 12:07 PM
I've started painting the camo on my Nieuport! I was a bit nervous about how it would turn out, but the top wing looks good! I've started the fuselage as well and I'm hoping to do a bit more work before I have to go into work tonight. Ruddratt- I DID have a few close ups of the engine and the cockpit - but unfortunately through "operator error" I deleted them from my camera! :( I can tell you that the engine was tiny, but easy to paint. And I didn't do too much detail work on the cockpit, as I am putting the 1/72 scale version of Eddie Rickenbacker inside of it! But here's a shot of the painting process: DSCF1509

4badges

  • Member since
    January 2014
  • From: Toronto
Posted by Rob S. on Tuesday, September 9, 2014 7:22 PM

rocker...great progress on that Nieuport.

Thanks for the comments on my woodwork. I've got to get it finer for the outside woodgrain, so, I'll have to ensure the pencils are extra sharp.

I got most of the engine done this evening when I realized I didn't take any pics Embarrassed.

Here's one shot of where I am with it...started wiring up the distribution system with copper wire...will paint them yellow once set up:

While the engine was drying, I started on the MGs.

Anyway, nervously started the MGs for the Roland. First off AM brass parts from Master: absolutely the last word in 1/32 PE parts:

Here's the parts sitting beside the kit part:

Kit barrel cut off and hole pin-vice bored for brass barrel:

Front barrel guide and heat shroud cap in place...this was NOT easy:

Heat shroud fixed to plastic kit part:

Barrel fixed:

Front site:

Gungray, Vallejo AIR finish!! NOW, just one more to go!!

______________________________________________________________________________


On the Bench: Nothing on the go ATM

  • Member since
    September 2011
  • From: Milaca, Minnesota
Posted by falconmod on Wednesday, September 10, 2014 6:39 AM

I got  the top wing attached,  what a pain, when you do manage to get the wing attached to the 2 center struts it acts like a teeter totter, until you can get the outer struts glued on,  and then adjusted so when you look at it from the front its equal distance for both wing tips,  then if you look down on the top of it you need to make sure it isn't twisted.  But I think I got it right.

 Now for the really scary part the rigging.

Also Eduard did not include the radiator tube from the front of the engine to the wing radiator.  So I'll have to get some styrene rod to make that,  O man another trip to the LHS Propeller

John

On the Bench: 1/72 Ki-67, 1/48 T-38

1/144 AC-130, 1/72 AV-8A Harrier

  • Member since
    November 2008
  • From: Central Florida
Posted by plasticjunkie on Wednesday, September 10, 2014 7:27 AM

Great work on those tiny planes.

hey Rob, great metal work. That pe sure brings reality into the picture!

 GIFMaker.org_jy_Ayj_O


Too many models to build, not enough time in a lifetime!!

  • Member since
    October 2013
Posted by Big Blue on Wednesday, September 10, 2014 3:19 PM

RockerRob & John: great updates all!  On one hand, I am amazed at how well Rocker & John are able to work in that TINY scale, and on the other, I love the details Rob has added in 1/32.   Really nice looking work all around.

Here is my brief update:

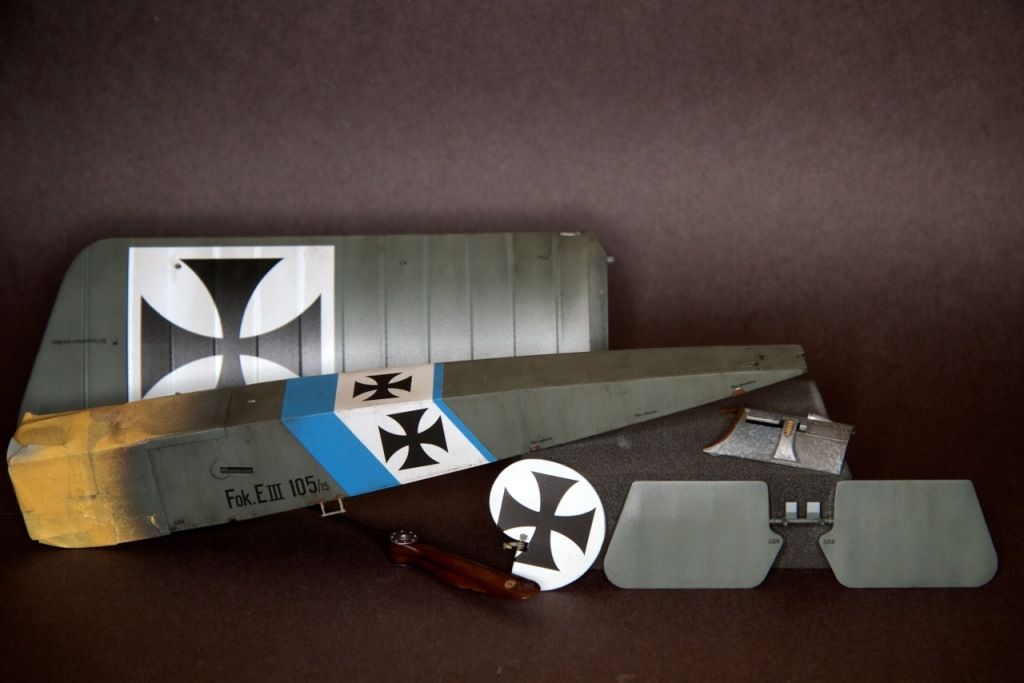
The exterior "fabric" surfaces have been stained and streaked using oil paints.  For the general stains, I used dilute washes of a mixture of Burnt Umber and Lamp Black.  For the vertical streaks, I placed small dots of Lamp Black, Burnt Umber, Payne's Grey and Transparent White along the upper edge of the fuselage, and pulled them downward with a flat brush dampened with odorless turpentine.  Everything has been sealed with a light coat of Alclad Matte Klear, which knocked the gloss finish off and blended the stains into the aircraft's surfaces.  I will be adding castor oil stains and spatters as well, and am still thinking through how I want to achieve those.

Other than that, the decals are basically finished (one still needs to be placed on the metal section currently under the tape, and there are two for the wheels that I have yet to do).  I have painted the undercarriage components, and will begin assembling that component soon.  I still need to finish the engine, and have a few random parts that need to be masked and painted (the leather bits on the fuselage, the metal walkways on the wings, windscreen, metal work on the tail skid, etc.), but there isn't too much left to do before final assembly and... yikes... rigging.

Once again, really nice work Rob, Rocker & John.

Blue

  • Member since
    December 2002
  • From: Bury St Edmunds, Suffolk, England
Posted by Bish on Wednesday, September 10, 2014 3:31 PM

Nice work there Rob. I do like master barrels, they are now my first choice for both 72nd and 32nd.

Looking good John. Is the radiator that item sticking up from the wing. I would never have known there was a tube from there to the engine, I will have to remember that, and be watching for your solution.

rocker, I like the scheme there, looking good.

Blue, that looks awesome, I love those massive crosses.

I am a Norfolk man and i glory in being so


On the bench: Airfix 1/72nd Harrier GR.3/Fujimi 1/72nd Ju 87D-3

  • Member since
    October 2013
Posted by Big Blue on Wednesday, September 10, 2014 3:53 PM

Bish

I love those massive crosses.

Yeah, no mistaking which side was flying this crate, was there?  Smile

  • Member since
    December 2002
  • From: Bury St Edmunds, Suffolk, England
Posted by Bish on Wednesday, September 10, 2014 3:58 PM

Certainly isn't, but just to make sure there's no doubt, there's an extra cross on top of the fuselage as well. The more I see, the more I want one.

How easy will it be to assemble everything without damaging the paint job. That's certainly a different approach, but I can see why you have done it like this.

I am a Norfolk man and i glory in being so


On the bench: Airfix 1/72nd Harrier GR.3/Fujimi 1/72nd Ju 87D-3

  • Member since
    October 2013
Posted by Big Blue on Wednesday, September 10, 2014 4:22 PM

Well, let's wait until after I get it assembled to answer that question!  

I thought about putting the wings on prior to painting, but thought it would be easier to handle in pieces (fuselage streaking, rib& longeron masking, etc.).  The wings on the actual Eindeckers were in fact separate pieces, and were designed to detach from the fuselage for transport like so:

Because of this, I won't have seams to fill since they would exist on the 1:1 model.  The attachment process is pretty simple, so hopefully I will be able to manage without too much difficulty.  KNOCK ON WOOD.

Coming from WWII aircraft, it definitely took a bit to get my head around the construction sequence for these WWI builds.  Because of the rigging, and (usually) the multiple wings, the standard build-then-paint order becomes more of a do-what-you-think-will-be-easiest order, and no two kit and builder combos are likely to be done in the same way.

  • Member since
    December 2002
  • From: Bury St Edmunds, Suffolk, England
Posted by Bish on Wednesday, September 10, 2014 4:30 PM

I know what you mean about the different build sequence. When I did the 0/400 I painted part of it, rigged, and then had to add the rest of the wings and paint those. Its defiantly a case of doing what you think best for you.

I see what you mean about the wings, the kit ones even have those small little tabs on them. And is that the propeller tucked on top of the undercarriage. On your kit I also see bit on the rudder and between the tail that I am guessing are the attachment points, so I think I am seeing how that works. I certainly would not question your approach, it all makes perfect sense from what I can see.

I am a Norfolk man and i glory in being so


On the bench: Airfix 1/72nd Harrier GR.3/Fujimi 1/72nd Ju 87D-3

  • Member since
    April 2005
  • From: Piscataway, NJ!
Posted by wing_nut on Wednesday, September 10, 2014 5:09 PM

Paint, decals, and PE all over the place and all looking very sweet.  Great work guys

Rob, you did a bang up job and that wood grain.  And you are most welcome.  It's always kinda cool when someone take your idea and uses it.  Although I'll betcha it's not original.  If I can think of it... someone else probably already did.Wink

Marc  

JOIN OUR COMMUNITY!

Our community is FREE to join. To participate you must either login or register for an account.

SEARCH FORUMS
FREE NEWSLETTER
By signing up you may also receive reader surveys and occasional special offers. We do not sell, rent or trade our email lists. View our Privacy Policy.