SEARCH FINESCALE.COM

Enter keywords or a search phrase below:

2015 Messerschmitt Bf 109 Group Build

180609 views
2798 replies
1 rating 2 rating 3 rating 4 rating 5 rating
  • Member since
    July 2014
Posted by modelcrazy on Friday, January 23, 2015 5:35 PM

That's a fantastic paint job Doug.

Steve

Building a kit from your stash is like cutting a head off a Hydra, two more take it's place.


http://www.spamodeler.com/forum/

  • Member since
    September 2011
Posted by fightnjoe on Friday, January 23, 2015 5:55 PM

Many thanks for the kind words.  

So much left to do.

Joe

Veterans,

Thank You For Your Sacrifices,

Never To Be Forgotten

Where you can find me:

Workbench on FaceBook  Google Plus  YouTube

  • Member since
    October 2008
  • From: Georgia
Posted by Rigidrider on Friday, January 23, 2015 7:06 PM

Thanks MC... Still a ways to go buy I'm sure I will be starting decals this weekend. (rainy weekend predicted)

Fighting Joe... I have watched a few of your builds and you always amaze! Definitely watching this one take shape.

Joe (Mustang) Found the Great Book of WWII Aircraft on Amazon, and ordered! Cant wait to get it! Thanks for tip!

Doug

When Life Hands You A Bucket Of Lemons...

Make Lemonade!

Then Sell It Back At $2 Bucks A Glass...

  • Member since
    October 2008
  • From: Georgia
Posted by Rigidrider on Friday, January 23, 2015 7:08 PM

By the By... 3 weeks into the GB and its over 900 replies and at 61 pages! Joe does Great GB!!! LOLOL...

When Life Hands You A Bucket Of Lemons...

Make Lemonade!

Then Sell It Back At $2 Bucks A Glass...

  • Member since
    December 2009
  • From: Laurel, MD
Posted by Tucohoward on Friday, January 23, 2015 7:53 PM

Moving along to the smaller parts. They always seem to take as long as the whole rest of the build. Various items including the Eagle Parts spinner and G-factor gear legs which have had an oil wash applied and are drying. This plane the gear doors removed for winter so the G-factor parts will be fairly visible, and definitely stronger. The exhaust shields have been sanded down on the edges for a more scale appearance. The kit exhaust for the F is better than the G and K kits, but still not great, so I am going with Quickboost there.

Jay

The Mighty Mo says no.

  • Member since
    September 2011
Posted by fightnjoe on Friday, January 23, 2015 8:33 PM

Many thanks for the kind words.

To be honest there are some very very talented people in this build.  

Joe

Veterans,

Thank You For Your Sacrifices,

Never To Be Forgotten

Where you can find me:

Workbench on FaceBook  Google Plus  YouTube

  • Member since
    July 2014
Posted by jubya70 on Saturday, January 24, 2015 2:32 PM

Oh I am so bumbed! I have never worked with photoetch before. Well I finally got my cockpit assembled and its total fubar! Super glue everywhere, parts falling off and ate up by the carpet and my fingers stuck together. Does a 109 that smacked the ground after being shot down count as a build? Because that's what mine is gonna look like if I keep this up. Oh well! Can't expect perfection the first time out. I did get all the old paint off the fuselage and I am going to try detailed panel lines, which I have never done either. The cockpit maybe fubar hopefully the rest will turn out good.

Jubya70

  • Member since
    May 2013
  • From: Indiana, USA
Posted by Greg on Saturday, January 24, 2015 3:24 PM

FWIW, I like to use dilute white acrylic glue (I prefer Gator's grip) for cockpit PE.

I know a lot of folks use CA with PE, but the unforgiving nature of boo-boos and too-fast-for-me set time makes it my last resort.

In the meantime, ain't PE fun? Stick out tongue (it actually kinda is once you get the hang of it, and you will)

  • Member since
    December 2004
  • From: Houston, Texas
Posted by panzerpilot on Saturday, January 24, 2015 3:42 PM

jubya70

Oh I am so bumbed! I have never worked with photoetch before. Well I finally got my cockpit assembled and its total fubar! Super glue everywhere, parts falling off and ate up by the carpet and my fingers stuck together. Does a 109 that smacked the ground after being shot down count as a build? Because that's what mine is gonna look like if I keep this up. Oh well! Can't expect perfection the first time out. I did get all the old paint off the fuselage and I am going to try detailed panel lines, which I have never done either. The cockpit maybe fubar hopefully the rest will turn out good.

I think we've all been there (and sometimes still are). Hang in there! Greg is right. Try to use white glue where you can. Also, try making a little homemade super glue adapter. I took a small needle, stuck it in a pencil eraser, then cut the eye of the needle in half. It gives you much more control of the super glue. You could try a 'thicker' super glue, which they sell at hobby lobby and other places. Also, a little PE bending tool is invaluable.

-Tom

  • Member since
    October 2008
  • From: Georgia
Posted by Rigidrider on Saturday, January 24, 2015 4:32 PM

Like the applicator tool Tom!

Jubya... I actually found out how far one could fly one time after a PE session. LOL... (not very far nor is that action recommended)

Doug

When Life Hands You A Bucket Of Lemons...

Make Lemonade!

Then Sell It Back At $2 Bucks A Glass...

  • Member since
    December 2002
  • From: Bury St Edmunds, Suffolk, England
Posted by Bish on Saturday, January 24, 2015 6:18 PM

Doug, ye, that's the book. Not heard of the Flying Colours book. I do have two on German fighter profiles and I am sure theres one in there as well.

I am a Norfolk man and i glory in being so


On the bench: Airfix 1/72nd Harrier GR.3/Fujimi 1/72nd Ju 87D-3

  • Member since
    December 2002
  • From: Bury St Edmunds, Suffolk, England
Posted by Bish on Saturday, January 24, 2015 6:20 PM

Yep, those small parts can be a real pain jay.

jubya, yep, all been there. Takes some time to get used to, but I couldn't be without some PE now.

I am a Norfolk man and i glory in being so


On the bench: Airfix 1/72nd Harrier GR.3/Fujimi 1/72nd Ju 87D-3

  • Member since
    September 2003
  • From: Northern hemisphere - most of the time-
Posted by blkhwkmatt on Saturday, January 24, 2015 6:50 PM
Well, Decals are progressing on Yellow 2, you will notice that I had applied what turned out to be an incorrect '2' as it did not have the black outline as seen in the few pictures. So, after returning from vacation it took several hours of gentle prodding to get the old decals off, but thankfully they did, and was able to get the correct ones in place.  In this picture you can see my rendition of Steigler's personal markings "Eva" with the apple and worm below it. This was hand painted as best I could using the limited references that are available.  And here it sits after the correct markings have been placed on the bird.   It took three separate decal sheets to source the markings. Really would like to have these in this scale instead of 1/48th. And now, here is the first build for this GB, although I have not determined if I will be finishing it as Yellow '1' or '15' yet.   Thanks for looking,

Quidquid latine dictum sit, altum videtur!!! - Anything said in Latin sounds profound!


  • Member since
    December 2004
  • From: Houston, Texas
Posted by panzerpilot on Saturday, January 24, 2015 7:25 PM

Nice job on yellow 2! Had you already sealed the decal when you decided to change it? scotch tape works great for removing decals, I've found.

I got my mug today!

-Tom

  • Member since
    September 2003
  • From: Northern hemisphere - most of the time-
Posted by blkhwkmatt on Saturday, January 24, 2015 8:07 PM

Tom,

I hadn't sealed them yet , but had used solvaset on them and then they had been on the model for about a month.  Took several hours of using scotch tape to get them off.

Love the mugs!!

<Matt

Quidquid latine dictum sit, altum videtur!!! - Anything said in Latin sounds profound!


  • Member since
    December 2004
  • From: Houston, Texas
Posted by panzerpilot on Saturday, January 24, 2015 10:05 PM

I was busy with the eduard mask and Mr. Surfacer today.

My personal technique to battle dust bunnies is to run the paint booth for 10 minutes or so to try to suck as much dust out of the room as I can before painting. I wipe the model down with a paper towel dampened with 91% alcohol, then use a can of compressed air to blow off any remaining dust.

-Tom

  • Member since
    September 2011
Posted by fightnjoe on Saturday, January 24, 2015 11:30 PM

Wow.  

One thing I am above all else is a fan of beautiful scale models.  I have never been to a show but I intend to go in the future to see the fantastic work that is on show.  

Absolutely fantastic work all the way through in this thread.  I feel a bit out of my element as all of you show such polished work.  My work cannot be considered polished by any means.  

As one so truthfully put it, what wonderful eye candy.

Joe

Veterans,

Thank You For Your Sacrifices,

Never To Be Forgotten

Where you can find me:

Workbench on FaceBook  Google Plus  YouTube

  • Member since
    May 2014
Posted by Sackgasse on Sunday, January 25, 2015 5:45 AM

Hi,

Sitting 2500Km from home base and realize that I left the drawing on the kitchen table.

Could anyone help out?

Trumpeter 02296 BF109G-6 Early 1/32.

Found a set of PE from Eduard at 75% discount (32658 Bf109E-3), can I make any use of it on the G-6?

Zack

BTW, you guys are posting excellent stuff, this thread is such an inspiration!

Happy Modeling! Cool

  • Member since
    March 2012
  • From: Corpus Christi, Tx
Posted by mustang1989 on Sunday, January 25, 2015 6:42 AM

jubya: .As was said, we've all been there. Just remember to take things slow and your first build doesn't necessarily have to be laced with PE. The point is to enjoy yourself at whatever skill level you are at currently. Don't rush things as your skills, as with alot of us here, will improve. In short, youre gonna be ok so hang in there pal.Wink

Doug: Glad you found the book and thank you for your vote of confidence in my......excuse me...you guys GB. If it weren't for you all there wouldn't be a GB so thank all of you for participating.

Jay: Keep it coming man. You're doing awesome!!Yes

Zack: The seat belts might work but I'm not for sure. Stay tuned........one of the true experts will respond to that drawing and the PE questions.

Tom: Good progress so far man. Looking forward to the paint. BTW you were right.........those DVD's are the bomb! 

Joe: If you ever go to a show that I'm around let me know. I'll have to see your builds in person!Indifferent

Matt:Thats a good lookin' build man! I'm very much looking forward to that Eduard kit build!! Yes


 Forum | Modelers Social Club Forum (proboards.com) 

  • Member since
    October 2008
  • From: Georgia
Posted by Rigidrider on Sunday, January 25, 2015 7:23 AM

Fightin Joe... as with every artist, We all see and interpret things differently. Some builders wouldn't think of dirtying up a plane like I do and make them pristine without a scratch, I like realism and strive to be as accurate as possible, You show the inner aircraft and its workings. I think your work looks great.

You keep building as you see... Like Mustang Joe said , we all build at out own skill levels and enjoy. Shoo helping me to work up the courage to try a skeletonize a kit like you do. I have a lot of books and the drawings but lack the skill.

Joe, (mustang) Your right, that its a "Group Build" but without the "Gravity" to hold it together ie: You and Clemens... The Galaxy flies apart!

Jubya Hang in there Bud... We live and learn, and as my dear departed Granddad used to tell me when I was just a little boy...If you don't make mistakes you don't learn, and another was ...,Do nothing , Learn nothing. I still remember and can here him, even now after all those years, and I try to pass on that sage wisdom whenever appropriate. Your in the right group to learn. The thing I like here is, I may tell you one way, Joe may tell you another, Tom will tell you his way. Neither is wrong, and its up to you to decide which if either idea to try, you will likely develop your own ideas.

Take care all

Doug

When Life Hands You A Bucket Of Lemons...

Make Lemonade!

Then Sell It Back At $2 Bucks A Glass...

  • Member since
    October 2008
  • From: Georgia
Posted by Rigidrider on Sunday, January 25, 2015 8:13 AM

OK, Morning all! Had a good peaceful day yester day, so I was able to get a lot done...

Sorry but once I get rolling on the decals and weathering, I have to force myself to remember to stop and take pictures. So I haven't stopped enough to explain my choices,,, sorry again.

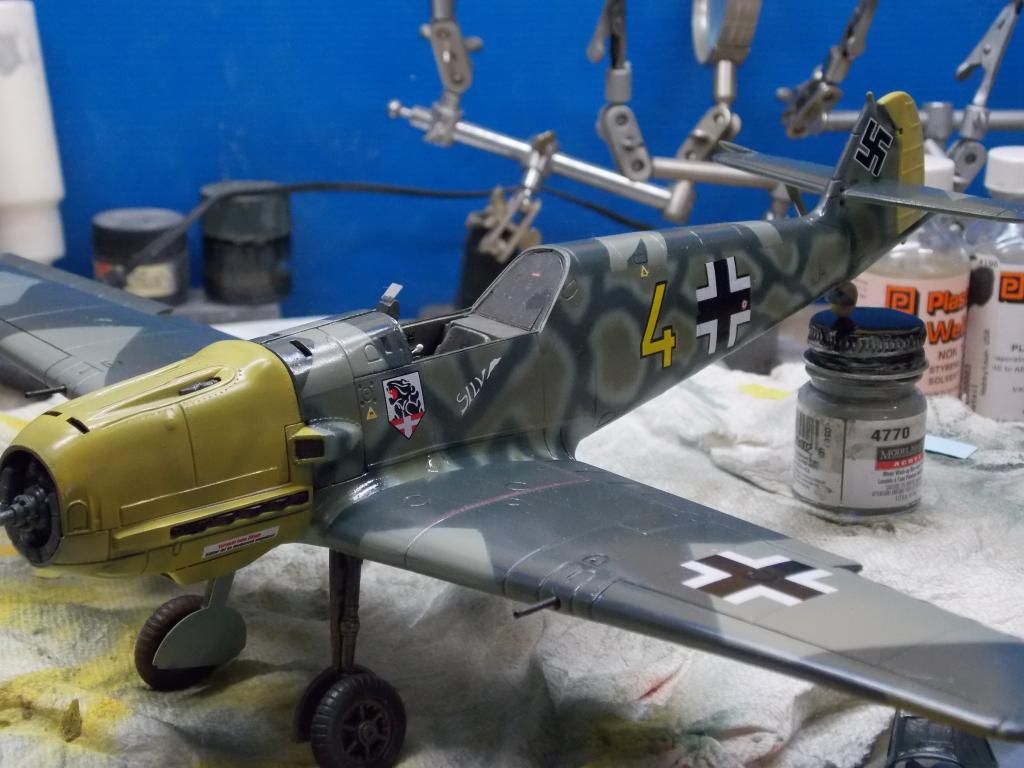
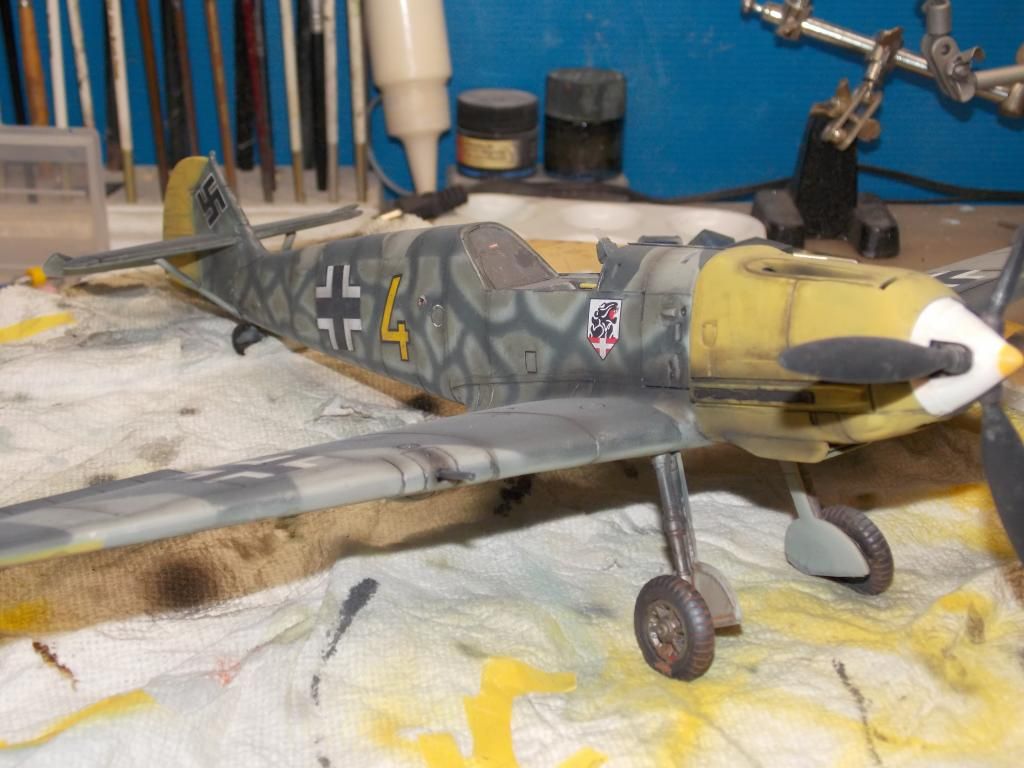
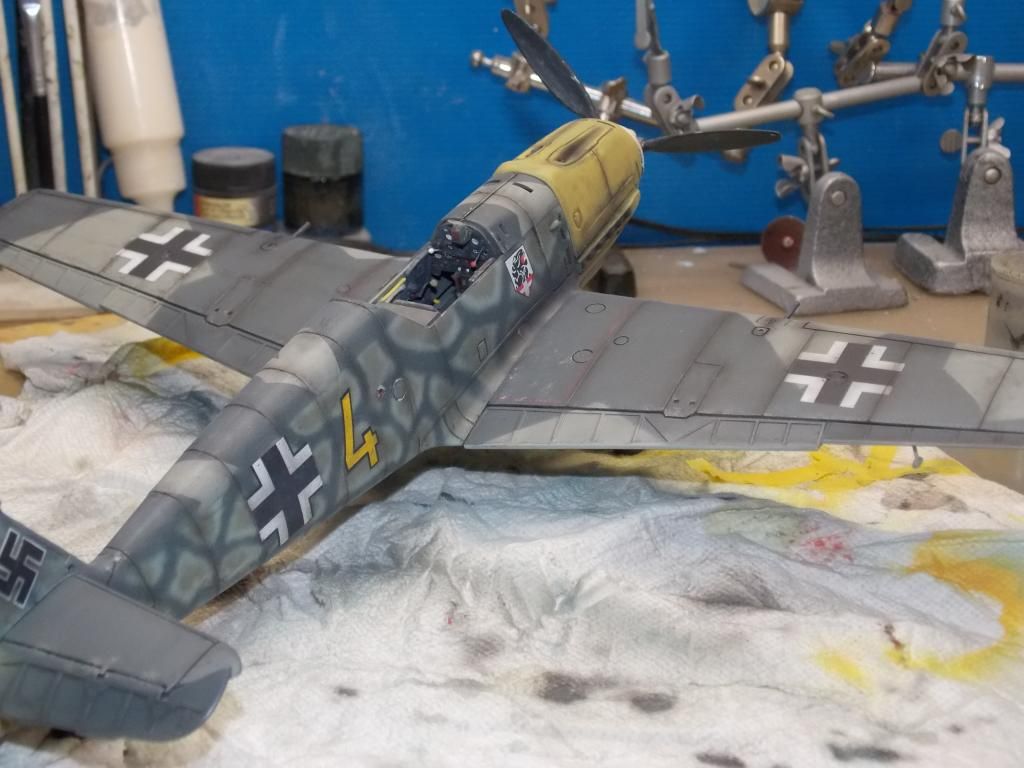
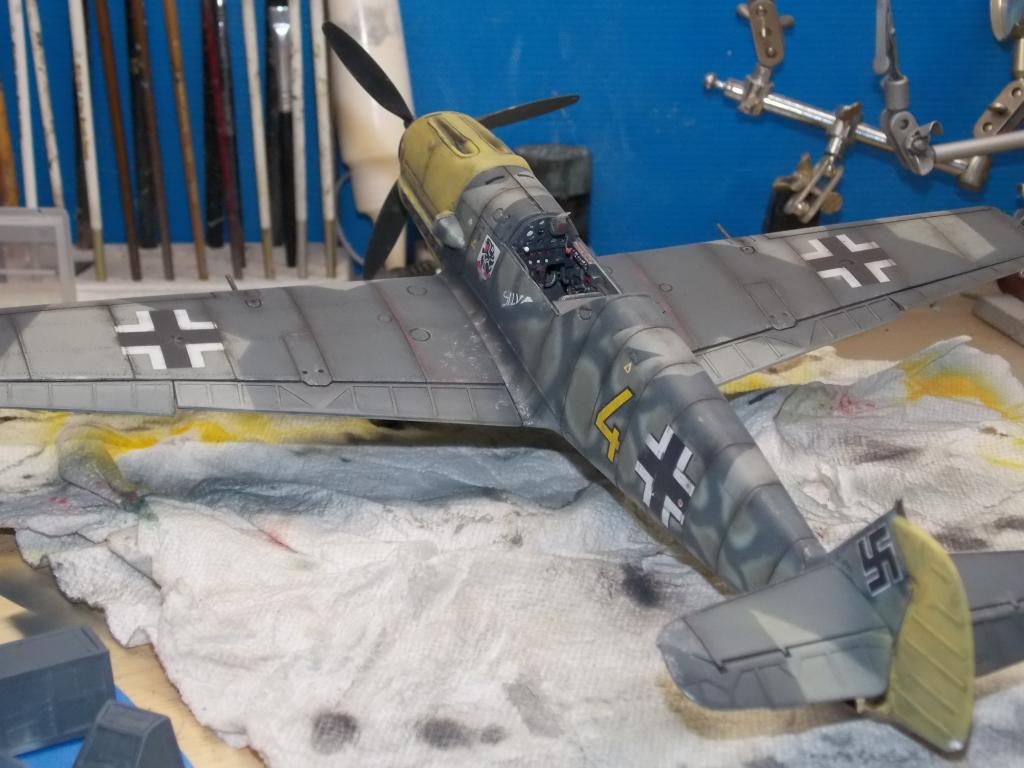
I've started into the weathering now, and you can see, and it will become more apparent later. Exhaust stains, chipping and hilites. Whats different here is I'm not using any liquid washes this time, I read up and thought I'd try to use dry pigments.

 What I read was to ust AK Interactive pigments which I'm sure are the best there is, But at about $9 bucks a bottle (about the size of a nose spray bottle) I had to find another way. I stopped by the local Hobby Lobby, and Michaels Craft stores and picked up some artists chalks in basic and fall colors, took a piece of 1000 grit sand paper and sanded pieces as needed into dust, Taking a still bristle brush , dusting sandpaper with it, produced a small pile of chalk dust.

The chalk dust is applied with a size appropriate chisel shaped brush. It takes a while longer then washes, being you have to brush dust into every panel line and recess but I like the results. Being a first attempt I know I have much to learn about the application, but all in all I think it came out pretty believable. Of course after this process you have to apply the Dull coat, and don't forget to dull down the sheen of the decals with a about a few drops of grey in an alcohol mix (my choice of paints).

Again guys, This is just my way of doing and there are many other tried and true methods, More later...

Take care all! Have a great building day!!!

Doug 

When Life Hands You A Bucket Of Lemons...

Make Lemonade!

Then Sell It Back At $2 Bucks A Glass...

  • Member since
    December 2002
  • From: Bury St Edmunds, Suffolk, England
Posted by Bish on Sunday, January 25, 2015 9:37 AM

Sack, I don't think there was to much difference between 109 pits as the aircraft evolved. But, personally, I think there is enough to make a difference. One thing I like about Eduard is that you can check out the instructions on there website, I always do this now before buying any of there sets. These are the links for the set you mentioned and the one designed for your kit.

www.eduard.com/.../32683.pdf

www.eduard.com/.../32726.pdf

Open them in two tabs and you can do a good comparison. The one for the G-6 sells for the same as the one for the E, but of course I don't know if you can get the same discount. If it was me, I would go for the correct set anyway, just makes things a lot easier.

I am a Norfolk man and i glory in being so


On the bench: Airfix 1/72nd Harrier GR.3/Fujimi 1/72nd Ju 87D-3

  • Member since
    February 2003
  • From: Rothesay, NB Canada
Posted by VanceCrozier on Sunday, January 25, 2015 9:51 AM

Love that camo work  Rigidrider. I've never tried the chalk weathering before but it looks very convincing from here. Well done sir.

On the bench: Airfix 1/72 Wildcat; Airfix 1/72 Vampire T11; Airfix 1/72 Fouga Magister

  • Member since
    December 2004
  • From: Houston, Texas
Posted by panzerpilot on Sunday, January 25, 2015 10:05 AM

Well done, Doug. That's looking really good! Nice job with the chalks.

-Tom

  • Member since
    May 2013
  • From: Indiana, USA
Posted by Greg on Sunday, January 25, 2015 10:29 AM

Jay, tiny bits looking good.

Matt, you're coming right along. I'm REALLY impressed with the hand-painted logo. And glad you were able to remove the incorrect "2's".

Tom, I've never used Mr Surfacer from a rattle can before, and my experience with Mr Surfacer is limited anyway. Holy Cow, the finish on that primer looks outstanding. I think I'll try a can myself.

Doug, holy cow is that coming out great. I already said I'm in awe of your 'roadmap' camo',but man does the gelb, decals and weathering compliment it.

I'm curious, did you buy artists chalks or artists pastels? I used to use one or the other back in my HO days, can't remember. Have some pastels but haven't experimented with them much yet. I'd love to try some AK washes, but the price (and availability which has been awful when I've looked) have dissuaded me to date too.

  • Member since
    December 2004
  • From: Houston, Texas
Posted by panzerpilot on Sunday, January 25, 2015 10:47 AM

Thanks, Greg. I'd be hard pressed to use anything else. It goes on very smoothly, almost like a fine mist, and is pretty forgiving. Even in areas where you may think you overdid it, it still dries very thin.

-Tom

  • Member since
    May 2013
  • From: Indiana, USA
Posted by Greg on Sunday, January 25, 2015 10:51 AM

Thanks for your input, Tom. When it comes to priming," forgiving" is just what I need!

  • Member since
    June 2014
Posted by BrandonK on Sunday, January 25, 2015 11:03 AM

Doug, that is very impressive. Now I have myself wondering if I should give chalks/pastels a go. Hmm.

Nice work, that is one very nice looking 109.

On the bench:

A lot !! And I mean A LOT!!

2024 Kits on deck / in process / completed   

                         14 / 5 / 2  

                              Tongue Tied

  • Member since
    December 2002
  • From: Bury St Edmunds, Suffolk, England
Posted by Bish on Sunday, January 25, 2015 11:43 AM

That's looking really nice Doug, and an interesting use of pastels. I have been using them for years on armour and even though I now use pigments, the chalk pastels are really handy. But you may have a problem. Pastels vanish under the varnish coat. The usual trick is to apply them after everything else. This in turn causes its own problem, namely handling and cleaning the model can mean you end up with no chalk.

One trick that does help is to add the dust into a small pot of water and then add it like a wash. While they are not as effective as pigments, it does give a more lasting finish than applying dry dust.

I am a Norfolk man and i glory in being so


On the bench: Airfix 1/72nd Harrier GR.3/Fujimi 1/72nd Ju 87D-3

  • Member since
    October 2008
  • From: Georgia
Posted by Rigidrider on Sunday, January 25, 2015 1:41 PM

Thank you all for the kind words...

Greg, they are indeed pastels, and the ones mainly used were the fall colors , various shades of brown and yellows and oranges, and of course some black and browns from the basic set.

Bish your right about the AK pigments "Lightening" under the dull coats of the Clear. After experimenting abit, I chose the 1000 to 1200 grit sandpaper because it grinds the chalks to that density and consistence, where the AK pigments are actually finer then talcum powder which makes it very easy to apply but is VERY easily absorbed by the top coat as it dissolves. at the 1000 grit consistence by adding a touch of black to the browns I was using to darken a bit more then I actually want, the absorption (due to the larger particles of powder) is slower and off set by the faster drying of the alcohol I use to thin with, and the darker pigment, making it like the pictures show after the Dull coat has been applied.

You are right, the first application virtually disappeared when the top coat was applied. Thats when I started experimenting.

Doug

When Life Hands You A Bucket Of Lemons...

Make Lemonade!

Then Sell It Back At $2 Bucks A Glass...

JOIN OUR COMMUNITY!

Our community is FREE to join. To participate you must either login or register for an account.

SEARCH FORUMS
FREE NEWSLETTER
By signing up you may also receive reader surveys and occasional special offers. We do not sell, rent or trade our email lists. View our Privacy Policy.