SEARCH FINESCALE.COM

Enter keywords or a search phrase below:

The 2015 /16 Red Hot and Rollin Automotive Group Build--Ended

120400 views
2225 replies
1 rating 2 rating 3 rating 4 rating 5 rating
  • Member since
    March 2012
  • From: Corpus Christi, Tx
Posted by mustang1989 on Monday, February 2, 2015 8:48 AM

Bonus build time today! I'm off so I finished the front seats. I disassembled both original seats, removed flash, filled seams, painted and topped 'em off with a semi-gloss clear coat. I had tried a wash after painting and didn't like it so I repainted over it and then the semi-gloss clear. 


 Forum | Modelers Social Club Forum (proboards.com) 

  • Member since
    November 2013
  • From: Jerseyville, ON
Posted by elass0wyp0 on Monday, February 2, 2015 1:08 PM

We had some heavy white stuff drop on us last night so it's dead in the store today.  Good and bad, good I get to update you fine gentlemen on my build so far but bad because I'm gonna go out of business if no one comes in to see me. 

Anyway, onto the update.  Sorry for the amount of pics, I don't think dial up exists anymore so it shouldn't be too much of a problem for anyone but I was over due so it had to be done.  :)  Thanks for understanding.

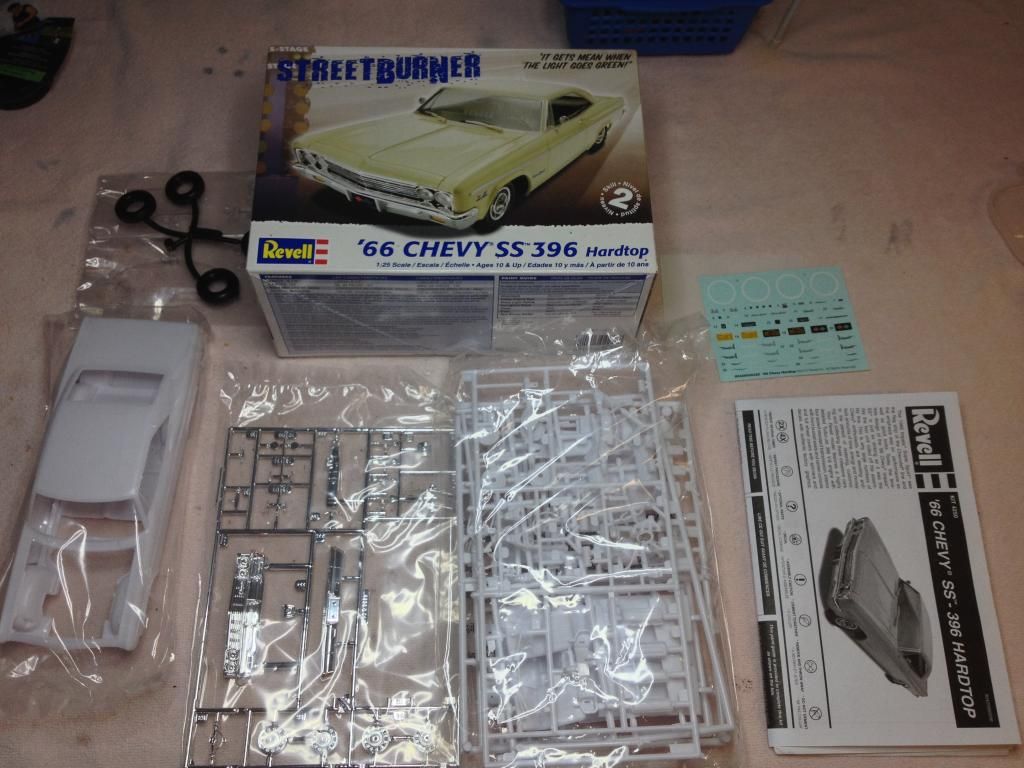
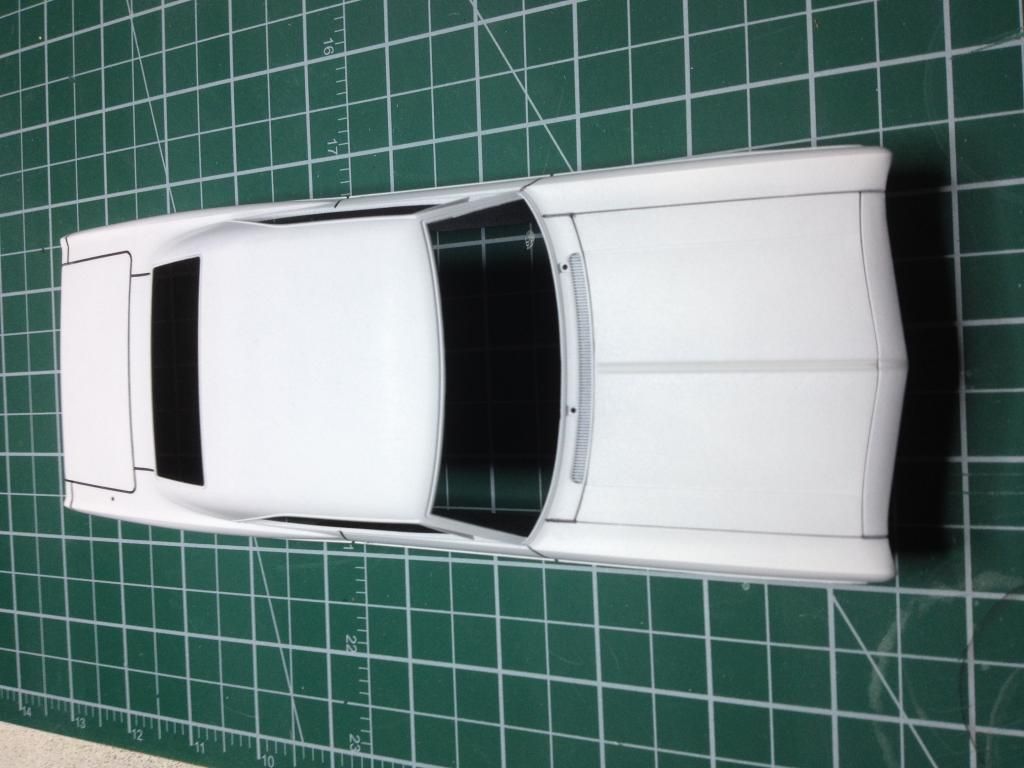
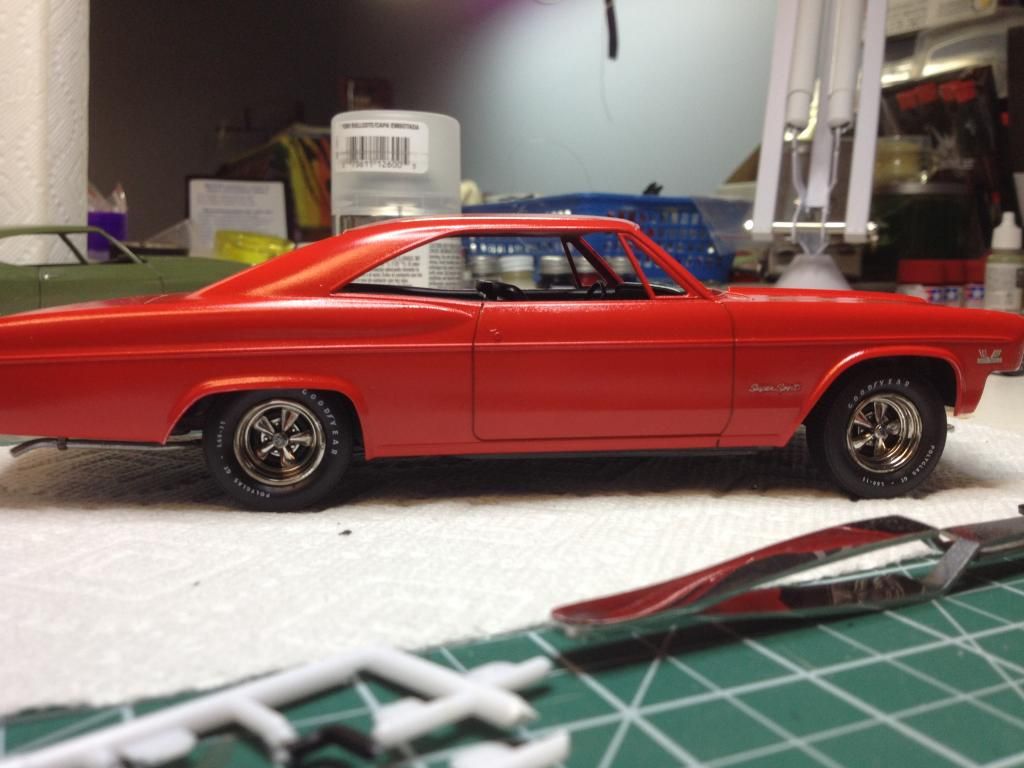
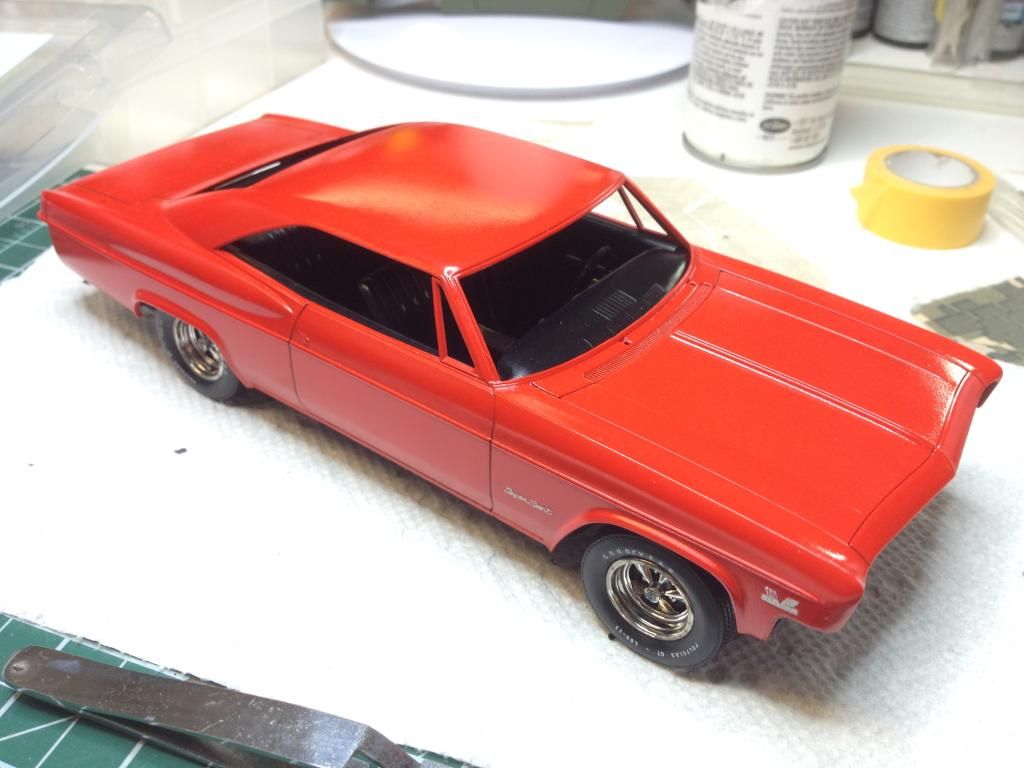
The '66 Chevy SS 396 Hardtop.  Molded in white, going to be Vallejo Lightning red (I think).

Some white primer and body lines with a fine pen.  I've been trying to build up body lines as I paint, not sure it's working yet but I simply can't do it afterwards. I'm too shaky and fudge it up. lol  I read someone suggested doing it this way so I'm trying it.

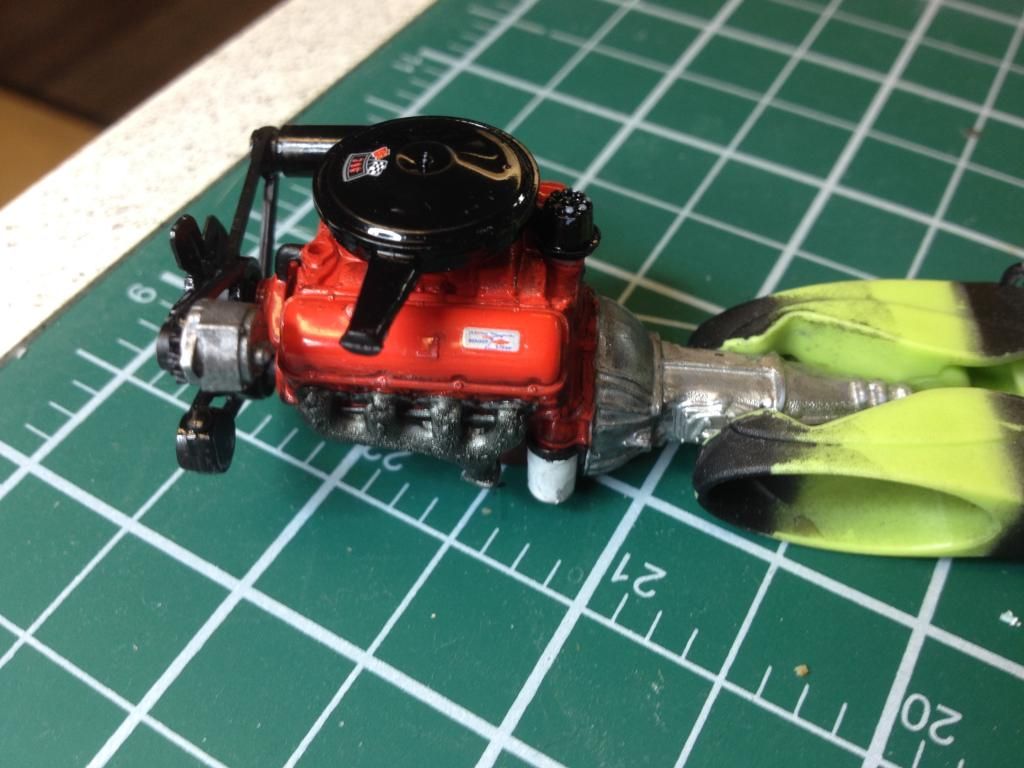
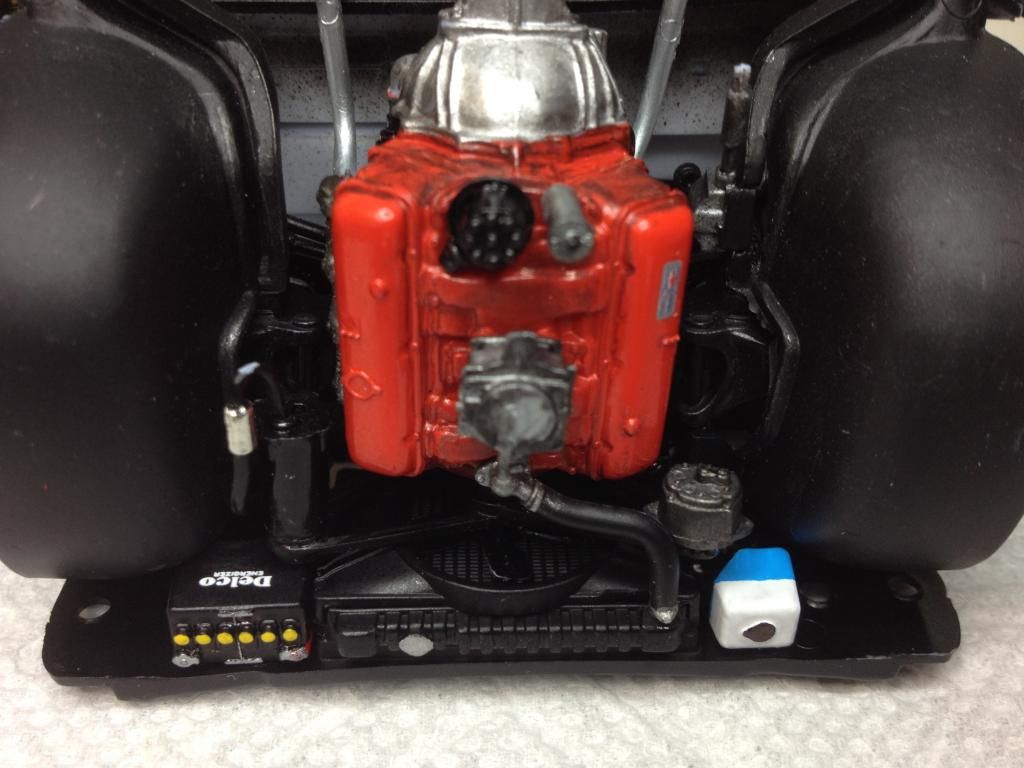
the 396, next time I do an engine I'm going to paint it black and dust the chevy red on like Mustang detailed in his build.  I think that's the real key to getting the colour to look accurate.  I think it was mustang who did the engine that way-sorry if I miss credited.

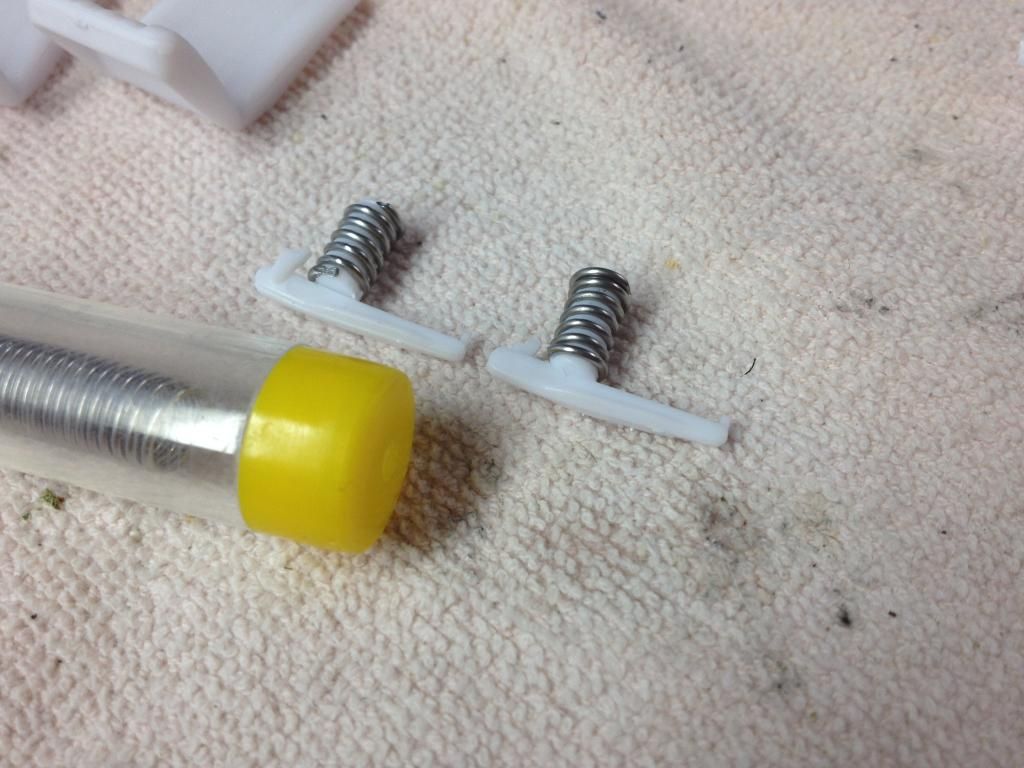
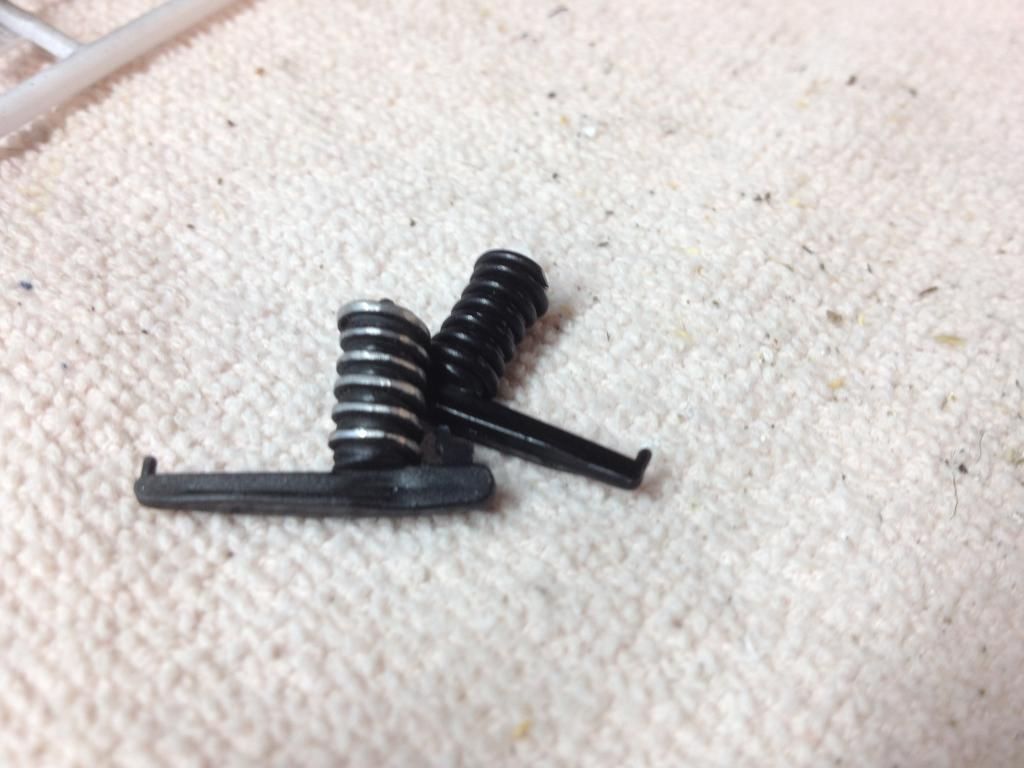
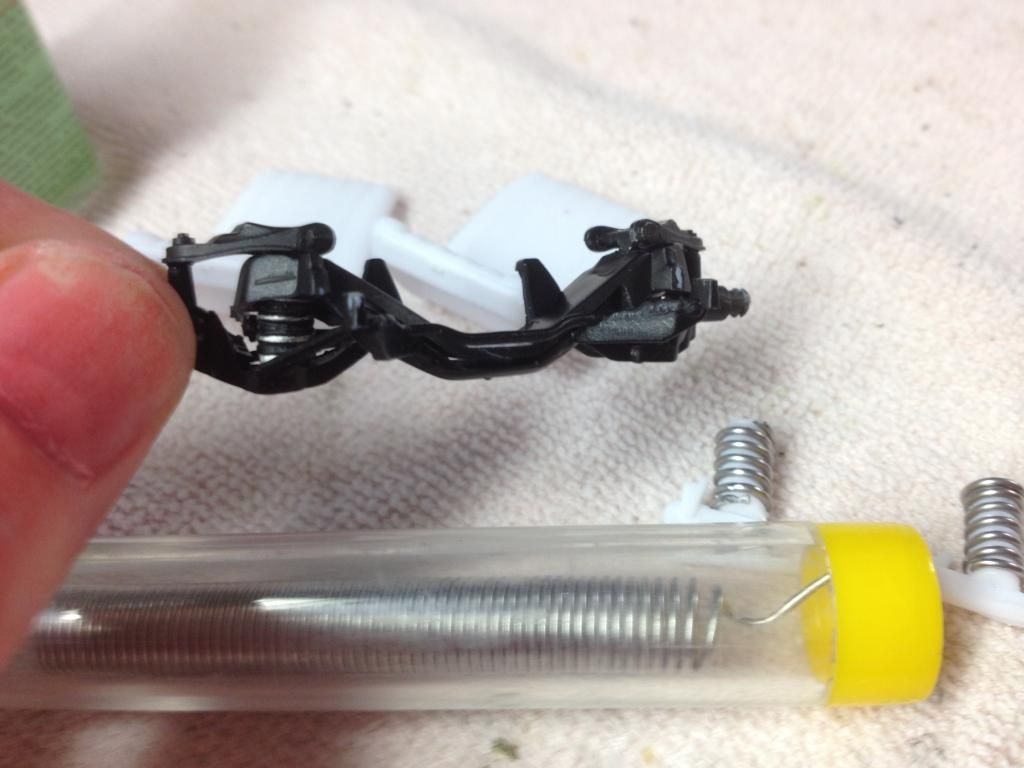
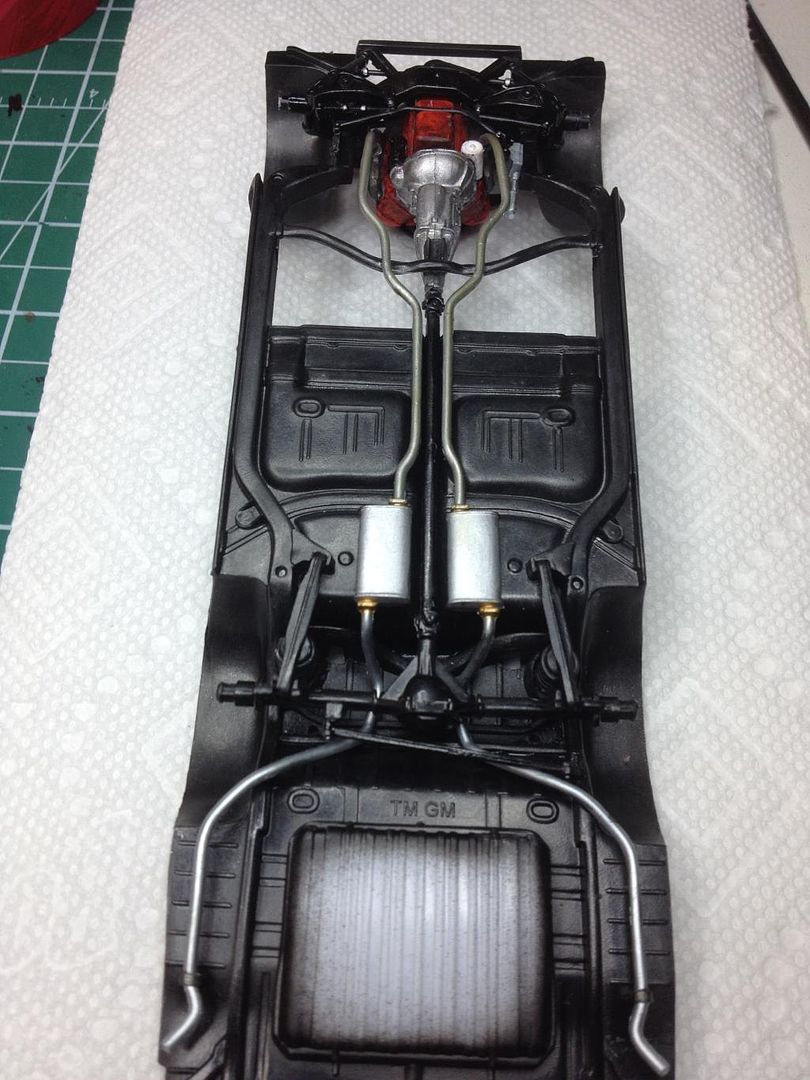
I did this thing where I wrapped thin solder around the springs, then painted them flat black and scraped off the paint to show the solder.  It turned out pretty good, I'm not sure how scale it looks but it seems like just enough extra detail to show the suspension a bit.

The backs look better than the front but you can just see them peeking out a bit.

So I snagged a set of Cragars from another kit, I'm not sure the ploy gt tires are accurate but they look much better than the stock steelies with hubcaps.  I read an article where the dood painted the rims with Tamiya smoke to make the chrome less toy like so I tried that.  They look pretty nice.

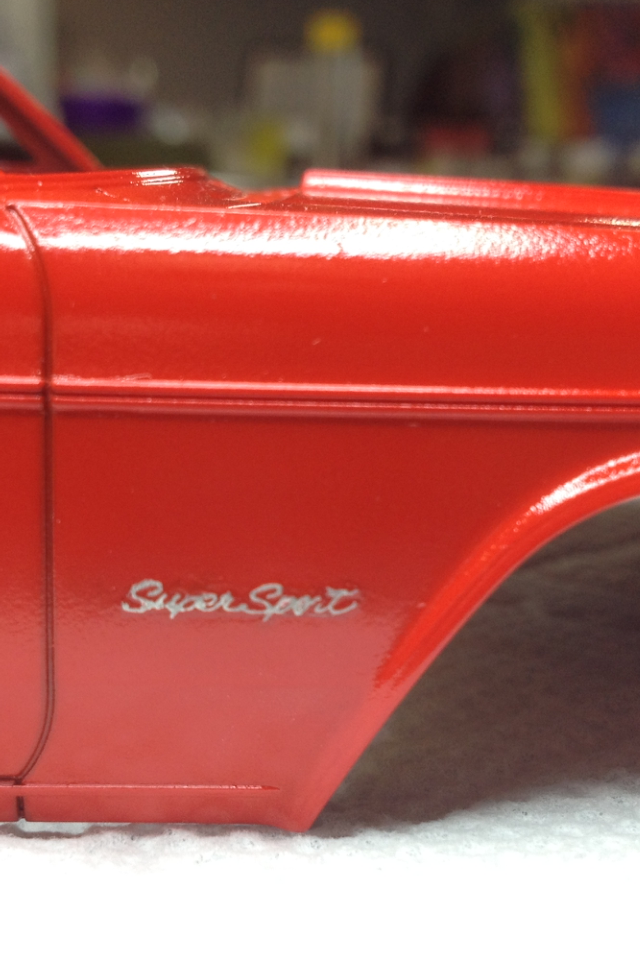
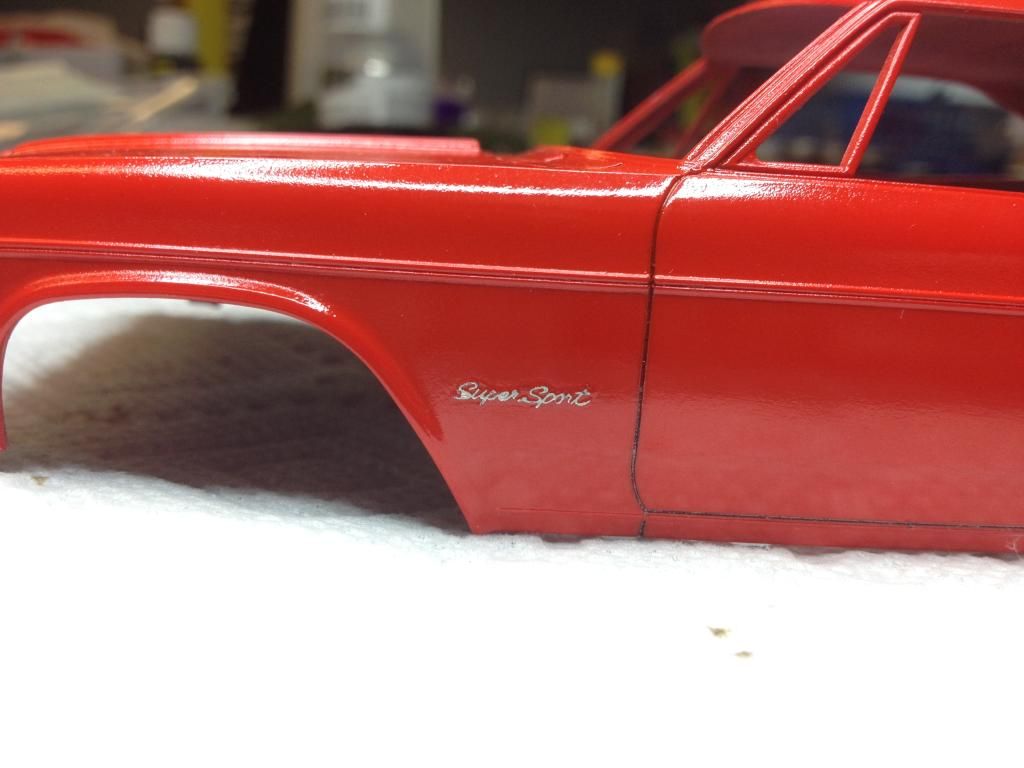
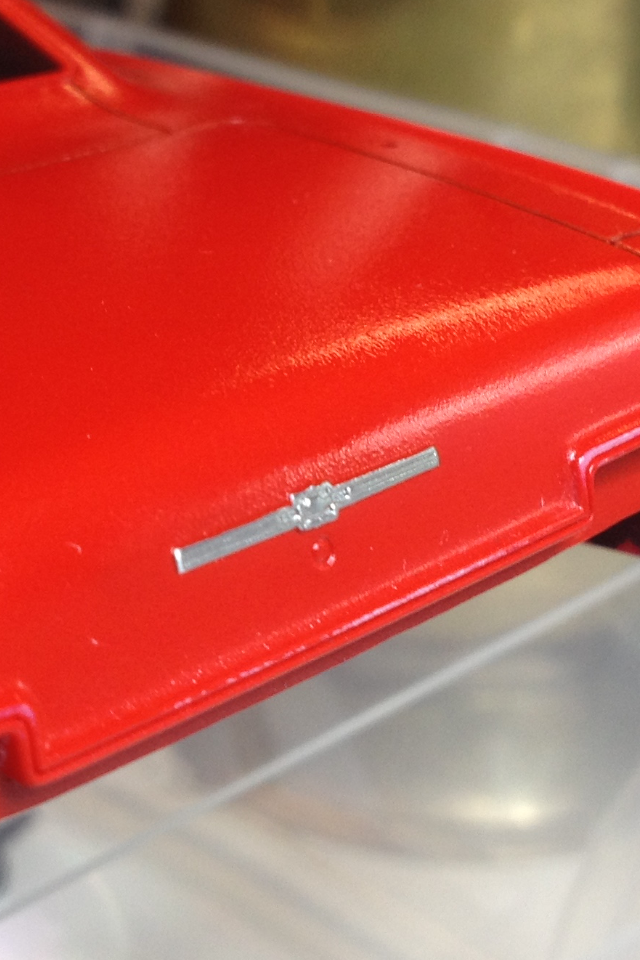
I read another article about 'reverse bare metal' I believe that was what it was called.  Anyway, the technique was to lay the bmf on the primer before the paint, then scrape away the paint revealing the scripting.  It was really easy and I think it turned out pretty great for a first attempt.  I did both fender scripts/flags and the badge along the trunk.

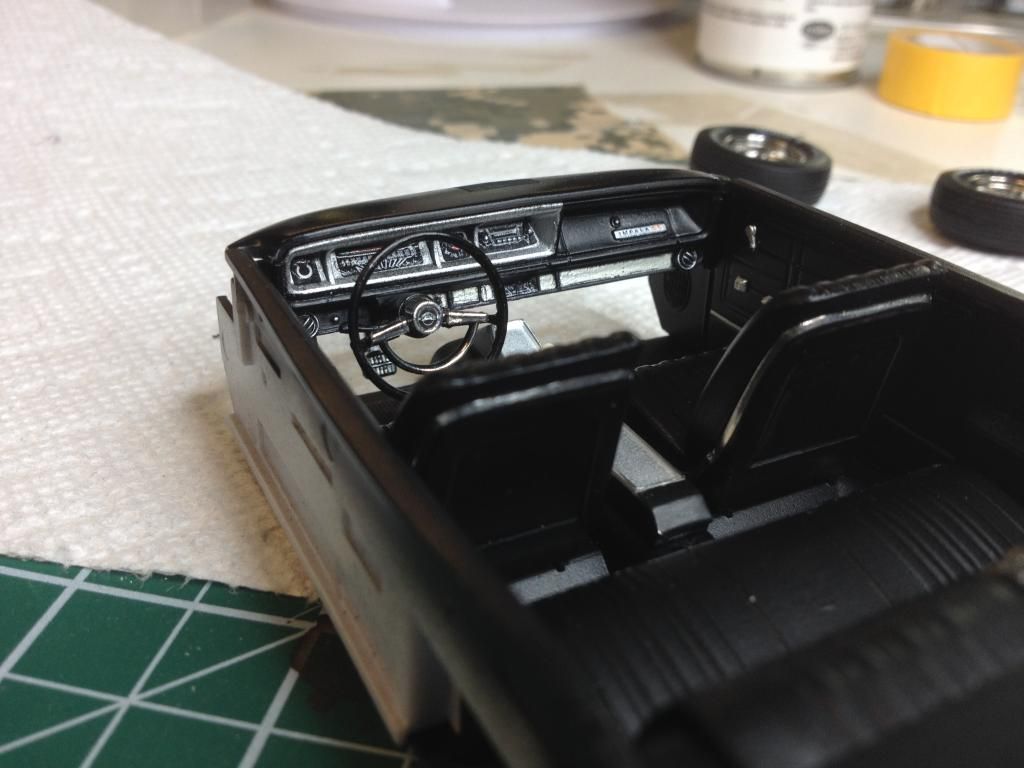
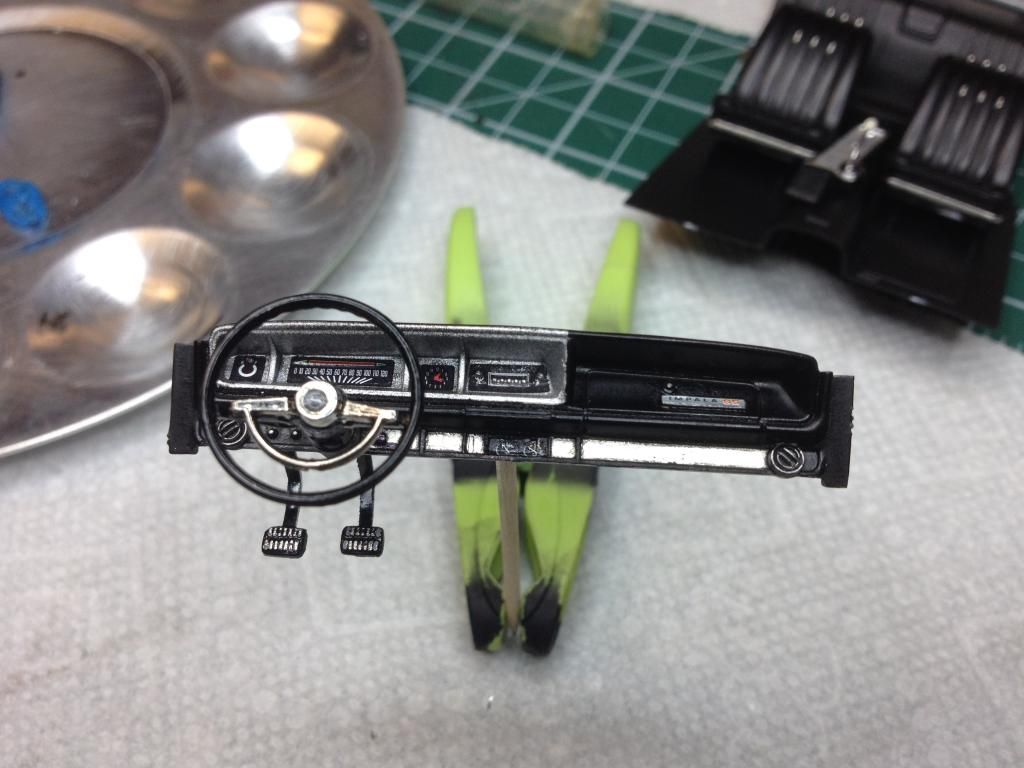
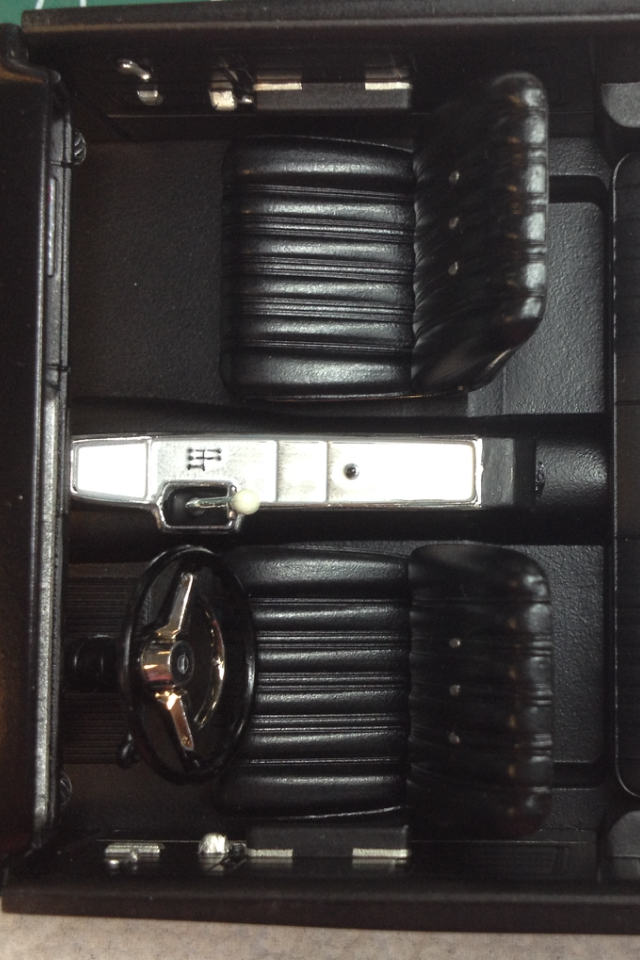
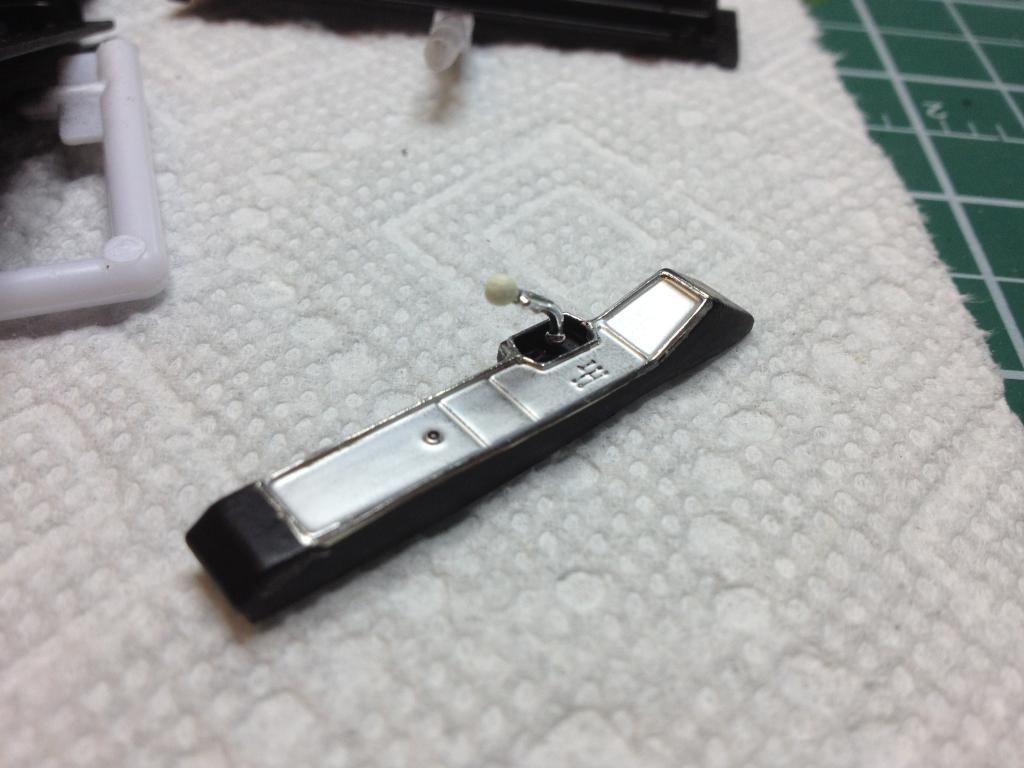
Interior, I think I've shared these already.

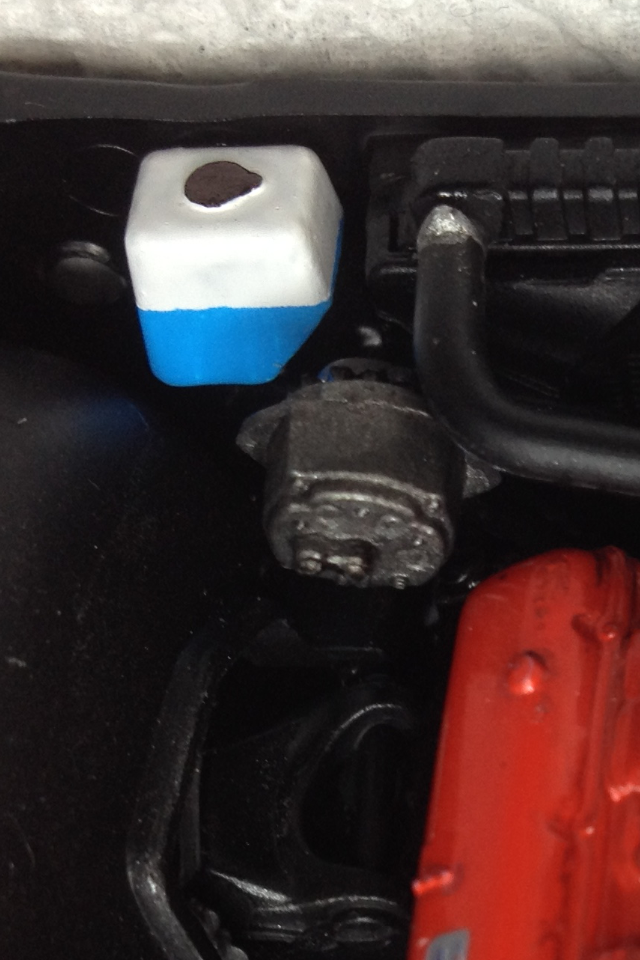
Under carriage.  I tried the rust flaking thing on the tank.  It turned out ok, then I messed with it and ruined it, then I fixed it and it looked ok, then I ruined it again, then I fixed it again.  I think it's still in ruined state now, I am not calling it a success just yet. 

Test fitting.  I had to shorten the axle a bit to tuck the rears under nice.

I'm not sure why this set turned out upside down but you get the idea.  I fixed a few in photobucket.

And that's how she sits today.  I just started some bare metal on the body then some a/c lines need to be painted up for final assembly.  I still have a couple weeks before I can get any significant damage done.

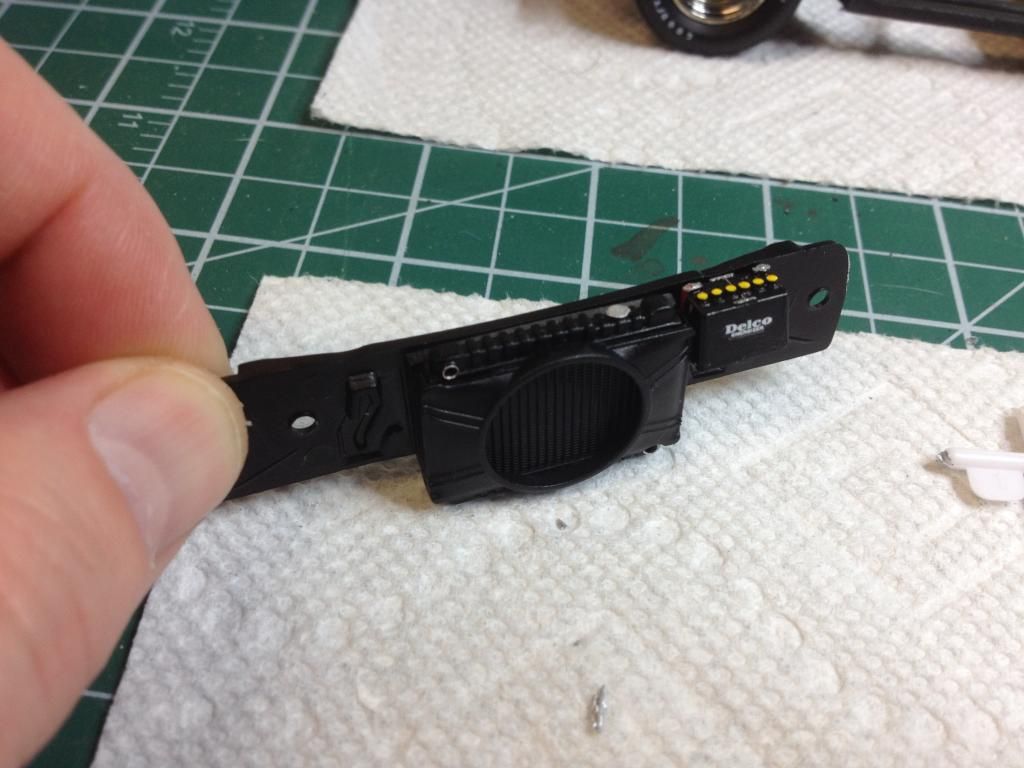
I didn't share any of the brake booster pics.  Hey now I have something to add tomorrow :)

More crappy pics in a photobucket slide show here: http://s293.photobucket.com/user/elass0wyp0/slideshow/Scale%20Models/Revell%201966%20Chevrolet%20Impala%20SS%20396%20Hardtop?sort=3

Thanks for reading and sorry again for the length.

Gordy

  • Member since
    January 2012
  • From: Hatfield
Posted by Misty on Monday, February 2, 2015 1:20 PM

does this GB cover F1 cars and moto gp bikes too?

  • Member since
    November 2013
  • From: Jerseyville, ON
Posted by elass0wyp0 on Monday, February 2, 2015 1:41 PM

Anything with wheels as far as I know.  Join in.  I'd be interested to see a bike build.

  • Member since
    March 2012
  • From: Corpus Christi, Tx
Posted by mustang1989 on Monday, February 2, 2015 2:20 PM

Hey there Gordy! I've seen that coil spring fabrication on another site and that's a great idea!! That was me starting off with a flat black engine long block and stepping the shades of paint up to where I thought looked best.

  I painted my windshield washer reservoir bottle up like yours up as well with one minor difference(this is for future builds BTW) in finishing. I started with a white bottle and painted the blue as you did. After that I mixed up some flat clear coat with a drop or two of white mixed in and shot the reservoir again. This gave the fluid an "inside the plastic container" look.  Your build is going to look great man! Keep up with the pics!! Yes

Misty: Go for it on the the F1's and bikes. Just lemme know what you want to build and you're in!Cool


 Forum | Modelers Social Club Forum (proboards.com) 

  • Member since
    January 2015
Posted by MOPAR - D on Monday, February 2, 2015 7:54 PM

Joe nice touch on the seats and the exhaust looks good.

Gordy your Chevy is taking shape. I like the stance and wheels you have on it.

  • Member since
    January 2015
Posted by taaron76 on Monday, February 2, 2015 8:00 PM

Not a whole bunch of updates on the '66 Shelby, but I got a little bit done.  I'm stripping the chrome off of a few parts and then will get them painted.  Finished up some of the rear suspension and started on the engine.  I still have a lot to do, but I'm trying the graphite technique on the chassis to see how it comes out.  Hopefully more updates tomorrow.  Slow steps on this one... busy as can be as of late.

Tim

  • Member since
    March 2012
  • From: Corpus Christi, Tx
Posted by mustang1989 on Monday, February 2, 2015 8:34 PM

Thanks Dan!!!!

This looks great Tim!! PM sent bubba! 


 Forum | Modelers Social Club Forum (proboards.com) 

  • Member since
    January 2014
Posted by Seabe on Monday, February 2, 2015 9:18 PM

It does, Misty! I am just building so slowly compared to these other guys that you don't see any coverage!

Looking great, Gordy!

  • Member since
    January 2012
  • From: Hatfield
Posted by Misty on Tuesday, February 3, 2015 12:23 AM

Okay, can I join with a 1/20 tamiya mp4/13  plus top studio upgrade set plz?

  • Member since
    April 2005
  • From: Australia
Posted by taxtp on Tuesday, February 3, 2015 5:36 AM

It's great to see you are doing an F1 Misty. I'll join you a bit later in the year. Maybe after the season starts and I get all enthusiastic.

Gordy - The Chev looks fine. I love your detail work.

Tim -  I was a Mustang enthusiast for many years, and now I think I am again.

Mustang - thanks for updating the roster

Cheers

Tony

I'm just taking it one GB at a time.

  • Member since
    March 2012
  • From: Corpus Christi, Tx
Posted by mustang1989 on Tuesday, February 3, 2015 9:34 AM

taxtp
Mustang - thanks for updating the roster

No prob Tony! Big Smile

Misty:You're now added to the roster and set to go...........and the answer would be "yes".Yes


 Forum | Modelers Social Club Forum (proboards.com) 

  • Member since
    January 2014
Posted by Seabe on Tuesday, February 3, 2015 10:11 AM

Looking forward to that build, Misty! I did one OTB when they were released. Still have a "Japan version" of that kit to do. Think with some extra hardware as well...

BTW - I actually (don't all start laughing at once!) touched that Jordan front suspension today! Baby steps, it'll come... On the Tyrrell, the blue is starting to get laid down, so nothing spectacular happening. Fortunately no painting dramatics... thusfar!

  • Member since
    March 2012
  • From: Corpus Christi, Tx
Posted by mustang1989 on Tuesday, February 3, 2015 11:15 AM

I hear you on that Seabe. There's been a few days here and there that I have no progress pics to post as well. Bugs the bajezzus outta me! lol


 Forum | Modelers Social Club Forum (proboards.com) 

  • Member since
    March 2012
  • From: Corpus Christi, Tx
Posted by mustang1989 on Tuesday, February 3, 2015 3:15 PM

Today's update comes in the form of an interior refresh. I kept all of the parts from the original build and took the interior all apart and went to work.

The Dodge logo on the inside door panel that I had painted red, yellow and blue at an earlier age got repainted the silver color it is supposed to be and have applied a uniform coat onto the door so it's less sloppy looking. The same went for the rest of the interior.

 Anyways here we go:

Door panel before:

and after:

Complete interior before:

and after one helluva lot of flash removal,seam filling and refinish work: (the scuffed up portion at the front of the door panels will be hidden by the dash when installed).


 Forum | Modelers Social Club Forum (proboards.com) 

  • Member since
    January 2014
  • From: Toronto
Posted by Rob S. on Tuesday, February 3, 2015 3:47 PM

VERY handsome interior Mustang..well done!! Sharp.

______________________________________________________________________________


On the Bench: Nothing on the go ATM

  • Member since
    August 2014
  • From: USA
Posted by mailwalker on Tuesday, February 3, 2015 6:58 PM

mustang1989, please add me to the build with this gas guzzler if you please:

Thanks!

It doesn't matter that you ARE the best, but that you DID your best!


  • Member since
    January 2015
Posted by MOPAR - D on Tuesday, February 3, 2015 7:18 PM

Joe those door panels look sweet. One question are you going to add wood grain to the slap stick Handle?

Welcome mail walker looks like a nice build you have there. What are your plan on the build?  

  • Member since
    March 2011
Posted by ewheeler454 on Tuesday, February 3, 2015 8:46 PM

Hidey-ho all,

Gord,

I am really diggin that interior, especially the dash. Wow! Engine looks sharp also.

Taaron76,

Welcome and although I'm a GM guy at heart, kudos on the engine hehehehe.

Good to see ya again Misty.

That's a huge difference on the interor mustang. Really like the wood look.

Mailwalker,

I have not seen that kit. I'll be interested to see how it builds.

I did manage to get out in the shop a little today. Mainly just prepped the valve covers, drilled guide pins in them for the wire looms, and drilled a guide hole and pin for the small hose at the top of the water pump so they line up. The valve covers are ready to be chromed. Need some warm weather so I can stay out longer hehehehe.

L8TR,

Eric

  • Member since
    January 2015
Posted by taaron76 on Tuesday, February 3, 2015 9:12 PM

More updates today... I got some more of the engine completed, put a light wash on it as well as the graphite technique on the chassis with a light wash as well.  I have to install the distributor and wires and get more of the engine completed over the next week or so.  I completed the interior as well.

I mocked the car up to see how it was looking, as so far, so good.  Lots to do yet.  Thanks for looking!

Tim

The white space will be painted and the aftermarket distort will be mounted there.

IMG_6910-vi.jpg

IMG_6918-vi.jpg

IMG_6916-vi.jpg

A very subtle change with the graphite thats hard to tell, but it did make a difference.  It's hard to tell in these pics though.

IMG_6920-vi.jpg

IMG_6922-vi.jpg

  • Member since
    January 2015
Posted by taaron76 on Tuesday, February 3, 2015 9:13 PM

Nothing special with the interior, just black and a little titanium to break up the black a little.

IMG_6924-vi.jpg

IMG_6926-vi.jpg

IMG_6928-vi.jpg

IMG_6930-vi.jpg

  • Member since
    January 2015
Posted by taaron76 on Tuesday, February 3, 2015 9:13 PM

I applied just a tad of Novus #2, then followed by #1.  Not much will be needed on this one and I'm very happy with the paint.  I have one small spot on the hood to fix, but I will do that this weekend with a coat or two of clear orange.  I also forgot to paint the two small body moulding on the sides.

IMG_6937-vi.jpg

FullSizeRender4-vi.jpg

A couple of mockup shots... I am VERY pleased with the stance and look.  It's exactly what I was going for.

FullSizeRender5-vi.jpg

IMG_6935-vi.jpg

There is still loads to do though.  I have to finish all of the wiring in the engine bay and sure the internet for reference pics.  Nothing but time, right?  

Tim

  • Member since
    January 2015
Posted by taaron76 on Tuesday, February 3, 2015 9:17 PM

I'm jealous of your interior, Joe.  Great work!!!

  • Member since
    March 2012
  • From: Corpus Christi, Tx
Posted by mustang1989 on Tuesday, February 3, 2015 9:24 PM

Rob S.: Thanks man!Big Smile

mailwalker: Well hell yeah I'll jot you down! Welcome aboard!!!

Dan: Thank you as well sir! That shifter handle was pointed out to me today at work by a fellow Mopar fan and the door trim still needs some work as far as chrome trim I found out. 

Eric: Man way to go on those rocker covers! Swell work!!!

Tim: What can I say? The engine, interior, exterior paint finish and the stance are all a breed of their own. There's just no way I could build that fast! Wow!  


 Forum | Modelers Social Club Forum (proboards.com) 

  • Member since
    January 2015
Posted by taaron76 on Tuesday, February 3, 2015 9:27 PM

Joe - Fast?  This build seems like it is taking forever!!!  LOL  Maybe because I'm so eager to get it done.  I still have a couple of weeks of work left... you know, its in the details. lol  Thanks!

Tim

  • Member since
    March 2012
  • From: Corpus Christi, Tx
Posted by mustang1989 on Tuesday, February 3, 2015 9:27 PM

You're down on the roster mailwalker!


 Forum | Modelers Social Club Forum (proboards.com) 

  • Member since
    March 2012
  • From: Corpus Christi, Tx
Posted by mustang1989 on Wednesday, February 4, 2015 7:55 AM

taaron76
I still have a couple of weeks of work left... you know, its in the details. lol  Thanks!

LOL...Yes I do!


 Forum | Modelers Social Club Forum (proboards.com) 

  • Member since
    January 2012
  • From: Hatfield
Posted by Misty on Wednesday, February 4, 2015 12:55 PM

Ok, usual first shots. not the sprues but the more interesting upgrades. Its not a comprehensive set but the bits look good and it will be good practice before i crack open the yzr and rcv bikes and mp4/4 sets in anger.

Boxs!! woooo!

the upgrade. ill try to stick to this but may add more if it needs it.

spot the ejector mark... no.. I couldnt find any either Blind Fold to be fair only EIGHT will be visible Sad ( are you sure this is a tamiya kit?)

  • Member since
    January 2012
  • From: Hatfield
Posted by Misty on Wednesday, February 4, 2015 12:58 PM

Tim I loooove the paint finish on that!  just like a showroom motor.

  • Member since
    March 2012
  • From: Corpus Christi, Tx
Posted by mustang1989 on Wednesday, February 4, 2015 2:09 PM

Misty
Its not a comprehensive set

You were saying that this was not a comprehensive set????????? Man I'd hate to see one that is in your book! lol Indifferent


 Forum | Modelers Social Club Forum (proboards.com) 

JOIN OUR COMMUNITY!

Our community is FREE to join. To participate you must either login or register for an account.

SEARCH FORUMS
FREE NEWSLETTER
By signing up you may also receive reader surveys and occasional special offers. We do not sell, rent or trade our email lists. View our Privacy Policy.