SEARCH FINESCALE.COM

Enter keywords or a search phrase below:

The 2015 /16 Red Hot and Rollin Automotive Group Build--Ended

120471 views
2225 replies
1 rating 2 rating 3 rating 4 rating 5 rating
  • Member since
    March 2012
  • From: Corpus Christi, Tx
Posted by mustang1989 on Tuesday, February 10, 2015 10:17 AM

Mike: Wow man! The bolt and nut detail is just friggin' awesome and you're doing an amazing job on this build despite the kit flaws of the day.

ewheeler454: I can't see the pics here at work but will be checkin' 'em out tonight when I get home.

Tim: Dust? Where? This build is da bomb dude! This looks show ready right now!!

Dan: Beeeautiful work on that trailer!!!!

Everybody:Well I haven't got a whole lot of progress as I had to get some rest after the weekend. Had company down, the wife was out of town and it was go-go-go all the way with few breaks in between the weekend events. Yesterday I just  "turned off" while driving and went right through a freekin' stop light! I snapped out of it in the middle of the intersection while still driving! That was a close enough call for me! So last night I didn't get on the forum and this morning I slept in a little longer than I usually do.

Anyhow I have had only about 45 minutes or so of bench time in the last two days but managed to get started on the BMF on the deck lid area and the window channel posts.


 Forum | Modelers Social Club Forum (proboards.com) 

  • Member since
    April 2005
  • From: Australia
Posted by taxtp on Tuesday, February 10, 2015 5:59 PM

Mike - your drag racer is starting to look really good. The bolts look great and the engine looks good in the frame.

Tim - I know what you mean about the hood colour difference. It tends to play on you, but I didn't notice it until you told us.

Eric - nice progress, seems to be a lot of honey-dos going on right now !

Mustang - Get some rest, then bounce back hard ! It looks great.

mailwalker - good to see you've made a start.

I decided that I didn't want to live with the previously painted chassis for my Sierra, so I've stripped it as well, and re-primed it this morning. At least it will be my work and won't have a quality compromise.

Other than that, it's the parts clean up phase, don't think you really want photos of that !!!

You can chalk me up for a Studio 27 resin 1/20 Ferrari 643 as well, It's from the 1991 F1 season. I'll definitely build it sometime later this year.

Cheers

Tony

I'm just taking it one GB at a time.

  • Member since
    January 2015
Posted by taaron76 on Tuesday, February 10, 2015 8:17 PM

So I've been taking a closer look at the Cobra 289 engine over the last few days and wanted to give it a little more detail so it doesn't feel like its on an island all alone, or stick out like a sore thumb.  Here's what I added today, in case the picture aren't good enough.

Added vacuum line from valve cover to carburetor

Added vacuum/line breather line from valve cover to the rear of the intake manifold

Added the fuel line from the fuel pump area (there is no fuel pump in this kit) to the carb

Added the send and receive heater core water lines from the water pump and manifold that will be plugged into the heater core on the firewall

I'm working on the solenoid wiring now, but won't finish it until tomorrow of the weekend.  I'm trying to make something that resembles a solenoid so I can hook up the battery, alternator and starter wires.  It shouldn't be too hard, but we will see.  Not much more detail to add to the engine, at least I think.  lol

Here's some update pics:

DSC_1147-vi.jpg

DSC_1143-vi.jpg

DSC_1145-vi.jpg

  • Member since
    January 2015
Posted by MOPAR - D on Tuesday, February 10, 2015 8:26 PM

Taaron76 nice update to the detail on your engine.

  • Member since
    February 2006
  • From: Smithers, BC, Canada
Posted by ruddratt on Tuesday, February 10, 2015 11:36 PM

Great progress fellas! 

Eric - love those rims you picked out. They're gonna look sweet on the finished model! Yes

mailwalker - yep, no need to hurry.  We got a whole year!. Definitely looking forward to your build! Yes

Joe - glad you got some rest buddy!  ....and even though it was only 45 minutes bench time, ya made good use of it.  Nice work!

Tony - seriously looking forward to that Ferrari!


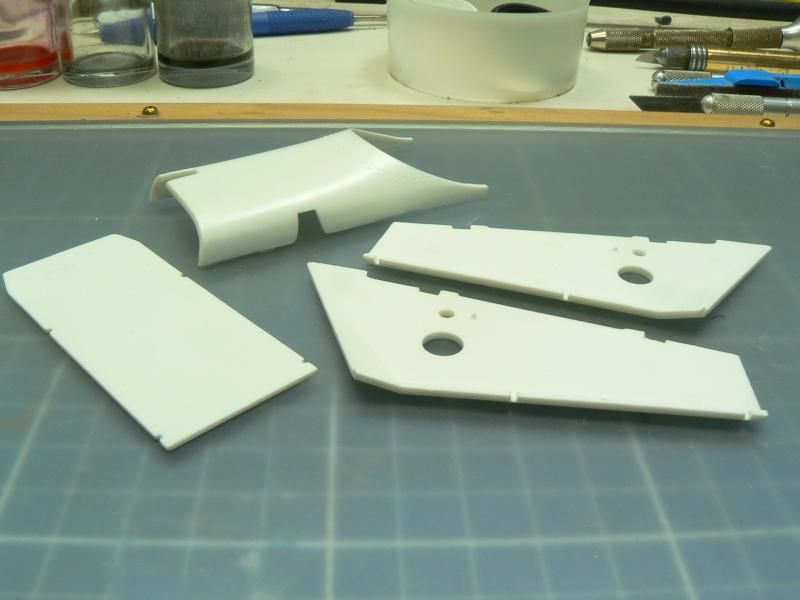
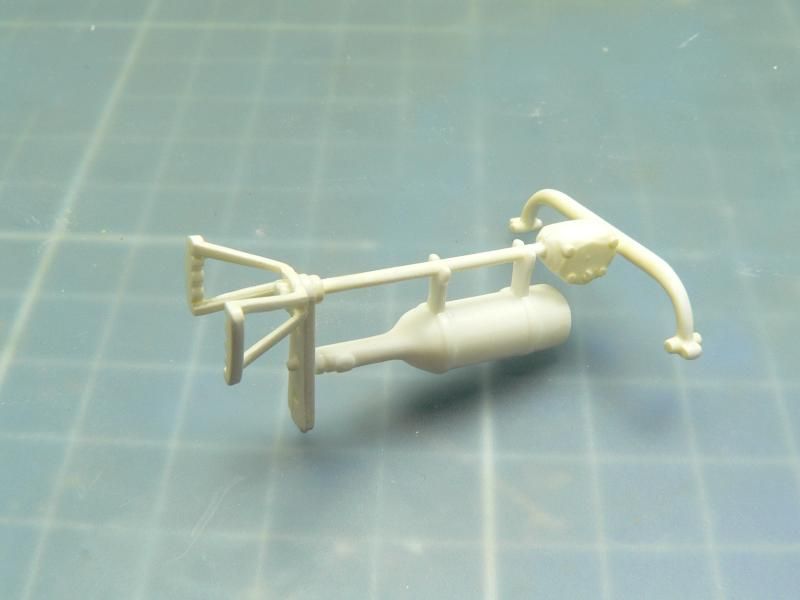
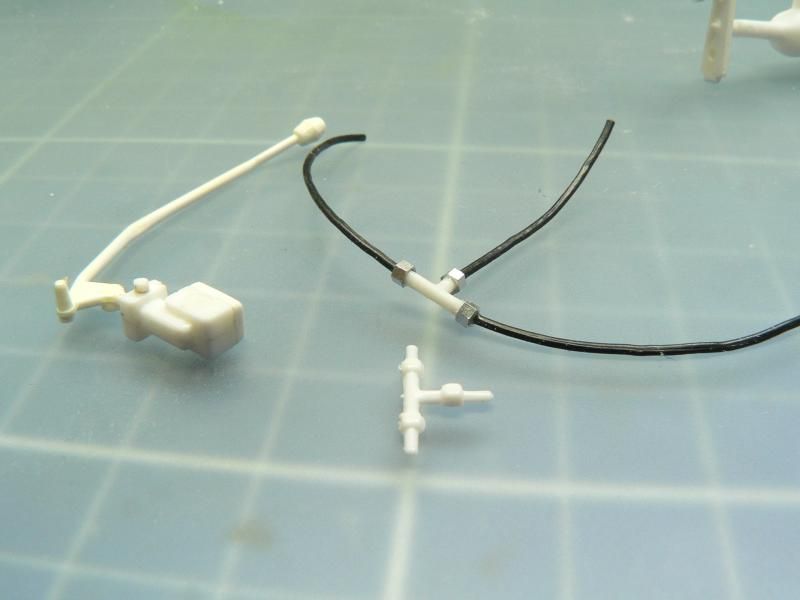
Not much to report on the dragster.  All the sink holes on the main body parts have been filled & sanded, ready for some paint, as is the steering assembly.  The brake lever/master cylinder is ready as well.  Didn't like the kit tee for the brake lines, so I scratchbuilt a new one.


I gave up on the kits front rims. The molds were way too out of register to fix and have look convincing, so I went hunting last night and found these beauties.....(upper left corner)

http://www.micronitro.net/Dragster%20wheels.html

Yeah, I know they're pricey at $45 a pop, plus another $45 for the jig, but since those front wheels are such a prominent feature, I didn't want to skimp on 'em.


Mike

 "We have our own ammunition. It's filled with paint. When we fire it, it makes pretty pictures....scares the hell outta people."


  • Member since
    April 2005
  • From: Australia
Posted by taxtp on Wednesday, February 11, 2015 6:04 AM

Mike, I'm with you. Those new rims will look much better. You can always use the jig again.

Cheers

Tony

I'm just taking it one GB at a time.

  • Member since
    January 2014
  • From: Toronto
Posted by Rob S. on Wednesday, February 11, 2015 2:26 PM

Wicked cool rims Mike! Very cool.

______________________________________________________________________________


On the Bench: Nothing on the go ATM

  • Member since
    January 2012
  • From: Hatfield
Posted by Misty on Wednesday, February 11, 2015 7:22 PM

Tarrant,  great job on the wiring, I wish I could make mine look so natural.

  • Member since
    January 2015
Posted by taaron76 on Wednesday, February 11, 2015 8:07 PM

I left one minor detail out that I added tonight.  The DIPSTICK!  lol  Engine is complete now.

DSC_1206-vi.jpg

DSC_1204-vi.jpg

  • Member since
    January 2015
Posted by MOPAR - D on Wednesday, February 11, 2015 8:33 PM

Taaron76 I was going to ask if you had a dip stick yesterday

  • Member since
    January 2015
Posted by taaron76 on Wednesday, February 11, 2015 8:44 PM

I do now.  :).

Tim

  • Member since
    January 2014
Posted by Seabe on Wednesday, February 11, 2015 9:11 PM

Super job on that engine, taaron76! And nice photography as well...

Tony, looking forward to that 643!

  • Member since
    January 2012
  • From: Hatfield
Posted by Misty on Thursday, February 12, 2015 5:54 AM

still have the bottles and a bit of wiring missing but cant put them on until its mounted on the car. i hate CF decals :-(

  • Member since
    March 2012
  • From: Corpus Christi, Tx
Posted by mustang1989 on Thursday, February 12, 2015 11:10 AM

Mike : That steering gearbox and brake lines look great! I really like the site for the wheels. I've already got a set of Weld Draglites in my cart!!! LOL

taaron: Great job on that engine. Really like the pics!!!

Misty: Looking good on yours so far!!!

Everybody:I meant to get on here yesterday morning but had more stuff going on at that point than I could keep track of. I've got some more BMF updates. Sometimes this stuff cooperates beautifully and sometimes it doesn't. Oh well we take the good with the bad here.

I've got the windshield and the passengers side drip rail moldings done here:

and the drivers side drip rail molding :


 Forum | Modelers Social Club Forum (proboards.com) 

  • Member since
    January 2015
Posted by MOPAR - D on Thursday, February 12, 2015 12:21 PM

Nice progress on the BMF Joe

  • Member since
    April 2005
  • From: Australia
Posted by taxtp on Thursday, February 12, 2015 8:31 PM

That's looking pretty sharp Joe, I like it it's lines and the quality of finish.

Misty, your work is always very realistic to me.

Cheers

Tony

I'm just taking it one GB at a time.

  • Member since
    April 2005
  • From: Australia
Posted by taxtp on Thursday, February 12, 2015 8:34 PM

I should add that I've sprayed the chassis black now, and it does look a lot better than the previous owners black coat, which was just passable. I'm glad I did it. I'm still cleaning up the body, almost done.

Cheers

Tony

I'm just taking it one GB at a time.

  • Member since
    January 2014
Posted by Seabe on Thursday, February 12, 2015 9:12 PM

Misty, I simply love those hoses! You're getting me ain the mood to also take out one of those Top Studio sets.

  • Member since
    January 2012
  • From: Hatfield
Posted by Misty on Thursday, February 12, 2015 11:07 PM

Do it! But do it before you eyes get as bad as mine!! I have to wear my glasses and a head magnifier with two lenses to see the tiny wires.

  • Member since
    January 2015
Posted by MOPAR - D on Friday, February 13, 2015 9:43 AM

Worked on finishing the glass and installing the interior today.

  • Member since
    January 2014
Posted by Seabe on Friday, February 13, 2015 10:44 AM

Hey man, who'se to say my eyes aren't worserer than yours?! Yeah, we had a conversation some time last year on another forum, it seems the new generation just aren't picking it up as a hobby... instant gratification and all that. I have more 43rd kits than my eyesight will allow to build... "Fortunately" our exchange rate took a dip and I think I've just ordered my last kit (43rd, at that...) in a loooong while.

As for progress, I've actually started working on my Jordan's front suspension! :D

  • Member since
    March 2012
  • From: Corpus Christi, Tx
Posted by mustang1989 on Friday, February 13, 2015 9:31 PM

Dan: She's lookin' good pal! Is the interior all finished up or do you still have some more to go in there?

Misty: My eyes aint that bad yet but this hobby aint helpin' 'em out I know! lol

Seabe: Show some pics bubba! In speaking of the next generation, something was written about that in this months issue of Scale Auto. My son leans towards Legos but will entertain a model here or there. 

Here's the article(speaking of  eyesight , and I'm included, you may have to blow it up a bit to be able to read it)


 Forum | Modelers Social Club Forum (proboards.com) 

  • Member since
    January 2015
Posted by taaron76 on Friday, February 13, 2015 11:34 PM

I got a lot done tonight on the '66 Shelby, but still have some minor things left to do.  I was able to get most of the BMF done, windows installed, interior installed, body mounted on chassis, and the water lines connected to the firewall.

Remaining work to do:

Run starter to the solenoid wire

Run alternator to the solenoid wire

Run ground wire to the chassis from the battery

Connect radiator hose 

BMF two side-rear windows

Install drivers side mirror

Paint the badges

Here are a couple of update pics...

Tim

  • Member since
    July 2014
Posted by modelcrazy on Friday, February 13, 2015 11:41 PM

taaron,

Your Shelby is totally awesome! Your work list makes it sound as if your working on a real car.

Steve

Building a kit from your stash is like cutting a head off a Hydra, two more take it's place.


http://www.spamodeler.com/forum/

  • Member since
    January 2015
Posted by taaron76 on Friday, February 13, 2015 11:56 PM

Modelcrazy - Thanks!  It's always fun to come up new ways to add more details to a model.  I guess that's what makes us so eager to start the next one.  :)

Tim

  • Member since
    March 2012
  • From: Corpus Christi, Tx
Posted by mustang1989 on Saturday, February 14, 2015 3:36 AM

Freekin' showstopper in the makin's right there! Great work on the paint finish Tim!! Cool

Well folks I've got the all of the window trim on , door handles BMF'd and painted the recessed areas, the rear side marker lights BMF'd and filled in with the reflective red and the front side marker lights BMF'd and waiting on me to buy some parking light amber to fill in the lens area. 

I test fitted the original front clip onto the body and am concerned about the interference fit between the clip and the front fenders. Monogram really jacked up here as far as I'm concerned because you have to wait to install this piece after the body is fitted over the chassis. The step at the front fender to front clip area is only an alignment issue and will be corrected when final installation is completed.  I'm simply going to do the best I can with what I have here and will be mindful of this discrepancy in future car builds. Aside from that small gouge I'm more than satisfied with this build so far.


 Forum | Modelers Social Club Forum (proboards.com) 

  • Member since
    January 2015
Posted by MOPAR - D on Saturday, February 14, 2015 7:36 AM

Tim your Mustang looks fantastic betweent the chrome and the colors you have in the engine bay it just all goes together for a very sharpe looking build.

Joe the interior is glued I place now. Your BMF came out real nice looking. By the way on the front clip they also have the seam line in th wrong place it should be in the front not on the side.  

  • Member since
    February 2003
  • From: East Bethel, MN
Posted by midnightprowler on Saturday, February 14, 2015 8:04 AM
Finally got a start on mine. Matthews white poly, and will have a red hockey stripe and red interior.

Hi, I am Lee, I am a plastiholic.

Co. A, 682 Engineers, Ltchfield, MN, 1980-1986

1 Thessalonians 4:13-18 1 Corinthians 15:51-54

Ask me about Speedway Decals

  • Member since
    March 2012
  • From: Corpus Christi, Tx
Posted by mustang1989 on Saturday, February 14, 2015 8:15 AM

...............and he brings out the Cuda' !!!


 Forum | Modelers Social Club Forum (proboards.com) 

  • Member since
    January 2015
Posted by MOPAR - D on Saturday, February 14, 2015 10:27 AM

Lee that's going to a very sharp looking Cuda. Are you using the Revell newly released Cuda for this build.

JOIN OUR COMMUNITY!

Our community is FREE to join. To participate you must either login or register for an account.

SEARCH FORUMS
FREE NEWSLETTER
By signing up you may also receive reader surveys and occasional special offers. We do not sell, rent or trade our email lists. View our Privacy Policy.