SEARCH FINESCALE.COM

Enter keywords or a search phrase below:

Mustang Build

80078 views
1582 replies
1 rating 2 rating 3 rating 4 rating 5 rating
  • Member since
    July 2014
Posted by modelcrazy on Tuesday, July 14, 2015 12:26 PM

That's some mighty fine detail work Larry. Your build is going to be a fun watch, and no doubt I will learn some new techniques along the way.

Steve

Building a kit from your stash is like cutting a head off a Hydra, two more take it's place.


http://www.spamodeler.com/forum/

  • Member since
    January 2006
  • From: Pineapple Country, Queensland, Australia
Posted by Wirraway on Thursday, July 16, 2015 2:09 AM

The big Bandai kit is coming along.  Unfortunately its a bit toy-like in some aspects.  While the clear covers for the gun bays are a welcome option, the    slot which runs along the top of the fuselage is not.  Its there for the canopy to slide backwards on but is now filled in with some sprue.  Detail in the wheel well is abysmal as well.  Had to put some plastic card in there rather than looking at the bottom of the cockpit tub.  After finding out that the kit comes with RAAF decals from Korea I'm going to paint it as that bird instead.

"Growing old is inevitable; growing up is optional"

" A hobby should pass the time - not fill it"  -Norman Bates


GIF animations generator gifup.com

  • Member since
    September 2014
Posted by rooster513 on Friday, July 17, 2015 9:52 AM

Calling her all done. This is Revell's 1/48 B/C Mustang in British markings. It's pretty much OOB with a small amount of scratch building. All paints are Tamiya Acrylics and I added a quick brownish acrylic wash. Exhaust and muzzle weathering was done with my airbrush. This was the first time trying anything like this and while I'm fairly happy with the results (left side is a little overdone) and think next time I will try it with dry brushing chalk. I used the chalk technique to finish up the right wing muzzle weathering and felt like I had more control than with my airbrush. Enough talk, time for pictures...

Added a little chipping to wing walk...


I swear the bag is not mine, just too lazy to edit the picsWink

This was my first GB and I had a blast! Thanks to all who commented and special thanks to Modelcrazy and CodyJ for putting this on! You guys are doing a great jobYes CodyJ I like either of the last two pics for the front page. Hopefully up next is a Hurricane for the BofB GB and then maybe a special project but I'd love to pop back in here for another build...I do love a good MustangBig Smile Thanks for looking!

-Andy


-Andy

  • Member since
    September 2014
Posted by rooster513 on Friday, July 17, 2015 9:59 AM

Sorry I must have deleted a picture. Either one of these for the front page. I can never decideSmile Thanks!

-Andy

  • Member since
    July 2013
Posted by lzdaily@comcast.net on Friday, July 17, 2015 11:29 AM

Andy, great build!

Larry

  • Member since
    July 2014
Posted by modelcrazy on Friday, July 17, 2015 3:00 PM

Ooo, I like the way your panel lines show. Not over done, but just right IMHO. Very Nice, great looking camo and I really like that Malcolm Hood.   YesYesYes

Thank you for joining in on our crazy little band of Mustang misfits and your'e welcome to jump back in if your'e so inclined. The build is going on for another year yet (I can't believe it's been 6 months already, sheesh). Grab yourself a badge if you want and Cody will get you up on the wall just as soon as he can.

Steve

Steve

Building a kit from your stash is like cutting a head off a Hydra, two more take it's place.


http://www.spamodeler.com/forum/

  • Member since
    July 2013
Posted by lzdaily@comcast.net on Friday, July 17, 2015 7:18 PM

I've spent some time in the cockpit of my F-6A.I used a base coat of Model Masters Interior Green and picked out details with red or black (there's a little blue and white in there, too). the wooden map case was first painted with a base coat of Model Masters Wood. Then I slathered on some burnt umber oil paint and slowly brushed over it with a brush dampened with Turpenoid to get a wood grain effect. In the past, I've cut up Mike Grant cockpit decals and applied them where the True Details set looked like there were placards, but then realized that in 1:48 scale you really couldn't make them out through a closed canopy. Now I just paint the placard locations. Once I was reasonably happy with how it all looked, I gave it a wash of burnt umber oil paint. I hope to close up the fuselage tomorrow.

Larry

  • Member since
    December 2013
Posted by CodyJ on Sunday, July 19, 2015 3:53 AM

Andy-  Pic is going up!  I must say that is one Super build!  I know the owner of the local hobby shop very well and have been friends for quite so time.  He lets any customers bring in built models and display them in his big display cases.   Every once in awhile he buys them off people! LOL    He'd try to buy this one...  Guaranteed.  He loves D-day schemes.

On a crappier note;  ALWAYS WEAR YOUR WELDING MASK!  I couldn't get my head under the cab of my friend's truck so I took mine off.  I closed my eyes but that didn't stop this...

  • Member since
    December 2013
Posted by CodyJ on Sunday, July 19, 2015 4:04 AM

Sorry to double post but this needs a Separate slot...

Awesome Job Folks we currently have 10 Builds in the Finish Gallery!

Excellent work is going on in here too!  


Give yourself a hand!


  • Member since
    September 2014
Posted by rooster513 on Monday, July 20, 2015 8:53 AM

Thanks for the kind words CodyJ. I had a great time with this GB and I'm already eyeing something in the 1/72 scale to build another one.

-Andy

  • Member since
    July 2013
Posted by lzdaily@comcast.net on Monday, July 20, 2015 9:07 AM

I've got the fuselage closed up. Here's a view into the cockpit. I have a bit of tweaking left to do and I need to get the IP panel in. I've also started working on the wings. I mounted some strip styrene behind the landing light locations so I can mount MV Products lenses. I also drilled out the formation light locations using a 1/16" drill bit. I cut three pieces of 1/16" clear styrene rod, polished one end of each, and glued them into the holes with the polished end flush with the exterior surface of the wing. Once they were good and dry, I cut the interior flush with the inner surface of the wing, polished it, and colored them with Tamiya clear colors.


  • Member since
    June 2013
Posted by bvallot on Monday, July 20, 2015 9:36 AM

Nice job rooster!  =] It's hard not to like invasion stripes...or that Malcolm hood.  

IzDaily, I have the same thing in mind for a Dauntless I'm working on as well.  I haven't tried it this way yet so I'm pleased to see you have some luck with it.  =]  Real nice start so far.

On the bench:  

Tamiya F4U-1  Kenneth Walsh


  • Member since
    July 2014
Posted by modelcrazy on Monday, July 20, 2015 11:22 AM

Man, you guys are leaving me in the dust!. All my stuff is packed right now and we are still packing the rest of the house. I think I'm going to put my 1/32 Hase 51 into the box of shame and purchase the Tamiya 1/32 Stang. It looks like a far superior kit to that 30 year old Hase kit. I should be up and running sometime early Aug, and I'll complete the 1/48 Monogram kit.

VERY nice looking builds so far. I am proud to be hosting a build with such outstanding talent signed up. You guys are really showing off the beauty of North American's and Ford's efforts.

Steve

Steve

Building a kit from your stash is like cutting a head off a Hydra, two more take it's place.


http://www.spamodeler.com/forum/

  • Member since
    March 2007
  • From: NJ
Posted by JMart on Friday, July 24, 2015 3:04 PM

Good luck on the move! We moved to a new house a few months ago, I have yet to setup my workbench in the basement as I finish a lot of other "stuff" first :(    Would like to join in with an easy build, the Hasegawa P51D "American Aces" (1:48, #0979). I actually have two of these, will be building them at the same time, the other one for the "Aces GB". Just OOB, nothing fancy, just a straight build as I unpack all my hobby stuff...


  • Member since
    June 2013
Posted by RobGroot4 on Friday, July 24, 2015 8:25 PM

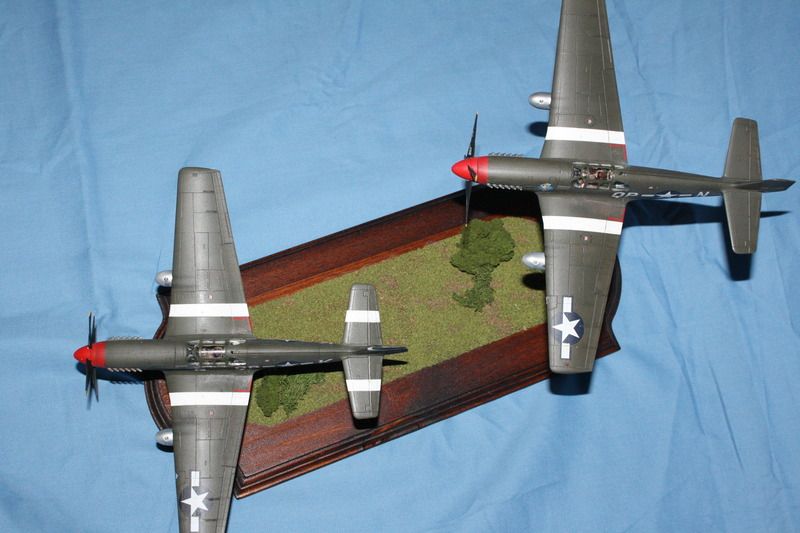
Man, you all have really produced some stellar builds.  I was finally able to finish up my humble submission.  Between work and studying it's been a pain trying to get bench time.  However, with CINCHouse out of town and a few days off I was able to complete my pair of misfits.

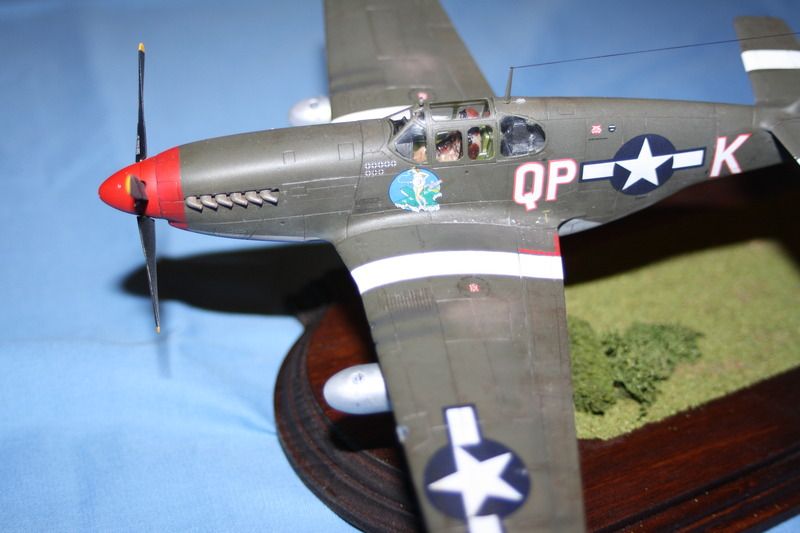
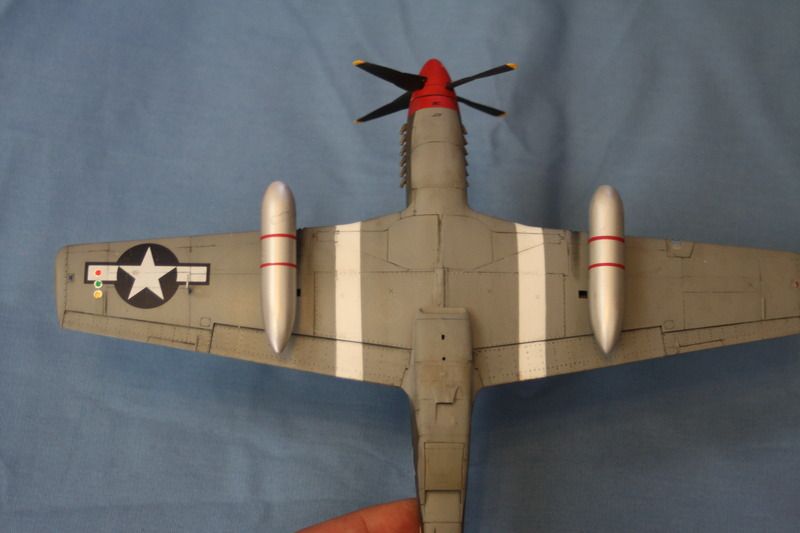
The kits are Tamiya 1/48 P-51B's OOB with the exception of Kitsworld decals for Ill Wind and Miss Dallas.  Based on the reference sheet with the decals, it looks like the photos they had showed Ill Wind right after being repainted and having her tail invasion stripes and the red outlines for the letters removed.  I thought it would be cool to do a pair in formation with some slightly contrasting markings.  This is the first time I've really gone for a roughly handled, beat up kinda look.  The base is just stained wood with some woodland scenics flocking and bushes attached.  Unfortunately both these pilots and planes were lost flying low, but I figured that was the place to put them, LOW!  Anyway, on to the pictures (apologies for quality, my photographer is out of town!):

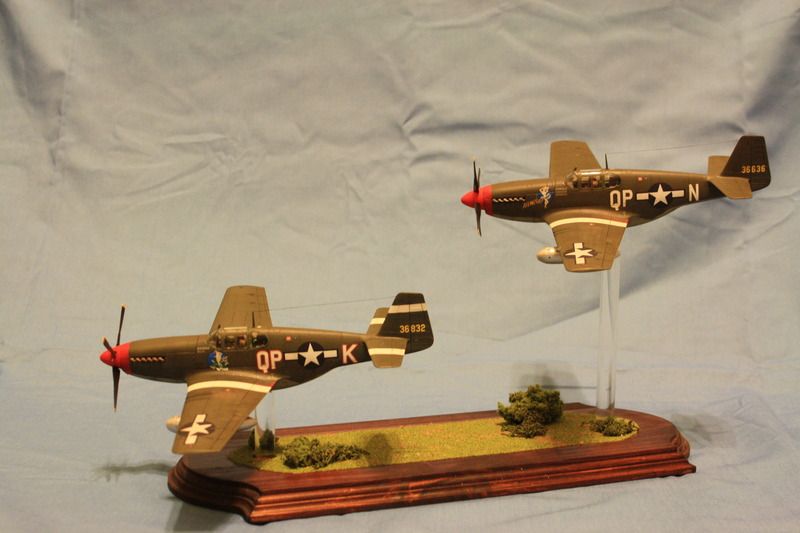
I am thinking the last photo for the completion page.

I had a lot of fun with my first group build and am definitely looking forward to getting going on the Boeing build next.  Thank you to Cody and ModelCrazy for pulling this together and to everyone for the support and suggestions!  

Groot

"Firing flares while dumping fuel may ruin your day" SH-60B NATOPS

  • Member since
    December 2013
Posted by CodyJ on Friday, July 24, 2015 9:47 PM

Awesome Awesome Work Groot!!!!!   Looks superb!  I am working but will be off in a few hours and can get the pic up.   Again man, super job!  Beautiful base too!  I like the dark wood color!

  • Member since
    July 2014
Posted by modelcrazy on Friday, July 24, 2015 10:57 PM

JMart,

I got you down my man, welcome to the Mad Mustang Mindbending Group Build.

Groot,

BOOWAAA! looks sweet man. Great job!!!  Bow Down Looks like they are making a run on an aerodrome. Grab a badge if that's your pleasure and thank you for joining us. If in the future you are bored, you're welcome to jump in again. We'll see you in the Boeing Build.

Steve

Steve

Building a kit from your stash is like cutting a head off a Hydra, two more take it's place.


http://www.spamodeler.com/forum/

  • Member since
    July 2014
Posted by modelcrazy on Sunday, July 26, 2015 12:50 AM

To the Mustang GB members,

I will be moving  out of my house on Wednesday, and moving into the new one on Friday. I will be very busy for several days, so I apologize in advance for any inattentiveness to the GB. It would only be because I did not get to my computer or I'm so pooped that I couldn't.

Steve

Steve

Building a kit from your stash is like cutting a head off a Hydra, two more take it's place.


http://www.spamodeler.com/forum/

  • Member since
    July 2013
Posted by lzdaily@comcast.net on Sunday, July 26, 2015 7:16 PM

Good luck with the move, Steve. I hope all goes well.

We've had a bunch of computer problems in my house this week that kept me away from my workbench, but I got my F-6A into the paint shop this afternoon. It's starting to look like an airplane.

  • Member since
    September 2011
Posted by fightnjoe on Wednesday, July 29, 2015 7:55 AM

Modelcrazy, Cody, If you will allow I would like to enter

I pulled this down from the shelf for a possible attempt at a submission to a magazine.  This will be the third attempt I have made to build a kit with that attempt.  The first two did not go so well.  One developed some major issues and although finished was never seen by anyone but me, the second is now sitting in the box after discovery of major issues during construction.  

If you would allow it I will enter this build and will show all until I reach the decal stage.  Then final pics after a yay or nay from the editor.

Joe

Veterans,

Thank You For Your Sacrifices,

Never To Be Forgotten

Where you can find me:

Workbench on FaceBook  Google Plus  YouTube

  • Member since
    June 2013
Posted by bvallot on Wednesday, July 29, 2015 12:50 PM

There he is!  Glad to see you on board.  =]

On the bench:  

Tamiya F4U-1  Kenneth Walsh


  • Member since
    December 2013
Posted by CodyJ on Friday, July 31, 2015 3:43 AM

Joe-   You Bet!  Steve is a bit busy for the next couple days I think, but he will put you up as soon as possible!   Of course feel free to start as soon as you wish!  Glad to have you aboard!!!

  • Member since
    September 2011
Posted by fightnjoe on Friday, July 31, 2015 11:54 PM

Many thanks Cody.  I began to plan and cut and grind tonight.  Pictures in a day or so.  i think I am getting better at the cutting and grinding part.

Joe

Veterans,

Thank You For Your Sacrifices,

Never To Be Forgotten

Where you can find me:

Workbench on FaceBook  Google Plus  YouTube

  • Member since
    January 2015
Posted by BrandonD on Saturday, August 1, 2015 1:37 AM

Lots and lots of nice work in here, guys. I really enjoy seeing it all, even if lately I haven't had much time to log on to the forums, I am still seeing it in my emails (Our work filters don't mind Gmail, but they get a little weird about forums... :)

Groot - Great job on that duo. It's really cool to see them staged like that in low flight.

Mustangs are my favorites (planes and cars), so it's cool to see all these come together.

And yes, I still have my Tamiya P-51D, and I will probably be posting about that soonish :)

-BD-

  • Member since
    September 2011
Posted by fightnjoe on Saturday, August 1, 2015 11:13 PM

First cuts.

Over the last day or so it has been Dremmel and Exacto time.

The most frightening moment of a build like this is that first cut.  After that there is no turning back.

...

And the cuts.

...

I am going where the feeling takes me at this point.  I think the wing will be first up.  Going to tackle it a bit different.


Till next time.....


All comments, critiques, and criticism are encouraged.


Joe

Veterans,

Thank You For Your Sacrifices,

Never To Be Forgotten

Where you can find me:

Workbench on FaceBook  Google Plus  YouTube

  • Member since
    July 2014
Posted by modelcrazy on Sunday, August 2, 2015 8:03 AM

Hi guys. We closed on our new home and are getting settled in. We are in the looking for boxes stage and found that everything is scattered from here to kingdom come.  My hobby room is going to take a little while as the boss wants me to do thing like set up the bed and hook up the washing machine.  Sheesh, doesn't she know what the priorities are?

I've been watching by phone when I get the chance and there's some incredible work going on.  I have alto of back reading to do once we get internet hooked up.

Thank to Cody for helping me out in my absence snd I'll be back in force soon.

Steve

Steve

Building a kit from your stash is like cutting a head off a Hydra, two more take it's place.


http://www.spamodeler.com/forum/

  • Member since
    July 2014
Posted by modelcrazy on Monday, August 3, 2015 9:30 AM

Joe,

I got you down on the front page. Now that I can see your build in a larger format, that is some major surgery your doing. Good luck, I can't wait to see the finished project.

Steve

Steve

Building a kit from your stash is like cutting a head off a Hydra, two more take it's place.


http://www.spamodeler.com/forum/

  • Member since
    September 2011
Posted by fightnjoe on Wednesday, August 5, 2015 9:42 AM
I hope not to disappoint. Joe

Veterans,

Thank You For Your Sacrifices,

Never To Be Forgotten

Where you can find me:

Workbench on FaceBook  Google Plus  YouTube

  • Member since
    January 2006
  • From: Pineapple Country, Queensland, Australia
Posted by Wirraway on Saturday, August 8, 2015 1:04 AM

Bandai 1/24 Kit is done.  Had a lot of fun with this one.  First attempt at seatbelts and first time using foil on the oleo's.  Markings are for a RAAF Mustang which was lost on 9 September 1950 over Korea.

http://s120.photobucket.com/user/rowie63/story

"Growing old is inevitable; growing up is optional"

" A hobby should pass the time - not fill it"  -Norman Bates


GIF animations generator gifup.com

  • Member since
    September 2011
Posted by fightnjoe on Tuesday, August 11, 2015 10:28 PM

Wing work has started.

Over the last couple of weeks I have spent some time getting the wing and its components ready to go.

...

I have also worked on the fuel cell for the wing.

...

Started the stringers and the gun bay/ammo bin.  


All comments, critiques, and criticism are encouraged.


Joe

Veterans,

Thank You For Your Sacrifices,

Never To Be Forgotten

Where you can find me:

Workbench on FaceBook  Google Plus  YouTube

JOIN OUR COMMUNITY!

Our community is FREE to join. To participate you must either login or register for an account.

SEARCH FORUMS
FREE NEWSLETTER
By signing up you may also receive reader surveys and occasional special offers. We do not sell, rent or trade our email lists. View our Privacy Policy.