SEARCH FINESCALE.COM

Enter keywords or a search phrase below:

The official Submarine Warfare Group Build 2016 - 2017

25688 views
611 replies
1 rating 2 rating 3 rating 4 rating 5 rating
  • Member since
    November 2008
  • From: Central Florida
Posted by plasticjunkie on Thursday, September 15, 2016 6:32 PM

Doug

Bob Ross would have been proud of your wet on wet work. Looks fantastic!

 GIFMaker.org_jy_Ayj_O


Too many models to build, not enough time in a lifetime!!

  • Member since
    October 2008
  • From: Georgia
Posted by Rigidrider on Thursday, September 15, 2016 5:18 PM

OK, Now the messy fun begins...

I'm going to start with some Raw Sienna artist oil (tubed paint) thinned with some odorless mineral spirits. Don't ask the mixture, when it feels right and covers like I want its good lol...

I also have some dark brown and black mixed up for the begining accents...

as you can see, it goes on kind of heavy and not at all completely covered. As I said earlier, I want it heavier so as to be able to add a bit od texture later as it dries, and I want to be able to see somewhat through to the base colors.

And thats about all for now... It took about two hours to apply the oils, and will take somewhere about a week or so until it will be dry enough to start handling again. Then I can begin with the acrylics to accent and wash this finish after applying some texture to this stage. In the mean time I will begin work on the dio base. Thanks

Doug

When Life Hands You A Bucket Of Lemons...

Make Lemonade!

Then Sell It Back At $2 Bucks A Glass...

  • Member since
    July 2014
Posted by modelcrazy on Thursday, September 15, 2016 11:05 AM

Thanks Doug and PJ, that means alot comming from you guys and yes, the Musashi is at the Lexington Museum. Now if they are displaying it is another question.

OK boys and girls, I sprayed a black primer to bring out any flaws before I moved on. I have to say I am pleased with the oil canning and will be continuing that process on other select builds, just not as much. I will be spraying a mix of Testers enamel rust, mixed with flat black to make a burnt umber color, onto areas where the paint should chip. I will go over these areas with a brushed on AK Interactives Worn Effects. This should make it easy to chip the acrylic paint off later.
Next the conning tower build-up which seems to take up the majority of the instructions.

Steve

Building a kit from your stash is like cutting a head off a Hydra, two more take it's place.


http://www.spamodeler.com/forum/

  • Member since
    November 2008
  • From: Central Florida
Posted by plasticjunkie on Monday, September 12, 2016 1:21 PM

Awesome job on both builds Steve. Wow that looks like an actual wreck.   Beer

 GIFMaker.org_jy_Ayj_O


Too many models to build, not enough time in a lifetime!!

  • Member since
    October 2008
  • From: Georgia
Posted by Rigidrider on Monday, September 12, 2016 11:54 AM

MC...I remember marveling at your Mushi build and how cool it looked. Didn,t you loan that to a muesum? It was without a doubt a muesum quality piece.  Any way, the work on your sub is looking great... I,m learning alot from you more experianced guys, and appreciate it.Mine is going to have considerable rusted appearance, but will still be very much intact. I,ve seen some wrecks that have been down for years and look very good but have seen others that are devistated. Not sure about the differences, but I know when salt water hits metal, you get rust. Maybe its the ammount of oxygen in the water in diffefent areas... not sure, any way, keep up the great work. Take care...Doug


When Life Hands You A Bucket Of Lemons...

Make Lemonade!

Then Sell It Back At $2 Bucks A Glass...

  • Member since
    July 2014
Posted by modelcrazy on Monday, September 12, 2016 11:33 AM
Here’s an update on the U-boat. I completed the oil canning, torpedo tubes, closing the hull halves and adding PE to the deck. I installed some cardboard tubing inside the hull to simulate the pressure hull. I need to do some filling and priming then on to the conning tower.
      

Steve

Building a kit from your stash is like cutting a head off a Hydra, two more take it's place.


http://www.spamodeler.com/forum/

  • Member since
    July 2014
Posted by modelcrazy on Monday, September 12, 2016 10:28 AM

Looking good Doug,

This is what I did for the Musashi wreck.

A wash of burnt sienna and brown

Followed by a wash of interior green

I covered all of that with a sprinkling of dirt which was pulverized by a front end loader at our local landscaping store.

Of course 2 years won't produce these results but it may be close. The Musashi is a mile deep.

Steve

Building a kit from your stash is like cutting a head off a Hydra, two more take it's place.


http://www.spamodeler.com/forum/

  • Member since
    October 2008
  • From: Georgia
Posted by Rigidrider on Sunday, September 11, 2016 11:33 AM

Well, a little more from me..

Starting om the paint... I'm using Tamiya Nato black for the lower hull...

Using a light gull grey for the upper hull...

and lastly a German Panzer grey (model master) on the decks.

Alright, the basic paint job is done. I paint almost exclusivly with acrylics, with very few exceptions. OK , why did I bother to paint the boat when I'm going to "sink" her? I intend to show it as I would think that it might look like at the end of the war, about 2 yrs and several months on the bottom,  and I want a faint appearance of the colors beneath the rust and weathering. Now the fun begins, The "rust" will be done with artists oils and the likes, with acrylic washes over the top of it. I like to use artists oils because I can really thicken it up and add texture to the finish without a thick build up of acrylics. I'm sure it will turn out OK, I've done this before and it looked OK. We'll see! Thanks all...

Doug

When Life Hands You A Bucket Of Lemons...

Make Lemonade!

Then Sell It Back At $2 Bucks A Glass...

  • Member since
    July 2014
Posted by modelcrazy on Thursday, September 8, 2016 4:09 PM

Oooo yeah, put her in the shipyard and lay the keel.

Steve

Building a kit from your stash is like cutting a head off a Hydra, two more take it's place.


http://www.spamodeler.com/forum/

  • Member since
    February 2011
Posted by Hokey on Thursday, September 8, 2016 3:32 PM

OK I'm in finally with this guy. I hope to build the USS Harder (after watching episode 6 of Hell Below).

  • Member since
    July 2014
Posted by modelcrazy on Sunday, September 4, 2016 10:58 PM

Excellent Tony, great start. Yes


I finished the oil canning on Friday and started the PE torpedo tubes. The Eduard instructions are vague on this part and finding a good reference of the open tube doors is difficult. There are some nice pics of the U-505 in Chicago but it almost looks like the upper doors are missing so I'm trying to find some other reference.

Steve

Building a kit from your stash is like cutting a head off a Hydra, two more take it's place.


http://www.spamodeler.com/forum/

  • Member since
    April 2005
  • From: Australia
Posted by taxtp on Sunday, September 4, 2016 9:21 PM

It's great to see so many concurrent builds in this GB, so I've got into mine too. 

At this stage it's just the hull, at this stage it's just getting nice clean construction.

Cheers

Tony

I'm just taking it one GB at a time.

  • Member since
    October 2008
  • From: Georgia
Posted by Rigidrider on Sunday, September 4, 2016 7:58 PM

PJ, no not yet... looking forward to it now, with that info. Yeah, having never really built boats before, this is a whole new experiance, and learning process. I don't mind taking overlooked and less detailed kits and trying to improve the detail and final looks, however, I dont either want to completely have to remake one. I have some friends that build only kits like Tamiya that almost fall together, and thats ok, but if you don't encounter difficulties along the way, you never learn to over come them. I think you know, I mainly build aircraft, but its just nice to take a brake from your comfort zone and try other things. I'm learning alot here, but applying aircraft technics aren't going to work on subs. 

MC, yeah, I thought that was a very cool sonar image especially considering that this sub has been on the bottom for over 70 years and still looks pretty darn good. At least shes still recognisable. I mean, who knows, she may have landed on her keel and eventually laid over. By the way she looks, I would imagine it was either completely flooded or nearly flooded before reaching the bottom. Not sure but I think 600 ft was about the max depth she could go and 700 ft was crush depth. Without actual pictures of the site its hard to tell, but as intact as she looks, I dont see any signs of explosive de compression.  

thanks for the comments and info...Doug

When Life Hands You A Bucket Of Lemons...

Make Lemonade!

Then Sell It Back At $2 Bucks A Glass...

  • Member since
    July 2014
Posted by modelcrazy on Sunday, September 4, 2016 7:12 PM

What a great image.

I love doing wrecks and will be looking forward to this month's issue.

Steve

Building a kit from your stash is like cutting a head off a Hydra, two more take it's place.


http://www.spamodeler.com/forum/

  • Member since
    November 2008
  • From: Central Florida
Posted by plasticjunkie on Sunday, September 4, 2016 7:10 PM

Well Doug, your scratch building makes a huge improvement over the kit's poor details. Those railings and gun look super coo!

This will be another interesting dio to follow.

Did you get the new FSM issue yet? It has a cool picture of a Jap amphi tank on water with a plane wreck at the bottom. Sort of what Steve did with his Zeke. 


 GIFMaker.org_jy_Ayj_O


Too many models to build, not enough time in a lifetime!!

  • Member since
    October 2008
  • From: Georgia
Posted by Rigidrider on Sunday, September 4, 2016 5:57 PM


Kinda sorta... I have a sonar image of the actual wreck site, (now declared a war grave, at the request of the German government) and she is laying fully on her starboard side in 690 ft of water, 30 miles off the coast of North Carolina. My vision is to portray her like at the end of hostilities May 8th 1945. U-576 was sunk July 15th 1942, which would be 2 yrs 10 mo on the bottom. I will pose her not fully on her side, but listing in that direction, and while not a total rusting hulk, the salt water will be taking its toll. The sonar image still shows a well preserved and still very much identifiable U-Boat complete with deck gun, conning tower and anti-aircraft gun. I think I can even make out some other items still intact on the deck. Yes there will be some silt and marine life begining to claim the wreck but not so heavy at this time period that I envision. The "weathering" is going to take longer to do then the build I think.


This is the actual sonar image taken upon her location in October 2014.

Thanks

Doug

When Life Hands You A Bucket Of Lemons...

Make Lemonade!

Then Sell It Back At $2 Bucks A Glass...

  • Member since
    July 2014
Posted by modelcrazy on Sunday, September 4, 2016 5:11 PM

Doug,

Wow, thathat kit does need some help. Nicely done with the railings and gun. Since this is going to be a wreck how are you going to pose it? Will it be covered in algie and silt?

Steve

Building a kit from your stash is like cutting a head off a Hydra, two more take it's place.


http://www.spamodeler.com/forum/

  • Member since
    October 2008
  • From: Georgia
Posted by Rigidrider on Sunday, September 4, 2016 4:58 PM

OK, Primer dry and I can do a bit more...

Next we will do the conning tower, again, this leaves much to be desired and will require alot of reworking, starting with the removal of the molded on anti-aircraft gun deck railings. Cut em off!

the beginings of a new one soldered together and partially done.

Added the navagational and attack periscopes, the loop antenna an anti-aircraft gun pieced together again from spare parts. I saw four different types of light weapons and decided on this one. I bent wire and fabricated some steps and the hand rail I had seen pictured in some books I have. A little history, during the war, the loop antenna systems  for all U-Boats were made by the family that founded the company I work for now.  After the war they came here and started several companies, many which are still operational today.

Fabricated the deck gun from spare parts.

Well, this is about what it will look like after completion. I still have a ways to go before I'll be happy with it, but its a start... Have a safe and Happy Labor day all!

Doug

When Life Hands You A Bucket Of Lemons...

Make Lemonade!

Then Sell It Back At $2 Bucks A Glass...

  • Member since
    July 2014
Posted by modelcrazy on Thursday, September 1, 2016 8:41 AM

I got you down Colonel.

Steve

Building a kit from your stash is like cutting a head off a Hydra, two more take it's place.


http://www.spamodeler.com/forum/

  • Member since
    September 2012
Posted by GMorrison on Thursday, September 1, 2016 12:31 AM

I just built that kit and I would be pleased to share everything I learned.

I did a WIP in "ships".

This is an extremely difficult but very satisfying kit.

First, do get the Breyer publication.

http://www.ebay.com/itm/German-U-Boat-Type-XXI-over-100-b-w-photos-drawings-48-pages-/162174287775?hash=item25c2573f9f:g:eUYAAOSw6aVUobFm

I also got a lot from this:

http://www.ebay.com/itm/U-BOAT-CREWS-1914-45-WILLIAMSON-OSPREY-ELITE-60-NEW-BOOK-18-95-Offer-/261585255225?hash=item3ce7b23b39:g:NEwAAOSweW5U97KD

Shapeways makes a couple of sets of U Boat sailors at the scale. I would say they are kind of rough, but they'll be a good addition.

A really fun boat to build.

 Modeling is an excuse to buy books.


  • Member since
    October 2009
Posted by Kentucky Colonel on Wednesday, August 31, 2016 10:19 PM
If it's not too late I'd like to join. I hat a Revell 1:144 Type XXI with interior I'd like to build. I don't know if I will get everything build this winter but I'm going to try.
  • Member since
    October 2008
  • From: Georgia
Posted by Rigidrider on Tuesday, August 30, 2016 6:58 PM

lolol...wish I'd thought of that! lol...Thanks guys...

When Life Hands You A Bucket Of Lemons...

Make Lemonade!

Then Sell It Back At $2 Bucks A Glass...

  • Member since
    November 2008
  • From: Central Florida
Posted by plasticjunkie on Tuesday, August 30, 2016 5:30 PM

Doug

Since adding P51 parts to this  U Boat, wil you be replacing the conning tower with a Mustang bubble canopy?  Propeller

Great way to improvise digging into the spares box. 

 GIFMaker.org_jy_Ayj_O


Too many models to build, not enough time in a lifetime!!

  • Member since
    July 2014
Posted by modelcrazy on Tuesday, August 30, 2016 4:26 PM

If anybody can scratch build Doug, you can. I never looked closely at the type VII steering gear and it seemed too bulky, until I looked up some images. The actual type VII was bulky.

Steve

Building a kit from your stash is like cutting a head off a Hydra, two more take it's place.


http://www.spamodeler.com/forum/

  • Member since
    October 2008
  • From: Georgia
Posted by Rigidrider on Tuesday, August 30, 2016 2:06 PM

I'm getting a bit more done  on mine ... I'm feeling kinda amaturish watching and listening to the welth of knowledge here, thats why I love these GBs... always able to learn something... Any who, heres some more from me,

got all the decking finished and in place.

according to pictures I've been able to find, the controls were totally wrong and I will attempt to scratch build most all of it.

old spare part bomb casings will work for the prop shaft housing ...

The rest of the parts are plasti struct, and other spare parts, including the rudders which are reshaped P51 mustand tail elevators. (a real Frankinstein here).

And lastly for now, a coat of primer to cover that awful red! Guess that will take a day or two to dry... Take care, Doug

When Life Hands You A Bucket Of Lemons...

Make Lemonade!

Then Sell It Back At $2 Bucks A Glass...

  • Member since
    August 2014
  • From: Willamette Valley, Oregon
Posted by goldhammer on Tuesday, August 30, 2016 9:03 AM

Thanks GM, think you are right. That would let whatever water was left from the limbers to drain out.  Filled the big gap (in places looked to be about a scale foot) and will rescribe more scale looking gap.  The big water jets appear to be far enough forward to be the diesel cooling outlets, from one of the engine rooms.

In doing one with the interior, that will be interesting and will watch and learn.

  • Member since
    September 2012
Posted by GMorrison on Monday, August 29, 2016 11:22 PM

The honor is mine.

BTW not Wahoo.

 Modeling is an excuse to buy books.


  • Member since
    July 2014
Posted by modelcrazy on Monday, August 29, 2016 11:09 PM

I would be honored to add you to the roster GM. That sounds like a fantastic build! One which I will be intently watching.

I'll add you to the roster in the morning. 

Steve

Building a kit from your stash is like cutting a head off a Hydra, two more take it's place.


http://www.spamodeler.com/forum/

  • Member since
    September 2012
Posted by GMorrison on Monday, August 29, 2016 10:57 PM

Hi-

Rather than blather over on the thread about the "Hell Below", I would prefer to join this GB. I haven't done a GB in a while. I'm in the middle of a move, so I won't get started for a bit.

Subject- the Trumpeter 1941 Gato, with interior added. I have the model, I have the references, I have a WEM 3" 50 caliber naval rifle and a set of 12 Mk. 14 torpedoes. I also have the WEM PE set.

What more could a guy need? Well, for starters the rest of the interior. That which comes with the kit looks all wrong. 

And four Fairbanks Morse OP's. THAT I have good drawings for, being an old model railroader and a huge fan of the FM "Trainmaster".

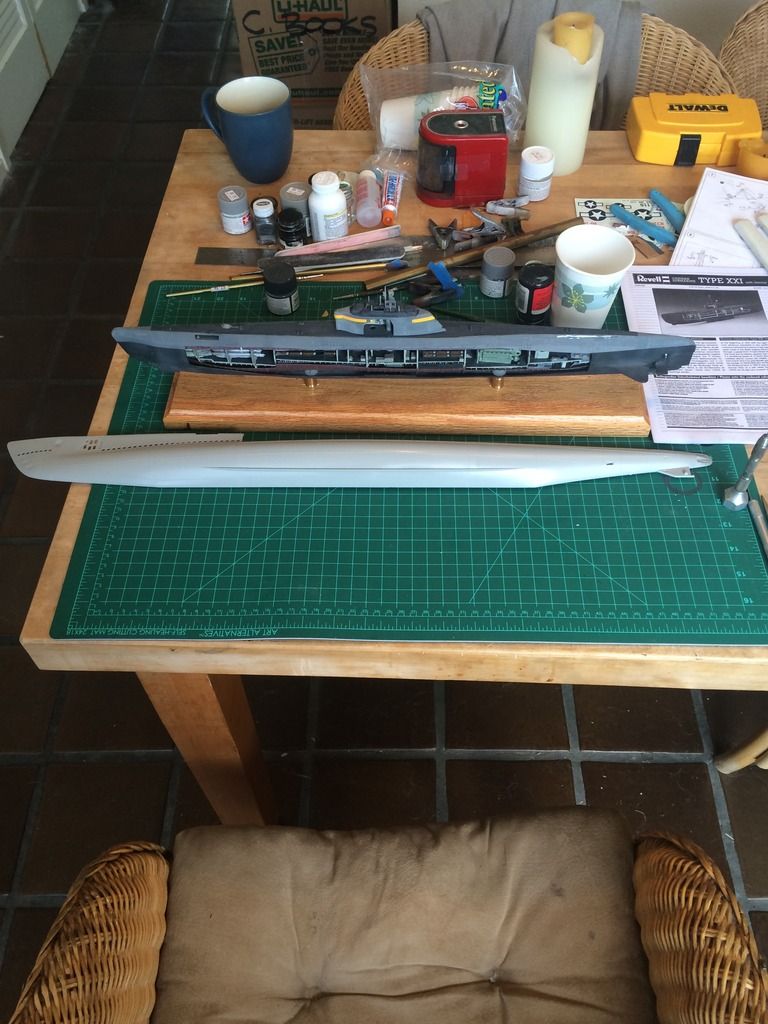
Shapeways has a great range of little 1/144 sailors, recently used to populate my Type XXI. Not in this pic., but here's where that project currently is.

Subject: I think I know but I'm not sure so I'll hold on that yet. A Mare Island boat on eternal patrol of course.

Goldhammer, you were saying that the upper hull coaming to hull fit of the Gato was gappish. I remembered this photo of SS-238 leaving Mare Island on 14 July 1943. She has lots of sea water running out through a gap there, in addition to the limber holes, it must be a couple of inches tall. Maybe that's the way it's meant to be.

 Modeling is an excuse to buy books.


  • Member since
    October 2008
  • From: Georgia
Posted by Rigidrider on Monday, August 29, 2016 7:38 AM

Yup, I thought thats what you were talking about, yuu've done a masterful job recreating the look. And yes there are many reasons for the effect on the metals to cause this. Many years ago I worked at a company that made machinery that "streched" aircraft skins. They were very thin and were allowed to do this to avoid the skins from cracking, from tre constant flexing and as you stated, constant temp changes and friction. Thanks for explaining the procedure and providing the pictures... again, very nicely done!

Doug

When Life Hands You A Bucket Of Lemons...

Make Lemonade!

Then Sell It Back At $2 Bucks A Glass...

JOIN OUR COMMUNITY!

Our community is FREE to join. To participate you must either login or register for an account.

SEARCH FORUMS
FREE NEWSLETTER
By signing up you may also receive reader surveys and occasional special offers. We do not sell, rent or trade our email lists. View our Privacy Policy.